
Article and Photographs by: Alain Briot
Alain Briot is one of the most successful landscape photographers working
in the U.S. today. He was educated at the Ecole des Beaux Art in Paris,
has a Masters degree in Fine Art, and is currently working on his Phd.
Alain works professionally with large formal film equipment,
but in this article explores the use of a consumer-grade
DSLR on a recent trip to Paris.
________________________________________________
Different camera systems for different photographic needs
Switching from one camera system to another isn’t easy. However, throughout the history of photography equipment changes have caused some of the most significant improvements in image content and image quality. Let’s face it, we are dependent on our equipment and on how we interface with this equipment.
In December 2003 and January 2004 I spent two weeks photographing in Paris. I took along with me my trustyLinhof Master Teknica 4×5, myFuji 645zimedium format, and my just-acquiredCanon 300D“digital rebel” camera. Yes, a digital camera, and an entry-model at that! Let’s see how these 3 different cameras performed, or interfaced, in a large-city environment.
Different photographic locations present different and unique photographic challenges. The location where I photograph most often, the grand landscape of the American Southwest, offers endless space, few people if one steps away from the park’s overlooks, and wide open roads and trails to travel on. In this situation using a large format camera, carrying the heavy, somewhat cumbersome gear that this format requires, and having to load film holders in the evening (and sometimes during the day as well) is definitely feasible and, if one likes working with this medium like I do, certainly enjoyable. In short, 4×5 requires, among other things, space to work in and the ability to carry a certain amount of equipment conveniently.
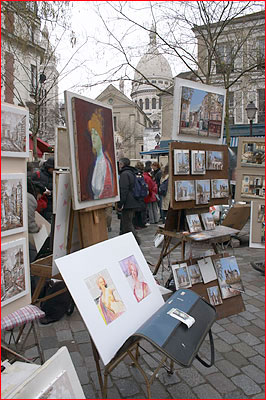
Place du Tertre. Canon 300D with dedicated Canon17-55 f4 lens
The location where I photographed this past December and January — namely, Paris, France — is as opposite to the Southwestern Deserts as can be. First, space is very limited. In fact, when coming from the United States, it feels like there is hardly any space in Paris. Second, people are everywhere, so much so that simply setting up a tripod is challenging, not to talk about the ever-present risk of being the target of a pickpocket or a thief. Third, carrying your equipment is a challenge. In Paris you can forget about using a car to move around unless you want to engage in an experiment in frustration. Therefore, all your equipment must be carried by yourself at all times. This means using a bag which is both practical to work with and not too heavy. It also means paring down your equipment so that the weight of your gear is not an impediment to your photography. In my case, I walked nearly all day in Paris while photographing, and a relatively lightweight bag was crucial in making this possible without exhausting myself unnecessarily.
I used the three cameras I took along with me in Paris but I used each of them in a different way. I used the 300D on a daily basis and it quickly became my main camera. I used the Fuji 645zi on a daily basis, and it became my secondary camera. In fact, I carried both the 300D and the 645zi in my shoulder bag at all times. I used the 4×5″ “sparingly” and on specific days only. The reason being the extra weight of this system, the longer time it takes to create a 4×5 photograph (you can fill up an entire 1mb flash card while taking a single 4×5″ photograph!), the need to use a different bag to carry the 4×5″ which meant either taking two bags or just taking the 4×5, and the need to photograph locations “propitious to 4×5″ meaning that we had to reconnoiter the area first, see if it offered possibilities for 4×5″, and then return with the 4×5”. To limit how much I carried I chose to do “4×5″ days” during which I only photographed with 4×5″. In effect, there was only one 4×5″ day in Paris during this trip. As you can see, when working in a city, it is not just the weight of 4×5″ equipment which becomes a hurdle. The logistics implied in working with large format actually become a significant issue.
________________________________________________
Where are we now?
Photography, good photography that is, is the result of deliberate and focused work. Luck may, and does, play a role in the results, but the uncontrollable nature of luck only plays in your favor if you have taken care of controlling all the other variables personally. “Luck favors the prepared mind,” said Louis Pasteur. Let’s be prepared, and then let luck come in if it pleases.
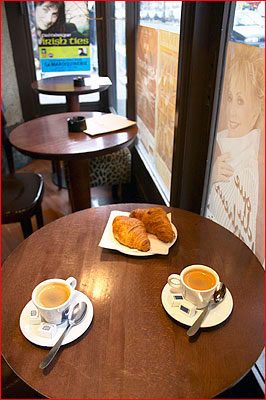
Continental Breakfast. Canon 300D with dedicated Canon17-55 f4 lens
Prepared I was. But in many ways this was a discovery trip. It wasn’t the first time I photographed digitally, but it was the first time I photographed with one of the latest digital SLR. My first foray into digital photography, indeed my very first digital photograph, something which in the future we may come to compare just like some today compare the first version of Photoshop they ever used, was taken in November 1998 with the then-cutting-edgeKodak DCS 560. The DCS 560 was a 6MP digital camera developed jointly by Canon and Kodak on the base of the Canon EOS-1N. I used it for one week while evaluating it and took over 2000 photographs with it. The quality of the results was good for the time but lagging compared to today’s Canon digital SLRs. Color balance was not always accurate and pixelization was a concern. The camera did great in sunny conditions but images created in low light conditions were very noisy.
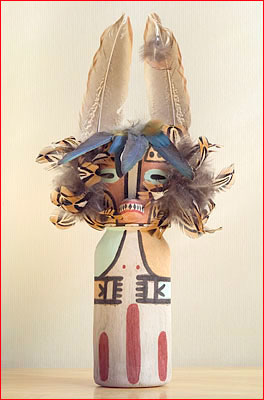
Hopi Squirrel Katsina. Kodak DCS 560
November 23rd, 1998, 4:23 PM: the very first digital photograph I created.
Canon DCS 560C, 1/6th” at f.22, 16bit, 5.3mb Raw file
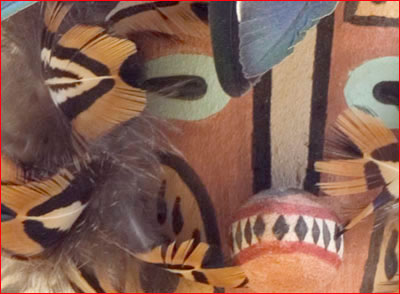
Actual pixels crop of Hopi Squirrel Katsina.
Processing and sharpening is the same as all the other images in this article except raw conversion
was done in Photoshop Raw 2.0 since C1SE is not compatible with the DCS 560.
This was then and this is now. While the Canon DCS 560 was heavy, needed a large battery which lasted only a few hours and stored images on removable hard drives, the Canon 300D is light, uses a small battery that lasts all day and stores images on compact flash cards. The 300D is lighter (by far), easy to use and delivers professional image quality. Furthermore, while the DCS 560 cost nearly $30,000 with a Canon 24 to 70 lens (this is not a typo), the Canon 300D costs $999 with a 17-55 lens. Granted, lens quality and camera build are in favor of the DCS 560. But the 300D delivers images of higher quality than the DCS 560 for precisely 1/30th of the cost. You could have thirty 300D for the 1998 cost of one DCS 560, or nearly four Canon1Ds for the same DCS 560. What a change in 5 years!
In the current lineup of Canon digital SLRs, and in my estimate, the Canon 300D is only topped by the Canon 1Ds and the Canon 10D. I added the 10D only because it has a metal body (the 300D has a plastic body) and offers mirror lockup, a feature sadly missing from the 300D. As far as image quality the 300D and the 10D are equal with, perhaps, a slight advantage to the 300D which, being Canon’s latest release as of January 2004, may benefit from an improved sensor or firmware over the 10D.
I believe this preamble on the state of digital cameras was important. It may sound redundant (much has already been said very well by Michael Reichmann) or it may be new to you. At any rate it shows how my views align with others’. Let us now look at images from Paris and at how they came to be. In doing so I will not only look at how the images were created but also at how they were processed since, with digital photographs, processing is just as important as photographing.
________________________________________________
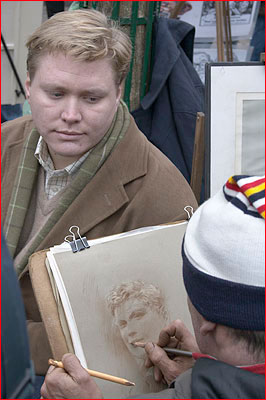
Sketched. Canon 300D with dedicated Canon17-55 f4 lens
Paris by night
Night photography is one of the areas where digital cameras excel. It is also one of the subjects that make using digital cameras so enjoyable. Unlike with 4×5″, or other manual cameras, there is no need to calculate the exposure whatsoever. You just place the camera on a tripod and let it do its thing. After reviewing the result on the LCD panel you decide whether more or less exposure is necessary. Even with automatic film cameras some amount of guesswork, or bracketing, is necessary as it is simply not possible to know exactly how the image will come out on film.
Furthermore, with the latest Canon digital SLR’s, long exposures are virtually noise free when you use ISO 100 or 200. Even at ISO 400 noise is minimal. This results in night photographs that are as noise free as daytime photographs. There is no reason anymore not to photograph at night. This alone opens photographic possibilities beyond what can be done with film.
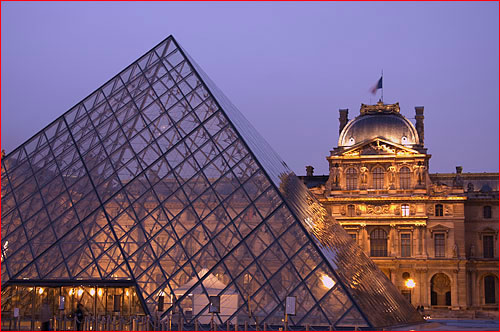
The Louvre at Dusk. Canon 300D with dedicated Canon17-55 f4 lens
One of my favorite times to photograph is actually dusk, or dawn, during the transition from day to night and night to day. At these times, in the city, and for a brief time, the illumination from the sky matches the illumination from artificial light sources. If you are at the right place at such times you can create stunning color images in which the sky has color and the artificial lights are not overpowering. A little too early and light from the sky takes over making artificial lights not visible on film. A little too late and artificial light takes over, turning the sky uniformly black. Here, timing is everything, together with positioning. You must be in the right place at the right time.
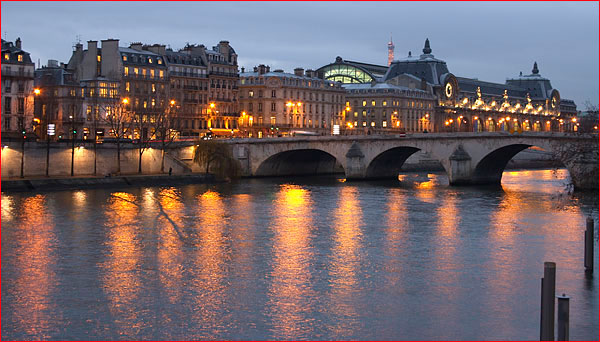
Dusk along the Seine. Canon 300D with dedicated Canon17-55 f4 lens
This photograph is a perfect case in point of what I just described. Although it was a rather gray and cloudy day in Paris the mix of natural and artificial light cooperate to create a colorful scene minutes before the end of the day. The reflections in the Seine are a bonus that helps bring the composition together and provide additional interest.
________________________________________________
Paris by day
Let’s compare this scene with a similar scene in daytime. Not the exact same scene but pretty close. This one is of buildings along the Seine. In terms of location, when looking at the previous photograph the image below was taken from river level, by the left side of the bridge.
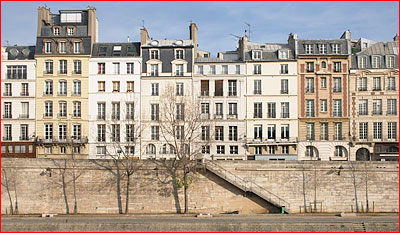
Houses along the Seine. Canon 300D with Canon 70-300
What a difference a day makes! During daytime the mystery and drama introduced by the interplay of light and dark are gone. I once read that light is best revealed by shadows. That light comes across best when darkness is actually the subject of the image. I often had confirmation of this fact when photographing in slot canyons, places that are by nature quite dark with light only reaching the bottom occasionally. Dusk and dawn are another example. As we can see here, this is independent of location, as similar effects can be achieved it in Paris or on the Colorado Plateau of the Southwestern United States.
At any rate the image quality provided by the Canon 300D is top notch. Here is a crop, at “actual pixels” from both the nighttime and daytime images above.
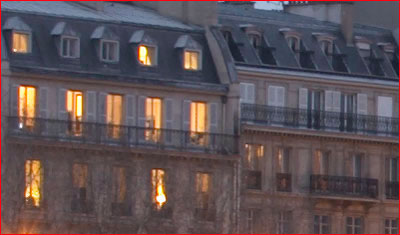
Dusk along the Seine cropped —
actual pixels.
This crop shows the top lit row of windows on the left side of the image
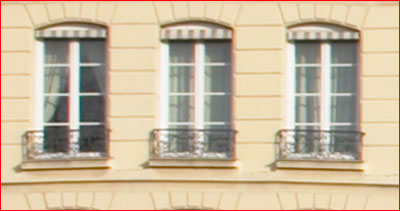
Houses along the Seine cropped — actual pixels. This crop shows the second row of windows on the second building on the left.
Sharpening was applied to both cropped images in amounts similar to what was applied to the full size images: Unsharp mask at 150%, half a pixel, and no threshold. The night photographs were exposed at ISO 200 while the daytime photographs were exposed at ISO 100. No image enhancement was performed past minor exposure adjustments in Capture One.
________________________________________________
The Art of Raw Conversion
This brings me to the all-important subject of raw conversion. My article on Film choice details the importance played by raw conversion software in the context of digital capture. The present article provides an opportunity to expand on this subject by going into actual raw conversion of my images and talk about the process I follow.
I won’t beat around the bush: my favorite raw converter today isCapture OnefromPhase One. Capture One, or C1 as I will refer to it afterwards, comes in different flavors: C1 Pro, C1LE, C1SE, and C1 Rebel. Only C1 Pro and C1 SE are available for Macintosh as of January 2004. I use C1SE which supports the Canon 1D, 1Ds, 10D, 300D and operates on the Macintosh platform. In my case all I currently need is support for the Canon 300D since this is the only digital SLR I own. In effect, the differences between the different versions of C1 do not affect the image quality, which is my most important concern. I actually downloaded C1 Pro and used it for some time, taking advantage of Phase One one-month free trial period, and did not see a difference with C1 SE in terms of the quality of converted images. C1 Rebel is offered at $49, C1SE at $249, while C1 Pro is $599. It is possible to upgrade from one version to another for the cost difference. C1 Rebel is only available for the Windows platform.
At any rate I find C1SE to be “top notch.” I compared it to Photoshop Raw 2.0, which is bundled with Photoshop CS, and found working in C1 much more satisfying to me. I say “satisfying” purposefully. We are talking as much about “film development” here (see myFilm Choicearticle) as about image quality. And, when conducting film development the quality of the darkroom environment, be it virtual or physical, matters greatly. By quality I mean how it feels to work in this virtual darkroom. How comfortable, and yes satisfying, the experience is.
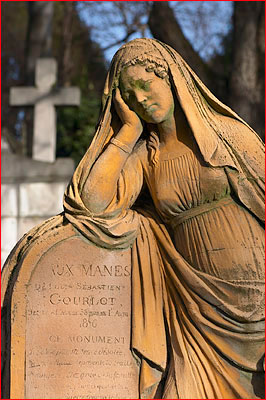
Cimetiere du Pere Lachaise. Canon 300D with Canon 70-300 lens
Nicknamed the city of the dead, the Pere Lachaise cemetery
is perhaps the largest outdoor sculpture museum in the world.
Let’s compare Photoshop Raw 2.0 and C1 for a minute. With Photoshop Raw 2.0, after downloading your RAW files to your computer, you first look at your images in the Browser (File>Browser) which is divided in two parts: thumbnails of your photographs are on the right side and a preview of the selected photograph is on the left. One of the nicest aspects of Photoshop’s browser it that the thumbnails load very fast. On my double processor Macintosh G5, a few seconds is all it takes to see the roughly 140, 6mp, D300 images a 1GB flash card can contain. In C1 seeing the thumbnails take a lot longer, up to several minutes, because C1 creates it’s own separate file for each image prior to showing the thumbnails and allowing you to work on each image. However, there is both a price to pay for Photoshop’s initial speed and a reward for allowing C1 to take its time.
In Photoshop Raw, once you find an image you want to work on and convert fromRAW, you double click either on the thumbnail or on the preview image. Doing so brings up the window for Photoshop Raw Converter. The image preview is on the left while the adjustments are on the right. This makes for a very large preview image since, unlike in C1 whose browser and RAW converter and in the same window, there are no thumbnails to take up space.
Photoshop RAW allows you to adjust the image’s color balance, contrast and density, sharpen the image, correct for the lens’ shortcomings such as vignetting, and calibrate the image. Each of these 4 adjustment areas are located on a different palette. In practice, I only use the image adjustment palette, preferring to sharpen in Photoshop when I am ready to print. As for lens corrections I have not had a use for it yet. Neither have I used the calibration palette.
In the adjustment palette, Photoshop Raw 2.0 allows you to adjust color temperature (in effect a blue-yellow slider), tint (in effect a green-magenta slider), exposure, shadows, brightness, contrast and saturation. A 3 colors histogram is provided, a nice and useful feature. Finally, you can save your settings in a custom setting file that you can bring back later on. For example, you can desaturate an image completely to make it black and white, save this setting under “black and white,” and bring it up any time you want to work in black and white. In short, all the adjustments you need and would expect to find. Nothing wrong there, plus they work very well. I achieved nice RAW conversions with Photoshop raw and have no complaints about it. It works well.
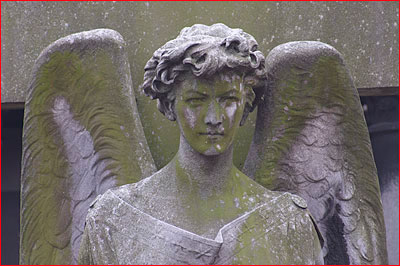
Cimetiere de Montmartre. Canon 300D with Canon 70-300 lens
The Montmartre cemetery is another opportunity for finding uniquely expressive statues.
However, personally, I prefer converting in C1. The C1 interface, which is common to all versions of C1, is divided in 3 parts: a list of image folders, or image adjustment controls, or list of batch files is visible on the left. The image preview is in the center of the C1 window. The thumbnails are located either on the right side or at the bottom of the window (your choice). I personally place thumbnails on the right side as it works better in terms of displaying previews for vertical images. I get a larger vertical preview that way while retaining a comparable size for horizontal images.
In comparison with Photoshop, which uses a separate window for browsing and raw conversion, having everything in one window is more satisfying to me. I compare it to having to work in only one room as opposed to having to go back and forth between one room and another. I sometime think of having to go from the wet to the dry side of my virtual darkroom. For those who have not developed film this may not make much sense. For those who have, it probably does. It certainly does for me! I like the speed, convenience and ease of navigation offered by having everything I need in a single window. I can go back and forth from files to settings to thumbnails to previews without having to close any window or wonder where one specific window is as often happens when one window obstructs the view of another window.
As I said, C1 takes a while to show thumbnails. However, this delay is only there the first time you open an image folder. After that, each time you open this folder, the thumbnails show up right away. This is because C1 creates a separate file the first time a new folder is opened and then saves this file to your disk. There is a benefit to this delay, and this is the amount of image adjustment and control, and the precision of these operations, offered by C1.
C1 offers 5 different palettes for image adjustment. First, a color temperature correction palette with a color adjustment wheel and a before and after preview. Second, a cropping palette allowing you to not only crop the image in C1 but also decide on the opacity of the cropping mask (the area which will be cropped out). Third, an exposure and color balance palette, with a curves and levels window. Fourth, a sharpening palette, with individual controls for image sharpening and noise reduction, allowing you to choose to reduce noise but not to sharpen the image (or the opposite) for example. Fifth, a raw conversion settings palette allowing you to select 8 or 16 bit files. I always use 16 bit, converting to 8 bit prior to printing. Sixth and last, a batch processing palette allowing you to batch files either for later processing or for processing while you continue to adjust new images. On a fast computer, such as the G5 2 processors, processing while batching is transparent resulting is considerable savings in terms of time. In fact, processing a 6MP image in either C1 or Photoshop takes only seconds on current computers.
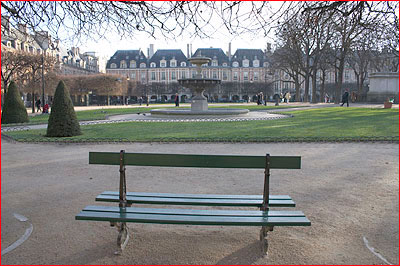
Place des Vosges. Canon 300D with dedicated Canon17-55 f4 lens
When using a digital camera and capturing images in Raw format it is not possible to separate the camera from the raw conversion software when making comments about the final image quality. While there are other raw converters available, other YARC’s (an acronym forYet Another Raw Converter) I found C1 to be a perfect companion to the Canon 300D.
All this to say that, personally, I prefer to convert images in C1 and then import them in Photoshop. I occasionally crop the image in C1 if I am positive that I will not need part of an image afterwards. Otherwise, I import the entire image to keep my options open
I set C1 so that the images are saved in Adobe 98 and then open them in Photoshop. One shortcoming is that C1 does not save the files with a thumbnail, making it difficult to find images on the desktop. To remedy this small issue I created a droplet in Photoshop to open and save each file with a thumbnail, and routinely drag and drop my list of new images on it so I can then open them selectively based on their thumbnails. If you process large amount of images and are not using droplets, taking the time to learn how to create them will save you large amounts of time in the long run.
The 300D photographs used in this article were all converted in C1SE. In practice, I find that I make relatively few minor adjustments to each image. Typically, I will use the “As shot” setting for the color balance. If this setting shows an image far off from what I would like I will adjust it so it is pleasing to my eye. I may, for example, use a different camera profile in the color temperature palette, a function supported by C1. In fact, my version of C1SE came with two free Canon D300 profiles made by Magne Nielsen. These other profiles, which replace the profile included with the 300D, offer alternate color balances, which, for specific images, may yield more pleasing results.
The image adjustment palette is the one I use the most. I routinely adjust the exposure for images that are either overexposed or underexposed. I love the “Film extra shadow” option that immediately opens shadows areas. While I normally try to “expose to the right” as recommended by Michael Reichmann, mistakes do happen (even with the benefit of image preview on the camera’s LCD screen) and I have to correct for underexposed images. With film, colors get muddy and grain overwhelming when shadows are opened more than a stop or so in Photoshop. Not so with digital. There is a much greater latitude in opening shadows or brightening an underexposed image. In fact, when comparing a normally exposed, an overexposed and an underexposed image of the same scene, all three adjusted to the same density, there is nearly no visible difference. Certainly, the overexposed image corrected for a normal density will hold an advantage quality-wise. But the penalty for underexposing an image and correcting it during raw conversion is minor, certainly far less than for doing the same thing with film and adjusting it at the scanning stage or in Photoshop. With 300D images correcting for underexposure is similar to brightening the image and making it look as if it had been shot properly to start with. With film, it is an attempt to make the best out of a bad situation, with results that may very well show that the image wasn’t properly exposed originally. 300D files offer an amazing level of flexibility when it comes to exposure adjustment.
The fifth palette is the sharpening and noise reduction control palette. I do not sharpen images during Raw conversion, just like I do not sharpen images during scanning. I prefer to do this in Photoshop, as the last step prior to printing.
However, noise reduction is both useful and important for raw files, especially those exposed at a high ISO setting such as ISO 1600.
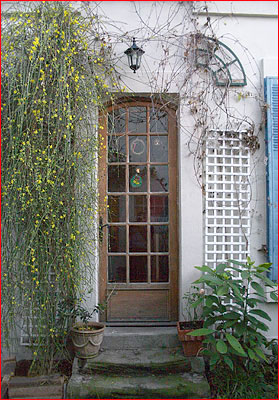
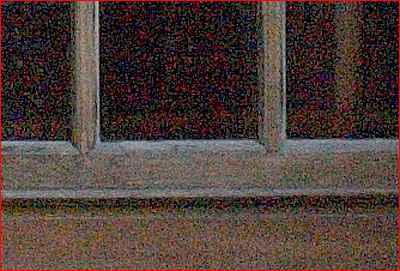
JoÎlle’s Doorway – Canon 300D with dedicated Canon17-55 lens. ISO 1600
Full size image with noise and banding suppression on. The cropped area is the lower half of the bottom-center window pane on the door. Noise and banding suppression in C1 is a nice feature but for high-level noise removal I estimate a separate noise removal utility is necessary.
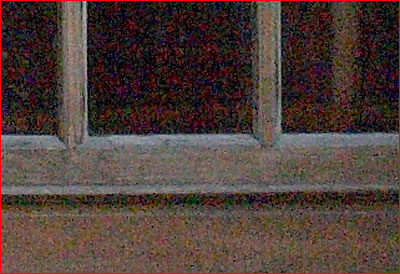
Noise and banding suppression on —
ISO 1600 photograph
Noise and banding suppression off —
ISO 1600 photograph
________________________________________________
Let’s compare 300D files to Medium format and 4×5 film photographs
I want to feature comparisons between the three formats I used. I just received my films back from the lab, literally while I was writing this article, and just took a first look at them. This is taking place on January 20th, while I have already seen and raw-converted some of my Paris 300D photographs since late December. Why even use film? In one word: higher resolution. I don’t see another advantage at this point. Both medium format and 4×5″ will give me the possibility to make prints larger than from 300D files. I could equal medium format resolution by photographing with the 1Ds which would take medium format out of the equation. This leaves 4×5″ as the only format whose resolution is matched only by digital 4×5″ backs costing over 20k. The cost prohibits the use of such backs except by a very small elite. Plus, they are, for several reasons, difficult to use in the field. None of them use flash cards or microdrives and full 4×5 frame units are scanning backs which take photographs in 3 passes, one pass for Red, Green and Blue. This means that anything moving in your image will be shown as moving on the digital file, thereby severely reducing the range of subjects which can be successfully photographed. If I upgrade to a higher-resolution digital camera it will be to a Canon 1Ds or its successor. Upgrading to a medium format digital back does not offer, in my estimate, a significant advantage over the 1Ds once the format has been cropped to a rectangular composition (with square digital backs). I will leave 4×5″ backs alone for the time being.
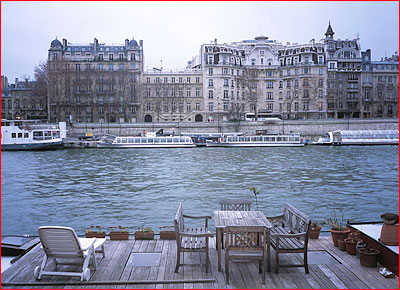
Prime real estate. Fuji 645zi medium format, Fuji Provia 100F.
If the view from this boat is ever taken, the owners can simply float to a better locationä
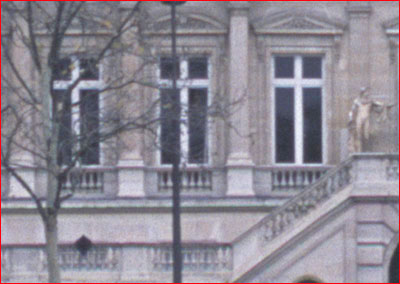
Actual pixels crop of the Imacon Flextight III 3000 dpi scan of Prime real estate.
The original 16bit scan is a 3500×2500 pixels, 476mb file.
The cropped area is located in the far center of the image, between and above the two black doorways
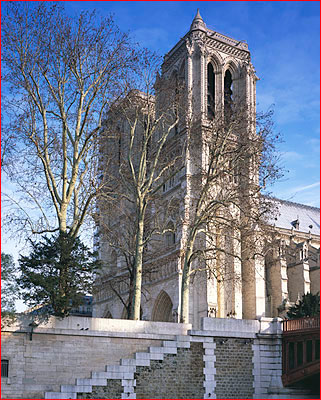
Notre Dame. Linhof Master Teknica 4×5, Nikor 90mm f4.5, Fuji Provia 100F

Crop at actual pixels of the Imacon Flextight III 3000 dpi scan of the image above.
The original 16bit scan is an 11, 000 x13, 700 pixels, 870mb file. The cropped area is located in the center of the image.
This small section demonstrates both the massive file size of a high-resolution 4×5 scan
and the huge enlargements that can be made from this file.
I can create a 30×40 print of this image without having to “res-up” the original scan.
________________________________________________
Conclusion
In evaluating the final results from my two weeks photographing in Paris, and while actually looking at prints done from my 300D images, I find these prints to be comparable to 4×5″, in terms of sharpness and overall image quality, in size up to 11×14 and maybe even larger, although I have not yet done prints larger than that from 300D images. For me, this is a lot to say! I use 4×5″ because it affords me optimal image quality on multiple levels. But, when not planning to make huge enlargements, digital 35 is something to consider seriously. In fact, when it comes to shadow control in underexposed areas, nighttime or low-light level photography, and, finally, lightness and speed, the 300D has a definite edge over 4×5″. Furthermore, several features offered in raw conversion software, such as Photoshop’s vignetting removal tool, and C1 “film extra shadow” settings are significantly attractive. In fact, there is no equivalent to these controls in Photoshop outside of C1 and Photoshop Raw 2.0. Yet, lenses not mounted on film cameras also cause vignetting and scanned photographs also need to have shadows lightened. Is film-based photographic adjustment software lagging behind raw conversion software when it comes to image control and adjustments?
What I am seeing here is a definite push, in terms of software and hardware development, in the direction of digital capture. In other words, to create the finest images today one must embrace digital capture, if not totally then at least partially. I see no way around it. Format size is no longer the sole guarantee of quality as artists who work digitally, and who decide to print no larger than 11×14″, or perhaps even16x20″, can easily rival, if not exceed, 4×5″ quality with a camera such as the Canon 300D, a camera which interestingly enough is not considered a professional camera per se.
This last point brings another interesting conclusion to this article and that is the introduction of consumer-grade cameras with the capability of delivering professional results. Certain features, deemed essential to considering specific cameras professional-grade equipment, are missing from these cameras. The 300D does not have mirror lockup. Its auto focusing system is limited to 7 points, and it has a molded (but lightweight) plastic body. TheSony F828, another candidate to this new category, does not have interchangeable lenses (but features a Zeiss zoom lens), causes chromatic aberration, and yet is able to create top quality photographs at moderate image sizes
The line separating professional gear from amateur gear is blurring. This line was never obvious but at least we could rely on price as a good indication of quality. This appears to no longer be the case, opening the door to outstanding image quality to people who are able to make smart choices rather than spend unlimited amounts of money. Hopefully, the knowledge of how to use these exciting tools will be more important than the tools themselves. And, even more hopefully, the results achieved through this knowledge will be even more important than both tools and knowledge. Eventually, when all is said and done, we are left with an image on paper or on screen. How we obtained this image, through which camera and software combination, may not matter all that much anymore.
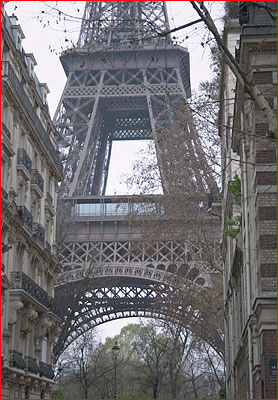
Eiffel Tower. Canon 300D with dedicated Canon17-55 f4 lens
_________________________________________________
© 2004 Alain Briot
Beaux Arts Photography
http://www.beautiful-landscape.com
alain@beautiful-landscape.com
____________________________________________________
Lorem ipsum dolor sit amet, consectetur adipiscing elit, sed do eiusmod tempor incididunt ut labore et dolore magna aliqua. Ut enim ad minim veniam, quis nostrud exercitation ullamco laboris nisi ut aliquip ex ea commodo consequat. Duis aute irure dolor in reprehenderit in voluptate velit esse cillum dolore eu fugiat nulla pariatur. Excepteur sint occaecat cupidatat non proident, sunt in culpa qui officia deserunt mollit anim id est laborum.
Lorem ipsum dolor sit amet, consectetur adipiscing elit, sed do eiusmod tempor incididunt ut labore et dolore magna aliqua. Ut enim ad minim veniam, quis nostrud exercitation ullamco laboris nisi ut aliquip ex ea commodo consequat. Duis aute irure dolor in reprehenderit in voluptate velit esse cillum dolore eu fugiat nulla pariatur. Excepteur sint occaecat cupidatat non proident, sunt in culpa qui officia deserunt mollit anim id est laborum.
Alain Briot creates fine art photographs, teaches workshops and offers DVD tutorials on composition, raw conversion, optimization, printing and marketing. Alain is the author of Mastering Landscape Photography, Mastering Photographic Composition and Marketing Fine Art Photography. All 3 books are available from Alain’s website as well as from most bookstores. You can find more information about Alain's work, writings and tutorials as well as subscribe to Alain’s Free Monthly Newsletter on his website. You will receive over 40 essays in PDF format, including chapters from Alain’s books, when you subscribe.
You May Also Enjoy...
Photographic Examples-9-Totem Pole
by Alain BriotTotem Pole, Monument ValleyMood as source of inspirationI visited this location several times prior to creating this image. However, each time the light was
Partner Workshops
Upcoming Workshops FromLeading Teachers and Photographers One of the best ways to improve your photographic skills is to join a seminar or workshop. These can
