This article from 1999 has now been superceeded bya newer onethat details
three different blending techniques that are more appropriate for digital photographers.
The Problem
Colour transparency film has a useful dynamic range of about 4-5 stops between the lightest area with any detail and the darkest. Beyond that is found featureless black or transparent white. Colour negative film has a couple of additional stops and B&W film another stop or so. But, nature can present the landscape photographers with scenes having a dynamic range of 10 stops or more — double that which slide film can handle.
Most landscape photographers, myself included, usesplit neutral density filtersto bring the dynamic range of a scene down to the range that film can handle. Occasionally I’ve found myself without a set of split NDs, faced with a challenging exposure. Below is one such example and the technique that I used to overcome it.
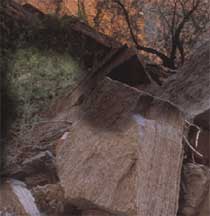
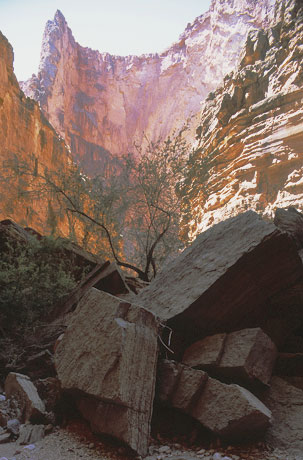 Matkatamiba Canyonƒâ€˜ Grand Canyon, May 2000
Photographed with a Canon EOS-1V and 24mm f/3.5L T/S lens on Fuji Provia 100F
On a Spring 20008-day rafting tripon theColorado Riverthrough theGrand CanyonI took the above photograph after a long, wet and arduous climb. Because of the difficulty of the hike I was traveling light and had left my set of split neutral density filters, along with a lot of other gear, back in the raft alongway below. (You can read about the making of this photographhere).
Using theCanon 1V‘s spot meter I found that the scene had a range of at least 10 stops from the rocks in the upper right to the shadow areas under the foreground rocks. What to do?
The exposure above was a compromise, set by splitting the difference between the two spot readings. While this photograph captures the scene it satisfies neither the need for highlight nor shadow detail. A 2 stop split ND set across the middle would have been the solution. The image above is a simply a poor compromise because the filters weren’t available, but it is the best that I could do.
The Solution
I realized at the time though that if I took two additional frames, one exposing for thehighlightsand another for theshadows(in addition to the compromise exposure above), I would be able to combine them digitally. Thus I could create an image that would render what I saw, but could not capture at the time on a single frame of film.

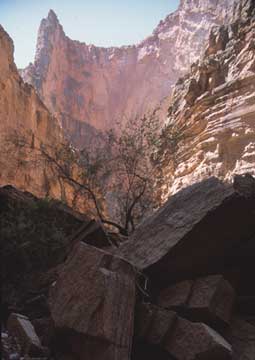
Light (shadow) Exposure Dark (highlight) Exposure
Blended in PhotoShop
The frames above tell the story. The first two are the raw separate exposures for the shadows and highlights. The larger center one below them is the blended image created inPhotoShop,using the technique described below.
The Technique
This technique is explained usingPhotoShop 5.5. It probably can be done with most image processing software that utilizesLayers.(SeeNote #1below regarding another approach.)
Here’s how it’s done.
You can experiment and learn this technique using the examplelightanddarkpictures above byright clickingyour mouse and usingSave Picture As…Then, skip toStep 4below.(They are already aligned).Otherwise, this series of steps is described generally for you to use with your own two exposures.
-
Scan the two exposures as you normally would except with the following alterations to your technique….
- Scan each frame with identical scanner settings. Don’t let your scanning software alter the exposure between scans.
- Include a black border around the frame. You’ll need it to ensure correct alignment, as seen below.
At this point you want to load the scans into PhotoShop. But, since you’ll be doing a lot of experimentation, it can be tedious and time consuming to do so at full resolution. Resave each of the scans at about 7"X9" size and 72 DPI. Use these low resolution files to experiment with and then when you have the technique well in hand return to the full-sized files and redo what you’ve learned.
- Load the two files and usingWindow / Tiledisplay them side-by-side on screen.
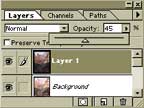
- PressTABand ensure that all required palettes are displayed. Now, click on theForeground / Backgroundsquares and ensure that they areBlackandWhite, withBlackon top.

- Turn on the rulers usingView / Show Rulersand then using theMove Tooldrag rulers onto each of the pictures. Using the black frame edges as your point of reference useImage / Rotate Canvas / Arbitraryto ensure that both pictures are straight. This is necessary because it’s almost impossible with most scanners to align the film exactly the same for each frame. Another method of aligning the two images is to temporarily set the opacity of the top layer to a low amount and then zoom in.
- Select theDarkframe and then useSelect / AllandEdit / Copy. (If you’re working on a large file you can now delete theDarkframe to free up memory and make PhotoShop work faster).
- Select theLightframe and useEdit / Paste. (If you are working with digital files you can skip ahead to step #12).
- Select theLayer Paletteand setOpacityto between40%and50%. This will allow you to see both layers at the same time. (Layer 1, the dark layer should be highlighted).
- Now the hardest part. Using theMove Toolmove the dark layer so that it exactly overlaps and matches up with the background, or light layer. Magnify the image so that you can clearly see what you’re doing. If you find that it doesn’t match exactly everywhere just ensure that the match is as close as possible at the point where the two images will be blended. In the example above that point is where the dark foreground rocks meet the brighter rocks in the background. (Remember, you can use the arrow keys to move the images in small increments).
- ReturnOpacityto 100%
- Now useLayer / Add Layer Mask / Reveal All.
- Choose a fairly large brush and select thePaintbrush Tool. Start painting over the dark part of the image (the lower half in the example above). You are removing the dark layer and revealing the light layer underneath. Don’t worry about overdoing it because once the upper (dark) later is removed the process stops. Be careful not to get too close to the light area with the large brush. Also, make sure that you don’t miss any areas.
(NB: You can useAdd Layer Mask / Hide Allinstead, combined withWhite foreground &Blackbackground squares. This allows you to erase the light areas rather than the dark. Depending on which area is larger this may be a more convenient way of working.
- Change to a smaller brush and increase the magnification toactual pixels. Very carefully erase the dark layer along the edge of where the light area meets it. If you make a mistake, use theHistory Paletteto go back.
- When done doing the above, useLayer / Flatten Imageand save the file as.PSDPhotoShop format file.
- Now, proceed to use all of the normal image processing techniques that you would normally apply, includingUnsharp Masking, spotting using theCloning Tool,Levelsusing anAdjustment Layer, and so forth. You’ll also want to crop the black edges.
- Don’t forget that you can do colour adjustments and the like on each separate layer before flattening, further adding to your ability to create an image that matches your perception. (You may also be interested in having a look at my tutorial titledInstant PhotoShopfor some basic yet powerful techniques.)
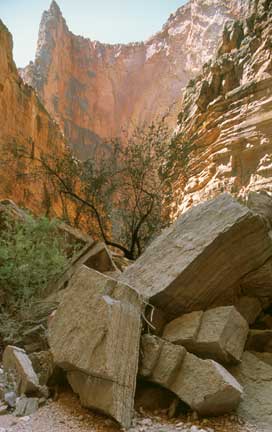
Compromise Single Exposure Blended Exposure
I find this technique to be very helpful when the use of a split neutral density filter in the field isn’t possible. This may be because one isn’t available, or because the area between highlight and shadow is too irregular.
Of course you must take two frames that are identical, except for exposure. A tripod is therefore a must. Also, I find that exposures with a spread of about 2 stops yields very good results.
Finally, like most techniques using PhotoShop, there are usually a number of different ways of accomplishing the same thing. If you have an alternative method, or a suggestion on how to improve this one, pleaselet me know.
There is a comparable yet quite different technique for accomplishing this available for those who usePicture Windows 2.5fromDigital Light & Color. A full description can be foundhere.
Michael Reichmann is the founder of the Luminous Landscape. Michael passed away in May 2016. Since its inception in 1999 LuLa has become the world's largest site devoted to the art, craft, and technology of photography. Each month more than one million people from every country on the globe visit LuLa.
You May Also Enjoy...
A Tutorial on Using QuadTone RIP (PC version) to Create Digital Negatives
A few days after my tutorial on platinum/palladium printing was published here on Luminous Landscape I received an email from Ron Reeder (co-author of Digital Negatives: Using Photoshop to Create
