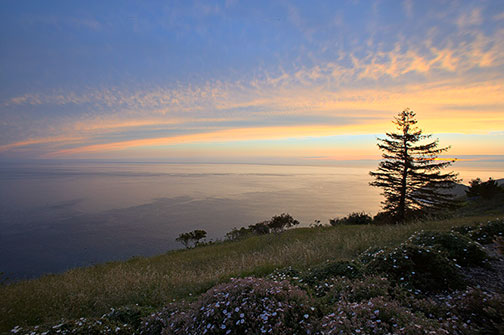
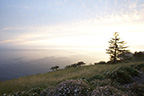
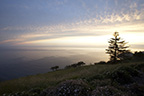
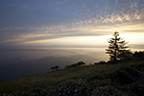
Big Sur, California. March, 2005
7 frame blend with a 14 stop dynamic range, using HDR
Everything has limits, and the technical evolution of photography during the past 150 years has largely been about overcoming the craft’s limitations. Dynamic range though is one of the limitations that hasn’t yielded much over the years to technology’s inexorable advances.
But, that’s about to change with the introduction of theMerge to HDRfunction inPhotoshop CS2, which became available in mid-April, 2005.
A caveat before proceeding, so as to forestall the usual deluge of e-mails that follows anyfirst-lookthat appears here, and that some readers don’t feel answers all of their questions or addresses their particular concerns.
This is not intended to be either a comprehensive how-to, or a complete technical treatise on the subject of HDR, or Adobe’s implementation in Photoshop CS2. Rather, and since I’ve been involved in the CS2 beta program and therefore have some experience with using the product – I thought that there would be photographers (especially landscape photographers) who would find an initial look at this exciting new capability to be of interest.
______________________________________________________
About Dynamic Range
Dynamic range refers to the range of brightness levels that exist in a particular scene – from darkest – before complete and featureless black, to lightest – before complete featureless white. In photography (rather than in sensitometry or printing) this is measured in stops, with each F stop being a doubling or halving of the amount of light being received by the recording medium, be it film or a digital sensor.
For the sake of this discussion, let’s assume that a typical colour transparency film or digital camera sensor can record 6 stops of dynamic range. Most people would agree that colour negative can record about one stop more and B&W film maybe an additional stop as well. So, somewhere between six and nine stops of brightness level is what most photographic systems are capable of recording.
I’ll just note parenthetically that with film there is a shoulder and toe to any film’s dynamic range curve, where values flatten out, and with digital sensors there is the question of noise acceptability in the lower values. Each of these fuzzys the exact values that various photographers can agree upon when it comes to the dynamic range that a particular film/developer combination, or sensor, can produce. I have no desire to enter that particular debate at this time.
So, if for the sake of discussion we will use the number of 6 stops of dynamic range as being what a typical film or sensor can record, we now see the problem that HDR attempts to address. Namely, to capture more dynamic range. While the majority of day to day scenes are easily handled by this dynamic range, there are situations, especially for the landscape photographer, where more is needed.
Now, there are many ways to accomplish this. The traditional method has been through the use of split neutral density filters. Put a two to three stop blocking filter over part of the scene that’s overly bright, and you can now set an exposure that encompass the brightness range available. The problem with this approach is that a full set of quality 1, 2 and 3 stop filters, in soft and hard edged configuration, with filter holders and lens adaptor rings, can cost close to $1,000. Also, they can be slow to use under the rapidly changing light conditions at the beginning and end of the day (when they are most likely to be used). Also, they really only work unobtrusively when there is a clearly defined edge to the brightness transition, such as a horizon line or a cliff edge.
A more contemporary approach is to take multiple exposures of the same scene, varying (usually) just the shutter speed. Take a "normal" exposure, and then a few more at 1-2 stops over and under that point. Then, in Photoshop, blend these exposures, using the parts from each one that capture properly the part of the scene that you want.
This can work very well, but to look convincing it needs to be done with some considerable skill, and usually requires quite a bit of work with masks and brushes.My blending tutoriallooks at this technique. Also popular, when multiple exposures aren’t possible (for example when there is movement in the scene), is to process the RAW file twice, once for the highlights and once for the shadows. This can’t, of course, extract information that isn’t in the actual file, but it can do a better job than using the usual raw processing tools currently available. The same blending techniques as are used for merging multiple exposures are also used here, with similar issues arising.
______________________________________________________
What is HDR?
The acronymHDRstands forHigh Dynamic Range. In Adobe’s implementation within Photoshop CS2 this is accomplished by using a series of photographs which one takes in the same manner as with previous blending techniques, and then using floating point 32 bit (per channel) math, merging these files automatically into one huge high dynamic range image.
As we’ll see in a moment with a practical example, this has the potential to allow photographers to create a photograph with 10, 12, or even more stops of dynamic range. But, it is not without its problems, not the least of which is that we as photographers still operate largely in an 8 and 16 bit world. (SeeUnderstanding Bit Depthfor more on this topic).
Because our screens and printers are for the most part 8 bit devices, and thus not capable of rendering 32 bit images, to be useful these images need to be compressed, both so that we can work with them, and ultimately display them. Having a 14 stop 32 bit image residing in your computer’s RAM may give you a warm and fuzzy feeling, but if you can’t turn it into a suitable image for display, it’s of academic interest at best.
But, when the technology works, and with some images it works exceedingly well, it is capable of producing quite remarkable results, and can do so with little user effort. Let’s see how.
______________________________________________________
A Case Study
Producing an HDR image requires taking enough separate exposures so that you place all of the brightness levels that you want in your final image into a range that your camera’s sensor can record properly. Ideally this means putting the darkest values no lower than somewhere in the mid-range of the sensor’s sensitivity range. (SeeExpose to the Rightfor more on this topic).
According to Adobe’s instructions you want to take enough exposures to cover the complete dynamic range – not less than three, and as many as five to seven, or even more.
These shots should be taken at between one and two stops apart. They should also be done by varying the exposure time, not the aperture, because changing aperture also changes depth of field. And, to the inevitable question –no, you can’t use different outputs of the same RAW file. They must be separate exposures covering different parts of the available brightness levels available in the scene.
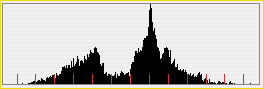
Below you see seven frames taken at 2/3rd stop intervals, which Photoshop interpreted as being from -1.94 to +2.7 stops below and above 0EV. These shots were taken directly into the setting sun, yet I wanted to capture the flowers in the foreground as well as the delicacy of the sunset’s light in the clouds.
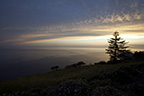
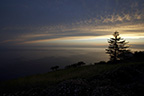
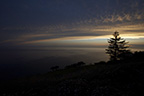
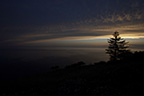
24-70mm f/2.8L lens
Before looking at how these files are handled by Photoshop’sMerge to HDRfunction, a few additional words on shooting images for HDR processing.
Exposure is best set to Manual mode, and Autofocus turned off. Don’t use your camera’s auto-bracket function, because these don’t allow for enough shots or enough range in bracketing. Simply take a series of shots at about 1 stop increments by changing the shutter speed. You can use the post-exposure histogram to judge when you have taken enough to adequately capture the scene’s brightness range.
If you have done the shots in RAW mode you will first need to process the files, preferably into TIF or PSD format. Ideally you want to keep them in 16 bit mode during RAW processing, though if you have been using a high-res digital back or camera, seven files of 100MB or so each can be too large for all except the most RAM enabled and fastest computer to handle.
Be careful as well when RAW processing that all of the files are processed with the same parameters, something, by the way, that Camera Raw 3.0 does very nicely.
Merge to HDR
With the files now in either 8 or 16 bit mode, and on disk in a standard Photoshop readable format, you invoke theMerge to HDRfunction from theFile / Automatemenu. (You can also accessMerge to HDRfrom withBridge, Photoshop CS2’s new file browser, throughTools > Photoshop > Merge To HDR.
Photoshop will next display the following window.
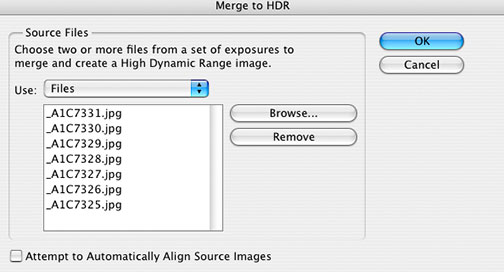
Here you select the files that you want to merge. Note the box on the lower left of the window, which when selected will attempt to align the images if they were shot hand-held. Do try and use a tripod whenever possible though. (Note that in this example I have selected JPGs. Normally one would want to use .PSD or .TIF files in 16 bit mode for optimum image quality. I have used .JPGs here to speed up creation of this tutorial and it’s screen grabs.)
Once the files are selected your computer will take a while loading each of these files. With large files and a lot of them, it could be averylong while.This is the excuse you’ve been waiting for to get a dual processor Mac G5 with 8GB of RAM, or a 4Ghz Pentium 4. BTW – Photoshoip CS2 can now access up to 4GB of RAM if you’re running a Mac G5, or a 64-bit AMD or Intel processor with 64-bit Win XP.
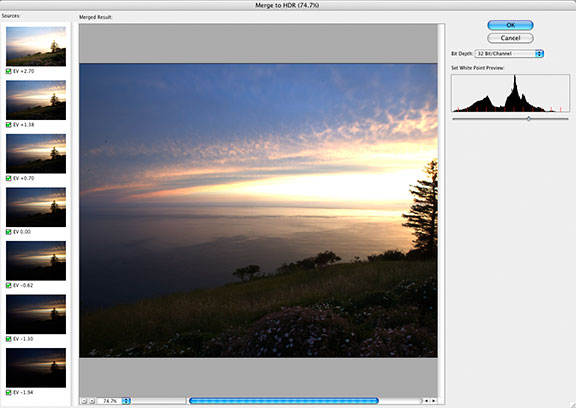
The above window will result, showing you a merged version of the files, along with thumbnails on the left, each one showing the additional dynamic range above and below a mid-point that it is adding to the final 32 bit image. You can choose to delete any of these files if you wish.
Here is the time to note that your screen is an 8 (or a best 10 bit) device, capable of only showing a limited dynamic range. There is therefore no way that it can display the huge range of levels that a 32 bit floating point HDR file can contain. You can adjust the image on-screen with a slider, so that you can see various parts of the dynamic range, (the 32 bit file itself is not altered), but at this point you can’t hope to see all of it at once.
You can now save the file in 32 bit mode. It will have the extension .PBM (Portable Bit Map).
But to display it properly, and more importantly to print it, you need to convert it to a 16 bit, or an 8 bit file. This is done with Photoshop’s usual bit depth conversion tool, but, when converting down from 32 bit a new dialog is presented.
You are presented with 4 choices for reducing the dynamic range down to something that you can work with, as seen in the screen capture above. In the online help file, Adobe describes these choices as follows…
Exposure And GammaLets you manually adjust the brightness and contrast of the HDR image.
Highlight CompressionCompresses the highlight values in the HDR image so they fall within the luminance values range of the 8- or 16-bits-per-channel image file. No further adjustments are necessary; this method is automatic. Click OK to convert the 32-bits-per-channel image.
Equalize HistogramCompresses the dynamic range of the HDR image while trying to preserve some contrast. No further adjustments are necessary; this method is automatic. Click OK to convert the 32-bits-per-channel image.
Local AdaptationAdjusts the tonality in the HDR image by calculating the amount of correction necessary for local brightness regions throughout the image.
I haven’t fully explored each of these options in detail, but the most versatile and flexible choice isLocal Adaptationusing theToning Curve and Histogram, as seen in the screen grab below.

Once you have achieved the look that you’re after, simply press OK, and a 16 or 8 bit file will be produced; one that you can now edit as you normally would.
______________________________________________________
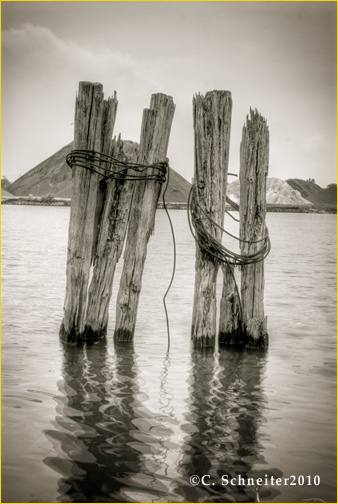
Ugly is as Ugly Does
Big Sur, California. March, 2005
In many ways, Photoshop CS2’s HDR function is the holy grail of dynamic range. With properly shot and processed files it allows photographers to easily create images that were previously impossible, or at least very difficult to accomplish. But, good as it is, like a gun or nuclear power, it can be a force for evil as well as good.
Not every image needs to have 10-15 stops of dynamic range. In fact, most photographs look quite nice, thank you very much, with the 5-7 stops of dynamic range that we’re used to. I fully expect to see some really silly if not downright ugly images in the months ahead, as photographers get their copies of Photoshop CS2 and start discovering what the HDR function is capable of.
But, as with all such tool, in the hands of sensitive artists and competent craftsmen, I’m sure that we will start to be shown the world in new and exciting ways.
April, 2005
______________________________________________________
An Open Letter to Camera Makers
Adobe’s HDR function changes the game for photographers. But the auto-bracket function in today’s digital cameras is inadequate for this new capability.
Most cameras provide an auto-bracketing capability of just 3 exposures. This was appropriate for film, but is inadequate for the needs of digital HDR shooting.
What photographers now need is the ability to set auto-bracketing in any increment, and in a user selectable range of exposures. So, for example, I should be able to set auto-bracketing in 1.5 stop increments both + and – the base exposure, over a user settable range; say 4 increments in either direction.
Oh yes, and while you’re making digital cameras that actually are more than film cameras with sensors, could we have a third control wheel or dial for setting ISO,andput the setting in the viewfinder? ISO is now the third user-settable variable for exposure, along with aperture and shutter speed. Don’t keep this setting buried beneath menu layers.
Please.
_ _ _ _
Update:
It’s beein brought to my attention that the new Nikon D2X allows bracketing in 2 to 9 steps, in 1/3, 1/2, and 1 stop increments. This is user selectable thru both the front and back command dials while pressing the Bracket button. Along with the Canon 1 series cameras, which also can display ISO in the viewfinder, these are among the only cameras which meet some of the criteria mentioned above.
The general point though, is that manufacturers need to rethink the fundamental design of DSLRs so as to provide photographers with user interface and controls complimentary to the new technology’s capabilities.
Michael Reichmann is the founder of the Luminous Landscape. Michael passed away in May 2016. Since its inception in 1999 LuLa has become the world's largest site devoted to the art, craft, and technology of photography. Each month more than one million people from every country on the globe visit LuLa.
You May Also Enjoy...
The NEW Sony A9 Camera and 100-400mm G-Master Lens – A Game Changer
Updated with links for ordering from B&H and Amazon I was invited to New York at the last minute for a very special event. An
