Most photographers work under the assumption that Adobe RGB 98 is the most suitable working space within Photoshop. Everyone also knows that the sRGB working space is smaller, and therefore less suitable for professional and fine-art printing applications. Sure, sRGB is fine for amateurs and the web, but real men use Adobe RGB – right?
Well, not really.
One of the most knowledgeable voices in the area of colour management over the last few years has been Bruce Fraser, the co-author of the current definitive work on colour management for photographers – Real World Color Management. In articles that he’s written elsewhere Bruce suggests that digital photographers should consider working in the much large ProPhoto RGB colour space. (ProPhoto RGB was developed by Kodak).
Though I’m familiar with the book and many of Bruce’s other writings, and I knew that ProPhoto RGB is a bigger space than Adobe RGB, somehow there wasn’t a mental connect – until recently.
What happened was – I had an epiphany. I was preparing for a presentation that I was to deliver to a seminar on colour managed workflow and fine art printing. As part of preparing my Powerpoint slides I wanted to show the difference between the sRGB and Adobe RGB workspaces, so I went into the ColorSync Utility, which is part of the Mac OS. This allows one, among other things, to look at graphic representations of profiles and colour spaces, and compare them.
Figure 1
 |
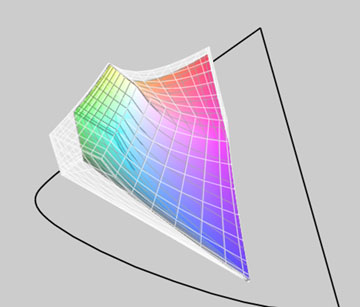
The sRGB color space inside the Adobe RGB color space
For example, in the illustration above in Figure 1 the large ghost diagram shows the Adobe RGB 98 colour space, while the coloured diagram within represents the sRGB space. It’s clear from this that the Adobe 98 space is quite a bit bigger, and that especially in the greens and reds / oranges, there is a lot of clipping if sRGB is used.
What does this mean? It means that if your file is in the sRGB space any colours that were in the original image or file will either be clipped or compressed, depending on the rendering intent used. In other words, they’re effectively gone.
Now, most photographers know this, more or less, and this is one of the reasons that when shooting in-camera JPGs, if the camera allows one to set Adobe RGB rather than sRGB, this is to be preferred. Why throw away information forever if you don’t have to?
Similarly, when working in a raw converter, most photographers know to export their files into Photoshop tagged as Adobe RGB, and of course to have set Adobe RGB as their working colour space.
This all seems very reasonable, and is common practice for most digital photographers. Me included.
So what was my epiphany?
Cameras in Space
Figure 2
 |
As I was doing screen captures for my presentation I noticed that a number of camera .ICC profiles were also listed. These had been put into the Colorsync directories by Phase One’s Capture One raw conversion software. The profiles are for different lighting conditions, and are supplied for each camera that Capture One supports. They are selected and then tagged to the raw file within the program. Camera Raw within Photoshop does the same thing, except that it does so behind the scenes. It has a daylight and a tungsten profile for each camera that’s supported, and these profiles are tagged to the raw file during processing.
Out of curiosity I loaded one of the Capture One camera profiles into the ColorSync viewer. Wow! The colour space was huge! I looked at a number of different camera profiles, and while they were different in many ways, they all were huge. Much bigger than the diagrams that I’d been looking at for sRGB and Adobe RGB.
To see this look at Figure 2 above. The image shows the Canon 20D generic camera profile as a ghost, with the Adobe RGB 98 profile within it. What a difference! The camera’s colour space is much much bigger than the Adobe space, especially in the deep reds and blues. Only in the yellows is the camera space smaller than Adobe RGB 98.
What does this mean? Simply, that if you are using the Adobe RGB colour space with a Canon 20D, for example, (and this applies to virtually every other DSLR on the market), you are not getting a lot of the deep saturated colours that the camera’s sensor is capable of capturing.
____________________________________________________________________________
ProPhoto RGB to The Rescue
What to do?
I immediately understood what I had been ignoring for years, even though I had read about it in Bruce’s articles and elsewhere. I needed to be working in a bigger colour space, right from the raw processor through to Photoshop.
That’s where ProPhoto RGB comes in.
Look at Figure 3 below. At first it shows the camera’s colour space as the ghost, with Adobe RGB within it. But when you pass your mouse over it the colour image is of the ProPhoto RGB colour space. As you can see, this is a much, much closer fit. There are a few spots where the camera exceeds even ProPhoto, and a few places where ProPhoto is bigger than the camera’s space, but basically it’s a decent match. (Notice how ProPhoto now encompasses the yellows that Adobe RGB clips).
Figure 3
Adobe RGB vs. Canon 20D Profile
Pass your mouse over the image to see…
ProPhoto RGB vs. Canon 20D Profile
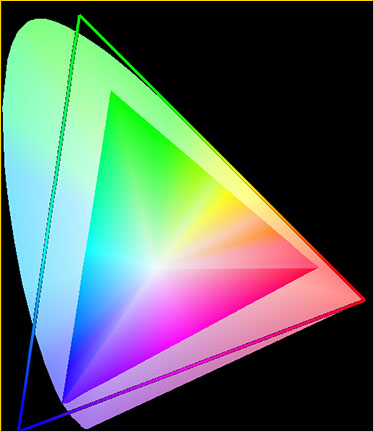
Below is a more traditional colour gamut chart. The large horseshoe shaped area shows the LAB colour space. This is the extent of human vision. Outside of this area human colour vision comes to an end. The open triangle shows the gamut encompassed by the ProPhoto colour space and the coloured triangle shows that of Adobe RGB.
Figure. 3b

Gamut chart created with ColorThink 2.1.2
Available for both Macs and PCs
What this comparison chart tells us is that while ProPhoto RGB encompass a great deal more of the visible spectrum, it actually exceeds it in the deep greens and deep blues. What this means is that colours can be pushed into areas which can neither be seen nor reproduced, producing very nasty looking results within the visible spectrum. User beware.
____________________________________________________________________________
ProPhoto RGB In Use
Using ProPhoto space is easy. In your raw converter, either output your files into Photoshop tagged with the camera’s profile if you’re using Capture One, or tagged with in the ProPhoto colour space if you’re using Camera Raw. (ProPhoto RGB is Camera Raw’s native colour space). When using other raw converters it will depend at the converter’s capabilities.
You should also set Photoshop so that its working colour space is ProPhoto RGB. When the file comes into Photoshop make sure that if it comes in as ProPhoto RGB it stays that way, and isn’t inadvertently converted to a smaller space such as sRGB or Adobe RGB.
Note as well that you must be working in 16 bit mode right through from your raw converter, because in 8 bit mode, with only 256 levels per colour channel, you run the risk of banding (gaps) if you perform large edits.
Is that all there is to it? More gamut providing deeper more saturated colours, and without any cost? Sort of. But, as with most things in life there’s a gotcha, and that gotcha is as follows.
Figure 4
17″ Powerbook monitor profile vs. ProPhoto RGB
Pass your mouse over the image to see…
Sony Artisan monitor profile vs. ProPhoto RGB
Above in Figure 4 you see the profile for the LCD screen on my 17″ Powerbook inside the ghost ProPhoto colour space. Now pass your mouse over it. What you then see is the profile for my Sony Artisan monitor inside the same ProPhoto space. The Sony is bigger, but not that much bigger. (Parenthetically, the Eizo ColorEdge CG220 LCD monitor purportedly encompass the full Adobe RGB colour space. But it’s priced at over US $6,000).
What should be obvious is that if you work in the ProPhoto colour space you have no way of seeing what the colours that you actually have available are, and likely no way or reproducing them. They’re not going to disappear altogether, but they will be compressed into your printer’s output profile space using the rendering intent that you specify.
So, why bother working in a larger colour space like ProPhoto RGB?
The main reason is the same as why you want to work in 16 bit mode rather than 8 bit mode. It gives you elbow room – room to work with the palette that the sensor has captured, change various aspects of the image to suite your creative needs, and not run into the walls, so to speak.
You’ll likely also find that the better inkjet printers and inks are capable of reproducing saturated cyans, magentas and yellows that are outside of the Adobe RGB colour space, making ProPhoto a much better choice. (See Figure 6 below).
But, the price that you pay for having all this freedom is that you’re capable of creating what some call “science fiction” colours. These lie outside the gamut of output devices as well as good taste, and they therefore can cause all sorts of problems. So, when working in ProPhoto RGB, or any really large colour space, restraint is the watchword.
____________________________________________________________________________
Gamut Warning
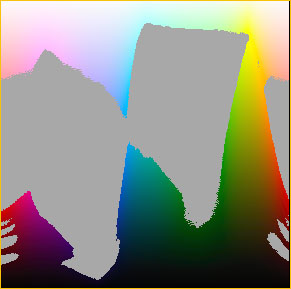
One way to see the effect if gamut clipping occurs, is to use the Gamut Warning function in Photoshop. It will highlight any out of gamut colours that the image you’re working on will have within your current working space or display space.
Here’s a good use for the Granger Test Chart which I wrote about recently. If you create two of them, one in the Adobe RBG space and another in the ProPhoto RGB space, you’ll see how much less ProPhoto is out of gamut. Figure 5 below illustrates this. The first image shows gamut clipping on Adobe RGB, while the one seen when you pass your mouse over it shows what happens in the ProPhoto space.
Figure 5
Gamut clipping in Adobe RGB
Pass your mouse over the image to see…
Gamut clipping in ProPhoto RGB
(Note:Adobe RGB is Gamma 2.2 while ProPhoto is 1.8,
thus explaing the different depth of the black area in the Granger chart)
____________________________________________________________________________
Usage Warning
Figure 6

Illustration courtesy Jeff Schewe
from A Color Managed Workflow
which is found on the Adobe Web site.
In the end, using ProPhoto RGB as your working colour space has many advantages, though a few caveats. The main advantage to my mind is that as technology progresses, and we end of with affordable monitors and LCDs with wider gamut display capability, and as printing inks have wider gamut (Epson’s new K3 Ultrachrome inks have a fuller gamut, not a significantly wider gamut), we will have image files that we can return to that can take advantage of these advances, rather than ones that were clipped at birth.
We also have files which will print better, even with today’s inks and papers, and which with careful work, can experience greater manipulation without damage, in the same way that 16 bit images can over 8 bit images.
But, on the other hand, an image file in a wide space such as ProPhoto RGB needs to be kept in a cage, so that it doesn’t accidentally get into the outside world. Anyone receiving a copy of such a file who doesn’t know what they have, and who doesn’t function in a properly colour managed workflow, or who presumes that the file is sRGB, can inadvertently use it to produce some really horrid results.
____________________________________________________________________________
Thanks to both Bruce Fraser and Jeff Schewe
for their feedback and suggestions in the preparation of this article.
____________________________________________________________________________
You May Also Enjoy...
Sony RX0 Hands On Review
FacebookTweet Sony Packs A Lot Into A Small Camera Sony is at it again, this time introducing the RX0. It’s kind of an oddball camera with


