Editor’s Note:
One of the most frequent requests by both beginners, and even experienced digital darkroom workers, is for detailed step-by-step instructions on how to perform various basic tasks in Photoshop. Many also want to have a complete workflow, from digital camera or scan right through to print.
This tutorial provides both. It is neither gospel nor the only way to accomplish the various tasks. Some approaches will be found to be overkill for many users, while experienced users may prefer alternate techniques. Take from it what you need. Don’t follow it slavishly. However, it does an excellent job of providing a roadmap for developing your own personal workflow.
Finally, if you are a newcomer to Photoshop you might prefer to begin with my Photoshop primer‚Instant Photoshop ‚ before diving into this tutorial.
Michael
These instructions apply to Photoshop 6 and Photoshop 7.
Article Index
Article and Illustrations by: Fred Scholtz
© 2002 Fred Scholtz
1. Image Acquisition
1.1. Digital camera: for fine art prints save your images in RAW mode through the software provided with the camera or a third party program such as Breeze Browser (for Canon) or Bibble (Nikon) and convert to 16-bit TIFF. Use JPEG (which is a lossey compression) only for the web or e-mail.
1.2. Scanner:scan at the highest resolution (e.g. 4000 pp/i; 48-bit) and at the highest film density the scanner can capture; do not alter image with scanner unless you have superior software (e.g., Silverfast , Vuescan); use Digital ICE (if available) when working with a particularly dirty print.
1.3. Save as a TIFF file to your "Image Capture" directory.
1.4. Open the image in Photoshop and convert to your working space (e.g. Adobe RGB 1998).
1.5. Rotate image to vertical if needed (Image>Rotate Canvas).
1.6. Adjust minor rotational error of horizon or verticals: choose measurement tool (under the eyedropper fly-out menu or Shift + I until the ruler appears); draw desired vertical or horizontal line on image; open Image>Rotate>Arbitrary>OK.
1.7. Histogram: review histogram (Image>Histogram) to see if it is reflective of the image without excessive highlight or shadow clipping; if graph is excessively bunched right or left, rescan unless this is a high-key (light tone) or low-key image.
1.8. Run curser over histogram and note ranges of excessive concentration of pixels for each channel.
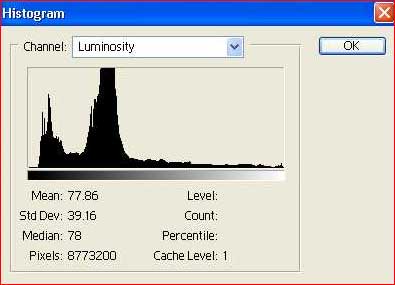
This histogram clearly shows work to be done.
CROP AND CLEAN
2. Initial Cropeliminates black and blank areas, which can distort histograms. Do not crop to size at his point.
2.1. Open Crop Tool (or Alt-C) and click Front Image; drag box loosely around image.
2.2. Drag corner handles inwards while holding down Ctrl key to eliminate black border; zoom in on one of 8 handles (View>Zoom or Ctrl-plus) to align crop (Ctrl-minus to zoom out); extend canvas size if necessary by dragging crop handle outside image.
2.3. Crop out or fill in blank areas with the clone tool (so they do not effect histograms); use Alt-Z to undo one step, or the History palette to go back; press Enter.
2.4. Make duplicate (Image>Duplicate); name duplicate, e.g.‚ Wood Duck 16-bit Master. Save this file as backup
3. Initial Cleanup and Spotting
3.1. Zoom in to 100%; press Home key; open history palette (Window>Show History).
3.2. Slightly darken image (Image>Adjust>Brightness/Contrast); drag Brightness slider to‚œ3.
3.3. Open Filter>Noise>Dust and Scratches.
3.4. Place square curser on a dust spot; move radius slider to far left, then slowly right until spot disappears with threshold 0; move threshold right without revealing spots; hit OK.
3.5. Set Dust and Scratches state as History Brush source by clicking left box.
3.6. Click on the state before Dust and Scratches to activate.
3.7. Open History Brush Tool; set soft-edged brush size slightly larger than spots, set the Blend Mode in the Options Bar for Lighten in pull down menu with opacity at 100%; press Tab to clear palettes (Tab again will return palettes).
3.8. Paint over spots working down, across, up image using PgDn¦, Ctrl-PgDn (moves window right), PgUp¦, Ctrl-PgDn, PgDn¦, etc. sequence; use Darken mode or Clone Stamp tool for white spots.
3.9. As alternative o pen healing brush tool (PS7) set to Normal, Aligned or clone stamp (PS6) set to Lighten (to avoid affecting grain), Aligned; brush size just bigger that spots; Alt + click to set source.
3.10. Click or paint over spots working down, across, up image using PgDn¦, Ctrl-PgDn (moves window right), PgUp¦, Alt-PgDn, PgDn¦, etc. sequence; use Darken mode for white spots.
4. Removal of Distracting Elementsmajor elements will come later.
4.1. Eliminate unwanted elements with the healing brush or clone tool then paint changes with history tool into previous state (to avoid mishaps) or open Image>Duplicate; Alt-Z to undo/redo.
4.2. For straight elements (scratches, wires, etc.), set brush to size of scratch, Alt + click a brush away perpendicular to end of line, click on end of line, Shift + click on other end.
TONAL ADJUSTMENTS / WHITE BALANCE
5. Set Reference Points at Luminance Thresholds
Note: We now will set four monitor points in the Info palette using the Color Sampler tool.
5.1. Open the Info palette (Window>Show Info); click on Color Sampler tool (under eye-dropper); set sample size to 3×3.
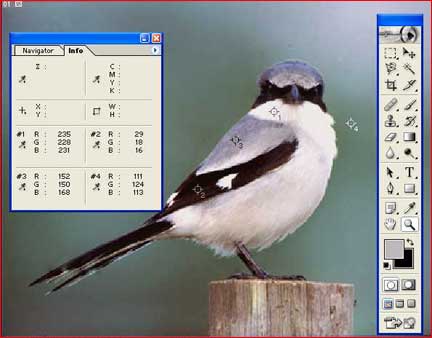
Four points will be monitored in Info palette during color corrections.
5.2. Option 1:Click on little eyedropper in upper left box of Info palette and choose Total Ink.
5.3. Run eyedropper over black areas to determine highest percent; click to set sample #1.
5.4. Run eyedropper over white area (with some detail) to find lowest percent; click to set sample #2.
5.5. Option 2:In16 Bits, open Levels (Image>Adjust>Levels); if 8 Bits (Layer>New Adjustment Layer>Levels).
5.6. With preview box checked, hold down the Alt key (to display‚ threshold mode) and move Input Highlight (right) slider to the left; note first significant (with some detail) white area that appears; return slider and click area with color sampler tool to set Sample #1 in Info palette.
5.7. With preview box checked, hold down the Alt key and move Input Shadow (left) slider to the right; note first significant dark area that appears; click to create Sample#2.
5.8. Option 3 8-bit only:Click on the halfwhite/halfblack icon at the bottom of the Layers palette; move slider left to reveal white point; OK; click color sample eyedropper on point for Sample#1.
5.9. Double click on same icon in Threshold layer; move slider right; OK; click color sample eyedropper on black point Sample #2; delete Threshold layer (click/drag to ashcan).
5.10. Click Color Sample tool on a true gray of any tone for Sample#3; click on the dominant color for sample #4.
Note: You are now able to monitor these points throughout the remaining corrections.
6. Set Print Map Target Preference
Note: if the destination is print, change the white and black points to match media characteristics so that you hold some information in white and black. The following are values for sheet-fed press on coated paper or Lightjet 5000, and most Epson printers.
6.1. If Levels is not open, Image>Adjust>Levels.
6.2. Double click Set White Point‚ highlight eyedropper (right); set the B (in HSB) to 95% (RGB values for 242,242,242); click OK: (if working in CMYK use 5,3,3,0).
6.3. Double click shadow eyedropper (left); set B to 5% (RGB to 12,12,12);OK: ( CMYK, 65,53,51,95).
7. Set White Point
Note: Our next step in color correction is to adjust the histogram with Levels. Some photographers use iCorrect for steps 6-11. For more precise control follow the Workflow. We’ll use the eyedropper to remap the white and black tones.
7.1. While still in Levels check for‚ true white: open Blue channel; move highlight slider left to end of histogram; if input level stops short of 244, there may be no true white so eyedropper may not be used (skip step); if values are over 244 or to create true white, click Set White Point eyedropper (right most).
7.2. Run eyedropper over area of neutral white identified (do not use specular highlight, reflection, glare, etc., which have no detail or image will be flat); zoom in if necessary (Ctrl-plus) reading Info palette to find brightest point where you want some texture (hold down space bar to move image).
7.3. Hold down shift to move Sample #1 if necessary; set pointer over sample target and click to set white point.
7.4. Toggle Preview for results; hold down Alt to toggle‚ Cancel to‚ Reset to undo
8. Set Black Point
8.1. Check for‚ true black; open blue channel; move shadow slider right to beginning of graph; if histogram stops short of 8, there is no true black so eyedropper cannot be used (skip step); if values under 8, click Set Black Point eyedropper (left most).
8.2. Run eyedropper over area of neutral black (with some detail) to find optimum point; zoom in if necessary (Ctrl-plus) (hold down space bar to move image).
8.3. Hold down shift to move Sample #2 if necessary; set pointer over sample target and click to set black point.
9. No True White or Black
9.1. If no true white, open each channel (red, green, blue) separately and move each highlight slider until it’s just within the graph (to create some white); do not move center slider.
9.2. If no true black, open each channel (red, green, blue) separately and move each shadow slider until it’s just within the graph (to create some black); do not move center slider.
EXPAND DYNAMIC RANGE
Note: If after the previous steps your histogram still does not extend to the left and right ends, you may want to remap it to use the full dynamic range. Be careful, however, with high key or low-key images.
10. Expand Histogram Range
10.1. If Levels is not open, then (Image>Adjust>Levels) (or Levels>Adjustment Layer>Levels in 8-bit); move the left then the right sliders to where they just meet the histogram.
Note: Colorcasts will occur when the ambient light is a different temperature than the film. Filters can help, but often an imbalance remains. The new (PS7) Auto Color can be tried, but it seems to create as many color casts as it cures.
11. Remove Colorcasts in Shadows and Highlights
11.1. If monitor samples are not already established, set as above.
11.2. If white point pixel values are the same in sample #1, there is no color cast; otherwise, choose lowest value channel (e.g. Green).
11.3. Move Set White Point slider to left until value in Color Sampler Info matcheshighestvalue (e.g. Red); do the same for remaining (e.g. Blue) channel.
11.4. Check sample #2; drag Set Black Point slider right to matchlowestvalue in sample #2 in Info palette.
11.5. Click OK; open Layers palette; click on eye in Levels layer to check result.
12. Remove Colorcasts in Gray Midtones with Curves
Note: If a colorcast is clearly visible in neutral midtones, this technique is preferred to using the gray eyedropper (which sets the R, G and B of the point to the same values) since you can see results of the adjustments.
12.1. If you have not yet done so, add a third Color Sample #3 by shift-clicking in atrue grayarea of any tone; note the channel with middle value.
12.2. Open Curves (Image>Adjust>Curves), then open, e.g., Blue in channel popup, click on midpoint and move up or down (use up/down arrows) until value in the Info palette matchesmiddlevalue, e.g. Red.
12.3. Do the same with e.g. Green channel so all three channels are equal.
13. Precise Color Adjustment
Note: In the event the above does not work, to selectively enhance a specific color channel or range of colors, Curves provides a more flexible control than Levels.
13.1. While still in Curves dialog Alt-click within graph to change to 10×10 grid.
13.2. Go to channel of color to modify, Red (cyan), Green (magenta), or Blue (yellow).
13.3. Click on each of nine intersections of graph to anchor curve.
13.4. Run eyedropper over position in image of target color with the mouse button down; Ctrl + click to add a handle.
13.5. Remove the lock down points adjacent to handle by dragging them off graph.
13.6. Drag point up and left (carefully) to add red, green, or blue, and down right to add cyan, magenta or yellow; (hold down Alt and click Reset to clear).
13.7. Save if in an adjustment layer (to reapply if necessary later), then OK.
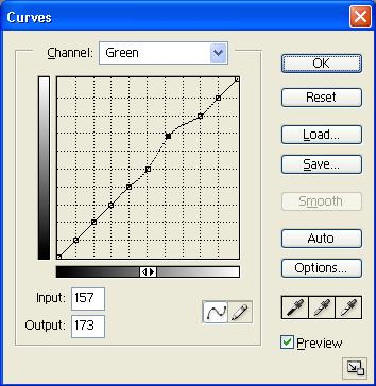
Individual colors can be tweaked with Curves.
ADJUST CONTRAST AND SATURATION
14. Contrast Adjustment
14.1. With Curves still open, Alt-click within graph to change to 4×4 grid.
14.2. Ctrl + click on area to be lightened; Ctrl + click on an area which should be darkened setting two handles.
14.3. Move upper handle up and left and lower down and right to produce s-curve.
14.4. Ctrl + click on brightest area; reduce contrast if Output is over 244; Ctrl + click black; reduce contrast if Output is under 12.
Alternatively:
14.5. Click on three intersections to lock down curve.
14.6. Click on lower anchor and move down with down arrow; click on upper anchor and move up with up arrow to create smooth s-curve (reverse to reduce contrast); monitor results in Info palette to avoid pure black or white as above; OK.
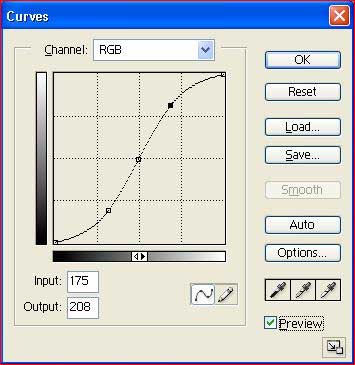
Curves gives greater control than Brightness/Contrast.
15. Increase Saturation
Note: Since faster films and most scanners reduce saturation, you usually have to restore some color depth. However, be careful not to overdo this since over saturation may look flashy at first, but does not wear well.
15.1. Open Image>Adjust>Hue/Saturation.
15.2. Select Master to change overall saturation (+10 to +20 usually enough);(inkjet printers require more saturation than Lightjets).
15.3. To correct saturation in a specific color range, go to channel to modify (R, G, or B), select a color with the eyedropper, adjust the default with + or‚œ eyedropper, or move color sliders.
15.4. Use Lightness not at all or only for minor adjustments.
15.5. Toggle Preview to assure saturation is not overdone; click OK.
EDGE SHARPEN AND CLEANUP
Note: If your edges look sharp and clean or you have pre-sharpened in the scanner (with perhaps Nikon software set at 20,10,3), skip this step. This is the first of a two-pass sharpening; at this time moderately sharpen edges only. If you are in 16-bit, sharpening is less destructive in Lab mode L channel since it creates no color shifts. Don’t convert to Lab if in 8-bit.
16. Edge Sharpen in Lab L Channel
16.1. Check setting: Edit>Color Settings>Advanced Mode checked>Conversion Options>Dither Off.
16.2. Change Master to Lab mode (Image>Mode>Lab Color), the sharpening space of choice.
16.3. Make second duplicate of original (Image>Duplicate), name Edge Mask; change Duplicate to 8 bit (Image>Mode>8 Bits).
Note: Pick up from here in 8-bit.
16.4. Make color channel with highest contrast active, e.g. Red; isolate edges with Filters>Stylize>Find Edges.
16.5. Invert image with Image>Adjust>Invert (or Ctrl+I).
16.6. Delineate edges with Filter>Noise>Median with radius value of 2.
16.7. Thicken edges (Filter>Other>Maximum) with 4 as radius.
16.8. Smooth edges with Filter>Blur>Gaussian Blur, radius 4.
16.9. Increase contrast to point below which artifacts are picked up (Image>Adjust>Brightness/Contrast).
16.10. Create selection (marching ants) outline by Ctrl + click the red channel in the Channels palette.
16.11. Choose Select>Save Selection and name‚ Edge Mask.
16.12. Make the 16-bit Master active by clicking on it; open Lightness channel in Channels palette by clicking on it; open View>New View; zoom in on detail with zoom tool on either view so you can see detail as well as overall effect.
16.13. Load edge mask (Selection>Load Selection>Edge Mask).
16.14. Eliminate marching ants outline with Ctrl+H.
16.15. Choose Filter>Sharpen>Unsharp Mask; set amount to 100-150, radius at 1.0-1.5, threshold at 0-1; adjust as necessary for moderate edge sharpening, with amount as final choice.
16.16. Ctrl + H to return selection outline; Select>Deselect to clear edge mask (make sure mask is cleared or it could affect subsequent steps).
17. Save and Convert to 8-bit
17.1. When done with overall corrections, save file to‚ Hi Res Images directory in PSD format.
Note: image should be very close to optimum at this point. Gamma and brightness have been corrected, white and black points established; color casts eliminated with white, black and gray points set to neutral, saturation level adjusted, and edges sharpened. Area corrections, resampling, and final sharpening remain.
17.2. Convert to 8-bit (Image>Mode>8 Bits).
17.3. Save 8-bit version using a different name, e.g. save as‚ ¦Master in‚ Master Images directory.
Note: image is now in 8-bit mode, so all selection tools can be used (Magnetic Lasso, Paintbrush, Eraser, Color Range, etc. are not available in 16-bit). Adjustments of this kind are best done in layers (not available in 16-bit mode) so they can be edited at a later time.
SELECTIVE CONTRAST AND EXPOSURE CORRECTION
18. Blending Modes for Tone and Contrast
Note: In the event further minor adjustment is needed, Blending is a method of correcting tone or contrast of images without the problems of selection techniques. However, for more precise control use the selection techniques below. The key Blending modes are:
Multiply-increase density of entire image if underexposed (better than Darken mode).
Screen-lightens image
Soft Light, Overlay, Hard Light- increase contrast progressively
Luminosity-selects light areas only
18.1. Make duplicate to monitor effect; return to original.
18.2. Add Layer>New Adjustment Layer>Levels; click OK without adjustment..
18.3. In Layers palette, move Opacity to 0%; open Blending mode in drop-down menu and raise Opacity slowly.
18.4. Open a new layer (Layer>Duplicate Layer); switch to Luminosity mode (preserves hue and saturation of base) in Layers palette (or Ctrl + Alt + ~)..
18.5. Click on Red, Green, and Blue channels to see which shows best detail in area to be adjusted (red for skies, green for faces); return to RGB.
18.6. Name Layer, e.g.‚ Red Only; leave new layer active.
18.7. Choose Image>Apply Image; set Layer=Merged; Channel=Red; Blending=Darken for skies, Normal for faces, Soft Light to increase contrast; set opacity at 100% (experiment with this); toggle Preview.
18.8. Choose Layer>Merge Down.
19. Selecting a Specific Area for Correction
Note: Some images require selective adjustment. Identify an area that needs further tweaking, e.g. sky, foreground, and determine optimum method of creating a selection. Precision is not necessary since selection will become an editable mask.
Note: it is sometimes easier to select solid color areas and then Select>Invert.
19.1. a) To select a solid or almost solid color skip to Color Range (best way) or use convenient Magic Wand (options bar set to tolerance of 8-16 depending on color variation, anti-aliased on, contiguous off); Shift + click to add to selection, Alt + click to remove).
19.2. b ) For areas with well-defined edges use the Magnetic Lasso tool (feather off, width 10, contrast 10%, frequency 50); hold down Alt to convert to freeform Lasso where edges are ill-defined; double click to close loop; Alt-Z to undo.
19.3. c) For entirely freeform selection use Lasso tool. (Marquee and Pen tools are not generally useful for photographs).
19.4. Choose Select>Feather and enter 1 or 2, or up to 6 radius for edge blend of hi-res images.
20. Color Range Selection
Note: Color Range is more precise than Magic Wand and generates a preview of the mask. You may want to use Color Range after making a selection to limit area of mask.
20.1. Double click on Quick Mask; click on color box and set for contrasting color; opacity 50%; click on standard mask (Q).
20.2. Choose Select>Color Range; select option from dropdown list, e.g. Sampled Colors; fuzziness 0.
20.3. Switch between image and mask by clicking Selection or Image radio buttons or by holding down Ctrl key.
20.4. Use eyedropper to specify color to be adjusted; ‚ + eyedropper (or Shift-click) to add (or drag); "-" eyedropper to delete; Ctrl-Z to undo.
20.5. Click on Invert to mask color.
20.6. Hold down Ctrl key to toggle preview.
20.7. To enlarge selection, use Select>Grow, or Select>Modify>Smooth Set.
20.8. Select>Inverse to reverse selection if required.
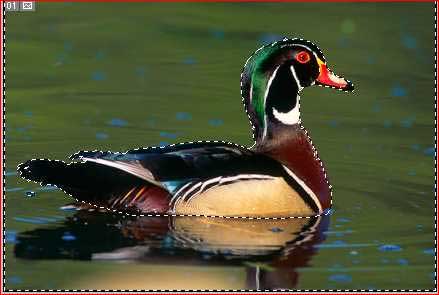
Using ColorRange to select background is often easier than selecting the object. The background can now be lightened for separation, and with Select>Inverse, only the duck sharpened.
21. Creating and Editing Mask
Note: Generally selections must be edited regardless of the selection technique. Quick mask is the most efficient editing tool of standard selections.
21.1. Click Quickmask mode in Tools palette (or hit Q); press D to set foreground color to Black.
21.2. Double click Quick Mask channel and set to 50% luminosity and radio click masked or selected area.
21.3. Select a paintbrush (press B); paint with black in foreground to add to rubylith overlay, paint with white (press X) to erase color.
21.4. Use the Gradient tool (press G) to draw a gradual transition.
21.5. Switch back to normal mode (marching ants) (Q again to toggle); Select>Feather 2-3 or 4-6 for hi-res.
21.6. Select>Save Selection; goes into alpha channel and may be saved for reload (select Load>Selection>Alpha).
22. Adjusting Selected Area
Note: Now that you have your selection, you may work on it with a variety of tools.
22.1. For the most control, Layer>New Adjustment Layer>Levels/Curves/Saturation to correct selection.
23. High-bit Mode Selection
Note: most selection tools are not available in 16-bit mode; selective corrections are usually done in 8-bit adjustment layers, but the following will guide you in 16-bit selection for those who want to continue in hi-res for whatever reason.
23.1. Open duplicate (Image>Duplicate); name‚ 8-bit mask; choose Image>Mode>8 Bit.
23.2. Follow steps above for creating a mask.
23.3. Save selection (Select>Save Selection) and name, e.g.‚ trees; click OK.
23.4. Click on the 16-bit original and Select>Load Selection‚œ‚ trees; delete the 8-bit image.
23.5. Use Image>Adjust>Levels/Curves/Saturation to correct selection.
24. Rescuing Shadow Detail
Note: if shadow details remain repressed after all of the above, the following may be helpful.
24.1. Open Color Sampler Tool; move sample #4 (click-drag) to shadow area near detail to monitor shadow.
24.2. Open Image>Adjust>Levels; move middle slider left until details appear in shadows but color sampler does not show degradation of shadow (ignore rest of image).
24.3. Make a copy for reference (Image>Duplicate); make original active.
24.4. Window>Show History; click on left box in History channel to set history brush (icon will appear); activate previous state; use history brush (press Y) choose soft brush, set on Lighten, 50-100%, to paint in shadow details using duplicate for reference; close duplicate.
25. Graduated Neutral Density Filter
Note: If you wish you had used a GND filter when you took the picture, this step might help.
25.1. Make duplicate (Image>Duplicate); name‚ GND; make duplicate layer (Layer>Duplicate Layer), name, e.g.‚ Sky.
25.2. Use Levels or Curves to adjust exposure (brightness/contrast) of sky without regard for the rest of the image.
25.3. Click Quick Mask icon at bottom of Layers palette; click on mask layer to make it active.
25.4. Open Linear Gradient tool (with black foreground/white background); click and drag line from foreground area to bottom of well-exposed sky to define gradient zone (adjust opacity slider if necessary to control intensity).
25.5. Click eye in Sky level to compare results; merge down layers (Layers>Merge Down).
25.6. Retouch using history brush.
26. Local Area Sharpening and Toning
Note: These tools should be used sparingly and only for very small areas.
26.1. Identify small areas that need correcting; use light opacity brushes since these tools are cumulative.
26.2. These adjustments are best made on a duplicate layer (Layer>Duplicate>Layer).
26.3. To sharpen a local area without selection, open the Blur/Sharpen/Smudge tool from the pop-up; try Blur tool before Sharpen; set pressure at 25%; select darken or lighten to target effect.
26.4. C heck highlight, mid-point, shadows, set low pressure (25%) and use on eyes, catchlights, sparkles, anything that glitters, etc. sparingly to avoid artifacts; try blur tool before sharpen tool.
26.5. U se Dodge tool (to lighten) e.g. to remove wrinkles with large, soft brush; Burn (to darken) local areas with pressure at 20-30%.
26.6. Sponge to saturate or, to de-saturate (hold down Alt) e.g. to de-emphasize an object or out-of-gamut colors.
PERSPECTIVE CORRECTION
27. Perspective Correction
Note: If perspective of converging verticals or barrel distortion of a super wide-angle lens has not been corrected above; the following steps are for a) symmetrical correction, b) free transform, and c) perspective cropping.
27.1. a) Select Image>Canvas Size; click lower middle Anchor box; open Width dropdown menu, select percent; change amount to 125%; OK (or use crop tool to crop outside image).
27.2. Open grid (Edit>Preferences>Guides and Grid) change Subdivisions to 1; select View>Show>Grid.
27.3. Use rectangular selection tool to select area slightly larger than image.
27.4. Choose Edit>Transform>Perspective;
27.5. Mouse grab the upper corner handle arrow and move outward to align converging verticals with grid;
27.6. Hit Enter. Use Crop tool to square image.
27.7. b) For non-symmetrical adjustment, same as above, but select Edit>Free Transform; drag left and right handles independently.
27.8. c) Use Crop tool to select all; unclick‚ Shield cropped area; click Perspective box.
27.9. Mouse grab the upper corner handle arrow and move inward to align crop edge with converging verticals; use middle handle to move horizontally to check alignment; return crop to frame edge.
27.10. For symmetrical crop turn on rulers (View>Show Rulers or Ctrl + R); align right crop.
27.11. Hit Enter.
RECOMPOSITION
28. Distracting Elements
Note: Examine the image for distracting elements, e.g. branches, hot spots, clutter, etc.
28.1. With PS7, click on Background Layer to make it active
28.2. Use the patch tool (J) set to Source to remove a small element where blending is desirable; circle the element (shift-drag to add to selection; alt-drag to subtract) (or use the Magnetic Lasso, freeform Lasso, etc.) and drag selection to an area from which you want to sample.
28.3. Use healing brush to clean up.
28.4. With PS6 or where blending is undesirable, click on Background Layer to make it active
28.5. Select the item to be removed using one of the tools above, e.g. Magnetic Lasso, Lasso, etc.
28.6. P ress Q to create a Quick Mask; feather edges with gaussian blur (Filter>Blur>Gaussian Blur) with radius 5-10 or higher depending on resolution; press Q to activate selection.
28.7. Use the selection tool to move the selection to an area to be copied remembering the location.
28.8. Choose Layer>New>Layer via Copy (or Ctrl + J); move the selection back over the cluttered area; dress up edges with clone tool.
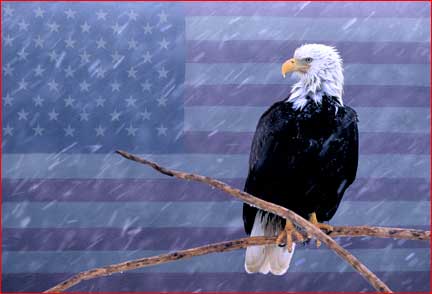
Sometimes adding elements works. By masking the eagle, a patriotic background layer was combined, set at Soft light with Luminosity 15%.
CROP AND RESAMPLE
29. Final Crop
29.1. Set snap to (View>Snap checked)(View>Snap to>Document Bounds checked).
29.2. Create duplicate layer (Layer>Duplicate Layer).
29.3. Open crop tool (or press C), clock on Front Image.
29.4. Adjust width and height to target dimensions; select Shield cropped area.
29.5. Drag rectangular marquee to select image to retain; drag handles to adjust (hold down CTRL to turn off snap).
29.6. Place cursor just outside bounding box (and inside image) to rotate.
29.7. If perspective has not been corrected above, check Perspective box on options bar; move each corner of the cropping rectangle independently; hold down Space bar to move image within outline.
29.8. Click Hide radio button (only revealed in layered file); click on check, double click image or press Enter to crop (Esc to cancel).
29.9. To view hidden pixels, Image>Reveal All.
29.10. Save file in PFD format to preserve hidden pixels as Master or in new directory, Final Images.
Note: When up-sampling substantially, increase image size in increments (stair interpolation) for better results.
30. Resampling
Note: resampling effects both size and resolution as compared to resizing which maintains the same pixel dimensions.
30.1. Flatten Image (Layer>Flatten Image).
30.2. Save file in Genuine Fractals (STN) if this is available (some believefractal resampling is better than Adobe bicubic) and reopen using GF settings.
30.3. Otherwise, choose Image >Duplicate (Merged Layers Only).
30.4. Open Image>Image Size; click on Width then Height arrows and choose inches; set size and resolution. (Note: for inkjet printers use 300ppi, for Lightjet, 304.8; otherwise⼠the resolution of the printer); OK.
SHARPENING AND CLEANUP
31. Final Sharpening / Examination
Note: Images acquired from a scanner or digital camera will almost always benefit from judicious sharpening. Sharpening should be done after all retouching and resizing, and is the last operation before Color Management takes over. Final sharpening should be done with size, viewing and printing parameters in mind. If available, use nik Sharpener to sharpen to image size and resolution (set on Anna). Otherwise, for Lightjet 5000 (and continuous tone printers) sharpen so image looks well on screen, slightly over-sharpen for inkjets (dithered).
Note: It is usually advantageous to mask out continuous tone areas to avoid sharpening grain, or to sharpen highlights and shadows separately through selections as above.
31.1. Open new view (View>New View); zoom in on critical area.
31.2. Open unsharp filter (Filter>Sharpen>Unsharp Mask)(donotuse Sharpen, Sharpen Edges, or Sharpen More).
31.3. Place preview box in critical area and set zoom (+/-) to monitor effects (you now have three views).
31.4. Set Amount (volume control; interacts with Radius to set degree of sharpening) temporarily to 500%; set Radius (width of edges) to final resolution divided by 150 (75ppi = 1.0; 300ppi = 2.0); fine detail needs less.
31.5. If using a 35mm scan, move sample box to smooth, continuous tone; if indicated, raise Threshold (delta of tonal values) carefully to point where grain and noise are not sharpened; detailed landscapes 0 inanimate objects 0-1, average 2-3, faces may need up to 5 Threshold; to restart use Ctrl-Z.
31.6. Return to Radius and set at point where detail is emphasized.
31.7. Finally, decrease Amount to between 120-400 (faces 70-100, fine detail higher) and monitor results.
Note: Lightjet sharpening for 16×20 print would be about amt. 300, radius 0.5, and threshold 0-2. Web sharpening should be about 200%, .5, 0.
31.8. Now choose cancel and reopen Unsharp Mask, which will contain your same settings.
31.9. Open color channels (Windows>Show Channels); click on Red and shift-click on Green (Blue channel produces more noise) or choose lightest channel with least detail.
31.10. Divide the Amount determined above by four, and apply the filter four times monitoring each step.
31.11. Look for and repair any unwanted artifacts with clone tool.
31.12. If the effect is too sharp, either backup one sharpening (Edit>Undo) or use Edit>Fade Unsharp Mask set for Luminosity in drop-down menu at e.g., 50% (experiment with setting).
32. Final Cleanup
Note: Levels, Curves, and Saturation can sometimes create artifacts which sharpening emphasizes. If this occurs, a final cleanup may be indicated.
32.1. Open a new layer (Layer>New>Layer); check the Use All Layers box and the cloning will remain in the layer.
32.2. Use the healing brush or clone tool to cleanup image.
32.3. Select brush size just bigger than specks, usually hard edge.
32.4. Zoom in 100%-200%; press Home key; press the Tab key to clear palettes; Alt-click then click (not drag) to remove spots.
32.5. Work carefully up and down image using sequence: PgDn¦, Alt-PgDn, PgUp¦, Alt-PgD, PgDn¦, etc.
32.6. Tab again to return palettes.
32.7. Save TIFF file as e.g.‚ (Subject) 13×19 in Print directory.
PROOF
Note: Soft proof requires ICC or Color Sync media profiles for your printer and the ink and paper combination.
33. Soft Proof
33.1. Image>Duplicate; soft proof the duplicate.
33.2. Open View>Proof Setup> e.g. Working CMYK or >Custom; choose saved preview profile in Setup dropdown or vendor supplied or custom profile in Profile dropdown.
33.3. Set Intent (maps out-of-gamut colors) on perceptional for most photographs (especially for strong colors); preserve color numbers-off; paper white and black ink-off (unless profile supports those options).
33.4. Press Save and give new preview profile a name, e.g., Epson 2200P SGloss
33.5. Open Layer>New>Layer Set; name set, e.g., Epson 2200P Semi Gloss.
33.6. Select Layers>New Adjustment Layer>Curves, or Hue/Saturation, etc., to tweak image.
33.7. Use Ctrl Y to toggle between image and proof.
33.8. When images match, save image with layer set as (printer/paper device name) Master w/Proof. Other layer sets may be added for different papers, etc
33.9. When all documents are closed choose View>Proof Setup and select your custom setup to make it the default.
34. Plug-ins
Note: These plug-ins can make the workflow easier. See web pages for descriptions.
Silverfast‚ for opening scans:http://www.silverfast.com/
VueScan‚ opening scans:www.hamrick.com
iCorrect‚ for color correction:http://www.picto.com
nic Sharpner Pro‚ to sharpen for print size:http://www.tech-nik.com/usa/products/maincontent/all_products/products.shtml
Genuine Fractals‚ to resample for large prints:http://www.altamira-group.com/
BreezeBrowser‚ download RAW images (Canon):www.breezesys.com/
Bibble‚ download RAW images (Nikon):www.bibblelabs.com/
Article and Illustrations by: Fred Scholtz
© 2002 Fred Scholtz
When Fred Scholtz moved to Florida fifteen years ago he changed his focus from marine scenes and images of ocean racing sailboats to photographing the natural world. Since then he has lectured extensively on his favorite subjects: the birds of Florida, the Colorado Plateau and Alaska, which he visits annually. Shooting with Canon 35mm and digital, and Mamiya 645, Fred’s present concentration is on large (30 x45) prints on canvas.
Michael Reichmann is the founder of the Luminous Landscape. Michael passed away in May 2016. Since its inception in 1999 LuLa has become the world's largest site devoted to the art, craft, and technology of photography. Each month more than one million people from every country on the globe visit LuLa.
You May Also Enjoy...
Saguaro Sentinel
The Sentinel© Miles HeckerCLICK ABOVE IMAGE TO SEE GOOGLE MAP LOCATION SEASONS Access to the Sonoran Desert section in the Rincon Mountain district of the
Jungle – Costa Rica
Please use your browser'sBACKbutton to return to the page that brought you here.
