The DNG Profile Editor and Lightroom 2.0
First – Some Definitions
This is going to take a bit of explaining, but bear with me. Some of this may well be known by many readers, but in the hope of starting with a common understanding here are some definitions…
– All digital cameras shoot raw. Some, like various point-and-shoots, throw the raw data away after generating a JPG. Others, such as all DSLRs, let you have the raw file, and optionally, a JPG file as well.
– To obtain an image from a raw file requires that you use special software from either the camera manufacturer or a third party. This software must specifically support the camera file format that you have since virtually every camera model is different. (There are now more than 200 raw formats, and growing almost daily).
– There is a small JPG file embedded within the raw file. This is separate from any in-camera JPG which you may choose to have the camera create, and is placed there automatically by the camera.
– Both the in-camera JPG file and the embedded JPG are generated from the raw data using certain processing parameters decided on by the manufacturer. These include the ways in which colours will be interpreted, tonal balance, luminance distribution, contrast, sharpening, and numerous other parameters. Most cameras allow you to customize some of your own variations to the manufacturer’s basic settings.
– The raw file itself though contains none of these settings. Theonlycamera settings which effect a raw file are the aperture, shutter speed, and ISO setting. Some settings, such as the colour space (sRGB or Adobe RGB), and white balance (colour temperature), are attached to the raw file as metadata, but do not actually change the raw file itself.
– Various camera settings, such as those that are used when a JPG is created in-camera, also affect the preview image on the camera’s rear LCD. The camera’s histogram is generated from the in-camera JPG and therefore is representative of the JPG, not necessarily the raw data itself.
– When processing a raw file ones computer’s software performs three major steps;
– decoding the Bayer matrix
– applying a tone curve to the linear tonal distribution (a linear raw file without this tonal distribution is very dark and very flat).
– interpreting the recorded colours according to a built-in or external profile
______________________________________________________________
Until Now
This helps us understand where we are ’till now. It explains why one person will say "I like the way that Canon’s DPP processes my files better than Adobe Camera Raw". Or, "I like Nikon’s Capture NX’s colours a lot better than those from Lightroom".
In the end what this is really all about is how various raw processing programs handle tonal distribution as well as colour interpretation. Each manufacturer has their ownsecret sauce. Their "look" if you will. There’s no question that different cameras have different ways of recording colour and distributing luminance values, and these differences vary according to lighting conditions, ambient colour temperature, and a variety of other factors.
Until now we could choose to use any one of a number of different raw processing programs; the manufacturer’s, or various offerings from companies like Adobe, Phase One, DXO, and many others. Each provided their own interpretation of colour, and in some cases their own provided profiles. Sometimes these profiles were embedded and inaccessible, while others could be edited, like those from Phase One, for example.
Adobe in bothCamera RawandLightroomdidn’t use ICC profiles, rather creating their own proprietary matrix based on Standard Illuminant A (tungsten) and D65 (daylight), varying the colour interpretation between them based on the indicated colour temperature. Many people found this to work well (particularly once Adobe started tweeking them to look good, rather than to just be accurate), but others also found the results to be less pleasing than the colour interpretation provided by their camera manufacturer’s raw software.
Till now both Camera Raw and Lightroom have provided a means for calibrating ones own camera, or for creating a custom look, but this has always been a tedious processes (aided by scripts, such as those by Thomas Fors), and so not many people bothered. Therefore, whereas some people choose their raw processing program for reasons of workflow, convenience, or features, others choose a particular program because they believed that the colour rendition that it produced was superior, or at least more to their liking.
But – as they saying goes,that was then, and this is now.
______________________________________________________________
Adobe DNG Profiles and Editor
With the introduction on July 29, 2008 ofLightroom 2.0andCamera Raw 4.5a new and very exciting change has taken place. Both of these raw converters (as well as any others which are DNG 1.2 compatible) now can use camera profiles.
DNG is an open standard digital file format put forward by Adobe, and now increasingly being adopted by camera and software manufacturers. The updatedDNG 1.2standard was announced this past April.
With the launch of these two programs Adobe is now making available profiles for virtually ever digital camera ever made. These are freely downloadable fromthe Adobe Labs web site. In addition to theStandardprofiles, (which are variations on Adobe’s standard interpretation as seen in previous versions of Lightroom and Camera Raw), for current model Nikon and Canon cameras they are also making several additional profiles available which Adobe callsColor Matchingprofiles. These profiles closely match the color rendition which Canon and Nikon provide for their cameras, which one normally gets from in-camera JPGs, or from using Canon’s DPP and Nikon’s Capture NX raw processing software. In other words, theseColor Matchingprofiles allow the new versions of Lightroom and Camera Raw to create images which accurately reproduce the colour and tonal rendition that one gets from in-camera JPGs, or from using Canon’s DPP and Nikon’s Capture NX raw processing software.
Furthermore, Adobe is providing a free profile editor, also available for download from theAdobe Labs web site. This allows anyone to edit those profiles provided by Adobe, or by anyone else. It also allows users to create their own profiles, edit existing profiles, and sell or freely distribute profiles created or modified with theAdobe DNG Profile Editor.
______________________________________________________________
The Implications
The implications of all of this are quite profound. Simply put, we as photographers now will have much greater personal control over the look of our images. If we like what our camera maker has decided on as the "look" of their cameras, then we can have it, not just from their in-camera JPGs and the output from their proprietary raw software, but from any third party software that now adheres to the open DNG 1.2 standard. (Yes, it’s just Lightroom and Camera Raw for the moment, but there will be others as soon as this coming Photokina I am told).
We also can take a particular camera maker’slookand do with it as we wish. Do you like the way that Canon does colour on a 40D, but you now also own a 450D Rebel? No problem. A few minutes in theAdobe DNG Profile Editorand that look is now yours. Or how about having your Olympus D3’s images look like a Nikon D300, or Pentax K20D? Just as easily possible.
Then there are the opportunities for users to create, give away or even sell custom profiles with alookthat they think is best. The possibilities are endless. (Not to mention all of the discussion that will be generated on on-line discussion forums. I can hardly wait).
______________________________________________________________
What’s in a Name?
The program is called the DNG Profile Editor. But, you might ask, why is the word DNG there? Are these DNG profiles, and if so, what does that mean? Does it mean that only DNG files can have these profiles applied to them?
The answer is both yes and no. Here’s what this is all about.
The word "DNG" is meant to convey two different things: (1) the new profiles use an updated camera profile format, which Adobe released with the DNG 1.2 specification in the first quarter of 2008, and (2) they can be embedded in DNG files. This second point — the ability to embed a profile in a DNG — is convenient for bringing raw images and their associated profiles into the DNG Profile Editor. After all, you can’t edit a profile interactively in the profile editor unless you can see what it’s doing to a real-world image.
The image that you open in the profile editor can be any raw image that you like, as long as it’s in the DNG format. Ideally, it should be one which contains the broadest possible range of tones and colours, including skin tones, and ideally a Macbeth or other colour chart. All you have to do is convert your raw file from whatever native raw format it might be into a DNG, and then bring that file into the DNG Profile Editor. (This raw format conversion can be done with the latest free DNG converter, Lightroom 2.0 or Camera Raw 4.5. When your profile edit has been completed you can
save the new or adjusted profile to disk as a completed profile, or as a "recipe". It can then be used in any raw program that understands DNG 1.2 profiles (Lightroom 2.0, Camera Raw 4.5, and others soon) to process both DNG and non-DNG images. These profiles can then also be sent to others, given away, traded, or sold.
So, in a way they really are DNG profiles. To summarize, the DNG Profile Editor will only open DNG raw files, but the profiles themselves (including ones created or edited using the profile editor) can be applied to both DNG and non-DNG raw files.
______________________________________________________________
In Use
Using theDNG Profile Editoris both simple and complex. I have no doubt that we will be seeing more really bad camera profiles floating around the web in the days and months ahead than I care to imagine. No doubt it will be fun for people to create, modify, and use them, but in the end producing profiles which do more than simple "tweak" things to an individual’s particular taste is going to take both skill and a keen eye.
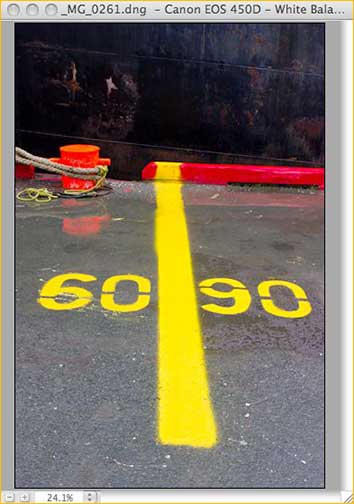
Above we see theDNG Profile Editorscreen along with an image which was brought in. (As I am away from my office and studio this summer, while writing this I do not have any files available to me with skin tones and a Macbeth colour checker, which is what one should ideally use.Therefore, apologies for the poor example above.)
I won’t go into step-by-step details on how to use the editor, because Adobe has provided verycomprehensive documentationwhich walks the user though the process.
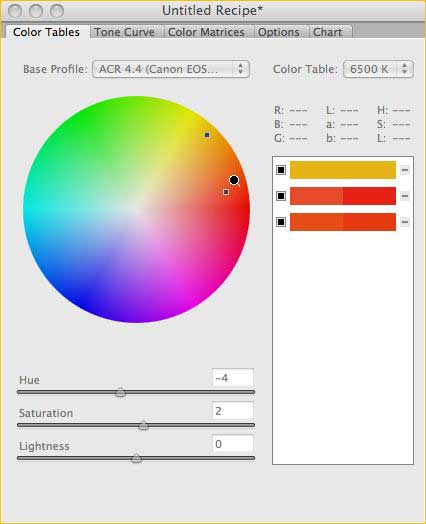
In brief though, the tab that you see above (one of five) shows that the image was shot with a Canon 450D Rebel. The colour table that’s being used is for daylight (6500 deg) and the base embedded colour profile is derived from Adobe’s ACR 4.4 interpretation. If the file had come in with another profile this would show in its stead.
What one does is click the cursor within the image to identify a specific colour that you would like to adjust. Now, in the editor, one can move the Hue, Saturation and Luminance sliders, or the associated dot on the colour wheel itself, to make the desired modification. Each colour chosen is represented on the right hand side of the editor by a small rectangle which shows both the before and after of each adjustment.
It should be noted here for those that have experience working with HSL in Lightroom or ACR, that whereas those controls cover a very broad colour spectrum (grab the green slider and almost all greens are changed) here one is working with extremely narrow parts of the spectrum and therefore quite fine adjustments are possible.
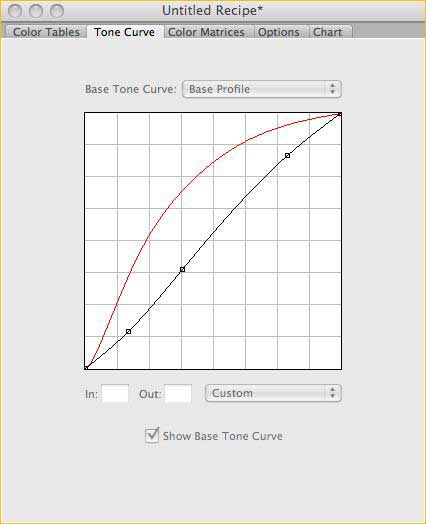
The next tab is the Tone Curve, and here one can adjust the tonal values (luminance) as desired.
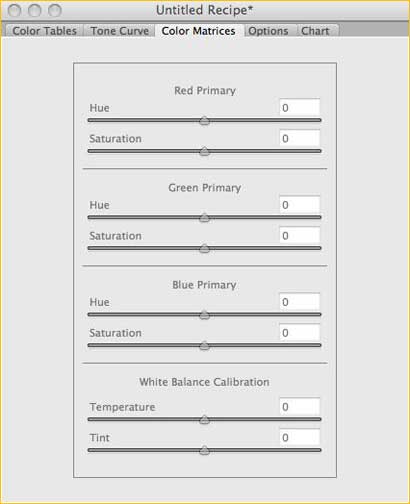
The Color Matrix tab contains both old and new functionality. The first six sliders make global color adjustments and should be familiar to photographers who have used the Calibration tab in Camera Raw or Lightroom. The last two sliders can be used to adjust the camera’s white balance interpretation, which is often needed for cameras that have been modified for infrared shooting.
The Chart tab is very similar to using a Calibration script with previous versions of Lightroom and ACR. One shoots a Macbeth ColorChecker and then the program generates a basic profile. This can be used to bring several different cameras into line, or as the starting point for creating ones own profile from scratch.
Anyone who has used a script with the calibration function in previous versions of LR or ACR will know that it can take seemingly forever (30-45 minutes) for the script to run. In the Profile Editor it takes less than one second.
It’s worth noting that if you find yourself shooting under very weird lighting conditions, such as unknown flourescents and mixed conditions, all that one needs to do is take out a ColorChecker (even the little pocket version) and take a shot of it under the unusual lighting. Then, use that image to create a custom profile for shots taken under that particular lighting condition. Results can be quite remarkable, and almost impossible to otherwise achieve because the colour controls in the raw processing program itself can be too broad in their action.
______________________________________________________________
Dual Illuminants
Those who are familiar with the history of Adobe Camera Raw may have read, or learned from one of our videos, that the way that Thomas Knoll and his colleagues have created profiles for LR and ACR up until now was by photographing a colour chart under both tungsten and daylight and then creating a matrix that moved between these two colour temperatures, depending on the white balance of the image or the settings that the user chose.
The reason for this is that camera sensors do not respond uniformly under different lighting conditions. Therefore the way certain colours are reproduced may be quite different under tungsten lighting and in daylight.
TheDNG Profile Editormakes provision for this and allows you to similarly create camera profiles that are able to self-adjust to varying white balance conditions. All that’s required is that you shoot a ColorChecker under two separate lighting conditions; 2850K and 6500K (tungsten and daylight). The program can then generate two sets of adjustment tables to be combined into a single profile. This is very desirable when a camera will be used in a wide variety of shooting situations.
______________________________________________________________
Wrap-Up
This has been a brief overview of Adobe’s just releasedDNG Profile Editor. Yes, it’s exciting, but no, it’s not unique.Phase Onehas had something quite similar in itsLooks Editor, provided withC1 Pro. But with Adobe’s broad market penetration and the fact that DNG is an open standard, these profiles will be able to be used with any DNG 1.2 compliant raw processing software. It’s clear that this represents an opportunity for a significant broadening of the use of camera profiles, particularly when one notes that the Adobe editor is free rather than a component of an expensive raw processing program, limited to just a selection of raw formats rather than just about every one on the market.
Here, on day one of the launch of widely available profiles for all digital cameras, and the ability for users to modify them and even create our own, it’s hard to see where this will all eventually lead. Add to this the availability from Adobe of theirCamera Matchingprofiles, which provide us with colorimetrically accurate renditions of Canon and Nikon’s versions of colour (with other brands likely to follow), we as photographers now have a much enhanced tool set. This provides us with greater choice, greater flexibility, and increased opportunities to express our creativity.
Thanks Adobe!
A word of thanks as well to Eric Chan, one of the engineers on the profile development team at Adobe, for his assistance in answering my questions and in checking this article for factual errors.
July, 2008
______________________________________________________________

Learn Lightroom 2 From The Experts
![]()
Michael Reichmann is the founder of the Luminous Landscape. Michael passed away in May 2016. Since its inception in 1999 LuLa has become the world's largest site devoted to the art, craft, and technology of photography. Each month more than one million people from every country on the globe visit LuLa.
You May Also Enjoy...
Making Profiles with the HP Z3100
One of the most exciting features of the new HP Z3100 series printers is the built-in capability to make profiles. This is made possible by
Advertise With Luminous-Landscape
To Find Out More About Advertising Opportunitieson The Luminous Landscape Please Contact Kevin Raber With the new design of the Luminous-Landscape web site there are now more
