Introduction
Some think the optimal way of scanning colour negatives is to minimize editing intervention at the scan stage by scanning exactly what the scanner produces unaltered, then opening the image in Photoshop, converting it to a positive and making other adjustments as needed. Stated advantages of this workflow are that no data gets altered or destroyed on the way to Photoshop and there is no need to bother about selecting and possibly re-configuring conversion profiles in the scanning software appropriate for the brand of negative film one is scanning.
The two big issues doing without the negative profiles in the scanning software are that the film has an “orange” mask (or some other hue) that must be neutralized and scans of negatives tend to come out of the “raw” process rather flat and lifeless. These issues need to be corrected somewhere.
In SilverFast, the default option is to use Negafix, select the closest Negafix profile for the film one is scanning, tweak it a bit as necessary and save that new profile as a Preset for future scanning of the same film stock. Then scan the images in 16-bit per channel mode using the Negafix profile. That’s the easy way and it works very well, but it’s not “raw”, as it does substantial image processing in the scanning software. I revert to it for comparison at the end of this article.
Alternative “raw” techniques are presented here. They work independently of negative profiling in the scanning software and reproduce the scanner data unaltered in the original scan. If you noticed that the word “raw” always appears in quotation marks here, it is because there really is no such thing as a raw scan in the same sense that digital cameras can give us access to raw image data. Digital camera raw images are not three channel pixel-based images. All RGB colour scans are, whether negative or positive. In the scanning context, “raw” only means that the scan is moved through the scanning software with no image editing done to it there.
Procedures
The first is a three-stage procedure, which uses SilverFast Ai Studio and SilverFast HDR for the first two stages.
Stage One: Isolate the L*a*b* value of the orange mask.
Stage Two: Scan your photograph.
Stage Three: Process the image into a positive in Photoshop.
Stage One: Getting the L*a*b* Value of the Orange Mask
(1) Find a frame-size piece of unexposed, but developed, negative film of the same stock used for the photographs you will scanning.
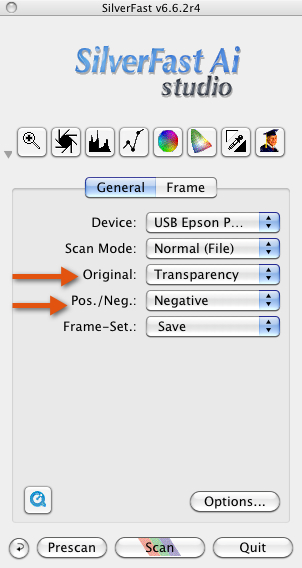
(2) In SilverFast Ai, General Tab, configure the job as a Negative Transparency scan, (Figure 1).
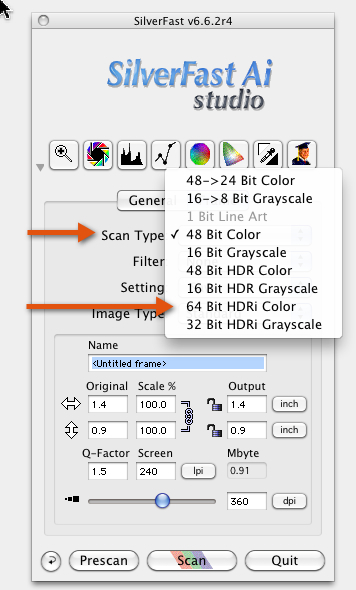

(3) In SilverFast Ai, Frame Tab, Select the Scan Type as 64-bit HDRi (Figure 2). This will turn-off ALL adjustments and allow you to clean dust and dirt using the infrared channel (in supported scanners) in the next stage. The size and resolution of this scan doesn’t matter. If your scanner does not support access to an infrared channel, select the 48-bit HDR Scan Type. To complete the set-up, in General Options, accessed from a button in the General Tab, I recommend selecting a Gamma of 2.2 and checking the box “for HDR Output” (Figure 3). This helps to mitigate the usually excessive flatness of HDR scans.
(4) Give the scan a name, press “Scan” and save the scan to your hard-drive wherever you prefer to keep it.
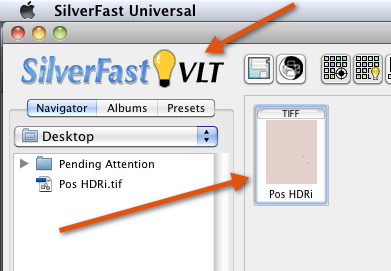
(5) Quit SilverFast Ai, and open SilverFast HDR[1]. The VLT should open. In the left panel of the VLT, scroll to the folder where you saved the scan from step 4 (Figure 4).
(6) Double click the icon. This will open the image in SilverFast HDR.
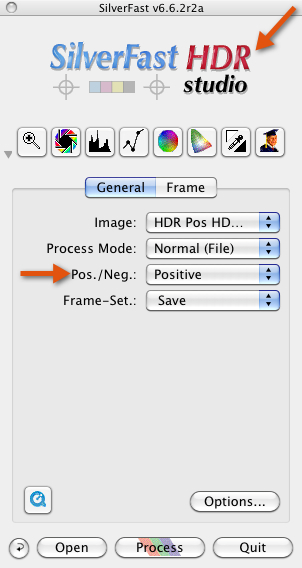
(7) Set the job type in the SilverFast HDR General Tab to Positive (Figure 5).
[1]SilverFast Ai Studio and SilverFast HDR Studio are complementary applications which come bundled together as the SilverFast Archive Suite. At time of writing, the Archive Suite is the least-cost way of buying the full-featured application set.
(8) Implement dirt and scratch removal using iSRD for scanners supporting access to an infrared channel, or just SRD for scanners which do not. One of my previous articles on The Luminous-Landscape contains detailed instructions for using iSRD. You will find it here:/scanning-the-old-world-joins-the-new/, where you will be directed to a PDF download of the article. The instructions for using iSRD are in Annex 1. The purpose of cleaning-up this scan is to prevent artifacts from possibly falsifying the reading of its L*a*b* value. Chances are they wouldn’t, but it’s anyhow nice to work with clean images and this process is easy.
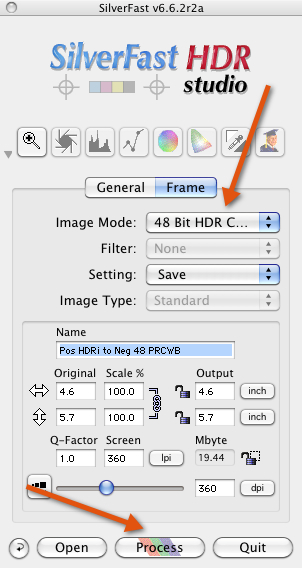
(9) In the Frame Tab, select 48-bit HDR Color as the Scan Type (Figure 6).
(10) Press “Process” and save this image to your hard-drive with a slightly altered name (I put “PRC” at the end of the file name.)
(11) Open the scan in Photoshop. It should be tagged with your scanner profile. Convert the scan to Adobe RGB(98) (Edit>Convert to Profile). For scans of colour negatives I find in general ARGB(98) works more reliably than ProPhoto RGB, where the sheer size of the colour space can cause issues with the rendition of some colours.
(12) Duplicate the Background layer (CMD/CTRL J).
(13) Go to Filter>Blur>Average and accept it. Then Flatten the image. This will ensure that the colour value of the whole image is uniform.
(14) Make the Second Color Readout on your Info Panel “Lab”, run your eyedropper over the image and note its L*a*b* value. For example, the film I’m using in this demonstration has an L*a*b* value of 78,14,9. That’s the colour of the orange mask as rendered in my Nikon scanner by SilverFast in HDR mode.
You are now finished deriving the tone and colour of the orange mask for purposes of Stage 2. You will not need to repeat this process for all scans from the same film stock and film development conditions (process, place and time). If you change film stock or development conditions, you will need to repeat it with the new film stock/development conditions.
Stage 2: Scan Your Photograph
(15) Repeat Stage 1 steps (2) to (11) inclusive on the photo whose negative you wish to scan.
Stage 3: Process the Image in Photoshop
(16) Open the image in Photoshop, where it should be a 16-bit TIF file showing a negative image of your photo.
(17) Add a Color Fill Layer (Layer>New Fill Layer>Solid Color) and in the color picker dialog that opens, enter the L*a*b* value of the orange mask noted in step (14) above (Figure 7).
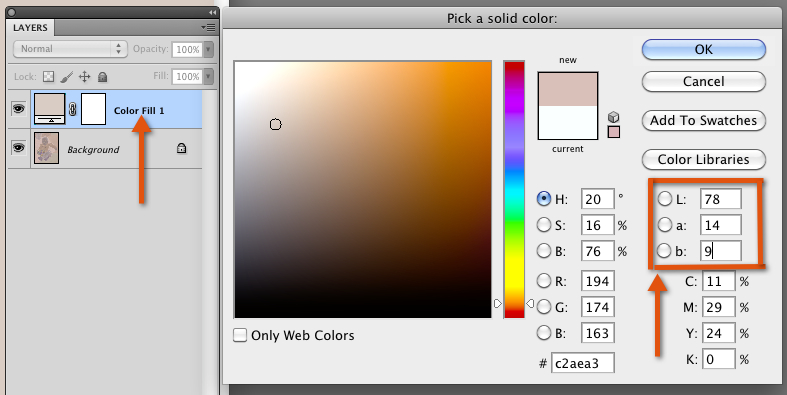
Figure 7
(18) Change the Blend Mode of this Color Fill Layer to “Difference” and Flatten the image. Your photo will now appear as a de-masked positive with no adjustments and looking rather dark (Figure 8).
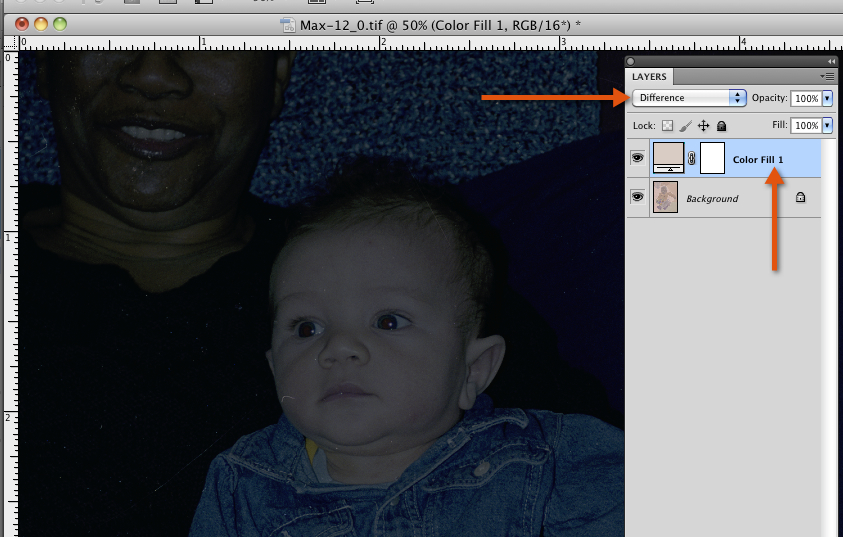
Figure 8
(19) At this stage I recommend adding a duplicate image layer and doing any grain reduction and “capture sharpening” you wish now.
(20) Add an Exposure Adjustment Layer and adjust the Exposure and Gamma sliders until the image has approximately the right brightness and contrast. Do any further adjustments to taste (Figure 9, immediately below).
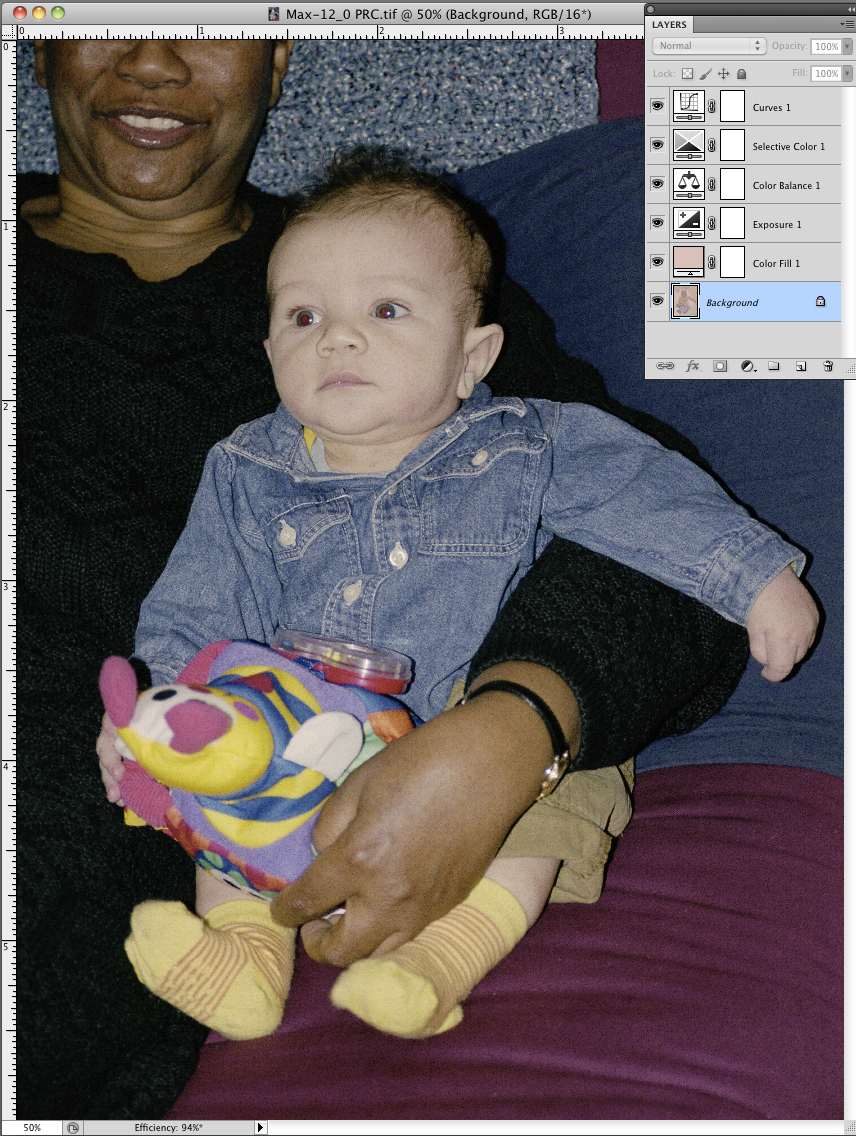
Figure 9
Stage 3 Alternative (A) – Use SilverFast HDR in Negative Mode, not Photoshop, to Process the Image:
(16A) Implement Step (15) by doing Stage 1 steps (2) to (9) inclusive, except in Step (7) change the Transparency type to “Negative”, and in Step 9, select “48-bit Color”.
(17A) Before you proceed to “Process” the scan, implement any image adjustments of tone and colour you wish in SilverFast HDR, change the file name, then Click on “Process”.
(18A) If you wish to do further work in Photoshop, open the processed scan in Photoshop and proceed.
You can see from Figure 10 that these two Stage 3 alternatives can produce very similar results. I only converged them enough to see that with more time and fiddling, I could get them very close indeed. A possible advantage of doing this work in SilverFast HDR is that you may save storage space, because the processed image is a 16-bit per channel TIFF with no layers. As well, if you don’t like what you did, you can revert to SilverFast HDR and re-adjust it as much and as often as you like without rescanning it. As long as you revert to the original scan from the SilverFast VLT, you may rework the image starting from settings saved for that image in SilverFast HDR, safe enough from visible information loss in a 48-bit image scan.
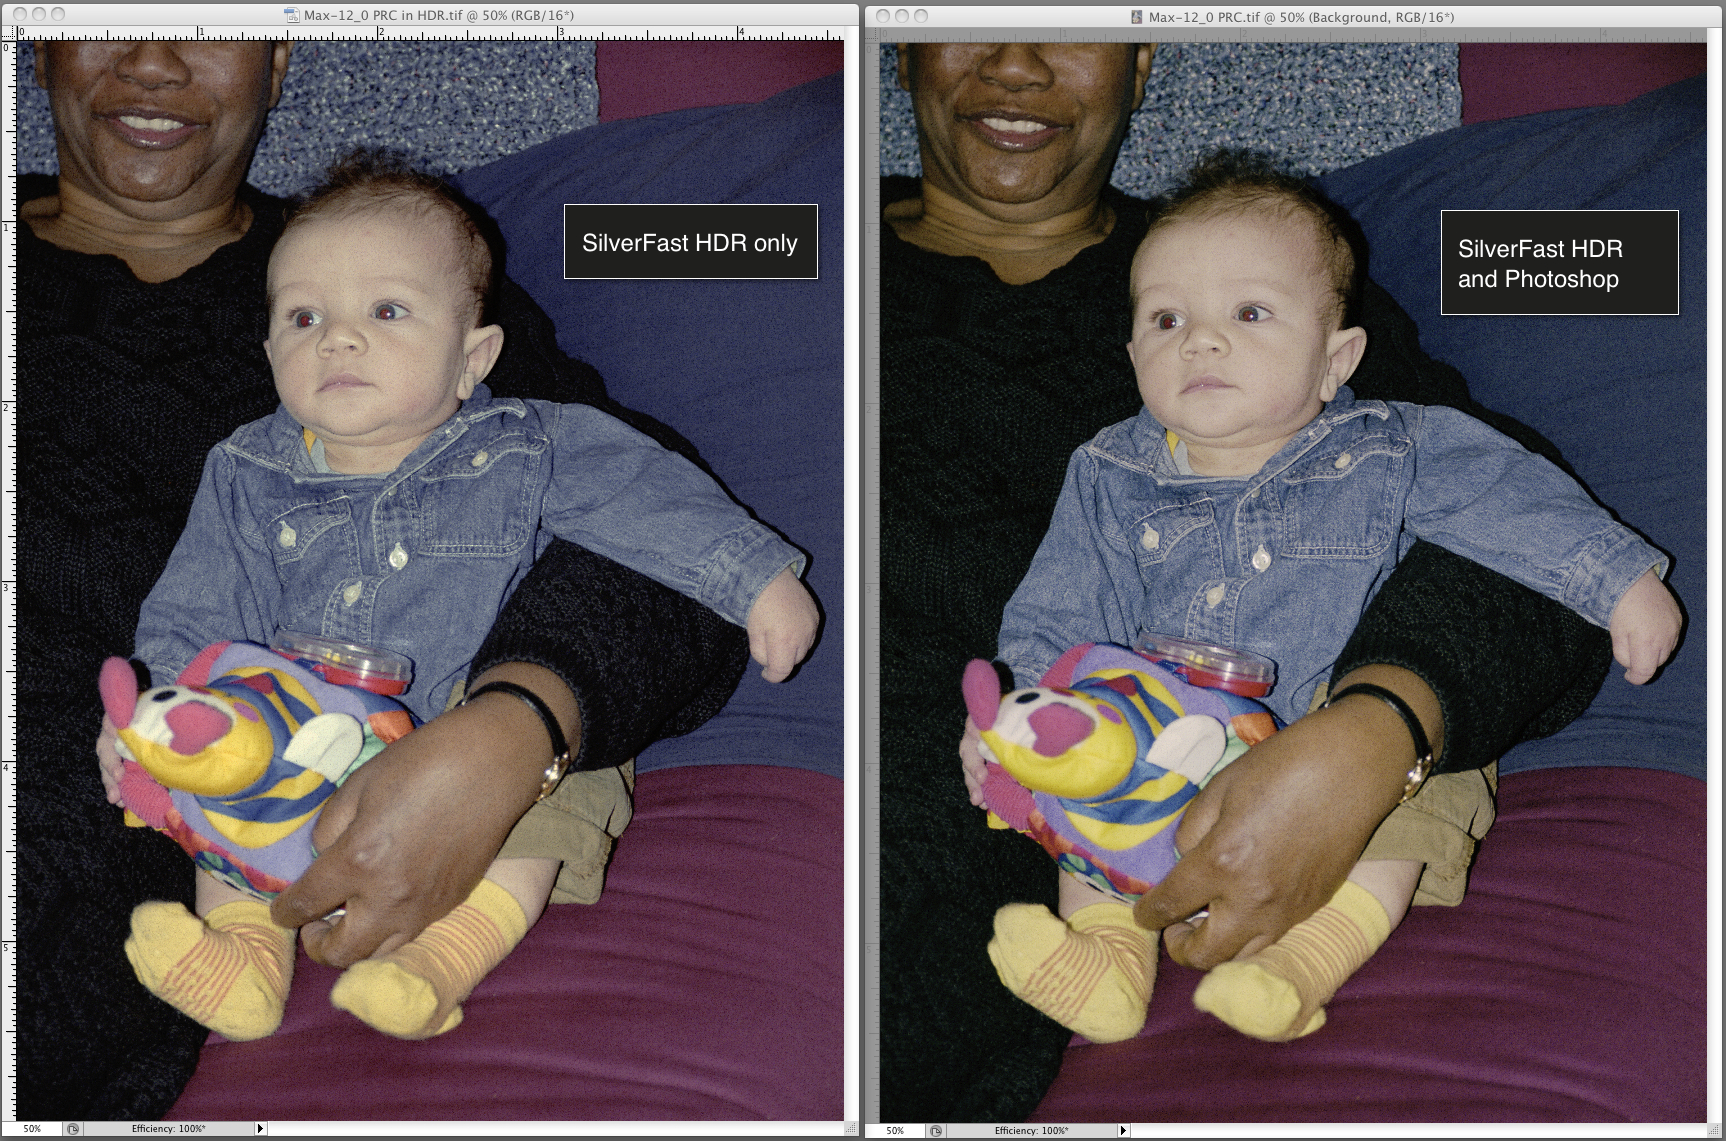
Figure 10
Stage 3 Alternative (B) – Use SilverFast HDR in Positive to Negative Mode
(16B) Implement Step (15) by doing Stage 1 steps (2) to (9) inclusive, except in Step (2) change the Transparency type to “Positive”, in Step (7) set the job type as Transparency Negative, and in Step 9, select “48-bit Color”.
(17A) Before you proceed to “Process” the scan, implement any image adjustments of tone and colour you wish in SilverFast HDR, change the file name, then Click on “Process”.
You will find that this yields a satisfactory conversion, with far less work and smaller file size than its Photoshop comparator (Figure 11). Here again, colour balance differs a bit, but they could be brought closer with more work.
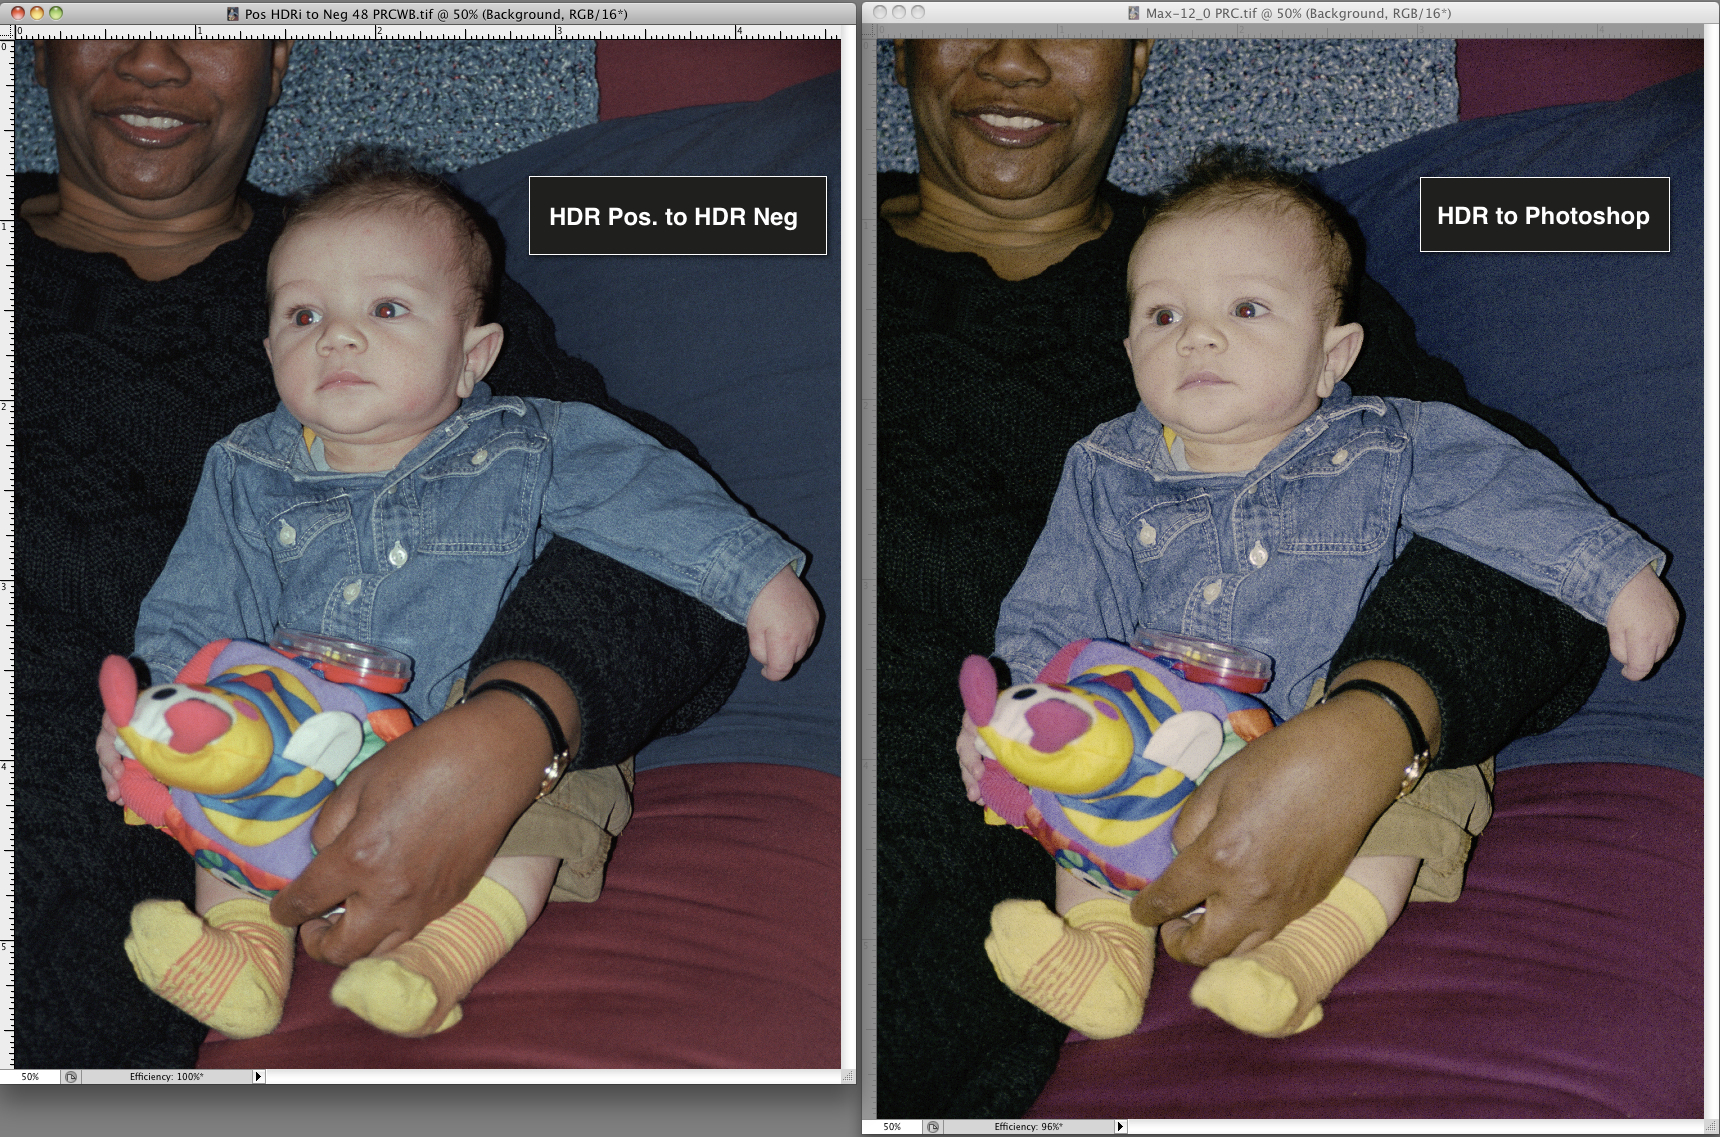
Figure 11
The Shaken-Down Approach:
Many steps in the first procedure above to send a “raw” negative scan for processing in Photoshop can be avoided by doing something much simpler, provided your image frame includes a bit of unexposed negative material within it.
The steps are as follows:
(a) Implement above Steps (2) to (10) inclusive using the negative of your photo with some unexposed negative material included in the scan frame.
(b) Open the image in Photoshop, where it will be a negative.
(c) Make a duplicate image layer.
(d) Invert it (CMD/CTRL J)
(e) Add a Curves Adjustment Layer clipped to the duplicate image layer and change the Blend Mode to “Color” (Figure 12A, orange arrow).
(f) Use the Black eyedropper (Figure 12A, red arrow) and click it on the unexposed film strip (Figure 12A, green arrow). This removes the orange mask and creates a black point for scaling the colour. The image starts-out looking flat and dull, but can be adjusted in Photoshop, especially by adding a new Curves Adjustment Layer in Normal Mode and adjusting the black and white points. Figures12A and 12B show it before and after further adjustment.
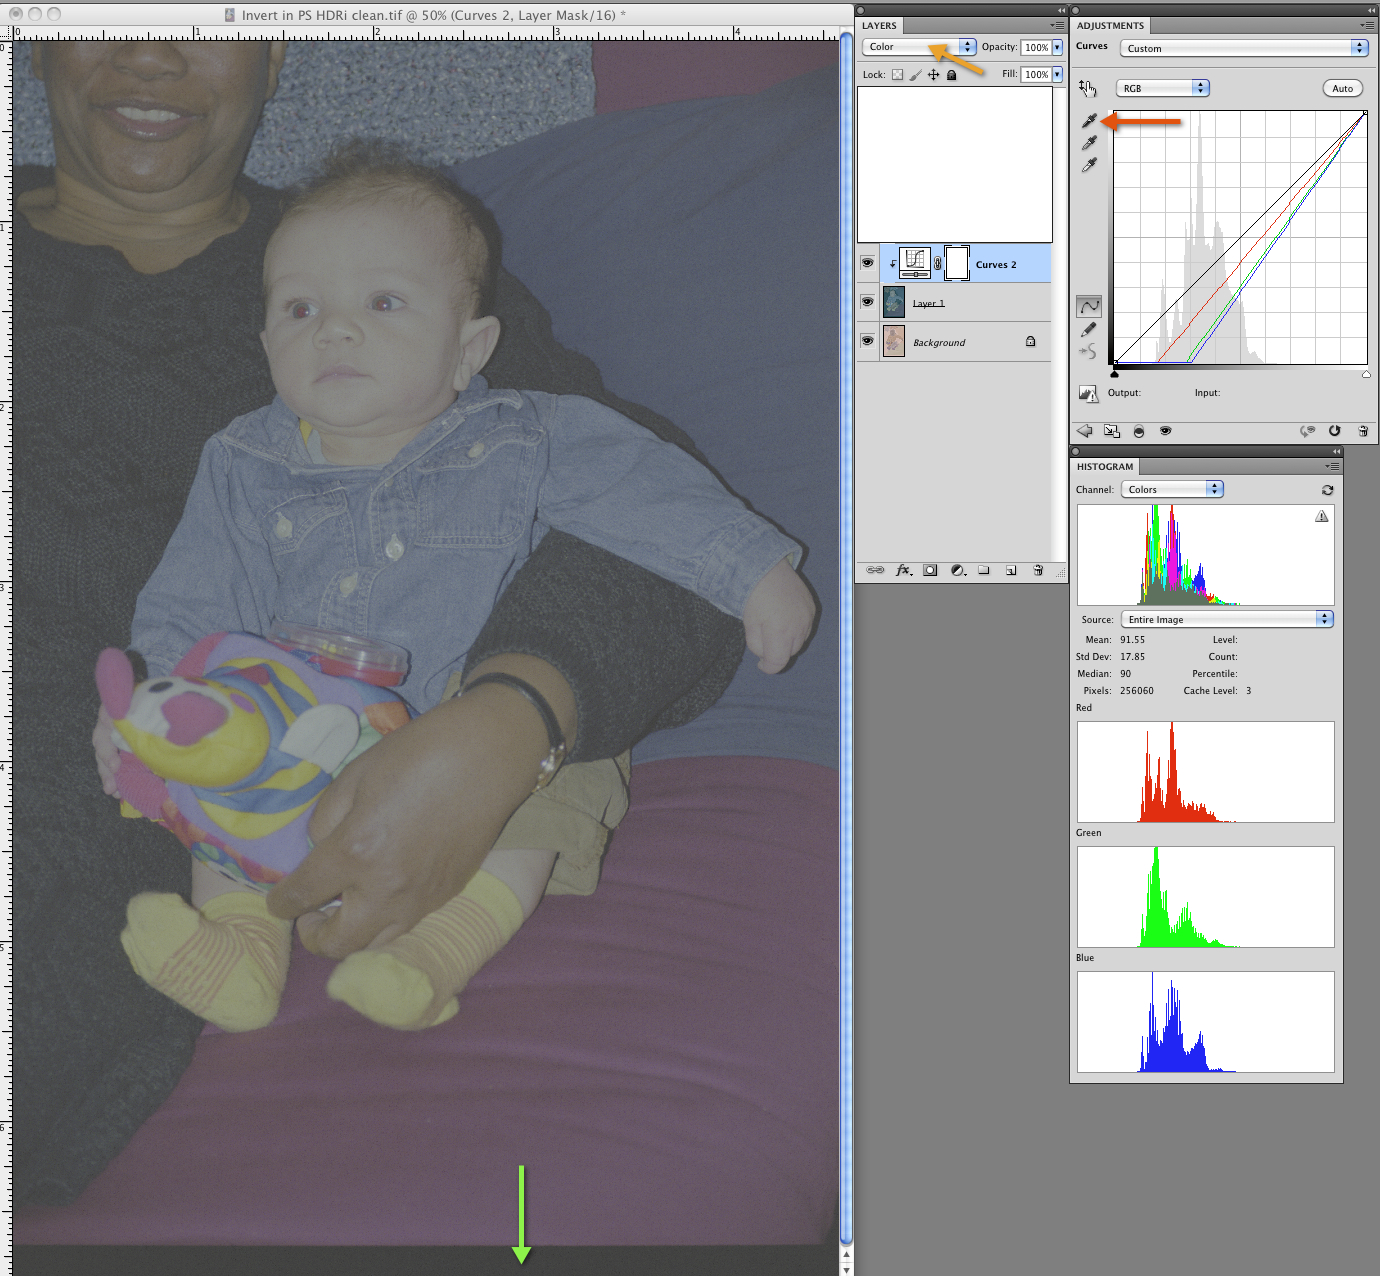
Figure 12A
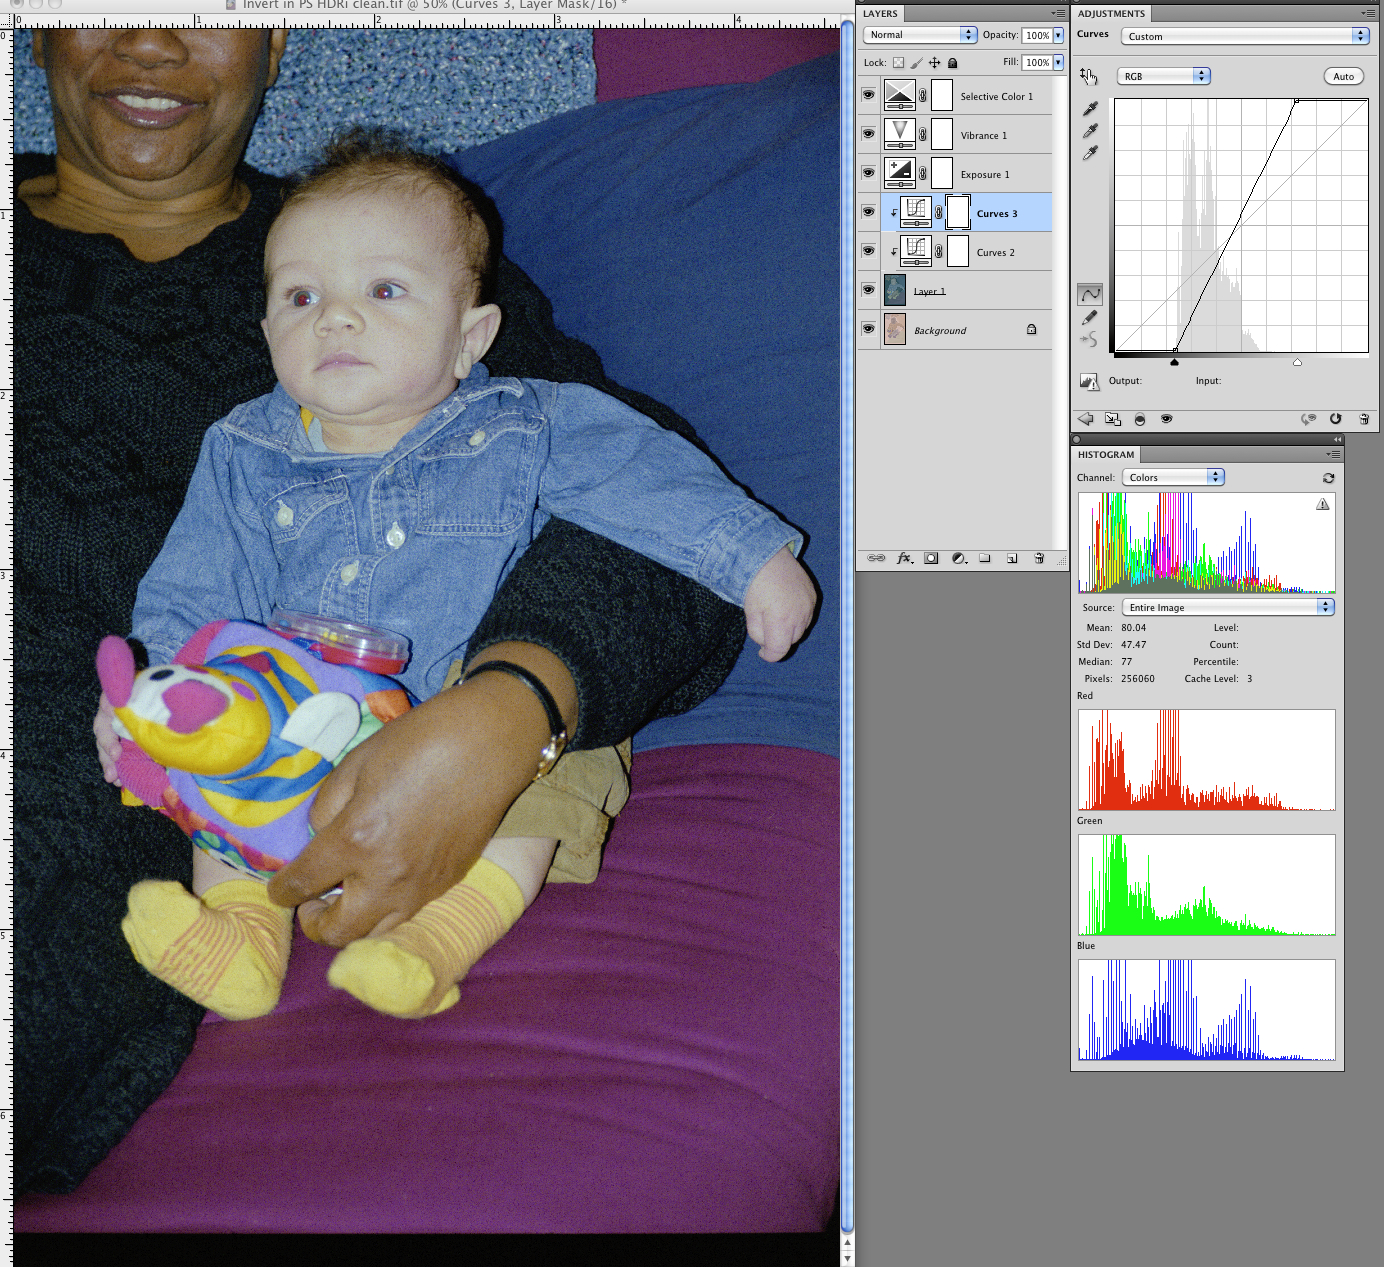
Figure 12B
This approach may be less satisfactory than some others, because it can require quite a number of subsequent adjustments to knock the image into acceptable tone and colour, as seen in Figure 12B.
An alternative approach after (b) above is to do as follows:
(c1) add a Curves Adjustment Layer;
(d1) use the White eyedropper on the blank negative space to set a white point;
(e1) create a Stamp Layer of the Background and the Curves Adjustment Layer by selecting them both and doing CMD-OPT-SHIFT-E (Mac) or CTRL-ALT-SHIFT-E (PC);
(f1) invert the Stamp Layer (CMD/CTRL I) and make further adjustments.
This also produces a usable positive result (Figures 13 and 14).
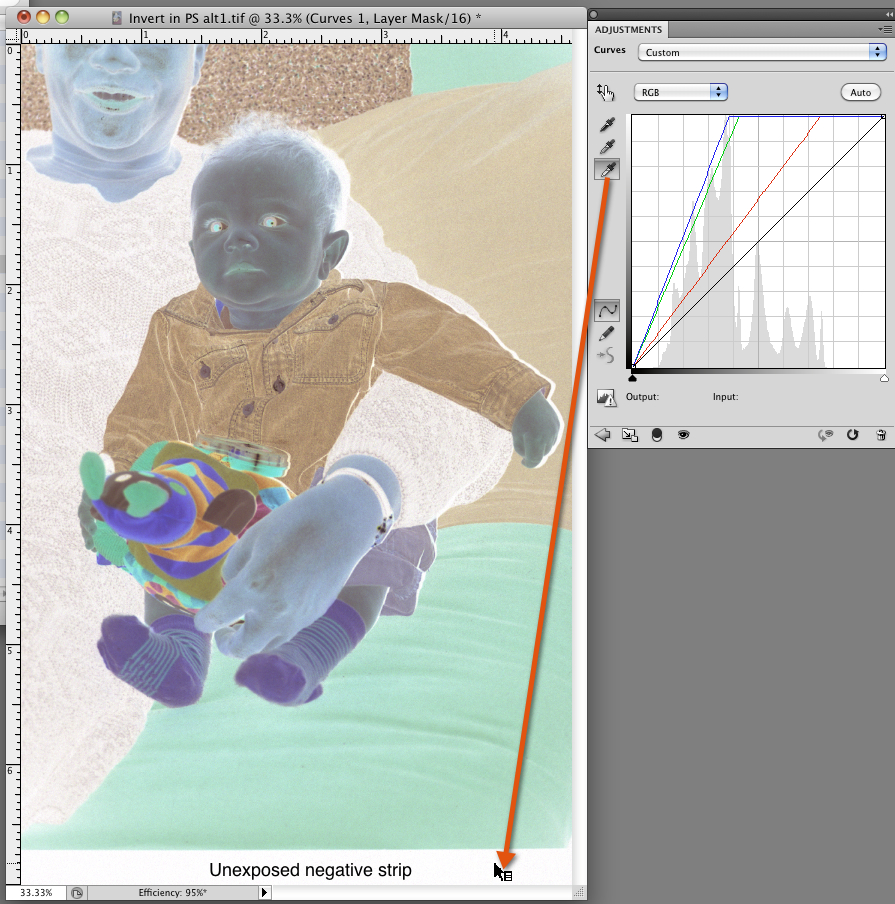
Figure 13 (Steps c1, d1)
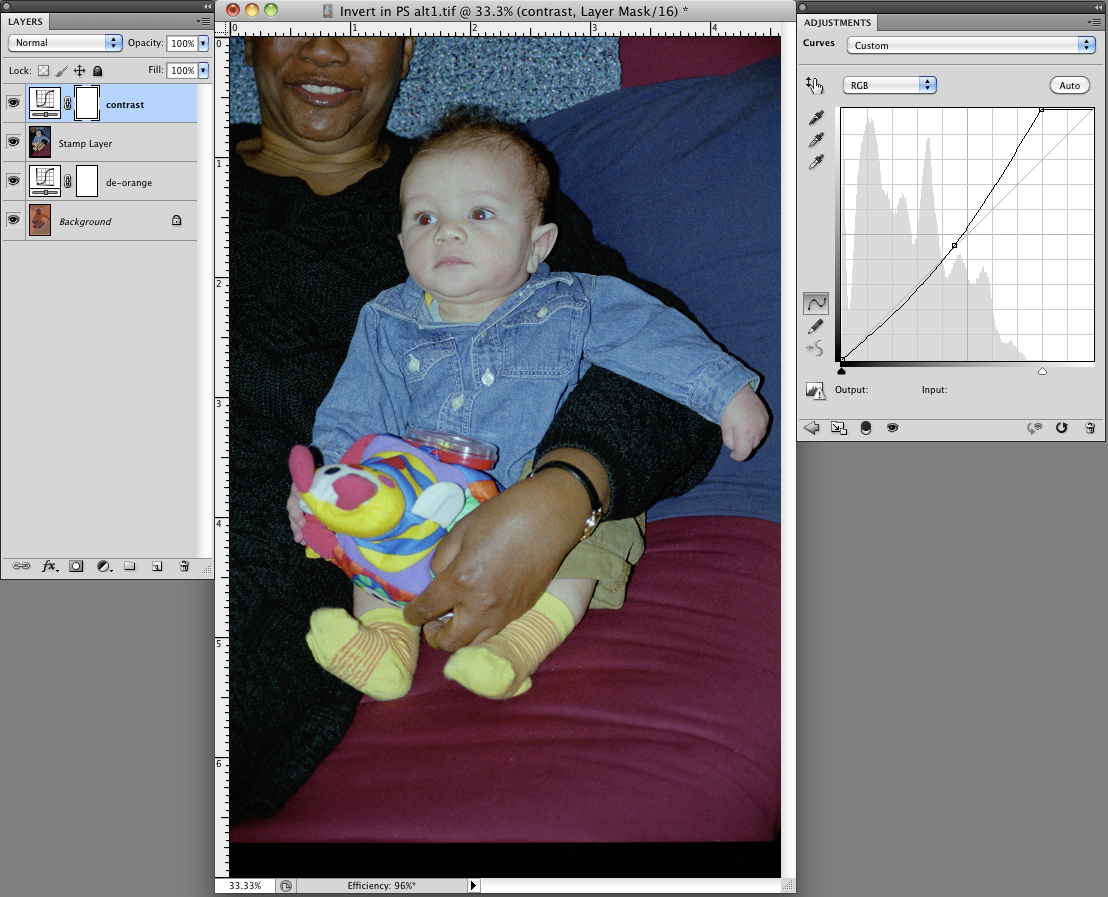
Figure 14 (Steps e1, f1)
The number of times I’ve implemented either of the “shaken down” procedures, I found it often challenging to knock the image into a satisfactory state of tone and colour, and the outcomes may or may not be totally satisfying.
The Easy Way:
In the final analysis, there is simply using SilverFast Ai in normal 48-bit Color mode, with Negafix, the SilverFast tool for converting a negative film scan to a positive digital image. To use Negafix, do the following.
(a) In the General Tab select Transparency Negative. This will open Negafix, (Figure 15) which is a set of about 127 different profiles for various brands, subtypes and ISO speeds of negative films (legacy and current). Select the Negafix configuration corresponding with your film (if it is not a rebranded version). If your film is rebranded, select the Negafix profile which makes the image look best to you.
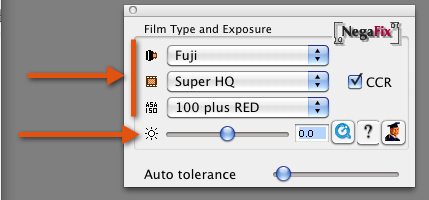
Figure 15
(b) It is quite possible that no negative profile will automatically optimize your images, even if the capture conditions included good exposure and colour balance. The conditions of film storage, development and other factors cause variance of outcomes relative to the test conditions in which LaserSoft Imaging configured these profiles. Hence you may need to “tweak” the most suitable Negafix profile you selected. Conscious of this situation, SilverFast provides a very effective toolset for adjusting Negafix profiles.
(c) To tweak a Negafix profile, first examine carefully what aspects of the negative to positive conversion need correction. If you think it is mainly a matter of exposure, use the exposure slider immediately under the film selection dialogs. If you think the overall colour balance may be an issue, try adjusting the “Tolerance” slider – this adjusts the orange mask impact on highlights (both controls shown in Figure 15 above).
(d) If neither of these adjustments suffices, you should then enter the Expert Dialog, where you have the individual RGB tone curves underlying the profile’s behaviour (Figure 16). You may reshape these curves to produce the colour balance and tonality you prefer, and use the “Expansion” tab for adjusting saturation of individual colour groups. The same principles of curves adjustment that apply in Photoshop apply here. Once you have a set of adjustments that work well, you may save them as a new film preset for all images using the same film stock.
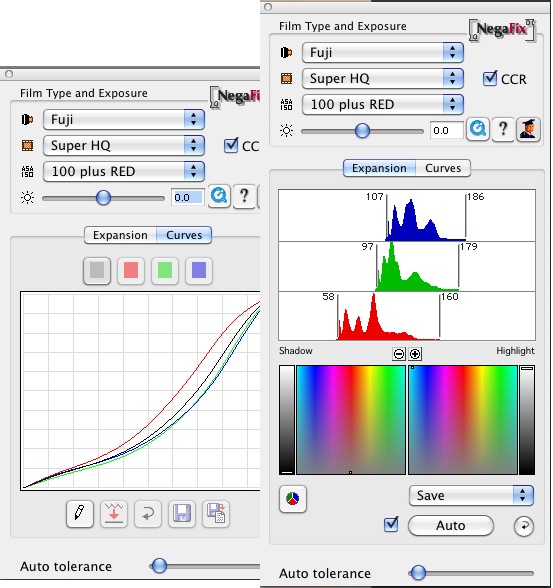
Figure 16
(e) Once the correct Negafix profile is applied and a few tweaks (to taste) made with the colour and tone controls in SilverFast, despite the fact there is nothing “raw” about this workflow, the resulting positive image opened in Photoshop compares well with any of the foregoing “raw” alternatives, and it is much simpler and faster (Figure 17 Negafix to Photoshop vs. HDR to Photoshop).
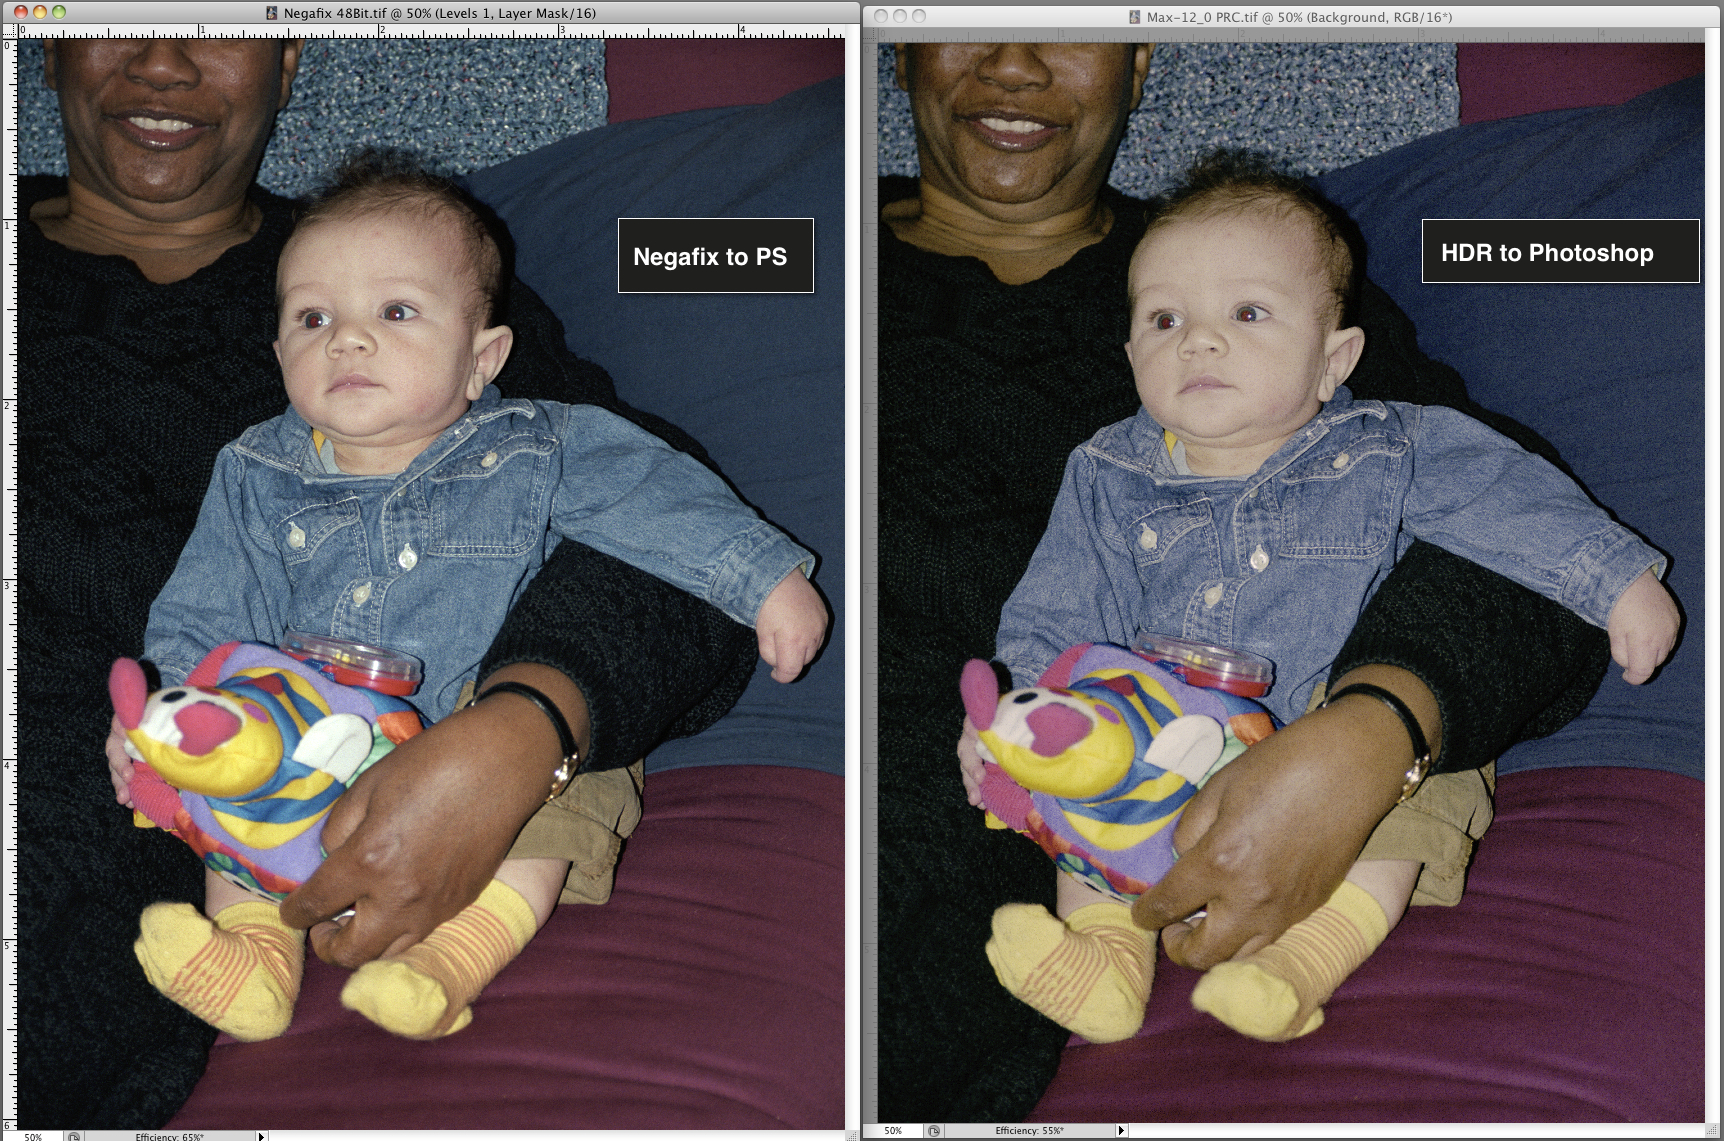
Figure 17
April, 2011
Download a PDF of This Article
Mark has been making photographs for the past six decades and started adopting a digital workflow in 1999 first with scanning film, then going fully digital in 2004. He has worked with a considerable range of software, equipment and techniques over the years, accumulated substantial experience as an author, educator and communicator in several fields and is a frequent contributor to the Luminous-Landscape website. Mark developed a particular interest in film scanning and authored the ebook “Scanning Workflows with SilverFast 8, SilverFast HDR, Adobe Photoshop Lightroom and Adobe Photoshop” available on the SilverFast website. In his “other life” (the one that pays for the photography), Mark is a retiree from the World Bank Group and now a consultant in electric power development.
