![]() February, 2002
February, 2002
Pictographicshas announcediCorrect EditLab, an excellent new program that surpassesiCorrect Professionalin a number of areas. With its release the price ofiCorrect Professionalhas been reduced to $79.00.
![]() August, 2001
August, 2001
Version 3.0 ofiCorrectis now available. A number of my original gripes have been addressed and certain features added, like the ability to work on 48 bit images. There is also now the ability to have certain settings remember their value, or not, and other settings can be adjusted in fine increments. Together these make a really good product even better. The review below has been updated to reflect these changes.
Plugin to Better Images
I’m not a great believer in or user of image processing “assistants“. There are quite a number of these plug-ins to help one arrive at the best colour balance, brightness and contrast settings. Most are aimed at the beginner who might have a difficult time arriving at a preferred setting, or who is not yet familiar with the proper use of the tools available withinPhotoshop.
It’s been my experience that if newcomers become too reliant on these tools they fail to learn how best to do image correction on their own, and come to rely on these as crutches. This not is dissimilar to a photographer who always uses his SLR in fully Automatic exposure mode and who therefore never learns how to gauge and set exposure any other way.
Finally, till now I’ve yet to see such a program deliver results that are as good as what even a moderately competent person can achieve after some time learning how to use the basic tools inPhotoshop.
iCorrect
Nevertheless, I’m always on the lookout for any software that can make my life simpler and my work more efficient. Though my hard disk has a large subdirectory labeled “Rejects” I still am always on the lookout for useful software.
A new one that I can strongly recommend isiCorrect ProfessionalfromPictographics International. (Phone: 1-952-894-6247)
Illustrations courtesy Pictographics International
The program automates the process of arriving at proper settings for brightness, contrast and colour balance. This is a tall order, but remarkably the program does a very good job. Let’s see how.
iCorrectis a plug-in. That means that it works withinPhotoshop, just like any other filter. (It will also work with other image editing programs that arePhotoshopplug-in compatible.) The interface is very simple — even sparse by comparison with some. But the power of this tool is not to be diminished by its apparent simplicity. A very sophisticated piece of code clearly lies beneath the surface.
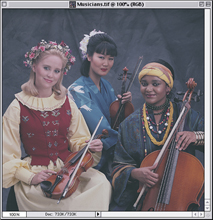
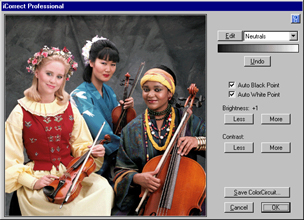
With your image selected (make sure that the focus is not on anAdjustment Layer) click onFilters / Pictographics / iCorrect. A roughly one quarter-screen sized window will open (as seen at the right, above) showing your target image. As you make changes these are reflected immediately in this window. When you are satisfied with the appearance of your alterations click OK and the filter will be applied to your main image.
Automated Intelligence
The first thing that you’ll notice are two check boxes labeledAuto Black PointandAuto White Point. With theseoffthe image in the preview screen will look the same as your uncorrected photograph. Click them and the program will automatically adjust brightness and contrast by establishing the proper points for the extremes of the exposure range. This is much like what you would do manually with the eye droppers inLevelsorCurves, except faster and apparently more accurately.
Next you will see a control calledBrightnessand under it a button markedLessand another markedMore. Similarly there is a control calledContrastwith identical buttons. These do what you would expect, being the equivalent of moving the center slider inLevelsfor brightness and the end-point sliders for contrast.
If that was all there was toiCorrectit would be convenient, but not terribly exciting. The real power comes into play with the colour balance controls.
Removing colour casts is always difficult. The colour temperature outdoors changes dramatically during the day and when moving from sunlight to shade. Large objects, such as red-rock cliffs, throw coloured reflections that can be difficult to identify and remove.
iCorrectcomes with 4 preprogrammed balance tools. The most useful one is “Neutrals“. Find a spot in the sample image that is white, gray, black or otherwise colour-neutral and click on it. Click on several different such spots. They’ll be averaged and any colour cast present in them will be removed.
Similarly there are pre-programmed tools forSkin,FoliageandSky. TheSkinselection is particularly effective when dealing with a variety of skin tones and types. I foundFoliageandSkysomewhat less effective.
These pre-programmed tonal set-points are supplemented by 6 blank positions. You are able to create colour set-points for any subject that you wish. So, for example, if you are in the habit of including a gray card in your shots, you can calibrate to it, of better yet, how about that yellow rain slicker that you always wear, or the green of your camera backpack? Just calibrate it and any shot that contains it in future can be instantly colour balanced. (For the studio photographer this includes background flats, or critical commercial items such as product labels).
A QuickComparison
The photograph below is of a bit of urban wall-art shot in an industrial area of Toronto. Nothing special, but a colourful test image done when I was shooting familiarity tests with theMamiya 7 IIin the winter of 2000. The wall was in deep shade.
I didn’t spend much time working on it originally — just some quick levels adjustments and visual colour balancing. The frame at the right is withiCorrect. Notice how much cleaner and more neutral the snow is, and the greater saturation of the wall colour. Possibly a bit too much so, but easily toned down.
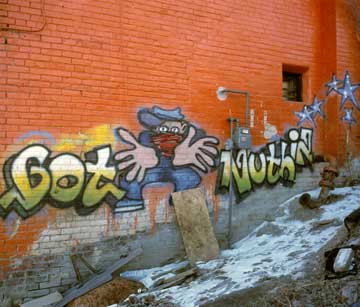
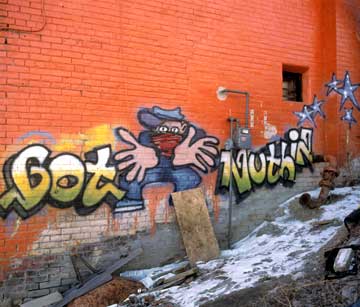
Manually Balanced Balanced with iCorrect
Gripes
My complaints with the original version were few, and with Version 3.0 there are even fewer. The install program still doesn’t copy the plug-in to the Photoshop Plug-In folder. You have to do it yourself. Other than that this is an extremely useful program. Recommended!
Conclusion & Disclosure
I normally buy almost everything that I review. This, and the fact that neither this site norThe Luminous Landscape Video Journalaccepts any advertising, ensures that my evaluations are as objective as possible. In this instance the manufacturer asked if I would be interested in seeing the program as soon as it was published, and sent me a review copy. I’m glad they did becauseiCorrectis now part of my everyday toolkit. If I had to buy a copy, now that I’ve seen what it can do — I would.
I regardiCorrectas the equivalent of the autoexposure setting in a camera in terms of convenience. It can do wonders for many images. Often, a couple of clicks iniCorrectcan accomplish as much as 10 minutes withLevels. Very nice to have, and I’m glad that it’s there when needed, but it’s no substitute for experience, learned skills and personal judgment.
iCorrect Professionalis available for download as a demo or online purchase. The price is U.S. $139.00.


Elevate Your Vision


Read this story and all the best stories on The Luminous Landscape
The author has made this story available to Luminous Landscape members only. Upgrade to get instant access to this story and other benefits available only to members.
Why choose us?
Luminous-Landscape is a membership site. Our website contains over 5300 articles on almost every topic, camera, lens and printer you can imagine. Our membership model is simple, just $2 a month ($24.00 USD a year). This $24 gains you access to a wealth of information including all our past and future video tutorials on such topics as Lightroom, Capture One, Printing, file management and dozens of interviews and travel videos.
- New Articles every few days
- All original content found nowhere else on the web
- No Pop Up Google Sense ads – Our advertisers are photo related
- Download/stream video to any device
- NEW videos monthly
- Top well-known photographer contributors
- Posts from industry leaders
- Speciality Photography Workshops
- Mobile device scalable
- Exclusive video interviews
- Special vendor offers for members
- Hands On Product reviews
- FREE – User Forum. One of the most read user forums on the internet
- Access to our community Buy and Sell pages; for members only.
You may also like