


A First-Look & Primer
By Michael Reichmann

This is a close up first-look at Adobe’s Lightroom, a new generation image management and processing application.
Because there are not yet any manuals or books available for Lightroom, and likely won’t be for some time, I have attempted to provide
an introductory primer on the program’s major features and functions. This report will by no means be comprehensive, but hopefully
along with Adobe’s training videos and online information, as it becomes available, we will all learn together how to make the most of Lightroom.
My recommendation, since Lightroom is free public test software, is for you to download it, and then use this primer to help understand
the program’s basic functionality. Reading this article without the program open in front of you will hopefully also be of interest,
especially to Windows users, who will have to wait another couple of months before a version of Lightroom for that platform becomes available.
Introduction
On January 9, 2006, Adobe announced a new software program designed specially for digital photographers –Adobe Lightroom. It will subsequently have been formally introduced atMacworldSan Francisco – January 10-13, 2006.
This is afirst – lookat this exciting new product, as well as a basic primer on its features and functions.
In a word or two, Lightroom is best described as next-generation photographer’s software. Simply calling it a raw file converter, or an image processing program, would miss the fact that Lightroom also is designed for sorting, cataloging, presenting and printing ones files. It is intended to offer photographers the vast majority of the tools that they need when working on their images – all under one roof. And, even though it’s from Adobe, it breaks with a number of thePhotoshopandCamera Rawparadigms, providing photographers with new, powerful, and in many cases easier to use tools for processing their images.
Announced in early January, and available immediately fordownload from theAdobe Labsweb site, Lightroom won’t go on sale until some time later in 2006. Instead, it is being released as a public beta trial, which will expire once the program is released commercially. What this means is that everyone is free to download and use the program without charge, though after it expires anyone using the program will be required to purchase Lightroom if they wish to continue to use it. (Various beta releases will expire at different times, but a version will always remain available for use until commercial release).
This first beta release of Lightroom is forMac OS Xonly. But, an essentially identical version forWindowsPCs will become available as a beta release within a few months. Both Mac and Windows versions will ship, likely simultaneously, later in the year, though one will not be held up by the other if not ready for release at the same time. Also, though the current version runs on a Mac / Intel machine in emulation mode (somewhat slowly I’m told) a native Intel version for these new computers will be available at the time of commercial introduction as well.
Library – Grid ViewLibrary Loup View
Library Compare ViewDevelop with magnificatio
n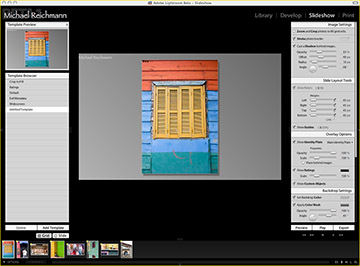

Slideshow ViewPrint View
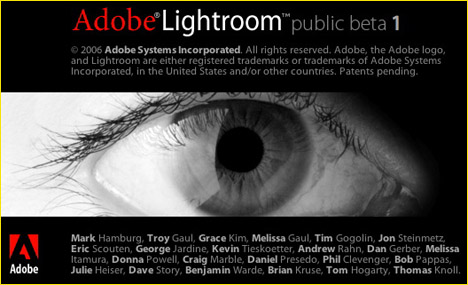
Figure 1
The Lightroom interface showing the screen view in each module
Some Background
Photoshopis arguably the 800 pound gorilla of the digital photography world, and these days digitalmeansphotography. Now in its 18th year, the brainchild ofThomas and John Knollhas gone from being a tool primarily for graphic artists and pre-press people, to the dominant program used by photographers around the world.
It is not without its problems though. Now on Version #9 (dubbedPhotoshop CS2), the program has been described by pundits as something of aFrankenstein. No, not because its evil, but because it has grown with a part fromhere, and a part fromthere– with a feature designed forthisconstituency, and another forthatone. In trying to become all things to all people (at least those in the imaging arena), it has become a heavyweight product, but also one encumbered by a lot of baggage.
With the extremely rapid growth of digital image capture, during the past several years Photoshop has grown and morphed yet again, this time into a primary tool for photographers. This has happened through the addition ofCamera RawandBridge. Camera Raw is the brainchild (again) of Thomas Knoll. When Thomas bought his first DSLR is 2002, he quickly became unhappy with the rather under-featured raw converter supplied with it, and so he simply sat down and wrote his own. This evolved intoAdobe Camera Raw, and now is at Version 3.3. It has subsequently become one of the most powerful and full-featured raw file processors available. It supports more than 100 raw file formats and comes bundled with Photoshop, along withAdobe Bridge, a stand-alone utility for browsing and organizing image files.
Photoshop has become an industry. There are literally hundreds of books in print about its use, training seminars and courses, dedicated magazines, regular columns in various online and print publications – even a dedicated annual trade show– all just for Photoshop and its related products.
Now comes Lightroom. It is natural to want to ask – where does Lightroom fit in? Is it a replacement for Photoshop and Camera Raw?
The answer isn’t straightforward. For a large percentage of photographers, Lightroom will likely provide all of the image management and processing capability that one could wish. But for others, only Photoshop’s advanced capabilities and sophisticated features will suffice. Some will love one, and hate the other. Many will use both. It’s all about choices.
If one has been using Photoshop for the past 5-10 years it all seems quite natural and straightforward. But if you’re coming new to Photoshop, the learning curve is quite steep. Otherwise we wouldn’t have entire libraries devoted to it, and a whole industry of trainers and courses available.
As for Camera Raw, Lightroom is based on its core functionality, including its ability to read virtually every raw file in existence. My opinion is that because of Lightroom’s enhanced controls and additional features, if youlikedCamera Raw, you’llloveLightroom.
After having spent considerable time with Lightroom (under its alpha test nameShadowland), I believe that Lightroom will find a home on a great many photographer’s computers, even those who already own and use Photoshop. Each program will do some things that the other won’t, along, of course, with many things that the other will. Either will be found to be suitable forsomephotographer’s needs, while many will prefer one over the other. Sounds a bit mealy-mouthed, I know, but it’s the situation when there are rich choices available in any marketplace.
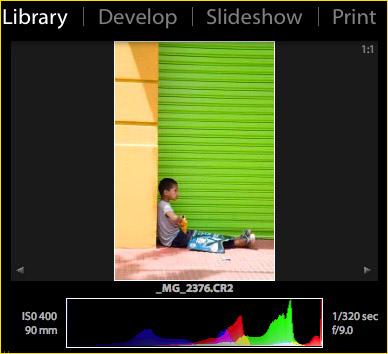
Figure 2
The Module selection menu showing the currently selected image
along with file name, EXIF data, and RGB histogram
What About Apple’s Aperture?
It would be disingenuous to look at Lightroom without discussing Apple’s recently introducedAperture. Mynon-review of Apertureappeared here on January 4th (actually late on Jan 3rd, Eastern Time). Though the conspiracy theorists will claim otherwise, it was posted about 15 hours prior to my first learning that Lightroom (AKA Shadowland) would be announced and released for public beta on Jan 9th. Up until that time I had no idea when the program would be released, or what its marketing name would be.
But, what I knew and when I knew it is neither here nor there. (How’s that for a turn of phrase?) If you’ve read my Aperture comments you’ll know that I found the program to be almost unusable in its current form. Too slow on today’s hardware, too many bugs, using a restrictive unitary database architecture, Mac only, fancy looking but under-featured, and not able to produce competitive raw conversions. I wrote that I believed that the program has great potential, but that in its current form I can’t use it myself, or recommend it to others. Great promise though.
These comments were made independent of Lightroom, as I had no idea in late December (when the Aperture review was written) what Adobe’s plans were for announcing and releasing its new program, which was still in its alpha-testing stage. For all I knew then it was still as much as 8-12 months away from release.
With that out of the way, while I won’t be doing any sort of side-by-side comparison (though I’m sure someone will soon enough), I will make a couple of observations.
Aperture is designed around a unitary database. In other words, it only knows about and can process and index files that lie within it. This has some theoretical advantages, but also a great many limitations from the user’s point of view. For example, an Aperture database can only be as large as one hard drive. Files located on other drives can not be part of an Aperture library. True, one can have multiple libraries, but then one can not sort, catalog, transfer and otherwise work with files between libraries.
Lightroom, on the other hand, uses a contemporary relational database structure. This means that while youcanput your files directly within a Lightroom library, you don’t have to. You can add files to the Library that are located anywhere, on any drive.
Much has been made by Apple of the fact that Aperture works on raw (and other files) nondestructively. In other words, editing changes made to a raw file are simply a set of instructions, and the raw file itself is untouched. Well, the reality is that’s what Camera Raw does as well, and has for several years. It’s only when a file is sent to Photoshop that the raw editing instructions are “baked” into the file, while of course the raw file itself remains untouched.

Snack Time. Buenos Aires, Argentina. December, 2005
Canon 5D with 24-105mm f/4L IS lens @ ISO 400
Because Lightroom is a comprehensive environment for working on digital image files it follows the same paradigm as Camera Raw of nondestructive editing, but then follows through to all aspects of image processing in the same manner as Aperture. In other words, any editing changes made to a file (raw or otherwise) are simply a set of instructions tagged to that file. From file import, though sorting, cataloging. labeling, tagging, editing and printing – everything done to the file is non-destructive, and is simply a set of instructions applied to the file when its sent to the screen or printed. If you want to send a file to Photoshop for some special manipulation you can, but it then comes back as a new file.
Finally, any file within Lightroom can be exported to a new separate file, in different file formats, and with all editing applied. Currently JPG, TIF and DNG output are supported (though curiously not Photoshop’s own .PSD format). More formats will be added as the beta program evolves, I’m sure. One current limitation is that Lightroom does not play well with files containing Layers.
So, is Lightroom Adobe’s response to Apple’s Aperture? In a way, yes, but it wasn’t originally intended to be. Lightroom was begun more than 18 months ago as a project to create a new paradigm for image management and processing. It’s rather remarkable given the time span how similar in overall concept the two programs are. It’s almost as if this is a design concept whose time had come, and both companies saw it coming roughly simultaneously.
So now we have both Aperture and Lightroom. Features and limitations aside (and both have lots of each), what needs to be understood about their differences, other than features and functions?
Aperture is a Mac OS X only product. It will certainly be updated to run on the forthcoming Intel-chip based Macs, but a Windows version seems unlikely since the program’s raw file processing capability is built right into the core of the Mac operating system. So, unless Apple decides to port an Intel chip oriented version of OS X to run on machines designed for Windows, Aperture is likely to remain a Mac only product. It is currently available at retail, and carries a list price of US $500.
Lightroom is also now available, but as a public beta test version, and currently only for Mac OS X. A Windows version will follow in a few months, as will an Intel / Mac version, and all three will ship commercially later this year. For the moment Lightroom is free, though when commercial release happens we will have to pay for it. No word yet on price. I don’t think that even Adobe really knows or has decided what the price will be. But, it’s safe to assume that given the competitive nature of the marketplace it will be priced below Aperture. No crystal ball needed for that one.
Possibly the biggest difference between the two programs is that taken by both companies to market introduction. While Aperture shipped as a finished product with a hefty retail price, for those that were willing to give it a try, Lightroom is free for those wishing to see what it’s all about. It is not complete, initially has missing features, and is a bit buggy (but so is Aperture). But Adobe has set upa forumwhere they will be actively soliciting user feedback as well as suggestions for features and functionality in the final product. They appear to honestly want to know what features users want. Apple has such anonline forumas well, but Apple reps do not appear to be active on it in terms of responding to contributors feedback. Time will tell if Adobe will be more responsive.
Finally, whereas Aperture appears to consist of a closed architecture, Adobe has learned of the value of plug-ins from its many years with Photoshop. It can in many ways be argued that it was its open plug-in architecture than contributed to Photoshop’s huge market success.
Lightroom takes a similar approach, indeed carrying it even further than did Photoshop. As you’ll see in my overview of the program below, Lightroom consists of four modules –Library,Develop,SlideshowandPrint. The program’s architecture is such that each of these modules is able to read and write data to the underlying Library and data structure. This is done in a fairly seamless manner.
According to Adobe, they will be creating anSDK(Software Developer’s Kit) so that outside programmers can develop modules to be integrated into Lightroom. This should be able to allow them to provide a rich working environment for their add-ons, that will appear to the program and the user as if it was an actual part of Lighrtroom – because in fact, it will be – at the same level of integration as one of Adobe’s own modules. Don’t look for such add-ons though until after Version 1.0 of Lightroom ships, later this year.

Figure 3
The Library’s display-type selector
The Library
![]()
Figure 4
Import
Lightroom gives the user two choices when it comes to file handling. The first is to have the program handle all image files based on their existing location, as determined by the user. In other words, if you like organizing your files so that you have each month’s projects in a directory, and then all the months on one drive… or by client or subject and then spread them out over any number of dispersed directories and drives, you are free to maintain this structure. Simply tell Lightroom where the files are, and they are linked into the Lightroom Library.
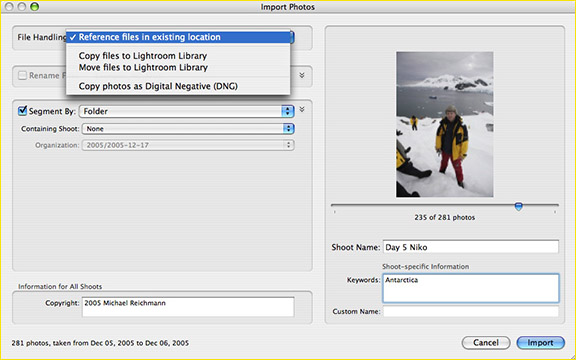
Figure 5
The Import Screen
Figure #4 above shows the Importand Exportbuttons. These are located on the lower left hand side of the screen whenever the Library function is selected. When you press Import the screen shown in Figure #5 above is displayed. Here you can choose whether to simply Referencethe files for the Library and leave them where they are, Copythe files into Lightroom, or Movethem into Lightroom.
Referencing them leaves the files where they are, and simply allows Lightroom to create indexes and thumbnails that it will use in its database. Even if the drive that holds the files is subsequently offline at some point Lightroom still can display its thumbnail, though obviously nothing substantial can be done with the file until its drive is back online.
Copying the file to Lightroom leaves the file in its original location but places a new version of the file within the Lightroom database. This approach can be wasteful of disk storage, though it does lead to a backup being created. The third alternative is to Move the files from their current location into the Lightroom database. This removes the files from their original location as they are copied, leavinginside Lightroomas the file’s only location.
There is a fourth alternative, which is to copy the images into the Lightroom database as DNG format files. This is potentially the most appealing of the choices because in one action it creates a non-proprietary DNG format backup of your files in a second location. DNG conversionandbackup, all at once. I like it!
As can be seen in Figure #5, you have as well the ability to retain the folder names as originally created, structure the files by shooting data, apply a Copyright notice within the IPTC data fields of the file, and also apply Keywords to all transferred files. Down the road I would like to see an IPTC template capability added to this, such as is found within Photo Mechanic.
In understanding the choices that Lightroom provides it’s important to keep in mind that the Library can either be the home for your files, or simply a place which references the file at its location somewhere else. If you leave the files elsewhere your library will remainrelativelysmall, because it only will contain thumbnails and metafiles (instructions and additional information related to a file). If you choose to import your files themselves into the Lightroom Library, then the library will, of course, be much larger.
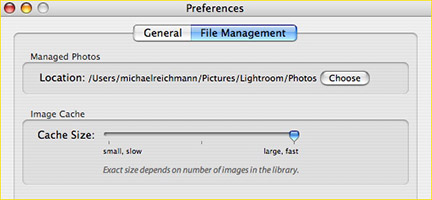
Figure 6
In Lightroom Beta One only one Library is supported. One feature that is on Adobe’s wish list is multiple Library database synchronization. This would be very welcome by those that travel on shoots with a laptop computer, and then wish to add their location shoot Library to their permanent one back at the studio.
The final decision as to whether to leave your files in directories that you create yourself, or place them directly within the Lightroom Library, will very much depend on your working style as well as the volume of work that you manage. If you’re a professional or other photographer who produces hundreds of Gigabytes of files a year, your only choice may be to manage the directory structures yourself. But if your shooting schedule is somewhat less demanding, or you’re the type of photographer who used to keep their slides and negatives in a shoe box rather than a cataloged file cabinet, allowing Lightroom to ingest your files directly into the Library may be the preferable approach.
Note that unlike the dedicated image cataloging programIView Media Pro, reviewed here recently, Lightroom does not currently allow for “watched” directories. This is a capability which I will strongly lobby for, as it means that when working with external files (those that live outside of the internal Lightroom Library database), one needs to keep track of any files that are added or deleted. When working with an ongoing project – one lasting weeks, months or even years, having directories which are automatically updated within the Library is almost a must.
A Word of Caution
Give some thought to where you want your Library to be located. This applies both to Libraries containing imported files as well as ones that simply reference external ones, and therefore only contain thumbnails. Even these can grow quite large, quite quickly. Thumbnails of high-res raw files can be well over 1MB each.
In Beta One, once a Library is created, it can’t be moved. You can add additional linked Libraries usingLightroom / Preferences / File Management / Managed Photosbut you can not move an existing Library elsewhere. In other words, you can create a number of “managed” locations for storage of your files, but as of Beta One, you really only have one database.The implication of this is that if you are using a laptop, for example, and specify your built-in drive as the first home for your Library, you can’t simply shuffle it off somewhere else if it starts to take up too much room.
You’re therefore probably best off locating your Library on a fast outboard drive with lots of space. At the moment, in Beta One, there is no mechanism for moving or merging libraries, though this is bound to be addressed in a subsequent release. Don’t let this limitation of Beta One deter you though from experimenting with a Library on your main drive. Just be aware that if you adopt Lightroom as part of your workflow, you may not want to have to duplicate the effort of rebuilding your Library elsewhere some time down the road. There is also currently no means for conveniently backing up a Library. This is a good reason, in my view, fornothaving the Lightroom Library as the sole repository for your files, at least for the time being.
______________________________________________________________
Export
While your original raw files or JPGs can live either within the Lightroom Library, or externally, you will frequently want toExportthe files to other locations, for web use, editing with another program, burning to a backup DVD, etc. Transferring a file back and forth to Photoshop is simply a matter of pressingCommand-E, or selectingPhoto / Edit in Photoshop CS2from the drop-down. You can also designate inPreferenceany other editing program that you would like to use, and it will show up under thePhoto / Edit in… menu item. Within the Preferences menu you can also designate whether the file should be transferred into Photoshop in 8 bit or 16 bit mode.
TheExportcommand (see Fig. 3) which is located bottom right of screen when using theLibrarymode, presents the following menu when selected.
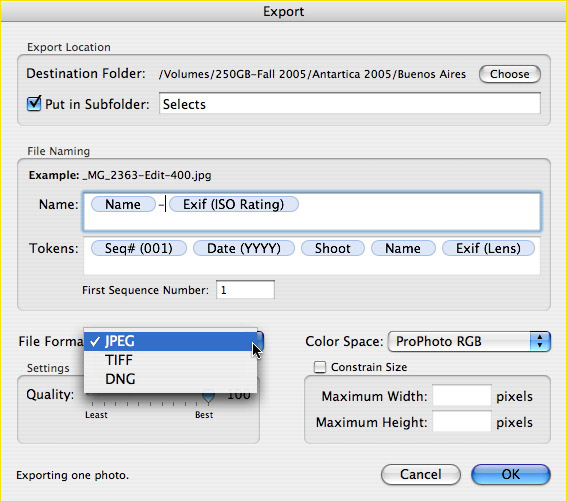
Figure 7
You can designate here where the files should be exported to, in which format, and select a preferred Color Space and quality level. You can also do some rather clever naming, using the ‘tokens” provided. So, for example, by having dragged the EXIF token onto the Name field and then within it selected theISOoption after theNametoken, my exported file will now have a name consisting of its original camera name plus the ISO that it was shot at. If before choosing Export I had selected a group of files in the Library browser, I could export all of them and have each one named appropriately along with the ISO at which it was shot included in the new file name.
I’ve mentioned that the current version can Export to JPG, TIF and DNG. DNG export is an exciting capability, because it means that you could raw process a file in Lightroom, and then export it so that it could be subsequently read and processed by another raw converter. Why do this? One example would be if you wanted a program such asDxO Optics Pro,which does specialized optical corrections, to be able to work on your raw file, but preferred to have Lightroom act as the actual raw processor.
That’s the good news. The bad news is that for the moment no raw processor can understand a DNG file that is exported out of Lightroom with raw processing metadata attached. Not even Lightroom itself. But this is bound to change for the better over the coming months. (Remember – Lightroom is a Beta Test program, and, as this is being written, many months from commercial release ).
______________________________________________________________
Quick Develop

Figure 8a
Located at the lower right side of the screen when in Library mode is a tabbed section withQuick Develop at the top, and a tab calledInfo, and another calledEXIF Metadatabeneath it.
Quick Developis a subset of the more compete image processing commands found on theDeveloptab, which will be described further below. The idea is to provide you with some basic controls, without the necessity of having to switch to the more full-featured Develop tab. Notice the line“Continue work in the Develop module…,” which does exactly that, if you feel that you need for the more powerful and flexible tools found in Develop. Also note the item called Presets.These are described later in this article, but what you’ll find is that these are a series of image processing parameters that ship with the program, and which also can be created and customized by the user.
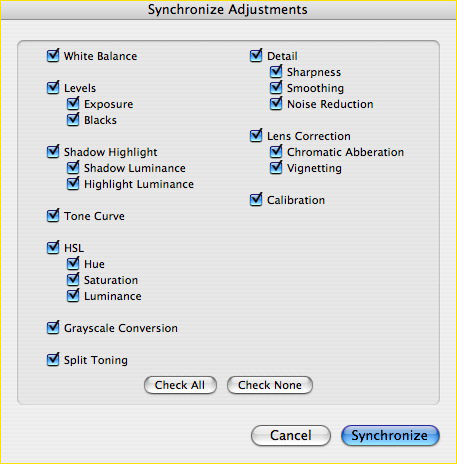
Figure 8b
Notice the Synchronize button. It allows you to take any individual setting, or subset of settings that may be applied to one image and apply them to any others. TheCopyandPastebuttons allow the same thing on an individual file basis, though multiple selected images can have new settings pasted to them as well. It’s simply a matter of user choice as to which method is to be preferred.
Make a mental note that when we look at Presets later on in the full Develop module, these provide a method for saving image control settings as reusable groups with user defined names.
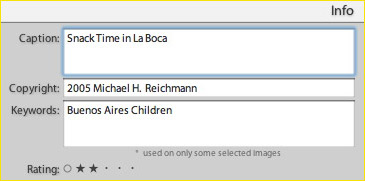
Figure 9
The next tab isInfo, which contains captioning, copyright and keywording fields. These are both for display as well as updating. The third tab,EXIF Metadata(Fig 10 below) operates similarly, providing you with all of the file’s camera-recorded metadata, which is also displayed in brief beneath the large thumbnail above this section of the screen (Fig 2 above).
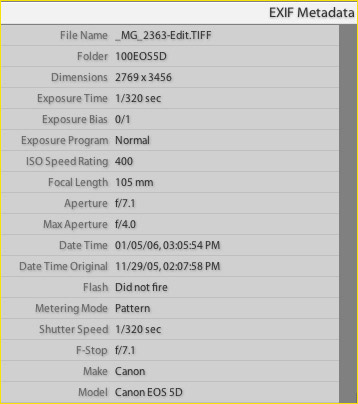
Figure 10
______________________________________________________________
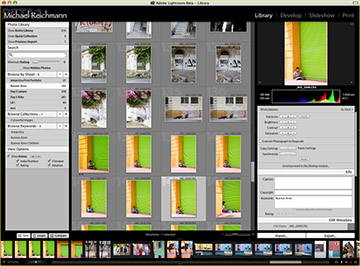
Grid / Loup / Compare
![]()
At the lower left of the Library module screen is a selection for how the center section of the program’s screen can be used.Gridshows image thumbnails in varying sizes, from several dozen at a time down to as few as a single image. Their file names and a sequential numbering sequence are also shown, though these are optional.
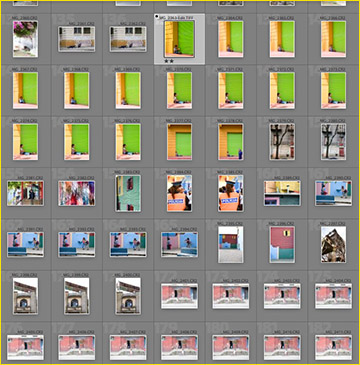
Figure 11
Rolling your mouse cursor over the image shows two of the thumbnail sizes possible
When the mouse cursor is passed over an image, it is highlighted, and a number of functions become accessible, as shown in Figure 12 below.
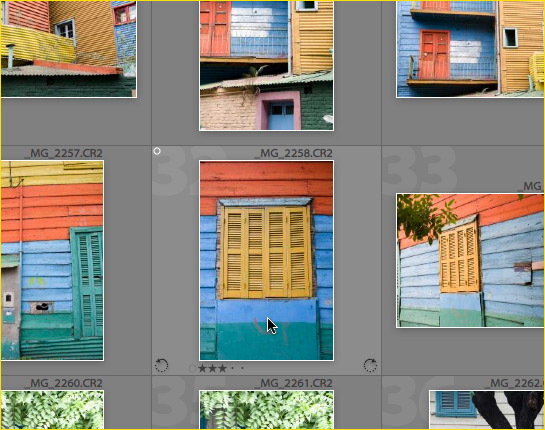
Figure 12
These include the ability to rotate the image by 90 degrees in either direction, and the ability to rank the image with from one to five stars. Later these rankings can be used to sort images for display and other purposes. Ranking can be done by clicking on one of the five dots beneath each thumbnail, or by pressing the keys 1-5. The 0 key removes ranking.
Here’s a little trick – click on an image while theOptionkey is being held down. The image will be rotated in 90 degree increments each time you click on it. In 100% magnification mode a small scroll box also appears on the large thumbnail in the upper left hand corner, and this can be used to navigate around the entire image.
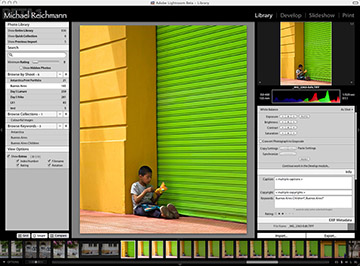
Loupe
Double clicking on any image will cause that image to appear full screen. This is theLoupview, and is also accessible via theLoupbutton. Once the image is full screen, double clicking on it again will increase the magnification to 100%. At this point the cursor becomes a hand and you can scroll around the image, while another click returns to full image view. Another shortcut is to hit thespacebarto zoom and unzoom the image.
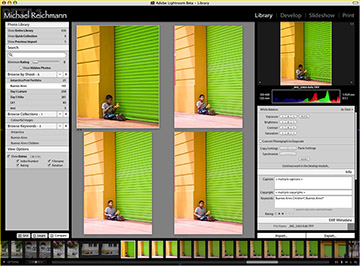
Compare and the Film Strip View

Figure 13
The third option for viewing in the Library mode isCompare. But before looking at whatComparecan do we need to be aware that theFim Stripat the bottom of ther screen is displayed at all times, in all modules. It gives you instant access to the files in anyShootorCollectionthat you are working with. So while theGridis the main means available to you for finding your way around available files, theFilm Stripat the bottom of the screen is always there, even when you’re using another tool, such as Compare.
The images displayed on the Film Strip can be changed to one of five different sizes, and there is a variable speed scroll wheel as well as a slider bar for navigation.
WithCompareselected you can choose two or more images from the film strip, and they will be displayed in the main viewing area. You can add more images by Shift-Clicking them on the Film Strip as well as by highlighting two or more at a time. Once these files are on the Compare window, clicking on one there will cause it to appear in the large thumbnail view at top right, along with basic metadata and a histogram. If you have the EXIF Metadata window open at the same time, as you click on each separate image this information will be changed as well. This is a very convenient means of choosing your Selects.
One “anomaly” that I’ve noticed though is that if you change the ranking of an image selected from a Compare group, all the rankings in the group also change. This is not the way I would expect it to work. And, though the rankings are displayed in the Compare window, they aren’t changeable there – only in the Info window. Certain to be fixed in the next release.
______________________________________________________________
Photo Library
Almost everything that we’ve looked at so far in the Librarysection has had to do with images themselves and the tools for organizing them. But we really can’t appreciate the power available in Lightroom without looking at the left-hand panel, the Photo Library.

Figure 14
This is the nerve center for managing your files. With it you select what to display, and how to organize what is contained in your library.
Permanent Items
There are three fixed items at the top of the Library panel…Show Entire Library,Show Quick Collection, andShow Previous Import. The first and last are fairly self-explanitory.Quick Collectionthough is a nifty means of grouping an otherwise unrelated series of images together – for a slide show, for example. Any time you have any image highlighted or selected simply pressing theBkey will place it in the currentQuick Collection.
Shoots and Collections
AShootin Lightroom’s nomenclature is a group of files that belong together. These may or may not necessarily be part of a single directory. So, for example, if you did one wedding in the morning and another in the afternoon you could import the files into two separate Shoots, or you could make all that day’s images a single Shoot. Your call. You can even subsequently move a file from one Shoot to another. But, and here’s where it can get confusing, this won’t move the physical location of your file if it is located in a directory outside of Lightroom. Got it?
ACollectionis a more ad-hoc assembly of files. The primary difference between a Shoot and a Collection is that a file can only exist in one Shoot, but it can appear in any number of Collections. So, for example, if a photo calledJohn and Mary #123is in a Shoot titledSmith Wedding, it may actually exist as a physical file located on externalDrive #9in a directory calledDecember 18 Weddings. And though it is in the Shoot calledSmith Wedding, you can copy it to a Collection that you create calledBest Wedding Shots, and another calledMarried Couples, and another calledFunny Looking People.
So, to summarize – there is only one physical file, located wherever you want. It needs to be loaded into the Lightroom Library (database) in a grouping called a Shoot, but then can then be moved to another Shoot, and can exist simultaneously in multiple Collections. Any instance of the image in any Collection all simply refer back to the one instance of that file in its particular Shoot, and from there to the real physical file in its folder somewhere on one of your hard disks. In other words, they are all proxies of the physical file. Whew!
Frankly, this is much harder to explain in words than it is to discover for oneself.
Note as well that in Beta One, all versions of a raw file contain the same image adjustment settings. But, Adobe has indicated that they plan to allow for multiple versions of a single raw file with different raw settings for each one.Versions, in other words.
Searching, Ranking and Keywords
There is aSearchfunction within this panel that allows you to search for any word in a file name or keyword. You can also filter images displayed by their ranking. The tab markedKeywordsserves a dual purpose. You can click on one of the keywords, which you create, and if those words are in a file’s IPTC metadata only those files contain that word will be displayed. Conversely, you can drag a Keyword onto a file or group of files and that word will be included into those file’s metadata. Very cool.
Screen Controls
Before moving on to the other three major Lightroom modules, I’ll take a moment to touch on some of the controls that are available for adjusting the image viewing environment to your particular needs. These are touched on in Adobe’s first training video, but I’ll recap them here for completeness.
TheFkey will expand the Lightroom window to full screen, without the top Apple menu bar. TheTABkey removes the left and right panels, leaving your image by itself on-screen. Even with them removed you can pass your mouse over the small triangles to the left and right center of the screen, and bring them back as needed.
TheLkey pressed once will dim the panels on the left and right, highlighting the main image. A second press turns the rest of the screen black, leaving the image or Grid displayed against a black background with no controls visible. A third press brings everything back to normal. I find this very handy when closely examining image files, and not wishing to be distracted by visual clutter.
You should also be aware that though Lightroom does not currently have an active Help function, each of the modules does have a keyboard shortcuts overlay screen available from under the Help menu.
______________________________________________________________
Develop
The Develop module is where raw and other file formats are processed. Everything thus far has been about the organizational side of Lightroom. Now we’re into image processing.
Think of the Develop capabilities as a cross between those found inAdobe Camera RawandPhotoshop. Much of the core functionality of Camera Raw is in Lightroom (including support for more than 100 different raw file formats), but these same tools, where appropriate, can also be applied to JPG and TIF files within Lightroom.
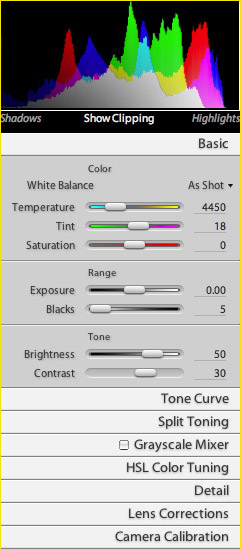
Figure 15
The controls seen in Figure 15 above show an RGB histogram as well as eight separate tabs. The one calledBasicis open in this example, but any of the others can be opened at any time simply by clicking on its title. When multiple tabs are open, and exceed the amount of screen real estate available, a scroll bar automatically appears.
Before looking at each tab, briefly, it should be said that since the Develop section contains as much functionality as Camera Raw, if not more, it would be impossible to provide a comprehensive guide here now. It would take a book. 🙂 Here are the highlights though…
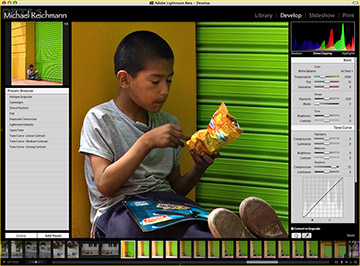
Basic
This tab allows you control overWhite Balanceand basic exposure. The White Balance controls provide the usual choices of fixed values as well as sliders for numeric settings. There is a basicSaturationcontrol located here as well.
Underneath the histogram are toggles for showing Shadow and Highlight warnings.
TheRangecontrols are similar toExposureandShadowin Camera Raw. The Tone control groupsBrightnessandContrast, essentially the same as the identically named controls in Camera Raw.
Tone Curve
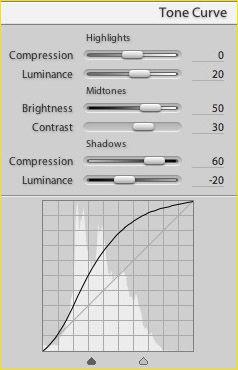
Figure 16
This is Lightroom’s version of Curves, and for many users it will be found to be much more intuitive and usable. The controls divide the image intoHighlights,Mid tonesandShadows, and then provides Brightness and Contrast sliders for each separate range.
The sliders at the bottom of the Tone Curve control the ‘range’ of the Shadows, Mid tones, and Highlights controls. If you drag the shadow range control to the left you are narrowing the range the Shadow Compression and the Shadow Luminance controls affect…. and at the same time, you are broadening the range that the Brightness and Contrast controls affect.
Similarly, when you drag the highlight range control to the right, you are narrowing the range the Highlight Compression and the Highlight Luminance controls affect…. and at the same time, you are broadening the range that the Brightness and Contrast controls affect.
Note that the Exposure and Blacks controls in the Basic tab affect therangeof tones that are then sent into the Tone Curve section. After these are applied everything else works on the histogram and curve displayed in the Tone Curve window. So Exposure and Blacks set the white point and black point in very similar ways as Exposure and Shadows do in ACR. The leftover range of values is then spread across the workable range for the rest of the controls to modify.
Because I found Lightroom’s Tone Curve to be a much more intuitive and usable tool than Photoshop’s familiar but complex Curves, I askedMark Hamburg, Lightroom’s project leader, for an explanation of the philosophy behind it. Here’s what he wrote…
Lightroom’s Tone Curve in Develop tries to balance between the simplicity of Levels and the power of Curves, with a unified model combining controls akin to Adobe Camera Raw’s brightness and contrast controls together with controls allowing one to achieve many standard curve shapes, often with greater control than a conventional curves UI would afford. (This is in contrast to other applications that simply give you the complexity of both Levels and Curves in one package.)
Whereas Adobe Camera Raw encourages a workflow in which you are strongly encouraged to set the Brightness and Contrast controls and then not touch them after making any detailed corrections in the curves panel, Lightroom tries to make everything work together in a single tonal adjustment.
Now then, here’s a breakdown on how it works…
Blacks and Exposure (at least when Exposure is positive) determine where black and white fall. The tone curve is then all about how one gets from black to white. The Blacks control is identical to the Camera Raw Shadows controls, but with the term Shadows being used as the opposite of highlights, we needed a new term for this control.
The split points, or crossover controls (for those who think in audio terms) determine where the breaks occur between shadows, midtones, and highlights. This then affects how shadow compression, midtone contrast, and highlight compression apply. Option-dragging the splits give you some feedback about how they segment the image, but this feedback could probably be better.
Shadow Luminance, Brightness, and Highlight Luminance all apply across the curve, and without regard to split points, since experiments so far with tying them to the ranges produced less pleasing results. Shadow Luminance and Highlight Luminance do have their strongest effects at their respective extremes, however, so the splits are somewhat less important.
Turning back to what the controls do:
Given the split points, Midtone Contrast spreads the output values apart or pulls them together thereby increasing or decreasing the slope in the user defined midtones. This means that you can pick the portion of the tonal range where you most care about emphasizing or de-emphasizing contrast and then use the contrast slider to adjust it. (And yes, we know that we need feedback from the image on the curve.)
The compression controls pull the values up or down in their respective ranges to result in darker shadows, lighter highlights, or the opposite.
All of this is combined using an approach to creating the curves that doesn’t fold back on itself and doesn’t generally clip against the extremes.
Brightness is a brightness adjustment focusing on the midtones though its effects extend throughout the image.
Shadow Luminance and Highlight Luminance adjust behaviors at the extremes, but apply throughout the image, losing their effect as they approach the other extreme.
Try setting the curve to flat by zeroing all of the controls and playing with each of the controls one at a time. To see the effect of the split points, crank the contrast up first or adjust one of the compression values.
Now then, why?
Lightroom’s tone curve strives for a balance between the simplicity of Levels – a dialog that pretty much everyone can figure out in Photoshop – and the power of Curves – a dialog that leaves many people baffled or at least frustrated.
There isn’t much we can do about the fact that to understand a curve graph, you need to know something about functions. But there were other issues with Photoshop’s Curves that did seem to be addressable such as:
* Needing to sprinkle points throughout just to lock things down
* Fighting foldback – i.e., places where the curve starts decreasing instead of increasing
* Fighting clipping against the extreme values
So, the approach Lightroom takes is based on providing controls that are at least moderately explainable, that afford reasonable knobs, and that can achieve most of the general curve shapes I could find in flipping through various Photoshop books. At the same time, to avoid some of the other problems, and enabled by the fact that the curve points aren’t actually
visible, Lightroom uses a very different algorithm from Photoshop and ACR for constructing the curve from the points, in order to avoid issues like foldback and clipping.In some ways, we’re happy with the results. People who work with the controls for a little while have reported that they do make it fairly easy to get the effects they need, and in fact that they make it easy to get some effects in the shadows and highlights that are difficult to get with a more traditional Curves UI. We know we’re going to hear calls for a conventional Curves UI, but we wanted to see how much we could do before we resorted to just dumping the responsibility for constructing a nice curve onto the photographer.
In other ways, there’s a feeling that we’ve still got more controls than we need. You can adjust contrast either via the Midtone Contrast control or by making appropriate settings with Shadow Luminance and Highlight Luminance. Some of the controls are tied to ranges and some aren’t. Hence, it is entirely possible that these controls will evolve a bit more in the future as we gain experience with them and the user community provides us with feedback.
We’re also still working through the defaults. Beta One ships with defaults that brighten the image a fair amount and hit it with a fair degree of contrast. On some images this looks great. On others, it’s less ideal. Beta One’s default also uses almost all of the controls, which means that if you go in to adjust, there are already a lot of variables in play.
If you want to try something much more subtle and with fewer variables in play, you can create a tone curve preset setting the values along the following lines:
Brightness = +25
Contrast = +25
Shadow Compression = +25And everything else to zero. This produces nice results on many images, but swings a long ways toward the conservative side relative to Beta One’s defaults, so images may look both darker and flatter.
Split Toning
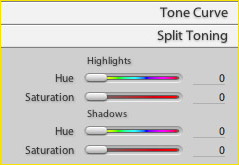
Figure 17
Split Toningis a unique new tool designed to introduce color casts into the highlight and shadow areas. This is very useful with grayscale images, and interesting on color images as a way to cool the shadows and warm the highlights, for example. When you move either the Highlight or the Shadow Hue sliders, if the Saturation slider is at 0 nothing will visibly happen. Of course sliding the Saturation slider off 0 then starts to show an effect.
But here’s a shortcut – simply Option / Drag either of the Hue sliders. When you do this it’s as if you had positioned Saturation to 100. If you like the colours that you see, release the drag and then simply slide the Saturation slider to the intensity that you wish.
My suggestion to Adobe would be to put an On-Off checkbox here to make it easier to toggle and thus judge subtle combination effects.
Incidentally, there is a good article onDigital Image Toningin the current (Jan / Feb 2006) issue ofPHOTO TechniquesMagazine. Their suggested methods can easily be translated to Lightroom’s new Split Toning capability.
Grayscale Mixer
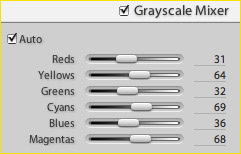
Figure 18
TheGrayscale Mixeris one of my favourite new tools in Lightroom. It allows you to convert an image to monochrome, but to do so with full control over the image’s tonal relationships.


Figure 19a
Figure 20a
Roll your cursor over Figure 20a
for an alternative tonal variation
The photograph in Figure 19a above shows a scene in Buenos Aires taken in colour. Figure 20a shows how changing the Blues slider can either darken or lighten the greyscale tonal values when producing a monochrome version. The strength of Grayscale Mixer lies in the fact that one is able to alter any of the colour sliders without changing the overall density of the image. This compares to the use ofChannel Mixerin Photoshop, which makes it a frustrating iterative process.
I have long been a fan of theConvert To B&W Proplug in for Photoshop. Now, with Grayscale Mixer I am able to achieve very similar results right inside the raw converter.
There is an important control at the upper left of the dialog box titledAuto. Here is what its purpose is, as described to me by the engineers at Adobe.
A conventional Grayscale conversion such as you would get in Photoshop using the Mode menu, or even via some more complex techniques involving Lab and multichannel mode, or such as you would get by simply turning down the Saturation control in Lightroom’s Develop or in ACR, just takes the colorimetric definition of how luminous a pixel is and uses that as the gray level. The results are independent of the actual colors in the image. So, if the colorimetry does not provide much differentiation, then the grayscale conversion will lack detail.
The Auto grayscale option in Lightroom looks for optimal settings for the grayscale mixer so that the line from black to white, instead of just following colorimetric definitions, follows a path that creates the greatest
diversity of grayscale values, based on the distribution of colors in the image.
Translation:Auto does the best possible job of causing the maximum differentiation between tonalities.
It’s then up to you though to decide if this is the “look” that you prefer for any particular image.


Figure 19b
Photograph courtesy Mark Hamberg
Figure 20b
Roll your cursor over Figure 20b for an alternative tonal variation. The initial version was converted using the Auto Function, while the second is a standard grayscale conversion.
HSL Color Tuning
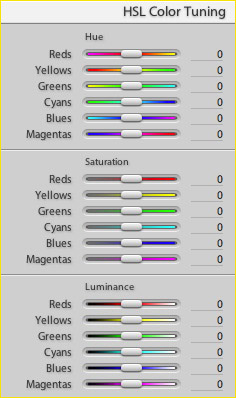
Figure 21
Here’s where you can really do some damage – or, produce colour images with the subtle colours and tonalities that match your creative vision.
While the Split Toning control (Figure 17) gives you Hue and Saturation control over highlights and shadows separately,HSL Color Tuning(Figure 21) provides separate controls for Hue, Saturation and Brightness for each of the additive and subtractive primaries.
My joke about doingdamageaside, The HSL controls have less ability to doreal damage to the image than does Photoshop’s Hue/Sat command, while still having a fair amount of flexibility, at least with regard to Saturation and Luminance.
Detail
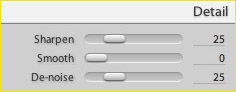
Figure 22
This control is for sharpening and noise reduction. It appears to be essentially identical at this point to the same controls in Camera Raw. It’s my preference not to do sharpening in the raw converter, because I much prefer to usePhotokit Sharpenerwithin Photoshop for both input and output sharpening. If a sharpening tool with that level of sophistication could be added to Lightroom prior to commercial release I’d buy everyone at Adobe a beer. Maybe two.
As for noise reduction, again my preference is to use a sophisticated external program or plug in for this when its needed. My favourite for the past year or so has beenNoise Ninja. I hope that a more sophisticated noise reduction routine ends up here eventually as well.
Lens Correction
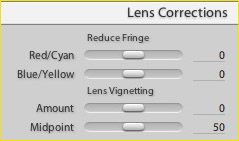
Figure 23
Again, other than in terms of labeling terminology, these controls appear to be essentially the same as those in Camera Raw. TheReduce Fringingcontrols are for control of chromatic aberration, and theVignettingcontrol is for – you guessed it – controlling lens vignetting. Both do a very good job, just as they do in Camera Raw.
Camera Calibration
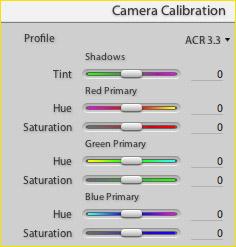
Figure 24
Camera Calibration is another carry-over from Camera Raw. It is a sophisticated tool designed to allow photographers to calibrate their particular cameras if they find that Camera Raw’s (Lightroom’s) generic profile leaves something to be desired. In his bookReal World Camera RawBruce Fraser devotes the better part of a chapter to this topic, so it isn’t something to be lightly touched on here. Frankly, it’s something best left to those that really know what they’re doing, and who have a strong need in this area.
Presets Browser
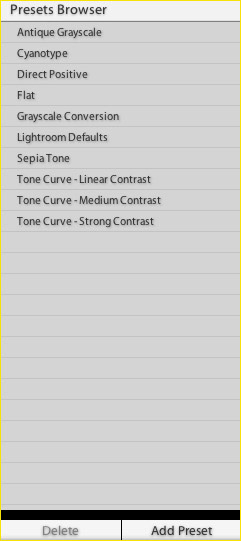
Figure 25
ThePresets Browseris located to the left panel of the screen when the Develop module is active. It comes pre-loaded with a number of self-explanitory items. Simply click on one, and its characteristics are immediately applied to the selected image. But the best part is that you can create and then add your own, consisting of virtually every image alerting characteristic that Lightroom is capable of applying.
In Figure 26 below you see the screen that is displayed when Add Preset is selected form the bottom of the Presents Browser window. Once you have done the various corrections to an image to create a “look” that you would like to apply to other images in future, simply select which ones to apply, and provide a convenient name. This can be as limited as the required Vignetting or Fringing controls for a particular lens, or as comprehensive as a complete “look”.
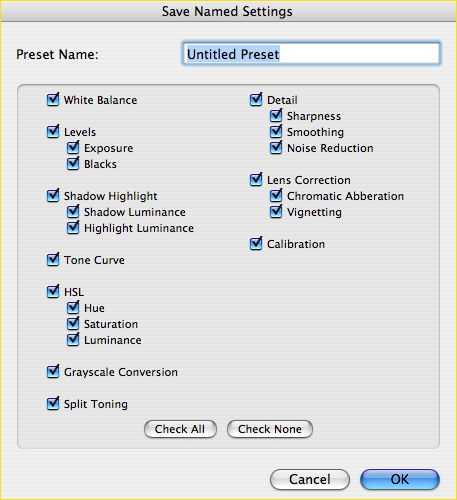
Figure 26
You mayrecallthat theQuick Developtab in the Library allows for the copying and pasting, or synchronizing, of image parameter information between files. The Presets function described here is a method for saving such combinations of settings under a specific name for future use.
______________________________________________________________
Slide Show
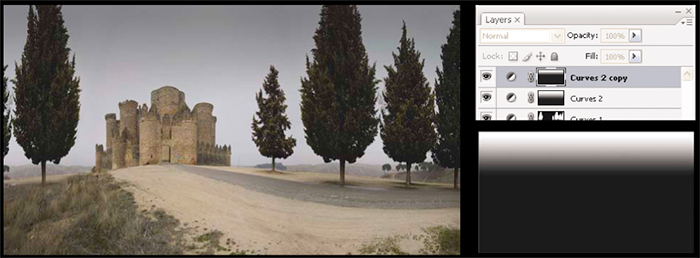
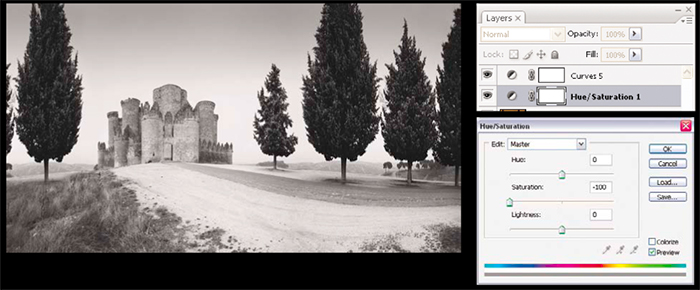
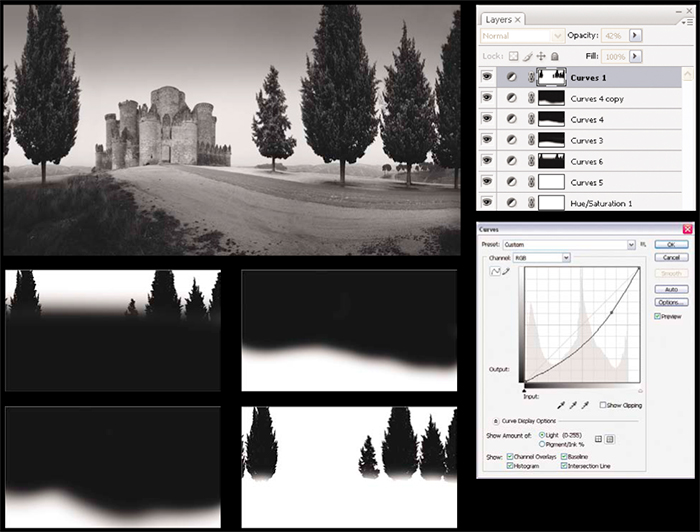
Figure 27
The third module, after Library and Develop, isSlideshow. This is an extremely feature-rich segment of the program, and most of it is straightforward and easy to use.
One of the only tricks to keep in mind is how to get images into a Slideshow. The easiest way, if they’re coming from diverse locations, is to place them into a Quick Collection. Then, press CTRL-A to select them all, and switch to Slideshow. Otherwise, whichever Shoot or Collection is selected in the Library, and therefore in the Film Strip, is the one that will be included in the slide show.
But, here’s another trick. If no individual image is selected in the Library, when you switch to Slideshow the entire Shoot or Collection will appear. If just one or a selection of images are chosen in the Library, then Slideshow will contain just those images.
Slide shows can be previewed in the center of the main screen, played full screen, or displayed on an external second monitor or projector via theScreen Selectortab.
There is also anExportbutton on the Playback Settings screen that has some interesting capabilities.
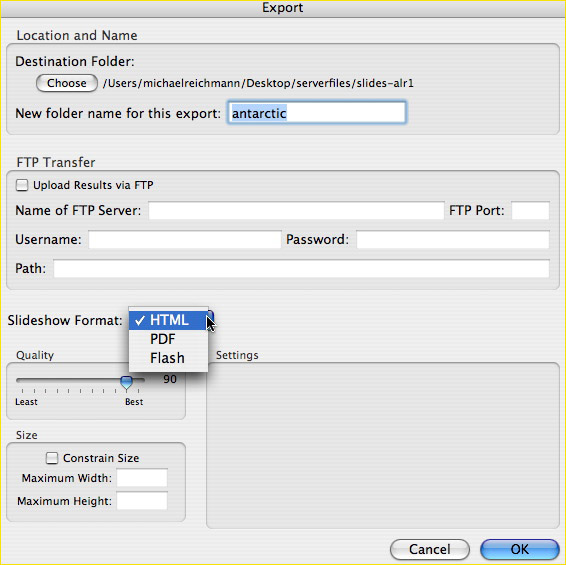
Figure 28
In addition to displaying your slide show on-screen they can be saved as HTML for use as a web gallery, or to a PDF file, or to a Flash animated show.
A small example of the web gallery that I created with Lightroom is found here. Clearly Adobe still has a bit of work to do in adding personalization features.
One can also Export a Flash animated slide show. These can be quite impressive.A sample of a Flash slide show that I created with Lightroom is found here. (Note that you have to have Flash installed on your computer to view this). Also be aware that while this sample four-image Gallery occupies about 300K on my server, the Flash show takes up 1.3MB, with commensurately higher bandwidth costs. But, they sure look good.
Also be aware that while HTML web galleries generate very quickly, Flash slide shows can take several minutes. Keep your eye on the progress wheel in the upper right hand corner of the Lightroom screen.
Both the HTML and the Flash slide shows can be uploaded to the web server of your choice from within Lightroom at the same time that they are written to your local disk.
The PDF export is straightforward, and you will find the samesample presentation available here as a downloadable PDF.
I should add that many professional photographers no longer provide their clients with contract sheets or proof prints. They simply create a web gallery, and tell their client where it can be found. With Lightroom (as with Aperture which has a similar capability), photographers can perform this chore in minutes, with a minimum of fuss and no programming ability needed. A Dot Mac or similar on-line account is all that’s needed to get your images online, and looking good.
Templates
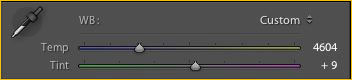
Figure 29
Just as the Develop module has the ability to save a wide variety of image processing settings as Templates, so too does the Slideshow. There are several sample Slideshow templates provided with Lighroom Beta One, as well as anAdd Templatebutton to create new ones, based on your own needs and preferences.
______________________________________________________________
The fourth and final module isPrint. While Lightroom uses the operating system’s printer driver, (which in the case of OS X is still its old forgetful self), the front-end that Lightroom provides is well conceived, and will offer most users all they need in terms of printing functionality, short of using a RIP.
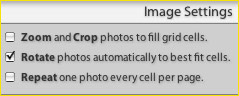
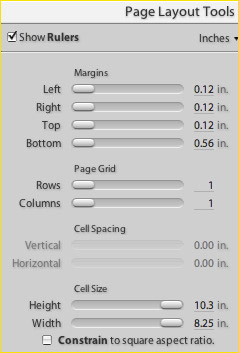
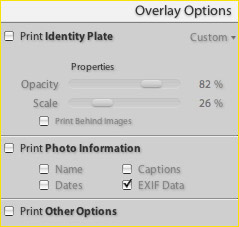
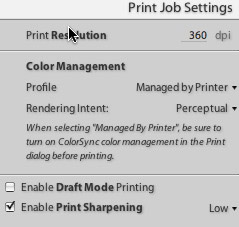
Figure 30
Four tabbed menus, in the typical Lightroom style, provide the ability to design, layout and print ones images in a variety of formats and styles. Rulers are provided along the left and bottom edges of the layout window (Figure 31 below) and just as within the Develop and Slideshow modules there is a Template function which permits creating personalized templates that can be reused as needed.
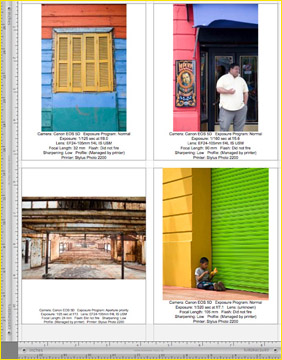
Figure 31
The2X2 Autofilltemplate provided (Figure 32 below), was used to create the above giant contact sheet, except that I added the EXIF data using theOverlay Optionsmenu, and then saved it out as a new Template called2X2 Autofill with EXIFfor future use.
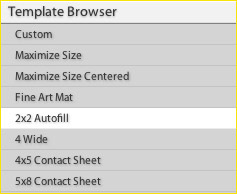
Figure 32
The printing of thumbnails, as well as variable size multiple images on a page is highly automated, flowing images from one page to the next based dynamically on the sizing you prefer.
One other productivity feature to be mentioned is that when printing contact sheets and even moderate sized prints, including 8X10″ , if youEnable Draft Mode Printing, Lightroom will print using data that already exists in the large full-res preview files that it has created for the Library. This means that such prints are produced incredibly quickly – much more quickly than if it had to generate new image files from the original filesplusthe linked processing instructions.
There is a lesson here in how Lightroom works (and also other next-generation programs that don’t “bake” their images, but instead use metadata files of processing instructions). Whenever you make a processing change to an image, new instructions are written to this metadata file. At the same time the thumbnail and hi-res large preview file generated by Lightroom for the Library is also updated, so that you always see the latest rendition on-screen.
But uniquely in Lightroom, when you invokeEnable Draft Mode Printing, what you are in fact doing is telling Lightroom to print from this preview data (which is already rendered) rather than having to wait for the program to render the original raw file, which when making a large number of small prints or contact sheets can potentially take a long time. Very neat. Very fast.
Oh yes, and it works perfectly when outputting PDF files as well.
______________________________________________________________
Identity Plate
Many professional photographers use their laptops to review shoots and portfolios with clients. Lightroom offers a very elegant means of customizing the program by allowing the user to put their name at the top left of the program’s main screen, and to select the font in which it appears. More than just a vanity plate, this can be made to appear beneath images on slide shows, contact sheets and other forms of image output. The program even allows you to incorporate a graphic instead of text, such as a corporate logo.
One small note – be sure toselectthe textbeforecalling up theFontdialog, (Lightroom / Identity Plate Setup) otherwise you’ll wonder why you can’t seem to be able to apply a chosen font to your name.
______________________________________________________________
What’s Missing?
Probably quite a few things, depending on ones needs. For me, until Lightroom has acropandrotatetool built in I’m going to have to send all of my files to Photoshop for additional processing. Adobe has said that they realize that this omission from Beta One is serious, and I expect that it will be one of the first things added to the next beta release.
I also will continue to export my Lightroom files to Photoshop so that I can usePhotokit Sharpener.
Other than those two items I find that even this first beta release of Lightroom is highly usable and relatively bug free, It needs several additional features, more polishing, and lots of user feedback before it becomes a commercial product. But even now, at this early stage, I find it to be light on its feet, demanding relatively little in the way of computer resources, and offering some exciting new functionality for photographers.
______________________________________________________________
A Work in Progress
A final closing thoughts on Lightroom – for the moment at least. This is very much a work in progress. There are a number of features missing in Beta One, and quite a fewwantsandneedsas well. But, that’s the point. To have potential users, tens of thousands of them, provide input as to the features they want, and to address as many bugs as possible. Of course this is a benefit to Adobe. But it also is a boon to photographers. A win-win, as they say.
While some companies release new software products and then expect their customers to beta test them – while paying for the privilege, (Microsoft comes to mind, among others)Adobe has taken the approach of releasing a true beta product and asking its customers for their feedback well prior to commercial sale.
Of course no should imagine that the beta release of Lightroom at this time (January, 2006) is unrelated to the first shipment of Apple’s Aperture just a month or so ago. This is the real world, where large companies do what it takes to compete with each other for both market share and mind share.
By releasing Lightroom now Adobe likely hopes to further side-swipe Aperture’s early sales momentum, though Apple bears considerable responsibility for Aperture’s generally negative early reception by reviewers and many users. With Lightroom out in the wild as a free beta for much of 2006, and with availability for Windows computers coming in the relatively near future, Adobe clearly hopes that huge numbers of photographers will explore and then start using Lightroom. Then, when it launches as a commercial product, a very large installed base of pre-sold buyers will exist. It also means that Lightroom (hopefully) will contain features and functions that are a result of feedback from these early adopters, and thus will engender a loyal user base. A pretty smart strategy, in my view.
And as for Aperture, if history is any teacher we can expect to see Apple turn its newest baby into a powerhouse, especially now that it has Adobe breathing down its neck with such a promising alternative. In the end the winner will be all of us – photographers who will have choices, and a rich new set of tools with which to pursue our art and our craft.
______________________________________________________________
I would like to express my sincere thanks to George Jardine,
Pro Photography Evangelist at Adobe Systems,
for his generous assistance in the preparation of the article.
______________________________________________________________
January 9, 2006
Useful Links
Adobe’s beta test web site, discussion forum and download center –http://labs.adobe.com/technologies/lightroom
Adobe’s first training video –http://av.adobe.com/russellbrown/LightroomSM.mov(Quicktime required)
Jeff Schewe’s announcement of Lightroom along with hisintroduction to the program, at PhotoshopNews.com.
The Shadowland (AKA Lightroom) development story, by Jeff Schewe at Photoshopnews.com.
AnAdobe Lightroom FAQ, at Photoshopnews.com.
The Luminous LandscapeLightroom Forum.
Computer-Darkroom Previewby Ian Lyons
______________________________________________________________
The Video Journal Lightroom Tutorial
Issue #14ofThe Luminous Landscape Video Journalwill feature an introductory yet in-depth live video tutorial onAdobe Lightroom, conducted byMichael ReichmannandJeff Schewe. If you’re not already a subscriber, now’s the time to do so. Issue #14 will ship in February.
______________________________________________________________
The Seminars
OnFebruary 15, I will be teaching two three-hour-long Lightroom seminars in Toronto in conjunction withThe Canadian Photographic Centre. They will be titledAn Introduction to Adobe Lightroom. you can find out more and sign up for this seminar on theCPCweb site.
______________________________________________________________


Elevate Your Vision


Read this story and all the best stories on The Luminous Landscape
The author has made this story available to Luminous Landscape members only. Upgrade to get instant access to this story and other benefits available only to members.
Why choose us?
Luminous-Landscape is a membership site. Our website contains over 5300 articles on almost every topic, camera, lens and printer you can imagine. Our membership model is simple, just $2 a month ($24.00 USD a year). This $24 gains you access to a wealth of information including all our past and future video tutorials on such topics as Lightroom, Capture One, Printing, file management and dozens of interviews and travel videos.
- New Articles every few days
- All original content found nowhere else on the web
- No Pop Up Google Sense ads – Our advertisers are photo related
- Download/stream video to any device
- NEW videos monthly
- Top well-known photographer contributors
- Posts from industry leaders
- Speciality Photography Workshops
- Mobile device scalable
- Exclusive video interviews
- Special vendor offers for members
- Hands On Product reviews
- FREE – User Forum. One of the most read user forums on the internet
- Access to our community Buy and Sell pages; for members only.
You may also like


