


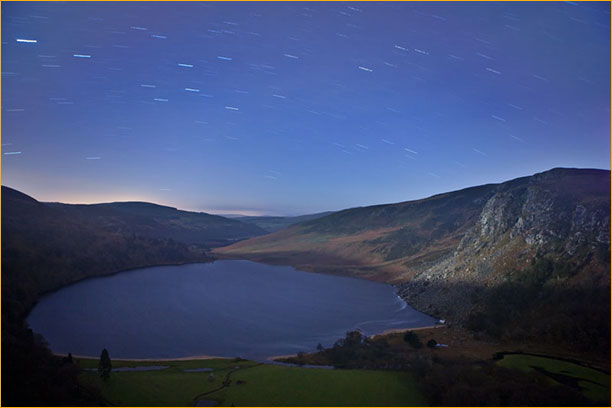
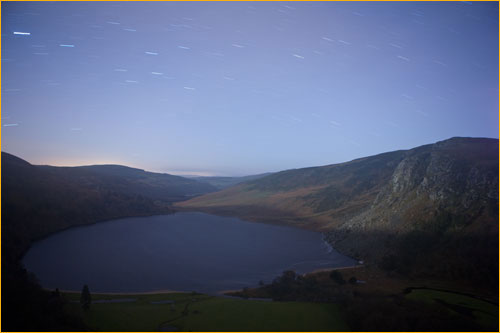
Midnight, Lough Tay, Co. Wicklow
Canon EOS 5D, EF 24-70mm f/2.8 @ 24mm
Exposure: 7 minutes @ f/2.8, ISO 400
I’ve always enjoyed night photography. There’s a real sense of wonder when you make a photograph after the sun goes down and you see the often fantastic and alien landscape that is revealed.
Late one evening nearing the peak of the Geminid meteor shower, which is one of the more spectacular displays during the year, I decided that it would be a good time to try and capture some meteors in a long exposure. It was a mostly clear (but very windy) night, with a half moon poking over the horizon.
So I grabbed my camera gear and headed down to on of my favourite spots overlooking Lough Tay. Despite the intermittent moonlight, it was very dark. Looking into the valley, I could see the vaguest outline of the lake, and could detect the faint gleam of moonlight striking the face of the adjacent mountain.
______________________________________________________________
The Setup
I set the camera up on its tripod and attempted to compose a photograph. Composing an image in conditions this dark involves a lot of guesswork. Unlike shooting at night in a city or other well-lit environment, you can’t really see anything through the viewfinder, and autofocus doesn’t work. This makes framing and focusing the shot rather challenging.
The correct exposure must be established of course, but the camera’s meter will not function in such dark conditions. Working in manual is essential, and limiting the duration of the test exposures is wise, as they will be long. Typically this involves setting the lens to its maximum aperture and the ISO to the highest setting. This will allow you to use the shortest possible shutter speed, which you arrive at by educated guesswork. I generally start at about 15 seconds, longer if the night is particularly dark or I’m using a lens with a small maximum aperture (f/5.6 or greater).
These settings will give you an image that is bright, but of low quality due to the high ISO. It will suffice to let you determine your composition, which you do by pointing the camera in the general direction of the scene and taking a photograph. This may seem crude, but by continuing to take photographs, adjusting the camera’s position after each, you will arrive at the composition you want.
Having made a few test exposures, I decided the lens I was using wasn’t the right one for the job. The decision to change lenses to my 24-70mm resulted in a blown-over tripod and a cracked-open lens. I didn’t realize this at first, as it was so dark that only when I went to adjust the focus did I feel that it was crooked! It ended up being a relatively inexpensive repair, but a few choice expletives may have slipped out at the time. After a few minutes of re-composition with the new lens, I was finally ready to take the actual photograph.
Focusing is tricky in the dark. Auto-focus won’t work, and you can’t see to focus through the viewfinder. Focusing by distance is the only option. In this case, I set the focus ring on the lens to the infinity mark. You can shoot a few more test shots, tweaking the focus a little bit between each one, until you’re happy that it’s as accurate as possible.
It’s far easier to shoot a night scene in which everything is at or near infinity, since you don’t need to stop down for depth of field. Reducing the size of the aperture will result in a longer exposure, which may not be desirable. Focusing also becomes more complicated and you need to make test exposures to verify you have sufficient depth of fied.
The one advantage film photography has over digital under these conditions is that digital cameras are reliant on batteries. You’ll have to do tests to see what the longest exposure your camera can make on a full charge is, but it’s unlikely to be more than two hours.
______________________________________________________________
Making the Exposure
Now, you’re finally ready to shoot. Don’t nudge the tripod! At this point, it’s worth taking a look at the histogram to make sure you’re not clipping your shadows, or indeed overexposing highlights. Avoid the temptation to accept the darkest exposure in which you still have detail. Exposing to the right (with the histogram pushed as far to the right as possible, without overexposing) will improve the signal-to-noise ratio in the shadows, resulting in a cleaner, less noisy image. This may not be practical due to the potentially much longer shutter speed, but it’s worth doing if circumstances permit.
My original plan for this image was to shoot a two hour exposure which would have resulted in more complete star trails and lower noise, but the wind was so high that I was worried the camera would blow over again. So I limited myself to something in the 5-10 minute range.
Another advantage digital has in night photography is the lack of reciprocity failure. With film, once exposures reach a certain length the reciprocal relationship between exposure time and increased brightness of the image breaks down. The threshold varies from as little as a second to more than a minute, but once it is reached, exposure times increase – often dramatically. For certain films, the extra time needed can exceed 3 stops once you get past 100 seconds – that means an actual exposure of 800+ seconds! On top of this, colour shifts will occur which need to be corrected with filtration, or additional postprocessing. Mercifully, that’s one headache digital doesn’t suffer from.
The final settings are calculated by doubling the length of the exposure for every halving of the ISO or the aperture. My last test shot was about 80 seconds at f/2.8 and ISO 3200. For a 7 minute final exposure, that required the aperture be unchanged and the ISO brought down to 400. Far from ideal, but it’s a testament to the lens quality and the camera’s performance that the image is sharp and relatively noise-free.
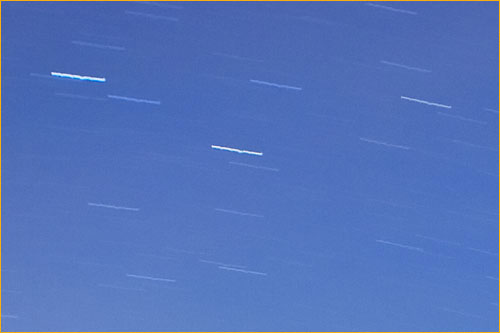
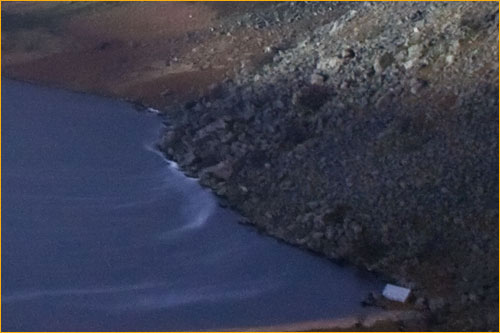
You can see from the above detail a side effect of the buffeting the camera received: the star trails look like a cardiogram, each one slightly shuddering in exactly the same way as all the others. This shaking didn’t much affect the sharpness of the rest of the image, as the below detail shows — perhaps somewhat surprisingly. That’s because the average position of the camera during the long exposure was unchanged.
______________________________________________________________
Post-processing
I frequently get asked if I “Photoshop” my photographs — the question really being “Are they real?” Post-processing is a vital part of the imagemaking process. Ansel Adams once said, “The negative is the score, the print is the performance.” To get an expressive print, you have to do some work. This should be done intelligently and sympathetically so as to not turn the photograph into something that has no bearing on reality.
Here is what this image looked like directly from the camera:
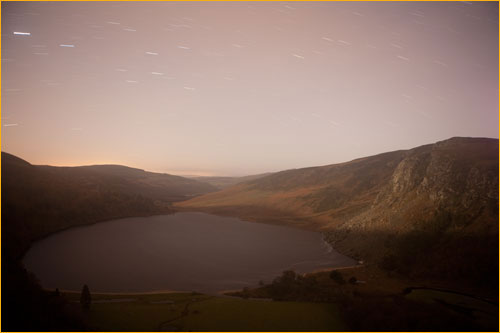
As you can see, the white balance is way off. Because I shoot RAW, I leave my cameras on automatic white balance, knowing that I can easily correct problems of this type in the conversion process. The alternative is to add one more thing to think about during the shooting process – and why do that if it’s not necessary?
Once the white balance was corrected, the color saturation and contrast were a bit anaemic. Some adjustments were made in Camera RAW, but my favorite tool for fixing those problems in images like this is the contrast mask. A duplicate layer is created in Photoshop, inverted and desaturated to give a black & white negative. This is then blurred while in the Overlay blending mode. The effect is to open up the shadows and bring down the highlights, also increasing color saturation quite effectively and improving global contrast.
This opened up the dark shadows too much, however. They were full of noise due to underexposure, the relatively high ISO and the long shutter speed. So a Curves adjustment layer brought them back down and produced a further boost to the image’s contrast.
It would have needed two more stops to push the histogram more to the right and open up the shadows at the time of shooting. This would have meant a 30 minute exposure (or an ISO of 1600): not an option under the circumstances.
Midnight, Lough Tay, Co. Wicklow
Canon EOS 5D, EF 24-70mm f/2.8 @ 24mm
Exposure: 7 minutes @ f/2.8, ISO 400
A light application of noise reduction and a local contrast boost later, and the image was finished. It’s very different from both what I saw and what the camera recorded – but it remains true to the spirit of the scene. We don’t see in color when it’s that dark, but clearly there’s still plenty of it around – and the camera can record it if given half a chance.
And I never did see any meteors that night.
April, 2009
______________________________________________________________
Peter Cox is a landscape photographer and educator living in the beautiful south-west of Ireland.
To see more of his work and learn about his workshops, you can visit his website at:http://www.petercox.ie


Elevate Your Vision


Read this story and all the best stories on The Luminous Landscape
The author has made this story available to Luminous Landscape members only. Upgrade to get instant access to this story and other benefits available only to members.
Why choose us?
Luminous-Landscape is a membership site. Our website contains over 5300 articles on almost every topic, camera, lens and printer you can imagine. Our membership model is simple, just $2 a month ($24.00 USD a year). This $24 gains you access to a wealth of information including all our past and future video tutorials on such topics as Lightroom, Capture One, Printing, file management and dozens of interviews and travel videos.
- New Articles every few days
- All original content found nowhere else on the web
- No Pop Up Google Sense ads – Our advertisers are photo related
- Download/stream video to any device
- NEW videos monthly
- Top well-known photographer contributors
- Posts from industry leaders
- Speciality Photography Workshops
- Mobile device scalable
- Exclusive video interviews
- Special vendor offers for members
- Hands On Product reviews
- FREE – User Forum. One of the most read user forums on the internet
- Access to our community Buy and Sell pages; for members only.
You may also like


