


If you haven’t already upgraded toPhotoshop CS, Adobe just gave you one more reason to do so —Camera Raw 2.1. First introduced exactly a year ago, in February 2003, as a $99 plug-in for Photoshop 7, then bundled as part of Photoshop CS, the latest version 2.1 is a free download for anyone who owns Photoshop CS. It isn’t available for any previous version of Photoshop because it is now more tightly integrated into Photoshop itself.
If you’re just finding out about 2.1, and are ready to download a copy, it’s a quick-to-get 1.5MB ZIP or SIT file (PC or Mac), assuming of course that you have a high-speed connection. Even if you don’t, it’s still won’t take you too long to get.Here is the download page.
Released in mid-February 2004, simultaneous with thePMAshow in Las Vegas, Camera Raw 2.1 has added support for a raft of new cameras.
Supported Cameras
EOS-1Ds
EOS-10D
EOS-D30
EOS-D60
EOS 300D
(Digital Rebel/Kiss Digital)
PowerShot 600
PowerShot A5
PowerShot A50
PowerShot S30
PowerShot S40
PowerShot S45
PowerShot S50
PowerShot G1
PowerShot G2
PowerShot G3
PowerShot G5
PowerShot Pro70
PowerShot Pro90 IS
FinePix F700
FinePix S5000 Z
FinePix S2 Pro
FinePix S7000
DCS720x
DCS760
DiMAGE 5
DiMAGE 7
DiMAGE 7i
DiMAGE 7Hi
Valeo 11
Valeo 22
Leica Digilux 2
Panasonic DMC-LC1
D1H
D1X
D100
D2H
Coolpix 5700
Coolpix 5000 (with firmware version 1.7)
E-1
E-20
C-5050 Zoom
C-5060 Zoom
In addition to the above there are at least three additional formats that are unofficially supported. These are for the recently discontinuedKodak DCS Pro Backs, and the newKodak DCS Pro SLR/n(the Kodak 14n replacement). The Pro Back support has had improvements in color calibration, but while the Pro SLR/n support is there, it is not fully colour calibrated yet. The newMinolta A2is also unofficially supported.
Curiously, theLeica Digilux 2is supported even though it wasn’t shipping at the time that CR 2.1 became available. This goes to show you the benefits of manufacturers working closely with Adobe, vs. those who drag their heals. You snooze, you lose.
But, the pace of new digital camera introductions being what it is, there are quite a few new models coming down the pike that aren’t supported in this release. These include several that were just announced at or prior to PMA; the newCanon 1D MkII,Olympus C-8080andCanon Pro 1. Likely there will be others along soon as well, and so it looks like Adobe has its work cut out for it in terms of keeping up with new camera and Raw format releases.Thomas Knollwill likely never sleep again.
The word from Adobe is that there will be three to four releases of CR a year to keep up with the pace of new camera introductions. These will be free to anyone who owns the current issue of Photoshop CS. But, when a new release of Photoshop comes out, something which typically happens every 18 months, that new version and its associated Camera Raw will be needed to be able to support any future cameras that come out after that point.

Pleasure Domes in the Bizarro Universe. Las Vegas — February, 2004
Sony F828 @ ISO 64
Installation
Installation is straightforward. Close Photoshop if it’s currently open and then unZIP or unSIT the downloaded file. Go into your Plug-Ins directory, probablyC:Program FilesAdobePhotoshop CSPlug-InsFile Formatsand remove the old version of Camera Raw. Rather than deleting it, it’s best to simply copy it to a backup directory somewhere (just in case). Now copy the new version of Camera Raw to the Plug-Ins directory. That’s it. The next time you run Photoshop the new plug-in will be active.
Two things to watch out for; make sure that there are no old versions of Camera Raw lurking about in some other Plug-in directory. Photoshop will load the old one if there is and ignore the new one. You can check for this after re-loading Photoshop by going toHelp / About Plug-inon a PC, orPhotoshop / About Plug-Inon a Mac. If you see more than one version, and it must be 2.1, track down the old one and delete it.
Be aware that if you have a mix of JPG and Raw files in a directory that a previous version of Camera Raw has already indexed, it won’t immediately see the Raw files that it wasn’t able to handle before. You’ll need to do anF5Refresh in the File Browser for them to be seen.
What’s Been Improved?
As well as the addition of quite a few new cameras, there have been a number of small upgrades and fixes to Version 2.1. These include improved highlight processing, several bug fixes, and better EXIF handling. Some shots with consumer digicams that were taken at high ISOs would also sometimes have a crosshatch pattern, and this has now been either removed or drastically reduced.
Observant users will also note that the defaultShadowslider position is now 5 rather than zero. This makes for much better image quality — out of the box, since it was intended that users make this adjustment themselves, and many didn’t. To protect users who set up their own custom default settings from losing those settings, CR 2.1 still reads the same preferences as CR 2.0. So any changes in default settings will not be visible until the user resets the preferences, either for a specific camera, or Camera Raw as a whole.
To reset the preferences for a one camera model, pick "Reset Camera Default" from the settings flyout menu.
To reset call of the Camera Raw’s preferences, hold down command-option-shift (Mac) or control-alt-shift (Windows) when opening a raw image.
Some Hints
Camera Raw wasreviewedhere when it first came out in the Fall of 2002. There have been quite a few enhancements to the program since then but I don’t feel that a full re-review is warranted. Also, the documentation that comes with CR is very good — but one needs to take the time to read it and play with the program’s many settings. The investment in time is worth it though, as this software is capable of quite a bit more than what first meets the eye.
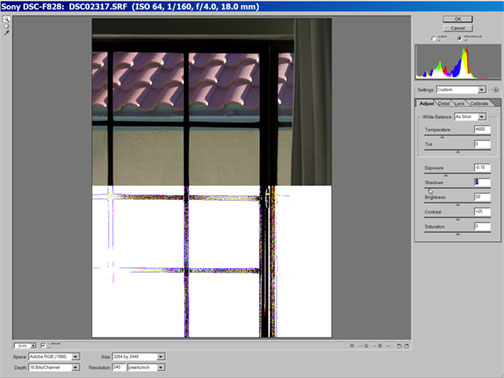
One thing that bears repeating, and bringing to the attention of those that don’t read documentation, is the use of theALTkey together with theExposureandShadowsliders. In the illustration above the top half of the image shows what you normally see, and the bottom half shows the display when the Shadow slider is moved with the ALT key held down. There is no absolute right or wrong point to set the slider to — it very much depends on the image itself and its contents. But, by slowing moving both of these sliders with ALT depressed, and being able to see when the highlights first appear, or the shadows go black, can really help you make these settings more appropriately.
Camera Calibration & Profiling
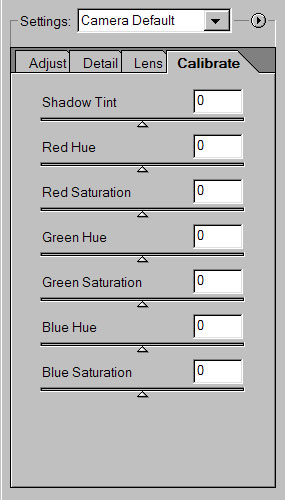
Many digital photographers , especially ones who do commercial product shots where colour must be "exact", are concerned about profiling their cameras. What this does is to balance variations between the ways in which a camera records different colours. In 2001 I reviewed a camera profiling program calledinCamera Pro, which sold at the time for $500.
With a bit of effort much the same thing can be done now with the tools available on theCalibratetab of Camera Raw. What you would do is to shoot aMacbethcolour reference chart. You then proceed to set theWhite Balance, and then theExposureandShadowssliders under theAdjusttab. Once that is done you will find seven more sliders under theCalibratetab, for a total of nine degrees of freedom that can be altered.
Putting your Macbeth chart under a calibrated light source, like anOtt Light, you now proceed to adjust the colours onscreen to achieve as close a match as possible. This assumes of course that you have a properly profiled and calibrated monitor. Once you have as good a match as possible between the screen and the physical chart you can then save your adjustments as acustom settingand use it whenever you are processing images taken with that camera. You may want to shoot skin tones as well, if these are part of your repertoire, and even to do a couple of different custom settings — one for daylight and one for shots done under tungsten lights or deep shade. It all depends on how compulsive you are, and how much work you want to put into it.
If your printer is also properly profiled you should now be able to make a print of the Macbeth chart that very closely matches what you shoot with your camera.
As an aside, there is one area where Camera Raw gives ground to many manufacturer’s own Raw processing software. Most digital camera manufacturers test and calibrate each camera that comes off the assembly line. Individual variations are then profiled, and this information is then burned into a ROM in the camera. This data is appended as Metadata to the Raw file and used by the manufacturer’s Raw conversion software to custom "tweak" Raw image processing.
Unfortunately, with only a handful of exceptions, this information is not provided to third parties, and thus programs like Camera Raw have to do without. So why use Camera Raw then in preference to a manufacturer’s own Raw conversion software? Simple. Workflow. Most camera makers haven’t a clue about how to write decent software, and so while they may have an slight edge when it comes to some aspects of image processing because of the proprietary information imbedded in the Metadata, CR is simply a far superior program to use from a productivity point of view.


Elevate Your Vision


Read this story and all the best stories on The Luminous Landscape
The author has made this story available to Luminous Landscape members only. Upgrade to get instant access to this story and other benefits available only to members.
Why choose us?
Luminous-Landscape is a membership site. Our website contains over 5300 articles on almost every topic, camera, lens and printer you can imagine. Our membership model is simple, just $2 a month ($24.00 USD a year). This $24 gains you access to a wealth of information including all our past and future video tutorials on such topics as Lightroom, Capture One, Printing, file management and dozens of interviews and travel videos.
- New Articles every few days
- All original content found nowhere else on the web
- No Pop Up Google Sense ads – Our advertisers are photo related
- Download/stream video to any device
- NEW videos monthly
- Top well-known photographer contributors
- Posts from industry leaders
- Speciality Photography Workshops
- Mobile device scalable
- Exclusive video interviews
- Special vendor offers for members
- Hands On Product reviews
- FREE – User Forum. One of the most read user forums on the internet
- Access to our community Buy and Sell pages; for members only.
You may also like


