


Fast, Powerful, Flexible and Versatile
This Capture One Pro 11 review covers what is new in Capture One and how it can benefit you. Are you doing all the edits yourself and in Capture One only, or do you have a retoucher to whom you need to pass along your instructions? Either way, you will enjoy the new tricks and tools Capture One 11 has up its sleeve.

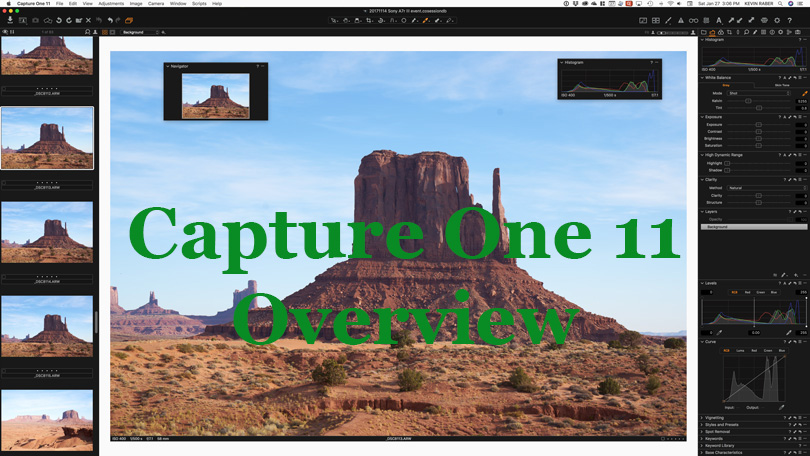
Capture One Pro 11 Review
Capture One Pro 11 lets you work smarter. It allows you to do your work better, creating better images in less time and effort. That is quite an achievement and I am going to show you how. First, I make a distinction between two types of Capture One users, the all-in-one, and the retouching-all-the-way user.
All-In-One User
You mostly import from the card and do all the editing in Capture One Pro. You frequently use the different Auto Adjust options and Styles to give your images the finishing touch. When you process your raw images to TIFF or JPEG in Capture One, your work is done. You will find Capture One Pro 11 a great help with more tools on layers, advanced mask options, more flexible Auto Adjust. The workflow with layers is more streamlined and you can apply Presets and Styles on layers. Card import now checks for duplicates.
Retouching-All-The-Way User
You often shoot tethered with an art director and client participating in the process and a retoucher doing the work after the shoot. For the retoucher you make mark-ups and you save the art director’s crop. You use an overlay for composition and layout. Finally, you pass on all these variables to the retoucher. You will find Capture One Pro 11 an even greater help. The layout in an overlay file is added to the image as a layer in a PSD output file, as are annotations and a watermark. You export the crop as a path in the PSD output file, effectively saving the uncropped image with a path. L*a*b readout let you make precise color adjustments. In case you prefer to work with layers, you find more options yet easier to handle with the improved tools.
Taste The Pudding
Now that you got your first taste of the pudding, let us take a close look. Because the list of changes and additions in this release is quite long, I just spill enough beans on each topic to make you understand. Expect separate tutorial posts, in particular on Layers.
- Layers
- workflow and workspace
- Local Adjustments tool tab gone
- new Layer tool on Exposure, Color and Detail tool tab
- tools automatically work on Layer when Layer is selected
- new tools on Layers: Color Balance, Levels
- different Clarity method per Layer
- Presets and Styles on Layers
- master opacity of Layers
- new Feather Mask, Refine Mask options
- Greyscale Mask preview
- new Filled Layer, Clear Layer options
- workflow and workspace
- Annotations
- new Annotations tool on Metadata tool tab
- corresponding cursor tools
- draw (in 6 colors) and erase
- show/hide Annotation toggle
- Annotation filter in Filters tool
- include/exclude when processing/exporting
- process to layer (output to PSD)
- Export/Process with Assets
- Annotations process yes/no; PSD process to layer
- Overlay process yes/no; PSD process to layer
- Watermark; PSD process to layer
- Crop; PSD process to path, retain full image
- Small changes to user interface/user experience
- new custom tool tab icons
- tool titlebars better readable
- single toggle button for Primary/MultiView in Viewer
- auto adjust for Exposure and Contrast/Brightness separated
- L*a*b color readout
And obviously, there is much more under the hood. Okay, let’s dig into it.
Layers
There is a lot to explore: new look, new tools, layer opacity, new masks options, new tool options.
Workspace And Workflow
The new Default workspace does not have a Local Adjustments tool tab anymore. It is still available, but the idea is that you do not need it. Remember that Capture One Pro 10 said goodbye to the Composition tool tab? I never looked back. In the stacked images below, you see the Capture One 10 workspace at the left and the new Default workspace at the right.
[twentytwenty]


[/twentytwenty]
Now, the Color, Exposure, and Details tool tabs have the new Layers tool on board. Here you select and manage your Layers. In addition, when you select a Layer all tools that work on Layers automatically get the Brush indicator to work on the selected Layer. In the stacked images below, you see the Exposure tool tab with the Background layer selected (left) and an Adjustments Layer selected (right). Notice the Brush indicator in all the tool’s title bar in the right image.
[twentytwenty]


[/twentytwenty]
Also, notice that the Layer Selector above the Viewer got a Create Layer feature (+ sign).
More Tools Locally
With Capture One Pro 11 you can use the Color Balance and the Levels tool on a layer. Older images need to upgrade to Process Engine 11 first before the Levels tool works on a layer.
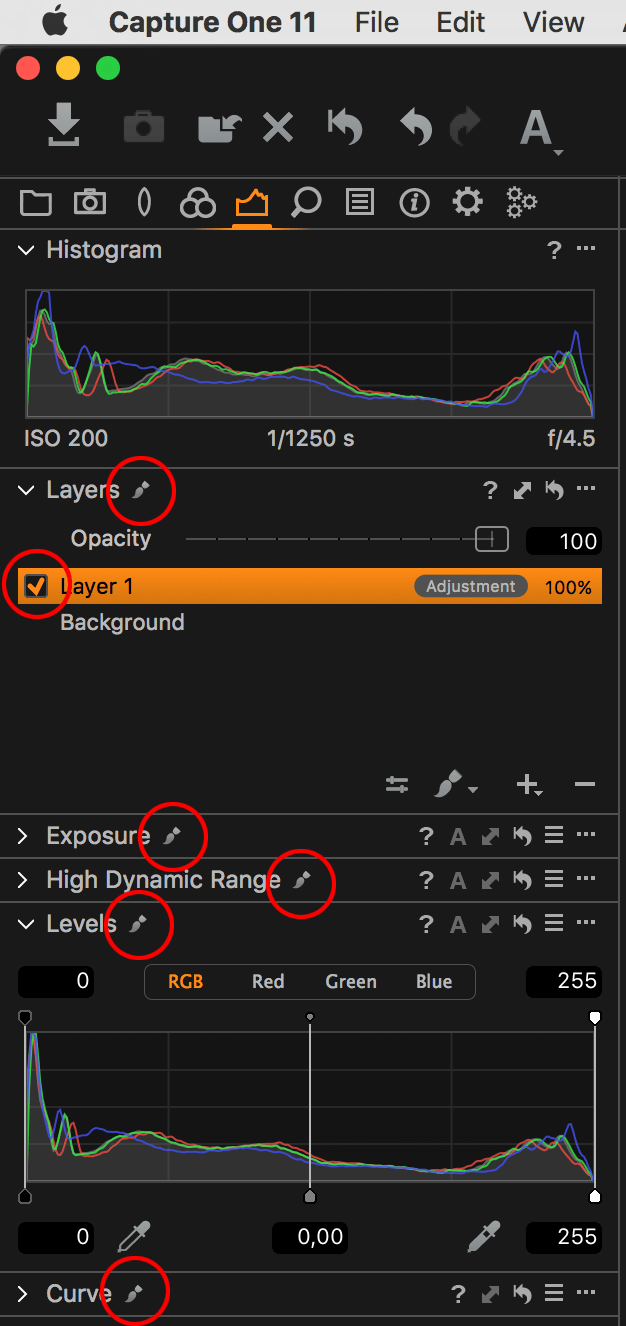 With the Clarity tool, you can select the Clarity Method per layer. Earlier, the Background layer determined the method for all subsequent Adjustments Layers.
Presets and Styles
Worth a special mention is the new ability to use Presets and Styles on Adjustments Layers. You can not only apply them but create them as well from a Layer. The use of this new feature is twofold. First, and most obvious, you now can apply a Preset or Style to a selected area of the image. You mask that area as usual. Second, with a mask that covers the entire image, you keep the Preset/Style separate from the adjustments applied at the Background layer. Continuing on that, you can apply different Preset/Styles to respective layers and switch layers on/off for comparison or different versions of one image. It is worth to mention that you can make Color Editor adjustments on different layers. Adjustments of different layers add up. See also the New Filled Layer option discussed below to quickly apply a Preset/Style to a separate layer.
 To apply a Preset, go to the Preset menu of the respective tool (3 horizontal lines), or from the Layers tool > Action menu (3 dots) > Apply Settings From > User Presets/Built-in Presets > select Preset. The second option is for applying Styles to a Layer. Do not use the regular Styles and Presets tool, as it works on the Background layer only and not on the selected Layer (which is a bit confusing). Saving a Preset from a Layer works as you are used from the tool’s Preset menu > Save User Preset. Saving a Style from a Layer again is done via the Layers tool > Action menu > Save Settings as Style. Again, do not use the regular Style menus or tools as they record the settings from the Background only.
Master Opacity
At the top of the new Layers, tool is the Opacity slider. You can set the Opacity per Layer in a range from 0 to 100%.
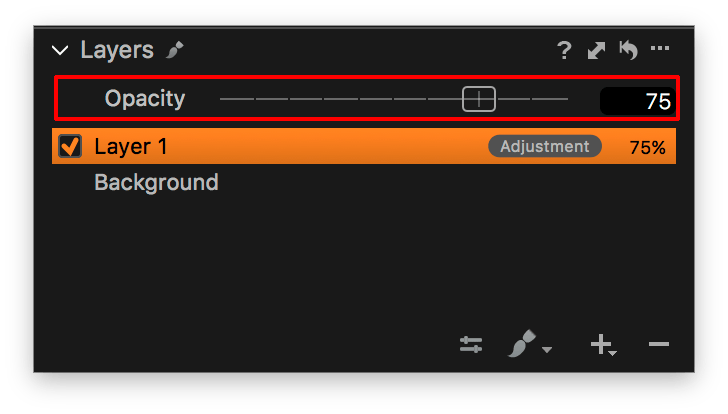 A lower Opacity value lowers the effect of all adjustments for that Layer. The default for a new Layer is 100%.
Important Notice:
If you plan to buy, upgrade, or subscribe Capture One Pro, please visit the Ambassador page. It will save you money!
Mask Options
There are several ways to improve the mask you just created. The first two are Feather Mask and Refine Mask. You find these options in the Layers tool > Action menu. Make sure you create your mask beforehand. Optionally make the mask visible.
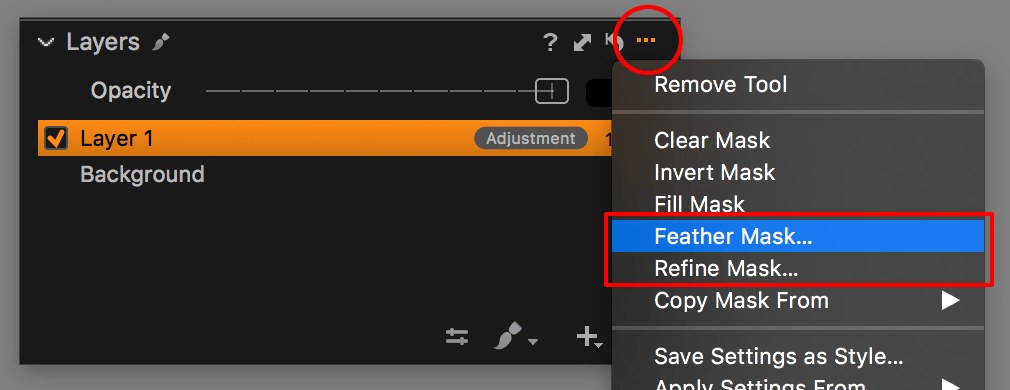 Feather Mask blurs the edges of your mask. The amount of blur depends on the Radius your select in the Feather Mask dialog. While you adjust the Radius, you can see the effect on the mask instantly before hit apply.
[twentytwenty]


[/twentytwenty]
Refine Mask optimises the edges of a mask near fine details. See the stacked photos with hair against a bright background, masked with Auto Mask. A typical use for Refine Mask is after using Auto Mask with your Brush or after Create Masked Layer from Selection with the Color Editor tool. Both options have computer generated edges and are sometimes not optimal for fine details.

Refine Mask finishes the job for you. Select the Refine Mask option, set a Radius that fits your needs, and apply the refinement. I find in particular the Refine Mask a great addition to Capture One Pro and use it a lot in landscape images as well like in the lead image of this post of a field with poppies.
Greyscale Mask
Quite a different new feature is Greyscale Mask. It does not alter the mask you made like the other two options just mentioned but is a way to check the mask without the distraction of the image. You find the option in the drop-down list of the cursor tool for Brush.
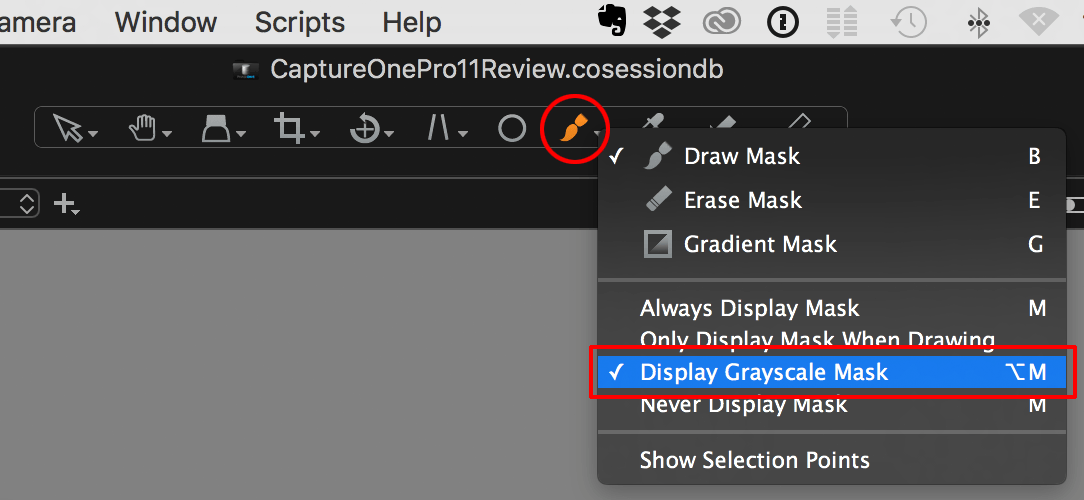 With Alt+M it is easy to toggle the Greyscale Mask. You can quickly fix areas that were not brushed or erased properly.
Layer Options
When you create a Layer you normally start with an empty layer, without a mask. This is now called New Empty Layer. In addition, New Filled Layer creates a Layer with a mask over the entire image. You can use this in several ways. First, sometimes is erasing a mask easier or faster than brushing it. Second, it is a great way to apply a Preset/Style or another adjustment on top of base adjustments at the Background layer. You can easily switch the Layer on and off to enable or disable the effect.
Tip
You could do as many adjustments on a Filled Layer and leave the Background layer for Crop and so on. Toggling the Layer gives you a before/after effect.
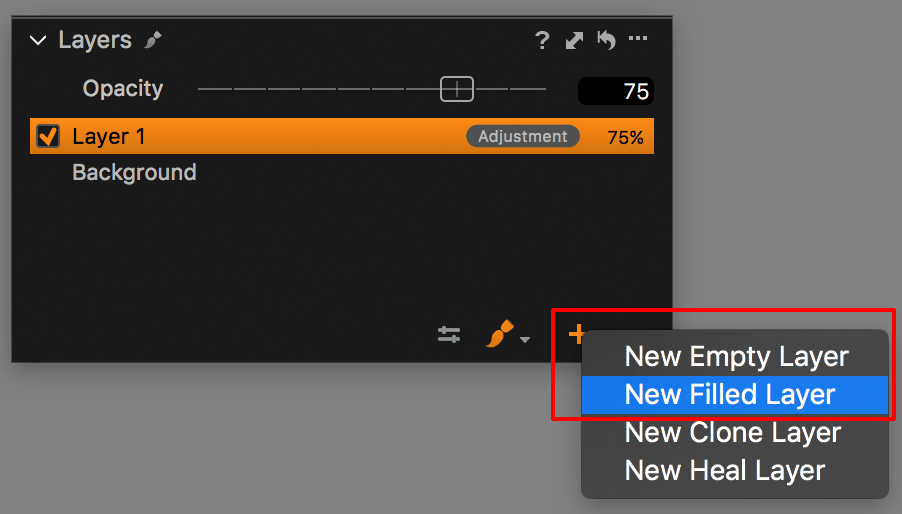 You find the New Empty Layer and New Filled Layer in the Layers tool when you long-click on the ‘+’ symbol.
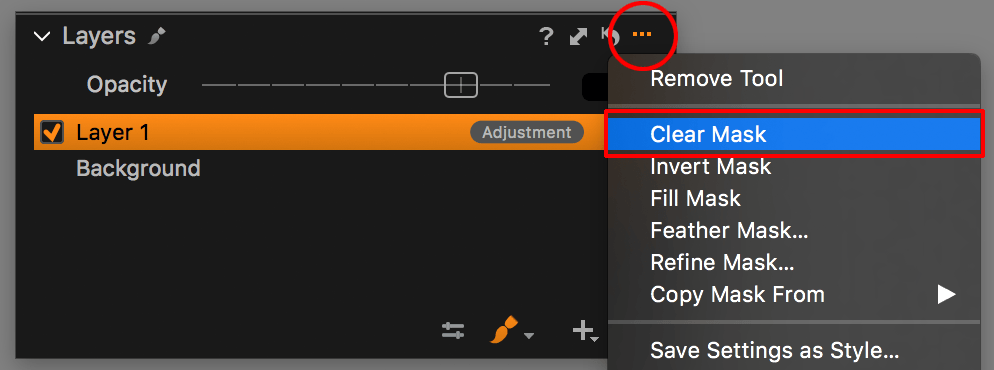 From the Action menu of the Layers tool, you find a new Clear Layer command, that complements the existing Invert Mask and Fill Mask commands. As the name says the Clear Layer command removes the mask but keeps the Layer.
Annotations
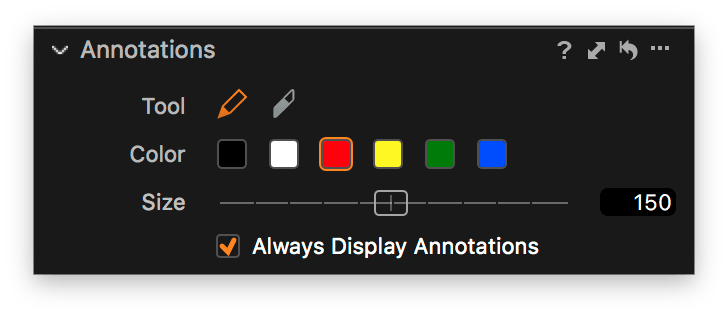
With Annotations, you can draw on your image with your mouse as a pencil. You can make multiple annotations per image, set the size of your pencil, and select one out of six colors. Annotations are very useful to point a retoucher to areas that are important or need to be worked on. When you process the image, you can choose whether or not the annotation is processed as well.
Annotation Tool
You find the new Annotation tool on the Metadata tool tab and it is accompanied by two cursor tools, Draw Annotations and Erase Annotations. You select one out of six colors and set the size of the pencil in pixels.
 There is also a toggle to show or hide the Annotations. Hiding is effective when you select other cursor tools, similar to showing/hiding Color Readouts.
 The cursor tools area at the toolbar is expanded to include the Draw/Erase Annotations cursor tools and the Always Display Annotations toggle. The Pencil size varies from 0-300 pixels. You can choose between Image Pixels and Screen Pixels, which means that the amount of pixels is related to the image or the screen.
 Go to Annotation tool > Action menu > Image Pixels / Screen Pixels.
Icon And Filter
When you make an annotation to an image you see a pencil symbol in the bottom right corner, next to the icons for adjusted and processed. The annotation itself is not visible in the thumbnail.
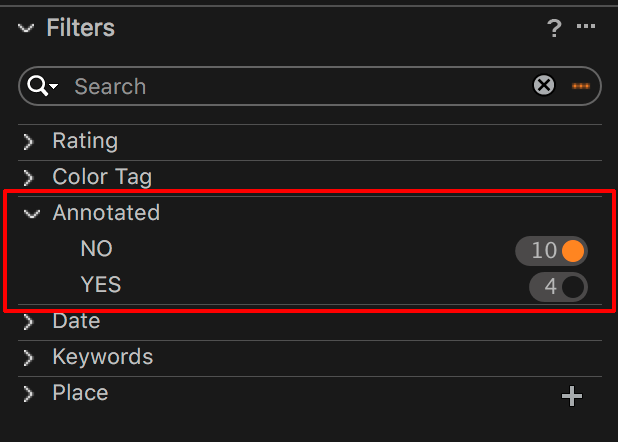 In the Filters and Search tools, the category Annotated is added to quickly filter and find images in the collection that do or do not have an annotation. Since Smart Albums are based on the Search function, Smart Albums now can contain the Annotated state among the search criteria.
Export And Process
What happens when you process an image with annotations? You tell me! Ask and I will serve. In either the Export > Variant and Process Recipe settings, go to the Metadata tab and find a checkbox for Annotations.
[twentytwenty]


[/twentytwenty]
Select PSD as output file or a Process Recipe with PSD output and you see at the Metadata tab Annotations (as a Layer). When you output to PSD file, the Annotation is stored on a layer. See the stacked images above, with the PSD output at the right.
Process with Assets
Capture One Pro 11 seems to have fallen in love with the PSD file format for output. It has taken some time before PSD was accepted for both export and import, but now it even gives you several benefits you do not get with other file formats. Let me explain what this has to do with Annotations, Overlay, Watermark, and Crop.
Annotations And Overlay
Both Annotation and Overlay are not really part of the image but help in creating it. When you process an image you decide whether you like the Annotation and/or Overlay to be part of the processed image. Go to Process Recipe > Metadata tab and check the desired box to process it with the image. This works for PNG, JPEG, TIFF, and PSD output file.
 However, when you process to PSD, both Annotations and Overlay are processed to a layer in the PSD file. See the screenshot of the Photoshop layers palette above. The layer names are created by Capture One (not me).
Watermark
A Watermark is always intended to be part of the image. The story is the same. For PNG, JPEG, TIFF you will find that the watermark is part of the image. For PSD, a separate layer is created for the Watermark. See the Photoshop layers screenshot above.
Crop
A crop is always processed unless you decide to ignore it. In your Process Recipe > Adjustments tab, you find the options Respect crop and Ignore crop. This replaces the Ignore Crop checkbox in earlier versions of Capture One Pro. New is the Crop to path (PSD) option. As you might understand, it is only available when you output to PSD.
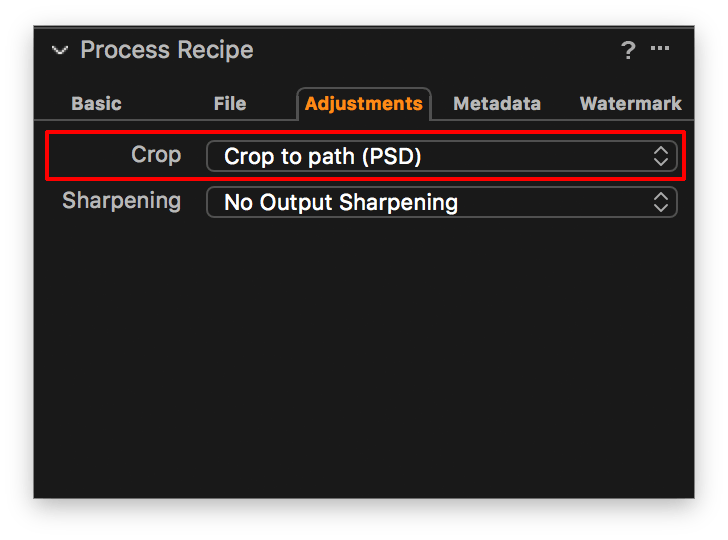 The Crop to path (PSD) setting means that the entire image (uncropped) is processed and that the crop is made into a path in the PSD file. The retoucher has the entire image file to work on while it includes the crop that the art director or client had made.
Smaller Changes
Smaller changes often do not get the spotlight but experience learns that they are often a game changer for many users.
User Interface
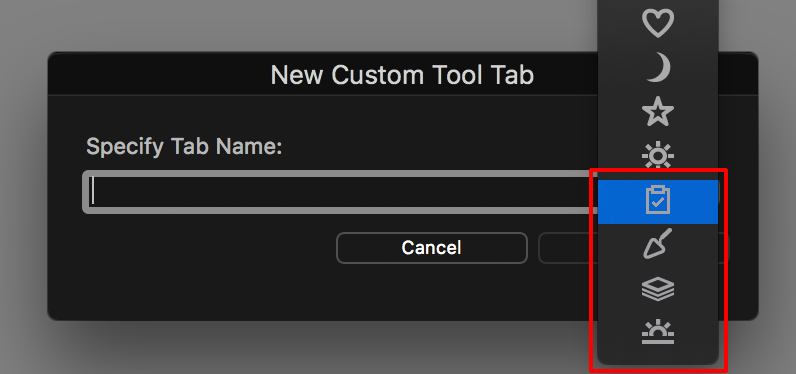
As I mentioned earlier, the default workspace now has done with the Local Adjustments tool tab, and a new Layers tool is part of the Exposure, Color, and Details tool tab. This gives more space for your own custom tool tab and there are four new icons to choose from.
 The name of all tools is now easier to read since the all caps typography is replaced for initial caps. Great choice! In the top left corner of the Viewer, we had two icons that let you switch between Primary and MultiView. This is now a single icon that works like a toggle. Easy!
Auto Adjust
You know the Auto Adjust for a quick fix. You also know that you can configure which tool to include in the Auto Adjust. Now, the Exposure tool is split for the Exposure slider only and the Brightness and Contrast sliders.
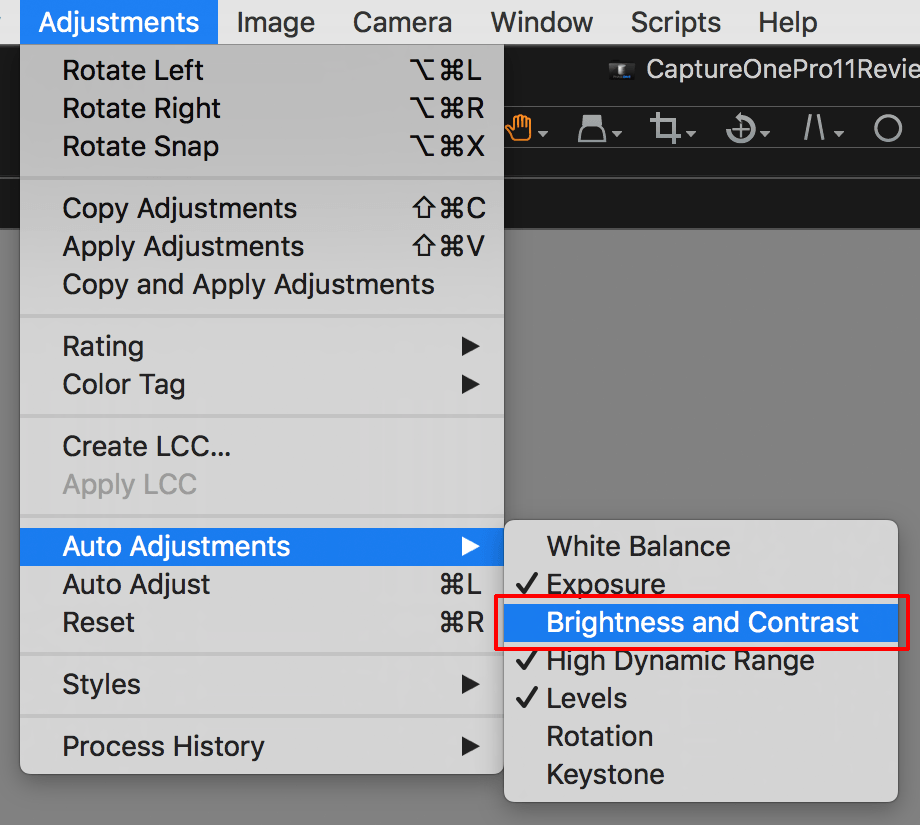 This allows you to automatically adjust Exposure without Brightness and Contrast settings being affected and vice versa. This makes the Auto Adjust feature again more usable after a recent improvement of the White Balance auto adjust.
L*a*b Color Readout
For those of you who are familiar with L*a*b or LAB for reviewing and correcting, it will be a great relief that it is now available in Capture One Pro 11. You can select the type of LAB readout from a list of six different built-in settings. Go to View menu > Lab Readout and choose your setting.
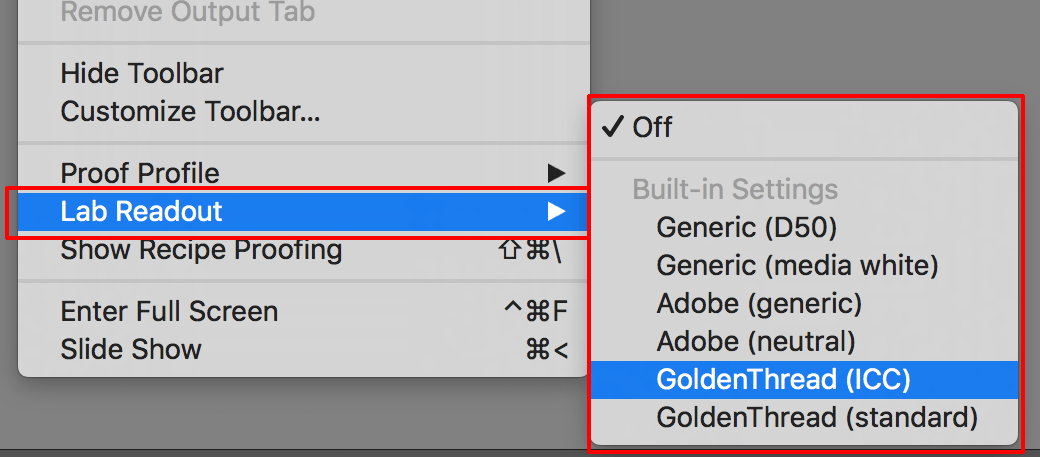 This changes both the readout from the cursor in the Viewer as well as the Color Readout tool. Full LAB documentation is available from Phase One.
Videos By Phase One
Phase One has posted on YouTube the following videos at introduction:
Before We End A Special Offer From The Author
I hope you enjoyed reading this article and will get more out of your images with Capture One Pro! Do you want to save 10% on Capture One Pro? Then visit Paul’s Ambassador page for the voucher code.Next, link directly to Phase One where you can buy Capture One Pro with the voucher code. Like to try first? Download and run a trial for 30 days. Free and fully featured! Thank you for reading. Please feel free to leave a comment. Like us on Facebook or subscribe to stay informed about new blogs and special offerings.
Paul Steunebrink
February 2018
Image Alchemist
Elevate Your Vision


You may also like