


Anyone doing printing is familiar with the use of printer and paper profiles, and of course we all have profiled our monitors – right?
But less known and understood is that our raw converters also use camera profiles. Depending on the program these may be visible, or hidden, but they’re there. Capture One has profiles available for all of the cameras that it supports, and even has versions for different lighting conditions. Adobe has them in Camera Raw and Lightroom. It used to be that they were “hidden” in Adobe’s products, but since the summer of 2008 with Lightroom 2.0 and Camera Raw 4.5 they are available, and the company even has a profile editor that allows for the customization of these so-called DNG profiles.
But now xrite has produced a simple and relatively inexpensive product ($99), the xrite ColorChecker Passport, that allows one to create ones own camera profiles, quickly and with little muss or fuss. The profiles that are created are in the form used by both Adobe Camera Raw (Photoshop / Bridge) and Lightroom.
Why Profile?
The question can be rightly asked – if raw converters come with profiles for our cameras, why bother to make ones own? The answer lies in the areas of colour temperature and white balance.
There are two choices when it comes to making profiles. One can have a profile for each major difference in colour temperature, or one can make a Dual Illuminant profile. Let’s look a little closer at what this is all about.
A device like a scanner, or a screen, or a printer / paper / ink combination, has a single colour temperature. One profile therefore does the trick. But, a camera shoots in a wide variety of lighting conditions, with temperatures from as low as 2,900K in dim candlelight up to 10,000K in some daylight conditions. The way that Adobe handles this is to make what are called Dual Illuminant profiles for every camera that they support. Since they can’t make a wide range of profiles for different lighting conditions that users may encounter they profile the camera for just two, Illuminant A and D65 – warm and cool colour temperatures to you and me.
They then create a profile that characterizes how your camera’s sensor responds under both extremes of colour temperature. When you then load a raw file into one of these programs the software determines which model camera was used and loads its profile.
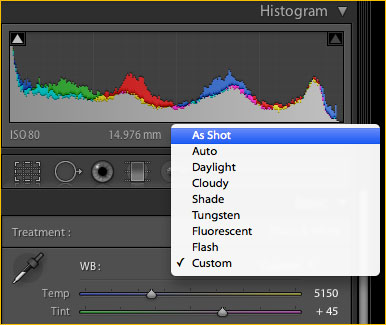
Your job now is to decide on what the White Balance should be. Since you’ve shot in raw the colour balance is not baked into the image. The shot has simply been tagged with what your camera setting was, from Auto WB to one of the fixed settings. You can now choose whichever seems best.
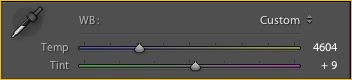
You are also free to fine tune the Temp and Tint sliders, which is simply a freehand way of doing what the fixed colour temperature sliders are doing. Indeed what happens when you do either of these is that the software is choosing information from the Dual Illuminant profile; dialing in a mix of colour characteristics derived from the two profiles that Adobe made for your model camera, one in warm light and another in cool light.
White Balance
Well – that’s all well and good you say, but we’re still flying by the seat of our pants. What was the actual colour temperature at the time and place that any particular shot was made? Good question!
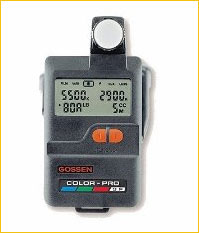
Gossen Color-Pro 3F
In the days of film we would choose either a Daylight balanced film or a Tungsten balanced film (or use a correction filter if the camera was loaded with the wrong type), and then live with the results. Careful workers, especially those doing product and technical work, would have along a colour temperature meter and a large selection of CC (Color Correction) Kodak Wratten filters to try and achieve a perfect colour balance.
In the digital realm we either tune our images by eye, or preferably we have a shot of a WB card or some other white reference taken at the same time and in the same light. Then, we use the white balance pointer in our raw processor to select that spot. Now, with a controlled white balance setting available we can apply this to all of our shots taken at the same time, with the same camera, and in the same light conditions.
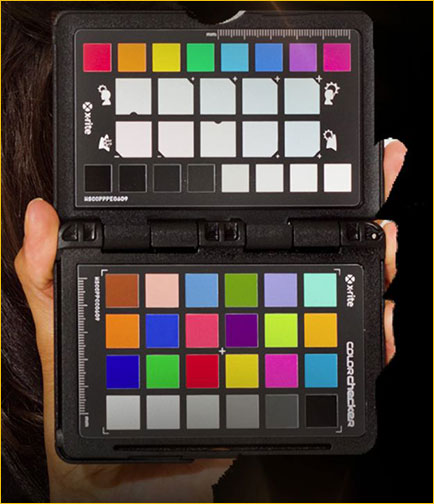
ColorChecker Passport
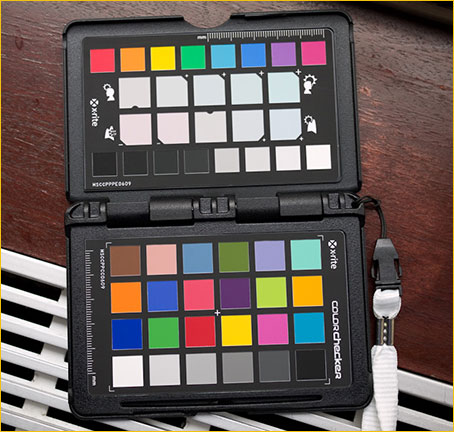
Which brings us to the xrite ColorChecker Passport. What xrite has done is put a standard 24 chip Colorchecker target into a hard plastic case, suitable for location use, along with a “Creative Enhancement Target” for color balance refinement, and a standard white balance card. In addition the Passport is provided with Windows and Mac software for creating Adobe DNG profiles as well as a Plug-in for Lightroom.
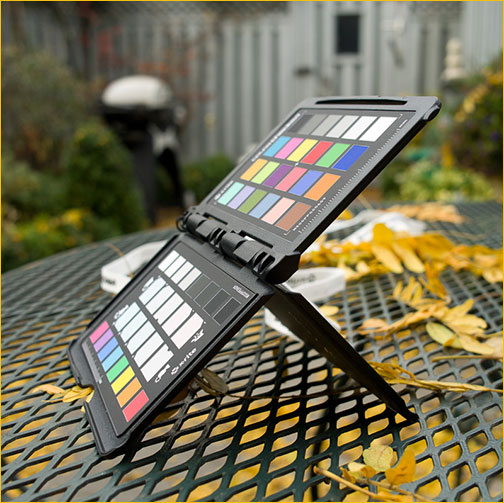
With this combo you are able to quickly and easily not only record a white balance target on location, but also a target suitable for creating a profile. The physical design of the Passport is excellent. Previous ColorChecker were either too large for field use or too small and delicate. The Passport’s plastic case is rugged and hinged so that it can be self standing with any of the faces visible. There is also a lanyard for securing it around your neck or to a camera bag.
To use it shoot the standard Colorchecker as large in the frame as possible. It doesn’t even have to be in focus. Even if you’re using a lens that won’t close focus, it’ll likely still work out OK. Try to expose properly so that there are no blinkies on your playback screen and therefore no clipping on the whites.
Now, to use the stand-alone Passport software simply Export the shot of the Colorchecker out of either Camera Raw or Lightroom to a DNG file. Drag it from the desktop (or wherever) into the Passport software and you’ll see something like the figure below. Click Create Profile, name it, and a few second later the job is done, with a custom profile having been created and put into the correct directory by the program.

If the Colorchecker is too small in the frame or too skewed you may have to manually locate the four points that delineate the corner of the required area, but this only takes a few seconds.
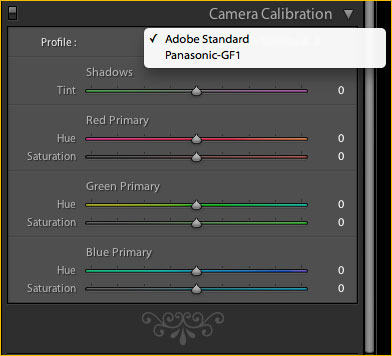
You’ll have to relaunch either Camera Raw or Lightroom for the program to become aware of the profile. If you now go to the Camera Calibration tab you’ll see that your named profile is now available. Select it and it’s active.
You may now also want to click on the second to the left bottom white square on the Colorchecker to choose your white balance point. That’s all there is to it. You can now load any other image shot under those particular light conditions and apply this new profile, or any other for that camera that you’ve made. Lightroom and Camera Raw only show you profiles for the camera used to shoot the image. No others are visible, so there is no confusion or chance of mistakes.
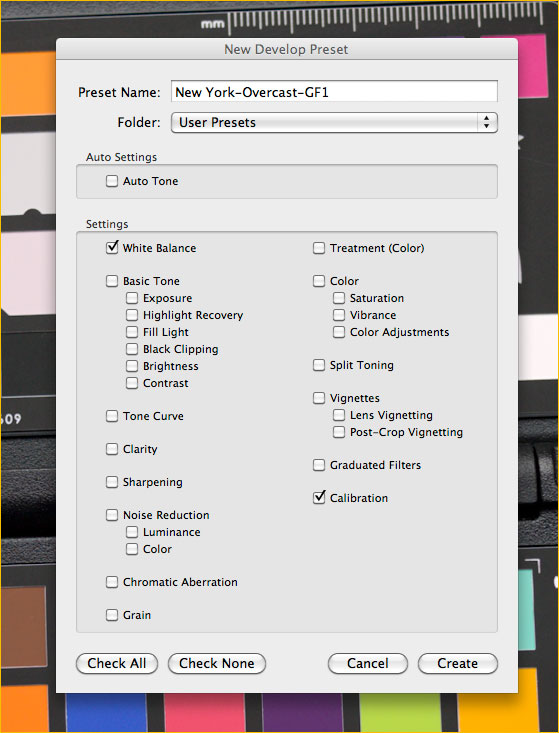
The next trick is to create a Custom Preset in Lightroom or Camera Raw that contains both the calibration (proper profile) and the White Balance that you’ve set. You’ll now be able to apply this to any image shot with that camera under those light conditions, even selecting a hundred or a thousand images at once and profiling and white balancing them all with a single click. Now that’s productivity.
You are of course free to create a custom profile and a white balance at any time when working on location. In the past I always shot a WB card in every new lighting situation. Now I can also shoot a profiling target, and in less than a minute back at my computer create a custom profile as well.
But, if you’d simply like to create a Dual Illuminant profile that is useful for just about any light condition, so that you don’t need to use separate profiles, just take two separate shots of the Colorchecker, one under a warm light and another under daylight or a cool illuminant, and then drop both into the program, having selected Dual Illuminant DNG. No additional profiling is now needed for almost any light condition.
An Example
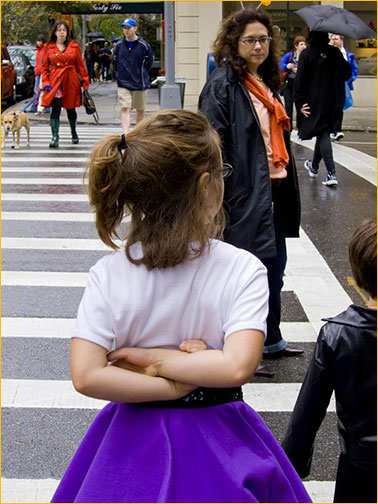
Pass your mouse over the above image to see it
with Adobe’s beta profile and alternately with my custom profile
created with Colorchecker Passport
Here is an example where the ability to create a custom profile really came in handy. I was shooting with the new Canon S90 using Lightroom 3 Beta, which had just been released. The program supported the S90’s raw format, but a proper profile had not yet been created by Adobe.
The image above shows what this looked like. Pass your mouse over the shot to see what it looks like with my custom profile. The lady’s scarf is indeed red not orange.
Creative Enhancement Target
On the separate panel located above the standard 24 patch Colorchecker is what xrite calls a Creative Enhancement Target. There are two sets of “creative” white balance patches that can be used to produce warmer and cooler images. These are the second and third rows of the patches above the color checker. These are particularly useful for portrait and landscape photographers. They are really good to warm up skin tones, and to produce better greens in landscapes, respectively.
The bottom row of patches on the same page are “clipping patches”. When turning on the shadow and highlight clipping warnings in Lightroom and CR they are extremely useful in setting the right values for the recovery sliders.
The Bottom Line
How good are these profiles created by Colorchecker Passport? Are they as good as the standard Dual Illuminant ones that Adobe creates and includes with camera Raw and Lightroom?
Likely not, since Adobe uses calibrated light sources and a much larger set of colour patches to make their profiles. But, when compared side by side I find the Passport DNG profiles to be very good, and a couple of colour gurus that I’ve spoken with are similarly impressed.
In summary, I now regard the xrite Colorchecker Passport as a must-have – a standard part of my field kit. It’s a simple as that.
November, 2009


Elevate Your Vision


Read this story and all the best stories on The Luminous Landscape
The author has made this story available to Luminous Landscape members only. Upgrade to get instant access to this story and other benefits available only to members.
Why choose us?
Luminous-Landscape is a membership site. Our website contains over 5300 articles on almost every topic, camera, lens and printer you can imagine. Our membership model is simple, just $2 a month ($24.00 USD a year). This $24 gains you access to a wealth of information including all our past and future video tutorials on such topics as Lightroom, Capture One, Printing, file management and dozens of interviews and travel videos.
- New Articles every few days
- All original content found nowhere else on the web
- No Pop Up Google Sense ads – Our advertisers are photo related
- Download/stream video to any device
- NEW videos monthly
- Top well-known photographer contributors
- Posts from industry leaders
- Speciality Photography Workshops
- Mobile device scalable
- Exclusive video interviews
- Special vendor offers for members
- Hands On Product reviews
- FREE – User Forum. One of the most read user forums on the internet
- Access to our community Buy and Sell pages; for members only.
You may also like


