ICC Profiles
If one wishes a reasonable match between one’s inkjet printer results and monitor, as well as maximal print quality, it is best to have acolor managed system,in which ICC profiles act as a “translator” between the various ways that these devices interpret colors. These profiles may be supplied with the devices, purchased, or one may generate them with appropriate equipment. There are various approaches, but it is generally accepted that specialized hardware, designed for the purpose, does the best job. In years past this was very expensive, but prices have fallen dramatically in recent years for monitor colorimeter based systems, and now this is also true for hardware based printer profiling.
Testing
I tested this software and hardware on three different Windows XP computer systems, using three different printers and inksets. Three papers were evaluated, Epson Enhanced matte, Epson Premium Luster, and Office Depot Pro Glossy.
Description
TheColorVision PrintFIX PROpackage is designed to produce ICC profiles for RGB inkjet printers. This includes the Datacolor 1005 Spectrocolorimeter patch reading hardware, and stand-alone software. The software creates printer profiles that support RGB-driven inkjet printers, as well as many other types of RGB based printers.
 The LED-based Datacolor Spectrocolorimeter 1005 is used to measure calibration targets and saves the data in L*a*b format. It offers 3 different patch targets containing 150, 225, and 729 patches. Once one becomes used to the procedure, the smaller targets can be read in about 3 – 5 minutes, while the larger ones take longer.
 ment head has a focusing lens, and six LED sets of 3 each red, green, and blue for a total of 18. These are placed at 120 degree offsets to minimize angular differences on surfaces with directional texture. This results in much more accurate profiles of thick, fibrous papers like fine art and matte.
The Spectro is a native USB device. The difference between a spectrophotometer (like the i1 by Gretag-Macbeth) and a colorimeter, is that the spectrophotometer utilizes either a diffraction grating or prism in the sensor, while a colorimeter utilizes a three color source (red, green and blue) generated by either a color wheel with colored filters, or, in this case, sets of specially designed LEDs. This package will be available at a lower price than the spectrophotometer based ones, retailing at $499.
A wizard guides the user through all the steps, including printer setup. There are good help files. More advanced users can avail themselves of time saving short cuts that allow them to “skip to profiling process.” Beginners and intermediate users have the ability to go through all necessary initial learning and testing steps, helping to make sure that all needed parameters are correctly entered.
Calibration procedure:
The initial screen is a “welcome”, describing the procedure.
The next screen, “Printer Definition”, describes the various printer parameters that should be entered. Some of these are recorded on the test prints, avoiding confusion.
At this point, one may skip several preliminary steps and go right to the profiling process.
The following screen allows the entry of the specific printer configuration settings, those entered into the printer driver.

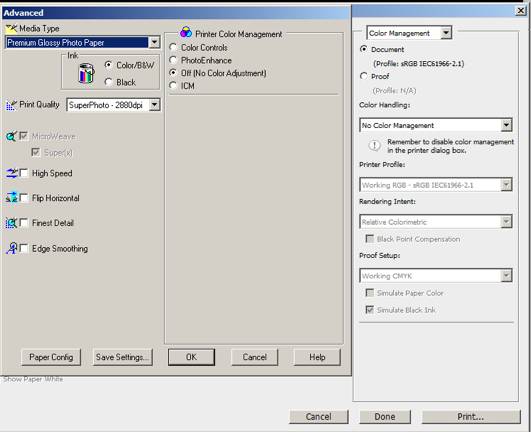
Here, the help file is useful to help choose the correct settings. It is MOST important that these exact settings are also used when the generated profile is employed in a color aware application, like Photoshop or (for Windows machines) QImage.
Here is the driver window for the Epson R2400 printer:
Note that color management is turnedoffin the printer, and that the settings are saved in a “custom setting” so they may be easily chosen when needed.
Next we see the “print quality check” screen, which I found initially puzzling, until I realized that it is a more sensitive evaluation of the general printer functioning than a nozzle check alone. Again, the help file is very illuminating.
Next, one is given the opportunity to optimize the media setting choice, in the “Media Setting Check” screen.
Again, I wondered at the purpose of this initially, but then learned that the ideal media setting in the printer driver (the paper type choice which determines how much ink is laid down on the image) is NOT necessarily the one which matches the paper name. This is particularly true with older printers. The help file delves into some detail about the print aberrations to watch for. The provided image yields quite a sensitive evaluation.
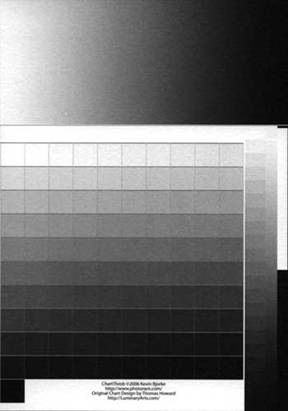
One then selects a profiling target from the 4 available choices. There are 3 sizes, 150, 225, and 729 patches, with the latter printed either on 3 sheets of 8.5 x 11 inch paper, or one sheet of 13 x 19.
I found that the 225 patch target represented a reasonable compromise between ease of reading (more patches take time) and quality of profile produced.
Next one is presented with the spectro calibration screen. One places the instrument on the white calibration tile, and presses the switch under the ridged area where one’s index finger naturally falls. The led lights for about 0.5 second (indicating a reading), and the next screen appears.
Now we are ready to read patches.

Here one may name a file to save the patch reading to, using an identifier that incorporates data like the date, patch number, printer, paper etc.. One can also call up a previously measured target file to generate an edited profile from it. It is best to name the profiles generated similarly to the XML patch reading file, as this makes subsequently using the profiles much easier.
Next one clicks on the “Read Patches”, and a patch reading template appears.
I find the “split” format the easiest to use. The read patches will have the ideal color in the upper left, (readout in RGB values) and the actual read color (LAB values) in the lower right. One carefully positions the sensor on the patch to be read, presses the read switch, and holds the device still for about 0.5 second while the green led flashes on and off, there are audible clicks at the beginning and end of the reading, and the value read appears in the lower right diagonal.
The red patch in the lower right, denotes the patch to be next read. This red mark then moves to the next patch to be read, helping to keep one’s place. One may re-read a patch at any time, by maneuvering to the desired patch with the arrow keys, and repeating the reading procedure.
When the end of the row is reached, a bell sounds and the cursor jumps to the beginning of the next row, as in a typewriter. At the end of the chart, a double bell rings! It is easy to keep ones place.
Here is a completed target:

The differences in the measured color from the ideal are what the profile will attempt to compensate for.
Next one enters the profile parameters screen – “Build Profile Setup”.
Here one chooses a name for the profile, preferably close to the name chosen for the measurement file, unique and easily identified. I always use the “high bit depth” (16 bits), and check the boxes for the black (ink color) and white (paper color) compensation. The initial profile should be made with all the sliders at zero. Subsequent tweaks of the various parameters will adjust the results to suit personal image preferences. Note that many parameters are available for these adjustments.
Upon leaving this screen, the profile will be built and placed in the correct subdirectory, and the print preview screen appears.
Any screen that has the four (selectable) quadrants has the function of allowing side by side print comparisons of varying parameters. At this point one can observe the initial print, then produce another “tweaked” profile and compare the results. Note that the default rendering intent is saturation, NOT a good choice, in my judgment. This will be discussed in my conclusions.
Impressions
Pros
– If one carefully reads the help files, the procedure is quick and easy
– Not much time is consumed in making the initial profile, and subsequent ones are very quickly and easily produced, thus making tweaking profiles very easy.
– The colorimeter gives stable, easily replicated readings
– The software makes patch reading fairly foolproof
– The profiles are very easily modified
– The profiles are of high quality, yielding prints with good shadow detail and clean gray ramps
CONS
– The default saturation rendering intent of the test prints is a poor choice, out of gamut colors will be mapped to ANY color, as long as it is saturated. One can choose perceptual, relative colorimetric, or absolute colorimetric intents. I prefer perceptual.
– One is unable to utilize a test print of one’s own choice while in the software.
Conclusions
My impression is that of a very solid package that offers the reliability and accuracy of spectro-colorimetric generation of printer ICC profiles at a more accessible price point than previously available. The basic instrument and software design is good.
 Estimated $500 street price for the Colorimeter and software, about $100 more for the Spyder2PRO monitor calibration device.
Available January 2006.
_________________________________________________________________________
By: Jack S. Winberg
Jack has degrees in Medicine and Microbiology, and teaches digital imaging at local colleges in the Sarasota, FL area.


Elevate Your Vision


Read this story and all the best stories on The Luminous Landscape
The author has made this story available to Luminous Landscape members only. Upgrade to get instant access to this story and other benefits available only to members.
Why choose us?
Luminous-Landscape is a membership site. Our website contains over 5300 articles on almost every topic, camera, lens and printer you can imagine. Our membership model is simple, just $2 a month ($24.00 USD a year). This $24 gains you access to a wealth of information including all our past and future video tutorials on such topics as Lightroom, Capture One, Printing, file management and dozens of interviews and travel videos.
- New Articles every few days
- All original content found nowhere else on the web
- No Pop Up Google Sense ads – Our advertisers are photo related
- Download/stream video to any device
- NEW videos monthly
- Top well-known photographer contributors
- Posts from industry leaders
- Speciality Photography Workshops
- Mobile device scalable
- Exclusive video interviews
- Special vendor offers for members
- Hands On Product reviews
- FREE – User Forum. One of the most read user forums on the internet
- Access to our community Buy and Sell pages; for members only.
You may also like