Camera calibrating and profiling is a controversial subject. Some people think that it’s a waste of time, while others feel that it’s the last remaining step to take in attempting a full and properly colour managed workflow.
There are two approaches to raw processing. Programs like Phase One’sCapture Oneuse expensive equipment, skilled technicians and a great deal of time and effort to create ICC profiles which are then used by the raw processing software. Multiple profiles for different light situations or subject types may be available.
The approach taken by AdobeCamera RawandLightroomis to create two proprietary custom profiles (non-ICC) for two different standard illuminants and then blend them depending on the colour temperature of the light recorded in the camera’s metadata. Without debating which is the best approach, be it enough to say that only one ,and in almost all cases never more than a couple of cameras of any particular model, are used when a camera profile is created by one of the raw processing software publishers.
Both of these approaches work very well, but they assume that the camera that was used to create the raw processor’s profile and your particular camera of the same model have the exact same colour characteristics. Now – they may, and they may not. And even if they do not, which is more than likely the case, how big is the variance? It may well be that it is so small so as not to be visible, even to the most critical observer. Or, it might be such that the generic profiling done by Phase One, Adobe, or someone else varies enough from what your particular camera does so as to make the creation of a custom profile (or as will be seen, an edited version of that profile) worth having.
Until now I have been a bit of an agnostic on the subject. I know how it’s done, I have seen and used products for editing and generating custom profiles, but have never bothered to do so for my own work and my own cameras. I just haven’t felt it to be all that necessary.
But in recent months a number of people at seminars and workshops have asked me about the subject, and so I felt that it was time to take another look at what was available, and how they worked. Therefore in this review I look at the first of three products, ranging in price from almost free, to moderately priced, to relatively high priced. And, as with most things in life, you typically get what you pay for.
______________________________________________________________________________
ACR Calibrator from Chromoholics
If you already own aGretag Macbeth Colorchecker (x-rite)then theACR Calibratorsoftware (actually a Photoshop script) is available as a free download. If you don’t have a Colorchecker (and if you don’t, why don’t you?) these are available for about $75 from most major camera dealers. If you can’t find one locally,B&Husually has them in stock.
ACR Calibratorworks with bothCamera RawandLightroom, and also requiresPhotoshop. Using it is quite simple. Download the script (works equally well on both Macs and PCs). Take your Colorchecker and place it in bright sun (or use studio flash) with no nearby coloured surfaces, such as grass or brightly painted walls. Photograph the target, bracketing the exposure to ensure that you get a well exposed (no blown highlights) raw file.The instructionsare quite straightforward.
Load the raw file into Camera Raw and set the white point following the instructions. Then load the file into Photoshop with no other adjustments.
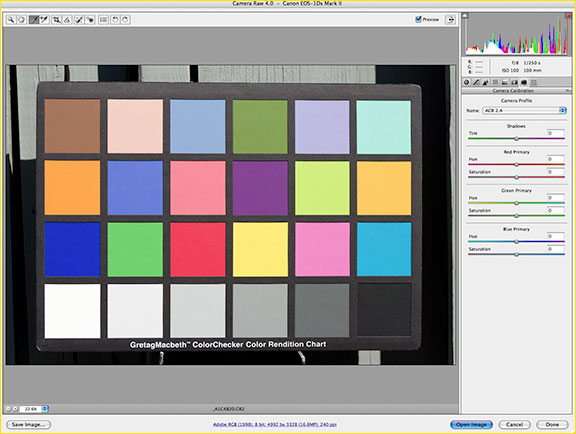
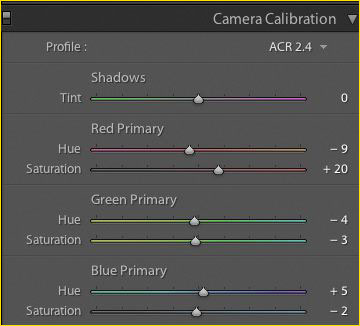
At this point you run the Script, after which you will see a screen that looks something like the following…
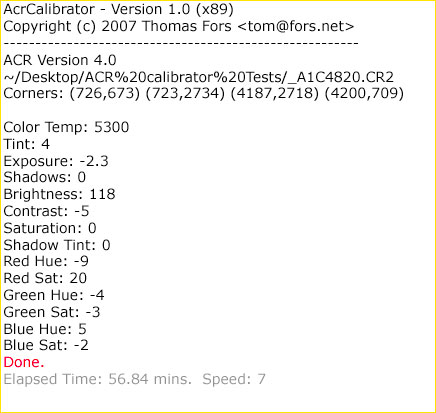
Now it’s time to go into that control panel in either Camera Raw or Lightroom that you never understood before. (They are the same in both programs). Beginning with the reading for Shadow Tint enter the values that were generated by the script, as seen in the example below. Save this as a preset so you can use it on any photography taken with that camera, either before or since.
That’s all that there is to it. In Lightroom, for example, just select all the images from a shoot done with a particular camera and click on the preset that you’ve created. In a moment they will all have that profile calibration applied.
How well does it work? It really depends on your expectations, and of course on the variance that your camera displays over the camera that was used by Adobe when their Camera Raw or Lightroom profiles were created. In most cases the changes will be subtle, but possibly well worthwhile. Since if you already own a GM Colorchecker the script is free, why not give it a try? You may end up being pleased, and at worst will have become a bit more familiar with the tools and programs used.
– May, 2007
______________________________________________________________________________
…coming soon: third party calibration and a high-end do-it-yourself system.

Elevate Your Vision


Read this story and all the best stories on The Luminous Landscape
The author has made this story available to Luminous Landscape members only. Upgrade to get instant access to this story and other benefits available only to members.
Why choose us?
Luminous-Landscape is a membership site. Our website contains over 5300 articles on almost every topic, camera, lens and printer you can imagine. Our membership model is simple, just $2 a month ($24.00 USD a year). This $24 gains you access to a wealth of information including all our past and future video tutorials on such topics as Lightroom, Capture One, Printing, file management and dozens of interviews and travel videos.
- New Articles every few days
- All original content found nowhere else on the web
- No Pop Up Google Sense ads – Our advertisers are photo related
- Download/stream video to any device
- NEW videos monthly
- Top well-known photographer contributors
- Posts from industry leaders
- Speciality Photography Workshops
- Mobile device scalable
- Exclusive video interviews
- Special vendor offers for members
- Hands On Product reviews
- FREE – User Forum. One of the most read user forums on the internet
- Access to our community Buy and Sell pages; for members only.
You may also like