


By setting correct exposure & white balance when you do your shooting it can dramatically reduce the time needed to adjust your images in Photoshop afterwards, therefore increasing productivity & providing a more predictable result.
I found in the early days of ownership of my Canon D30 that a lot of my shooting was sometimes described as ½estimated best guess when it came to exposure & white balance. Sometimes I wasn’t quite confident that I had got the shot quite right, so I would take a lot of extra exposures, bracketing the exposure just to be sure. Unfortunately in some cases it meant that I would spend hours in Photoshop fine tuning images to get a result exactly the way I wanted them to appear. Since most of my work is portrait work I also had terrible trouble getting accurate skin tones, and this was mainly due to inaccurate white balance. The Canon AWB (Auto White Balance) setting was not good enough for my type of work. Another problem arises as cameras in-built light meters measure reflected light, it can very easily get tricked depending on whether or not you are photographing dark or light subject matter.
Over a period of time I have developed the following simple technique which can significantly reduce the time spent tweaking the images in Photoshop, because you have a better image to start with. Whilst this process may be a bit awkward to start off with, like anything new, with practice these simple setup adjustments can be done in 1-2 minutes. Well worthwhile as this can save you hours of computer time later on.
To do this you will need:
Kodak Gray Card (gray on one side, white on the other)
Handheld incident light meter (optional but best to use one ½ see text later on)
Digital camera with histogram display & custom white balance functions (e.g. EOS-D30, D60, 1D)
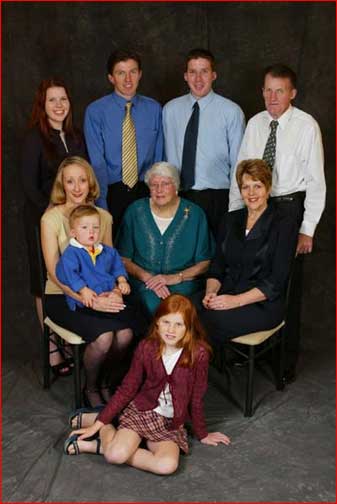
The sample images provided here were shot on an EOS-1D of a family group in our studio and were illuminated by electronic flash heads. The same principal applies whether you are using natural light or studio flash equipment.
Step 1 Measure Initial Starting Exposure
After setting up your required image composition take an incident light reading with your light meter in front of the middle of your subject with the white dome pointing back to where you will be taking the picture from. With your camera in Manual mode, set you camera to the same shutter speed & aperture readings displayed by the light meter. Be careful also that the ISO on your camera is the same as your light meter (in my case ISO 200).
Step 2 Set White Balance
With your camera’s exposure set to match your light meter (in my case 125sec @ f/10) get your subject to hold the Gray card with the WHITE side facing the camera. Take a photo, making sure the central spot in the viewfinder is fully covered by the white area as seen below. Note that your camera’s AF system will have trouble focusing on the white card, so focus on your subjects finger or edge of the card, and without taking your finger off the shutter button recompose your shot before completing the exposure by fully depressing the shutter button.
Select this shot as the white balance image to be used & make sure your camera is set to custom white balance (for full details on this it is best to read the Canon instruction manual). A note for users of the EOS-1D I have found colour matrix 2 the best for portraits.
Make sure the histogram info display on the camera is enabled (see Canon instruction manual).
You should get something close to the image below on the display panel on the back of the camera.
Please note that I have found that correct white balance is particularly critical when shooting portraits, because of the subtle skin tone variations of the subject. If not spot-on will easily show with odd colour casts.
Step 3 Fine Tune Exposure
Ask your subject to flip the Gray card over so that this time the GRAY side is facing the camera. Take another photo of the card but this time it is VERY IMPORTANT to make sure the Gray card fully covers the viewfinder. You should get something close to the image below. Your cameras AF will have the same trouble as mentioned before trying to focus on the Gray card so handle this in the same way.
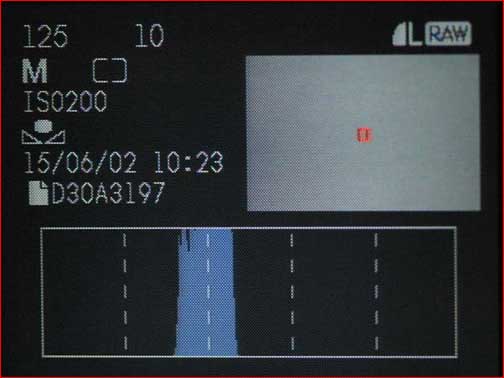
Now this part is critical for you to understand. A Gray card is meant to measure the mid-tone of the image, so if everything has been set correctly the histogram peak should also be in the middle as well. But you can clearly see from the above image that in my case it is to the left of centre, so we will need to adjust the exposure on the camera.
Since I have found these vertical division lines to be roughly one f-stop apart, I increased the exposure by 2/3 of a f-stop (in my case 125sec @ f/8) and then re-shot the Gray card with the revised exposure. This was what resulted.
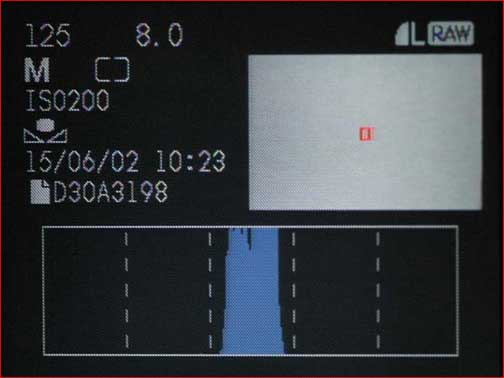
OK the histogram peak is right in the middle – I now have accurate exposure & white balance both set. Please note that if I had just relied on my incident light meter to give me my final reading, then in this case I would have been almost 1 f-stop out in my shooting, therefore not capturing the full tonal range in my digital files.
Step 4 Start Shooting
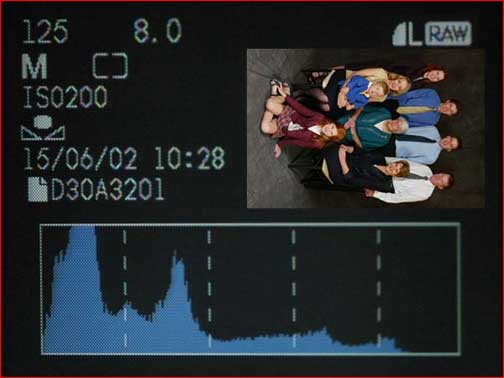
You now have it. Start shooting without changing your exposure your histogram should give you a good spread from left to right (dark to light tones). Providing your lighting does not change there is no need to change your exposure and no need to bracket exposure either.

Below is a final image straight off the camera before any adjustments were made. Not much to be done here at all.
Whilst this example applies to a portrait shoot in a studio it can easily be applied to outdoor shooting of people with natural light or with some allowances for shooting just about anything. I have used the exact same procedure for photographing small table-top commercial product shots also giving excellent results.
I mentioned earlier that the handheld incident light meter is optional. All this does is provide you with a more accurate starting exposure to begin with. I suppose in a way it is also a double check when used with your Gray card. You can best guess the exposure to start with and then by using the Gray card fine tune the exposure. The only other thing is by occasionally checking the exposure with your light meter it will easily tell you if the level of light has changed from taking your initial measurements. This is particularly useful if your photos are outside with variable lighting conditions and/or shooting over a long period of time. Just remember the variation in settings between your light meter and camera when you were initially fine-tuning your exposure.
This technique will provide you with photos which are a lot closer to the mark than what you had to start with before, and reduces Photoshop computer adjustment time. One other benefit is if you have made adjustments to one image in Photoshop using certain settings then in most cases you can use those exact same adjustment settings to other images shot during the same shoot ie: you do not have to correct each individual image.
It seems in this modern digital age of photography that the old Gray card is not dead yet and is indeed a very useful tool.
I hope this article will help others who were suffering from the same problems that I was. If you find this info helpful please let me know by email. If you also have any special tricks of your own I would also like you to drop me an email.
Here’s To More Shooting & Less Time Wasting.
2002


Elevate Your Vision


Read this story and all the best stories on The Luminous Landscape
The author has made this story available to Luminous Landscape members only. Upgrade to get instant access to this story and other benefits available only to members.
Why choose us?
Luminous-Landscape is a membership site. Our website contains over 5300 articles on almost every topic, camera, lens and printer you can imagine. Our membership model is simple, just $2 a month ($24.00 USD a year). This $24 gains you access to a wealth of information including all our past and future video tutorials on such topics as Lightroom, Capture One, Printing, file management and dozens of interviews and travel videos.
- New Articles every few days
- All original content found nowhere else on the web
- No Pop Up Google Sense ads – Our advertisers are photo related
- Download/stream video to any device
- NEW videos monthly
- Top well-known photographer contributors
- Posts from industry leaders
- Speciality Photography Workshops
- Mobile device scalable
- Exclusive video interviews
- Special vendor offers for members
- Hands On Product reviews
- FREE – User Forum. One of the most read user forums on the internet
- Access to our community Buy and Sell pages; for members only.
You may also like


