


By: Gary Ferguson
In the first part of this article we looked at how badly image quality was degraded by any shift from the plane of precise focus, and the way that historic concepts of depth of field are inappropriate if enlarging to the capacity of today’s inkjet printers. So if stopping down only delivers limited benefits are there any alternative solutions?
Well, there are at least three focusing strategies that don’t revolve around the traditional notion of extending depth of field with smaller apertures.
Infinity Focus
When we’re confronted with a scene that demands near-to-far sharpness most of us instinctively bias the depth of field in favour of the foreground. The rationale being that the far distance tends to be a bit soft anyway, so the eye won’t object if we make it a bit softer still. For many compositions it’s a strategy that makes sense, especially when the background only serves to give context to a dominant foreground object. For example a popular subject for British landscape photographers are the many Neolithic stone circles found throughout the UK and Ireland. Most photographers would choose to emphasize the stones by skewing the available depth of field to the foreground, rather than concentrate on the immediate environment.
But infinity focusing is a perfectly valid alternative for many subjects. It’s an approach that was brilliantly articulated by Harold Merklinger, and you can find his detailed analysis here,
http://www.trenholm.org/hmmerk/
What Harold Merklinger did was throw away the traditional focusing approach based on optical theories of circles of confusion, instead he developed a method that concentrates on resolving real objects within the scene. In particular he noticed that objects in front of the plane of focus may be blurry, but they can still be identified for what they are. However, objects behind the plane of focus are not only blurry, they quickly become unidentifiable. This observation was condensed into a simple rule of thumb. Set the lens to infinity then divide the focal length of the lens by the aperture. This will give you, in millimeters, the subject resolution limit from the far distance to right in front of the camera. For example, say you are using a 35mm lens focused on infinity, and the aperture is f/11, then 35 over 11 is three (give or take). Now any object in the scene larger than 3mm will be identifiable, provided it’s within the resolution capabilities of the lens and sensor. So even though you’re focused on infinity, a 3mm wide blade of grass in the immediate foreground will still be distinguishable as a discreet and distinct object. It may be a bit soft, but it’s still identifiable.
Here’s a practical demonstration.

This scene comprises of a simple sign in the foreground, and some complex and detailed brick houses in the background. It may look uninspiring but shots like this actually pay for all my digital toys!
There’s no way this could be convincingly covered by traditional depth of field, the only thing in sharp focus would be the empty air in the middle distance. But biasing the focus to the foreground sign would mean the individual bricks in the houses would be lost.
The camera was a Hasselblad 903 SWC with a 38mm lens; it was set to infinity with an aperture of f16. So 38 divided by16 gives a little over 2mm. The lettering on the sign is about 8mm thick, so it should be easily resolved, even with focus set to infinity and the sign less than two meters in front of the camera.
Here’s a 100% crop of the lettering

And a 100% crop from the background

To my eye this is an advantageous trade off, what’s been gained in the background more than compensates for what’s been lost in the foreground.
Furthermore, when this technique is used the results can be subtly but startlingly original, or they would be with a more deserving subject! It’s clear that the almost universal decision to bias depth of field to the foreground has become something of a photographic cliché. Harold Merklinger’s technique results in an image that reverses our normal human vision and replaces it with something uniquelyphotographic,an image that pulls us past a mediocre rendition of nearby things and into the distance to enjoy unexpected clarity. It’s a kind of Alice in Wonderland vision where things get clearer the further away they are! I’m sure there’s a vacant niche in the crowded world of landscape photography for someone who makes this technique their signature and produces an original and comprehensive body of work, all done with a lens firmly taped down at infinity!
Scheimpflug Photography
Movement or technical cameras command the affection and respect of landscape photographers in a way that, in my opinion, isn’t wholly deserved. In particular, those who don’t use them seem to believe that lens tilts provide aget out of jail freecard, one that will solve every focusing problem the photographer might ever meet. I wish it were so, but it’s not.
Lens tilts can’t expand the plane of sharp focus, they just allow it to be moved around to better fit the scene. However, the same comments made earlier, that depth of field is more limited when we make large prints from small sensors, also applies to lens tilts. With a rigid lens camera the plane of sharp focus is like a wall directly in front of you. With a movement camera it can correspond to that same wall, or it can be the floor beneath you, the wall alongside you, or the ceiling above you. In fact it can be anywhere you like. But sharp focus with a movement camera is still a flat plane rather than a magically undulating shape that conforms to every nook and cranny in a three dimensional landscape.
However, if you find yourself photographing basically flat planes, such as seascapes, desert scenes, or the façade of a building, then a movement camera will allow you to select the optimum aperture for your lens. And you can do so secure in the knowledge that you’ll have perfect front-to back sharpness. Furthermore, if you want restricted focus, for example to fix the viewer’s attention on one element within a scene, then again movement cameras are superbly capable of delivering the goods.
So they certainly have their uses.
However, in my subjective opinion, movement cameras don’t have quite the same comfortable relationship with single shot capture digital that they enjoy with film. The problem is precision in manipulating the camera movements relative to the comparatively small digital sensor. To give you some idea of the exactitude demanded by digital photography, the smallest possible focus change that I’m capable of making, even with the precise helical of a manual focus lens, will reveal itself under 100% inspection on a monitor. And with a movement camera you’re not just adjusting a focusing helical, you’re basically rebuilding all the dimensions of the camera for each individual shot. Now maybe I don’t have the touch of a concert pianist, but I’ve used movement cameras for thirty years so I’m reasonably adept with them, but I can’t deliver the hair splitting repeatability that digital demands if it is to produce everything it’s capable of.
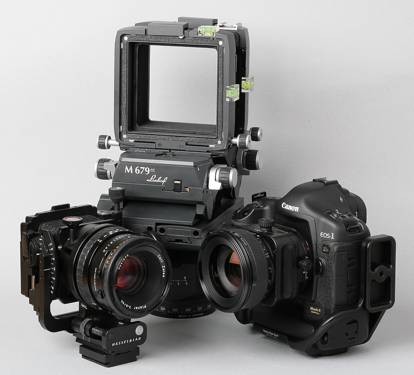
By comparison 4×5 film is easy. A stress free experience where close enough is good enough, but with digital if it’s not right then it’s wrong. Ironically, the nearest I personally can get to this counsel of perfection is with the Hasselblad Flexbody. Ironic because it’s the only one of the three cameras pictured above that is no longer manufactured. It’s by no means faultless, no camera is, but in terms of operating precision I can achieve more predictable results from this than from either Canon tilt & shift lenses or from the Linhof M679.
If you want to learn more about Scheimpflug techniques then you’ll find a detailed analysis on Harold Merklinger’s web site.
Software depth of field expansion
Everything about focusing discussed so far would have been familiar to the earliest pioneers back in the middle of the 19 th century. Even the infinity focus technique would have had some connection through the mechanics of pinhole photography. But the notion of taking a stack of photographs with varying points of focus, and assembling them to produce infinite depth of field, well that surely carries the stamp of the digital era!
There are a number of products that offer to perform this trick. I chose one called Helical Focus for no better reason than it came recommended by a member of the Luminous Landscape forum. If you’re interested in enquiring further you’ll find more about it here,
To demonstrate the potential of Helicon Focus I set up this shot.
An hour or so with the Linhof, tilting here and shifting there, would probably have made a reasonable job of it, reasonable that is for say an A4 or just possibly an A3 print. But to try and retain absolutely critical sharpness through every last one of the flash sockets and bevels and lens engravings would have been a fool’s errand. There’s no focusing technique that wouldn’t have required some compromise or other.
But with a software solution all that was required was to use a 90mm Canon tilt and shift lens at f11, it was shifted slightly to correct for converging verticals, then focused exclusively on the nearest element to the camera, which in this case was the green dot on the vertical lens in the foreground. After that six further exposures were made, each one being focused fractionally further away, until the furthest element in the shot was reached, the “Carl Zeiss” lettering on the vertical lens in the background. For more or less demanding subjects you can alter the number of exposures to suit, from five to eleven has covered all the subjects I’ve tackled so far. It works in 8 bit or 16 bit, and handles JPEG, TIFF, PSD, and some RAW formats, there’s also no file size limit.
The shots were loaded in the original taking order, a few adjustments were made to align the program with the characteristics of this particular subject, and in about a minute it had merged the individual shots into one consolidated image that drilled down through the collective depth of field selecting the best bits from each.
Except it stumbled slightly along the way!
On its first attempt it also incorporated some of the out-of-focus blurred highlights, so the final result although accurately focused had a slightly dreamy look, as if there was a stocking over the lens. But it should be noted that this was still superior to the f22, stop down for depth of field approach.
Here’s a 100% crop from the first attempt,

To avoid this effect requires the more advanced (and expensive) Helicon Focus Pro, which allows you to construct “opacity maps” which give the software greater guidance on which parts of each shot should be incorporated or deleted. These “opacity maps” require an image editor such as Photoshop. This took about twenty minutes to build and the second attempt gave the following result,

Pretty good, although if I’d known it would be this crisp I’d have backed off the exposure slightly to prevent the lettering burning out. More significantly, it’s equally sharp throughout the entire image, front to back and top to bottom.
So is this the end of focusing history?
Well, as always there’s no such thing as a photographic free lunch. Helicon Focus Pro isn’t cheap at US $250, but you can download it for a free 30 day evaluation period or take a one year license for US $70. It would be interesting to hear from other readers in case there’s a cheaper or better alternative out there. However, to put the price in context, I said earlier that nothing destroys photographic quality more quickly than focusing constraints. But the reverse is also true; nothing adds quality as quickly as a solution to those same focusing constraints. In this regard US $250 is probably something of a bargain, and it’s certainly a lot cheaper than a Linhof!
The second drawback is time and technique, not just in processing but also in the initial capture. The camera must be firmly mounted on a tripod and the quality of the final result is contingent upon small and equally spaced focusing steps. It’s much easier to achieve this with a manual focus lens rather than an auto focus lens used in manual mode. The reason is that auto focus lenses have helicals with significantly shorter throws. Interestingly subject movement is less of a problem. It might not be up to motor sports but for landscape photography you could use the opacity mapping function to select which individual shot delivers the moving clouds or waving trees. In fact because you’re more likely to use wider apertures you’ll also enjoy correspondingly faster shutter times, so these more dynamic elements will gain an additional sharpness benefit.
The final disadvantage is more of an opportunity cost. If you’re taking multiple shots to deal with depth of field can you also take multiple shots to handle exposure latitude or stitching? At some point the answer must be no. Seven shots for focus, multiplied by three shots for exposure, multiplied by five shots for stitching, all adds up to a logistical and processing nightmare!
I hope you find one of these techniques useful for your photography.
_________________________________________________________
Gary Ferguson has been been an enthusiastic photographer for nearly thirty years
since completing a degree in photography. He specialise in architectural and cityscape photography.
_________________________________________________________


Elevate Your Vision


Read this story and all the best stories on The Luminous Landscape
The author has made this story available to Luminous Landscape members only. Upgrade to get instant access to this story and other benefits available only to members.
Why choose us?
Luminous-Landscape is a membership site. Our website contains over 5300 articles on almost every topic, camera, lens and printer you can imagine. Our membership model is simple, just $2 a month ($24.00 USD a year). This $24 gains you access to a wealth of information including all our past and future video tutorials on such topics as Lightroom, Capture One, Printing, file management and dozens of interviews and travel videos.
- New Articles every few days
- All original content found nowhere else on the web
- No Pop Up Google Sense ads – Our advertisers are photo related
- Download/stream video to any device
- NEW videos monthly
- Top well-known photographer contributors
- Posts from industry leaders
- Speciality Photography Workshops
- Mobile device scalable
- Exclusive video interviews
- Special vendor offers for members
- Hands On Product reviews
- FREE – User Forum. One of the most read user forums on the internet
- Access to our community Buy and Sell pages; for members only.
You may also like


