


Fast, Simple and Fun Scanner for Preserving Memories

![]() If you are a regular reader of Luminous-Landscape, you’ll know that I am a big proponent of printing. Photography for me is all about the print. In a previous article, I showed a small printer, the Epson PictureMate PM-400. For me, this was a way I could make small prints made from iPhone images, which is another camera I own. This little printer is used on an almost daily basis. This solution solved a much-needed necessity of mine.
If you are a regular reader of Luminous-Landscape, you’ll know that I am a big proponent of printing. Photography for me is all about the print. In a previous article, I showed a small printer, the Epson PictureMate PM-400. For me, this was a way I could make small prints made from iPhone images, which is another camera I own. This little printer is used on an almost daily basis. This solution solved a much-needed necessity of mine.
My next dilemma was to figure out what to do with the many boxes and containers I had of old prints from the 70’s, 80’s, and 90’s. While I love having the prints, I am concerned with the achievability of all these images. I want to have a permanent digital record of all the incredible memories of when my kids were growing up. I want to be able to pass these along so my kids can share them with their kids.
I have been watching these prints change color over the years as they age. I was concerned about the longevity as well as wondering how I would share one print with three sons. The solution was to find a way to scan all of the images and then share those files with them.

 I tried the flatbed scanner route but gave up on that option real quick. While there is no arguing in terms of the quality of a flatbed scanner, the time to do a scan would mean I would have faded in color by the time I was done with the entire project.
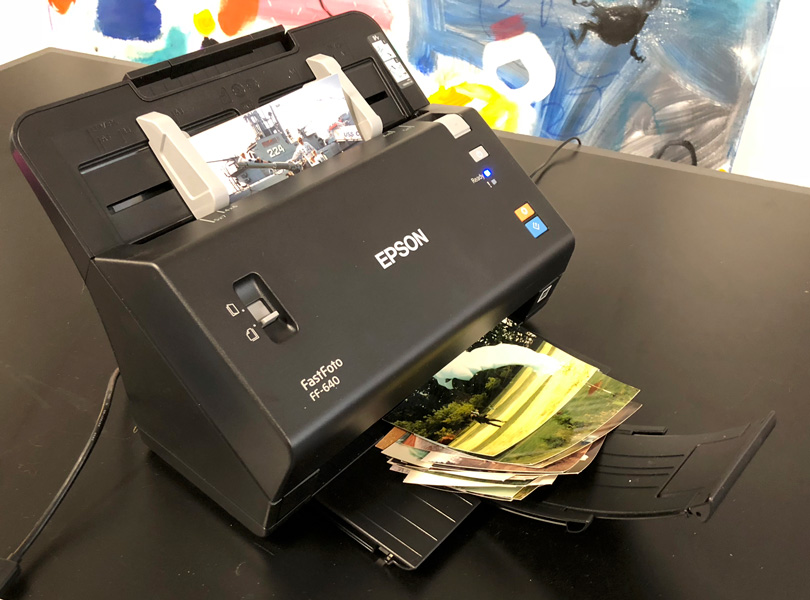
The solution presented itself when Epson previewed for me new the Epson FastFoto FF640 scanner. The FastFoto 640 is a very quick, bulky scanner that is the perfect solution for all of the boxes and albums full of old snap shot size prints I have stored away.
Epson was kind enough to send a scanner to me and I immediately got to work. The video below will give you a good overall impression of what I thought and how this scanner performs. Essentially, it is a blast to use and it allowed me over a few weeks of after-dinner sessions to not only scan thousands of images, but also enjoy and edit all of the thousands of images I made of my kids growing up. Plus, it was fun to relive all of the good times.
The Epson FastFoto FF640 Video
Specifications
Maximum dpi Resolution – 1200 dpi
Optical Resolution – 600 dpi
Duplex Speed – 120 ipm (Color), 120 ipm (Grayscale)
Simplex Speed – 60 ppm (Color) 60 ppm (Grayscale)
Maximum Document Width – 8.5″ / 21.6 cm
Maximum Document Length – 120″ / 304.8 cm
Color Depth – 24-Bit (External, 48-Bit (Internal)
Grayscale Bit-Depth – 16-Bit (Internal)
Duplex Scanning – Yes
Single Pass Duplex – Yes
Scan Modes – Color, Grayscale, Monochrome
Document Feeding – ADF
Life Expectancy – 4500 Sheets per Day
Connectivity – USB 2.0
Media Types – Photo, Plain Paper
Maximum Paper Thickness – 9 mil / 0.23 mm
Operating System Compatibility – macOS/OS X, Windows
Light Source – LED
Control Panel – 3 Buttons
Drivers – TWAIN
Maximum Sheet Capacity – 80
Automatic Image Corrections – Yes
Environmental Compliance – RoHS
Operating Humidity – 10 to 80%
Operating Temperature – 41 to 95°F / 5 to 35°C
Maximum Power Consumption – 42 W
AC Input Power – 100 – 240 VAC, 50 / 60 Hz
Power Source – AC Adapter
Dimensions – 11.8 x 8.7 x 8.1″ / 30.0 x 22.1 x 20.6 cm
Weight – 8.8 lb / 4.0 kg
Package Weight – 11.8 lb
Box Dimensions (LxWxH) – 15.4 x 11.6 x 10.4″
Hands On

The FastFoto scanner was a breeze to set up. The feed tray on the back needed to be snapped into place and some Epson Blue Tape needed to be removed. The power cord was long and had a transformer pack in the middle. From the pack ran a thinner cable to the plug on the scanner. The scanner had a typical printer USB-type cord. The square plug goes into the scanner and the standard USB plugs into the computer.
I went to the Epson website and downloaded the scanner software, which was easy to install and launch. The software immediately recognized the scanner. There were a few questions that needed to be answered before installation. These were prompts like where to store the files and whether I wanted to keep the original scan as well as the optional auto-corrected version.


Y
Yes, the scanner software does some great auto-correction to compensate for some of the off-color (faded) colors typically found by scanning older photos. The scanner asks for some basic information as well, such as the month or season as well as the years and the occasion for each photo. This allows you to take the images from the summer of ’84 and group them together. A folder is then created and the images are stored in these folders.
You place the images into the scanner face down and adjust the feed guides to the print size you are scanning. You can stack around ten images in the feed tray. You activate the scan process by either a button on the scanner or a button in the software. The scan takes like a second for each scan, which is very fast. After the images are scanned, the software shows a total amount of pictures scanned and gives an option to continue scanning. It’s as simple as that.
I did experience a few issues, mainly jams. As seen in the images below, many of my photos were slightly curled. Loading these photos without doing a de-curl would prevent some of them from feeding into the scanner. When this happens, the scanner stops and you receive a warning on the computer. You need to pop the top, which is really easy, and remove the jammed print. Re-feed the prints and hit the Continue Scanning button.


Let me make this clear: The jams that did happen were because I had some difficulty with my curled prints. When used with some flatter prints I had complete scans with no jamming issues.


The Bottom Line
The FastFoto Scanner sells for USD $649.99. It was totally worth it to be able to scan all the boxes of old photos I had. The scanner can also be used as a document scanner. Epson provides a link to set up a document scanner. I connected to this link so it would upload into my Evernote account. This made the purchase even more worth the price. A great way to go paperless and if you haven’t checked out Evernote yet you should.
Available at B&H Photo and Amazon
I’m sure you have boxes of old photos under the bed or on the top shelf of your closet. You owe it to yourself to get these images digitized and archived. Share them with family and friends. This is one cool scanner, and I had a blast not only reliving memories as I sorted through the images I was to scan, but also sharing these files with my family.
Finally, a do-it-yourself, easy to use print scanner for good quality scans of all the important memories in our lives.
Kevin Raber
January 2017


Elevate Your Vision


You may also like


