


This review is late. Really, really, late. Mea Culpa.
Epson sent me a Stylus Pro 7900 printer for testing last Fall. I started using it immediately and simply fell in love with it. I printed my recent Antarctic gallery show with it and have used it when teaching dozens of people at my studio over the past six months. But, somehow, I kept putting off writing my review. I have two excuses. The first is that during this period I was traveling a great deal on shoots and to do workshops, including to Antarctica, Costa Rica, Florida, Arizona, and California. Hard to write a printer review when one is on the road. My second excuse is that I kind of forgot about the urgency. The 7900 just became a standard fixture at my studio – churning our dozens, even hundreds of large prints, and I simply stopped thinking about it, the way one does with any reliable tool that consistently does what one expects of it.
So, with that repentance out of the way, here it is. The review is late; the printer is great, and here’s why.
The Printers
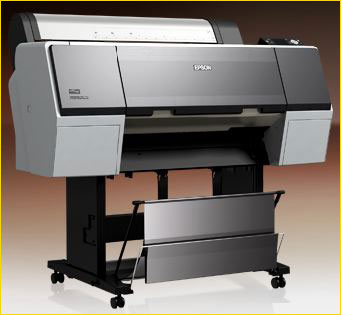
There are two new printer models, essentially identical except for their widths, and of course price. The Stylus Pro 7900 is the 24″ version and currently retails for about $4,000. The Stylus Pro 9900 can take up to 44″ rolls and retails for about $6,000. Prices vary by country, of course, and there are official rebates and discounts available from dealers from time to time.
These printers are big; big enough for you to require at least three people, and preferably four in the case of the 9900, to set them up. They are delivered on a wooden palette. Be sure to request that the delivery truck have a lift gate, because otherwise they’ll assume that you have a loading dock for something of this size.
Both printers are able to take 150ml, 350ml or 700ml ink cartridges. Ten separate inks in eleven slots are used. More on these below.
An optional SpectroProofer with a built-in X-Rite spectrophotometer is available for both printers. The test unit which I have did not include this and this report does not cover its use. In my opinion the SpectroProofer is likely to appeal only to those in the proofing trade, which is one of the primary markets that this printer is aimed at.
Indeed, it’s worth mentioning that the 7900 and 9900 printers are not replacements for the previous Epson 7880 and 9880 printers. These continue to be available and are at lower price points – about $1,000 less in each instance.
As will be seen below, there’s considerable new technology in these printers, from heads to inks and more. This does translate into higher quality prints, more rugged construction, and faster printing times, as well as smoother operability and reliability. All at a price, of course. But whether these benefits are worth the financial cost is up to the buyer and user, and therefore Epson has allowed both the previous as well as these new models to continue in parallel.
Ultrachrome HDR

As mentioned, there are ten inks, including four separate blacks, and orange and green. The four blacks include a choice of Photo Black and Matte Black, depending on the type of paper used, and both of these carts are present at all times, living in eleven slots within the printer. The correct black ink is automatically chosen by the printer depending on the paper selection. No manual swapping is required and there is no appreciable ink loss when auto-switching.
This new ink set is called Ultrachrome HDR and for the first time in an Epson Pro series printer Green and Orange inks are utilized. This actually allows these printers to exceed Adobe RGB in certain parts of the spectrum, by a not inconsiderable margin. Don’t interpret this to mean that the 7900 has a greater overall gamutvolumethan Adobe RGB, but as can be seen in the plot below there are substantial areas where the 7900 exceeds Adobe RGB
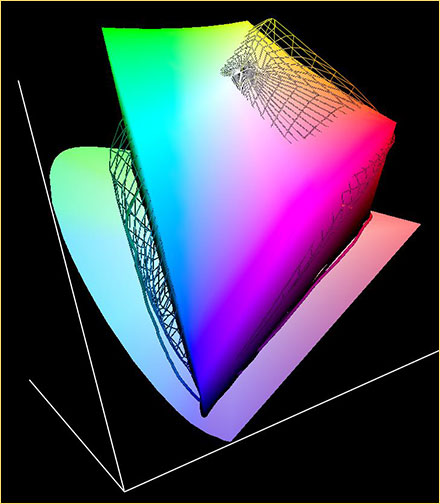
Solid = Adobe RGB. Wire Frame = Epson 7900
Interestingly, the purpose of the new Green and Orange inks is primarily to improve these printer’s yellow capabilities. Green is a 50% / 50% mix of Blue and Yellow, while Orange is a 50% / 50% mix of Red and Yellow. By adding these two new colours Epson significantly increases the printer’s yellow response, and yellow, as many know, is a very difficult colour to reproduce because it is inherently very light.
You can find out a bit more about colour mixing in my 2001 essay on Colour Theory. Note as well that in its previous generation of inks, Ultrachrome K3 with Vivid Magenta, as used in the 7880 and 9880, a second magenta was the new colour added to enhance gamut. As we know, inkjet printers are CMYK devices, even though we send them RGB files. The HDR ink set now provides us with three blacks (K), two magentas (M), two cyans (C), and at least two yellows in the form of added green and orange.
Previous printers in the proofing and pre-press industry have used similar technology under the name Hexachrome, but Epson is the first to bring it to this price level for photographers. For those in the pre-press industry these two new inks also allow the printers to hit difficult to achieve spot colors.
Though I don’t do much in the way of portraits myself, I am told by those that do that the 7900 / 9900 printers and HDR inks consequently provide a significant improvement in the skin tone reproduction, apparently as a result of the mixing/screening of the new orange ink with the light black ink.
This brings our attention to one of the realities of the 7900 / 9900 printers, which I’ll have more to write about as this review progresses. Specifically, that as devices like these exceed what we have been used to in the past, and push the envelope technologically, we need to improve our own technique and processes if we are to take full advantage of what they have to offer.
As another example, I wrote recently in an article titled So You Think That Medium Format Digital is Easy, that using very high resolution backs such as the Phase One P65+ and hoping to extract its full potential in terms of resolution and detail means using meticulous shooting technique. The corollary to this is that it makes little sense to have a state-of-the-art printer such as the 7900 and feed it anything but the highest quality files.GIGO.
This means, for example, ensuring that files are in the widest possible colour space, ie: ProPhoto RGB. If you’ve been following the advice of some self-proclaimed gurus who preach that Adobe RGB isgood enough, ask them what happens to the colours that can now be reproduced by a wide gamut printer and which can not be contained in a space such as Adobe RGB. The answer is, that they fall on the floor, never to be reproduced.
Without getting into too many arcane details, it’s worth noting that Epson is claiming a number of additional enhancements to their HDR inks. These include reduced gloss differential through the use of a new micro-encapsulation technology, and much faster colour stabilization, which is very important for the proofing industry, which this printer is also aimed at in addition to photographers. For example, Epson claims a Delta E of below 1.5 within 5 minutes of printing, which is quite exceptional. In terms of metameric failure Epson is claiming a delta E of less than 1.0 – again exceptionally low.
Finally, this is as good a time as any to discuss print permanence. Epson has been in the forefront of this since their first pigment ink printers, and the new HDR inks continue with as high if not higher ratings.Wilhelm Researchis showing numbers of around 85 years for colour and more than 200 years for B&W, depending of course on the paper used. This is about as good as it gets, and essentially the same as the previous generation of Ultrachrome inks, which themselves exceed most if not all previous colour printing technologies.
Gamut Plots
Gamut plots are a good means of visualizing differences between generations of printers, though obviously only with reference to one aspect of performance. Immediately below is a view of the Epson 7800 (solid) vs the 7900 (wireframe). I don’t know what the percentage increase is numerically, but on the plot it’s substantial and this is also quite visible when comparing prints – something that I can’t really show you on the web, but that’s pretty easy to see in person.

7800 vs 7900 with Ilford Gold Fiber Silk
Given that the Epson 3800 continues to be extremely popular and a very good value for the money, some people are curious as to how the image quality between it and the new printers compare. While the 3800 is a fine printer, the reality is that over the past two years the 7800 and then the 7880 offered increased colour gamut as well as other enhancements, and now the 7900 simply raises the bar again, as can be seen below and comparing that plot to the one above.
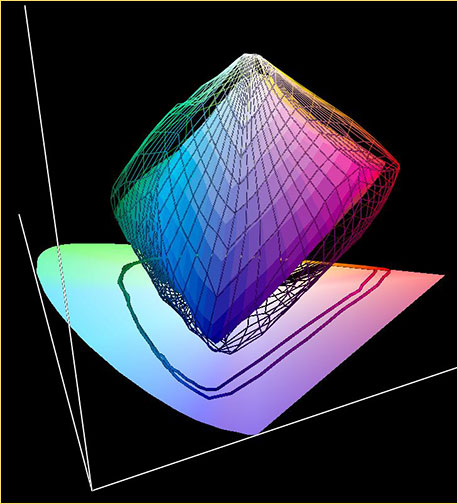
3800 vs 7900 with Ilford Gold Fiber Silk
Paper Transport
How well or how poorly a large format printer handles rolls and sheets is a significant part of a printer’s measure of goodness. Sometimes a characteristic as simple as basic paper handling capability can trump the slickest new technology in inks and heads.
I’m happy to be able to write that the 7900 has the simplest and most efficient roll paper handling that I’ve yet seen in a printer. This starts with the top load position, which is streets ahead of any printer, especially the HP 3100 / 3200, that require that you climb behind the printer to load a roll. This gets annoying very quickly, particularly when it means having to lean over the top of the machine to read an upside down control panel to load the paper.
With the Epson 7900, front / top loading continues as with previous models, but becomes even easier than in the past. The right hand side of the loading mechanism is fixed, while the left side is on a sliding carriage, latching and unlatching with a large lever. When unlatched, the left side moves freely to any size, allowing odd-length rolls to be used.
The rolls themselves are held by a newly designed spindle end cap that has a large, easy to open and close mechanism. No more cursing when placing end caps on a new or reused roll. These now simply latch on and off. One then slides the whole assembly to the right and latches the large locking lever. Nothing could be faster and easier.
Unlike other printers the paper then does not have to be exactly aligned with a dotted line somewhere near the bottom of the platen. Just unroll the paper down through the carriage mechanism so that it shows though a bit, and then press the Load button. The vacuum mechanism is activated, the paper is advanced, and generally a few seconds later the paper is aligned and ready to print. Very occasionally there is a skew, but for the most part the printer appears able to align the paper automatically. This is a huge advance over previous models from Epson, not to mention other manufacturers.
Sheet paper is handled one sheet at a time. In the sheet position just drop a single sheet of any size into the slot. Press Load and the paper again measures the size of the sheet and adjusts itself accordingly. Really simple and straightforward.
Since all of this is actually easier to judge live rather than read about, below is a brief video which illustrates what I mean.
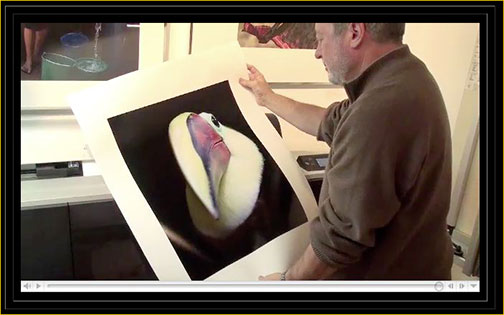
Other aspects of paper transport worth mentioning are the vacuum system, noise level, and roll paper cutter. I was pleased to note that the vacuum system used to hold the paper properly is only noisy at the start of printing, and quickly becomes almost silent a minute or two into a large print. The movement of the head itself is almost silent, making this one of the quietest large format printers that I’ve ever used – important in a gallery or studio environment.
The paper cutter on the 7900 / 9900 is a new rotary design able to handle the heaviest papers, and which Epson claims to be almost maintenance free. These printers also are able to print a bar code on a partially used roll so that both the user and the machine know what a reloaded roll is all about in terms of paper type and length remaining.
The Panel

User interface is always an important aspect of any printer and with the 7900 / 9900 Epson has taken strides toward simplifying their control panel as well as making it easier to use. The first thing one notices is that the LCD screen is in colour, which while mostly cosmetic does make comprehending what inks status is at any time a much easier process.
I also found the general user interface to be a bit more straightforward than on past models.
The Heads
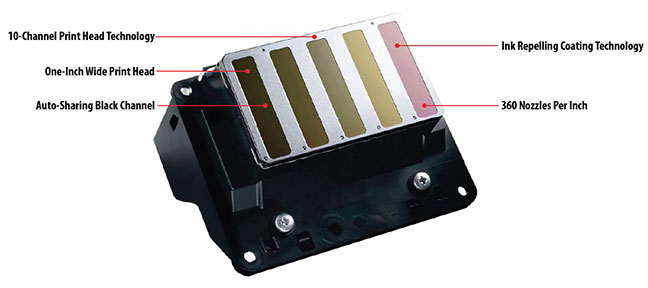
The crown jewel, as it were, of these new printers are the heads. Using Epson MicroPiezo TFP technology, first proven in the 11880 model, these heads have 10 channels – one for each ink – and are able to produce variable droplets as small as 3.5 picoliters using 360 nozzles per inch.
Due to the new head’s resolution is an area where the new printers really deliver, but only if you feed them files that are of sufficiently high quality. These heads along with new dithering algorithms permit the 7900 / 9900 to produce higher resolution prints than we’ve seen before, and in the process this is the first printer that I’ve used where 2800 output resolution actually delivers visibly higher print resolution. So, if you have a large high-res file with extremely high frequency data 2880 is now worthwhile, and because of the high speed printing capability of the inch-wide head there is little penalty for using this mode. Be aware though the proper sharpening technique, both on file input and output, is going to be needed to ensure that the full image quality that these printers are capable of is delivered.
Also, because of the TFP technology the 7900/9900 can print at almost 2X the speed of the 7880/9880, with higher quality; and of course even faster when compared to the 7800/9800.
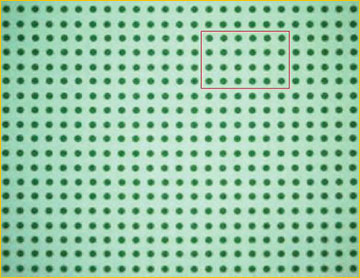
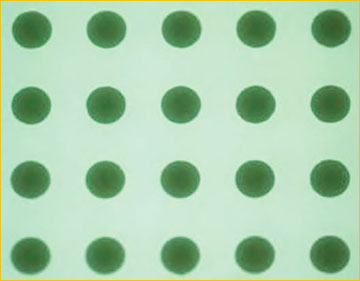
210X Magnification1,420X Magnification
The illustrations above are actual photomicrographs of dots printed with these new heads. The figure on the left at 210X magnification shows how accurate the dot alignment is, while the one on the right at 1,420X shows the extremely high level of dot consistency. All of this is intended to translate into extremely photo-realistic and highly accurate reproduction, and it’s been my experience over the past six months that this is indeed the case. In fact it’s hard to find any aspect of the 7900’s print performance to fault.
One point though that has raised concerns among some early users (myself included) is that the printer is designed to have self-monitoring heads, checking themselves for clogs and other problems as needed, and cleaning themselves automatically. Unfortunately, with some early machines this seems to have been made too energetic a setting at the factory, and the printer would spend a lot of its time (and ink) running diagnostics and cleaning itself.
The solution that I found, and which Epson recommends, is to turn off automatic head checking. This is easily done from the front panel. Then, instead, what I do is print out a nozzle check first thing in the morning and again before making any large or important prints. This just takes a minute or two and uses only a miniscule amount of ink and an inch of paper off the roll.
Since I started doing this a few months ago I have never seen a single time where the heads showed a problem.
Dithering
A large part of the magic that inkjet printers utilize when producing smooth photographic quality images is their dithering algorithms, otherwise know asscreening. These are proprietary, and part of thesecret saucethat companies avail themselves of to make their output superior to others.
There was a time, not that long ago, that critical photographers would use third party RIPs because they were seen as able to produce superior imagery, especially in B&W printing modes. This is now generally not the case, and with the 7900 / 9900 series printers Epson claims to have developed new dithering algorithms able to produce even smoother tonal transitions in both B&W and colour.
This is the type of claim that is very hard for one to verify other than though subjective print comparisons. Many hours comparing prints between the 7900 and other printers available to me over the past half year has proven to me that these claims have merit. This means that to my mind RIPs are no longer justified for their superior screening.
And, as for B&W printing, the 7900’s Advanced B&W mode, when used on a paper such as Epson Exhibition Fiber, can yield a dMax of 2.6, higher than was possible in the chemical darkroom. As for the need for RIPs when doing B&W printing, with these new printers all I can say is R.I.P.
In Use and Summary
As I began this review by writing, I’m about six months late in completing the review, in large measure because the 7900 loaned to me by Epson quickly became a tool for daily use rather than a test product. A case almost ofout-of-sight, out-of-mind.
My guess is that some people reading this review will imagine that my fulsome praise for the 7900, and by inference the 9900, are because Epson loaned me the printer. Well – no. Both Canon and HP also lend me printers for long term testing, so there nothing special going on there, and eventually they all have to go back anyhow.
The summary simply is that this printer is the finest that I’ve ever used, both in terms of print output quality and operational efficiency and ease of use. In fact it’s hard to imagine where Epson or anyone else for the matter is going to go next. Gamut is remarkable, longevity is as good as it gets, resolution is superb and the printers themselves seem to be built like the proverbial brick outhouse, and in fact are intended for industrial level usage rather than the relatively light usage that the typical photographer or studio is likely to put them to.
A question that needs to be asked when it comes to each of the new printer’s separate enhanced capabilities, from wider gamut, to faster speed, to better dithering, the superior screening, and so forth, is – is the improvement worth the upgrade cost from whatever one has been using to date, or more to the point cost-wise, is it worth the premium over a 7880 or 9880?
My take on this is that on each individual point the answer might be – no. Every aspect of the new printers is improved over the previous (and still available) models, but none is that compelling by itself. But, when you add all of the improvements together it’s hard to avoid the conclusion that these new printers are worth every penny being asked for them. And for those photographers that print on a variety of papers, requiring switching black inks, the premium for the 7900 / 9900 printers will be paid back in relatively short order (depends on swapping frequency), and certainly this will be the case over the life of the printer.
The bottom line on the 7900 is that, for me at least, when Epson calls to request their loaner back, (take your time Epson), the very next thing that I’m going to do is call my a dealer and order one for immediate delivery.
May, 2009
Updated: April 1, 2015


Elevate Your Vision


Read this story and all the best stories on The Luminous Landscape
The author has made this story available to Luminous Landscape members only. Upgrade to get instant access to this story and other benefits available only to members.
Why choose us?
Luminous-Landscape is a membership site. Our website contains over 5300 articles on almost every topic, camera, lens and printer you can imagine. Our membership model is simple, just $2 a month ($24.00 USD a year). This $24 gains you access to a wealth of information including all our past and future video tutorials on such topics as Lightroom, Capture One, Printing, file management and dozens of interviews and travel videos.
- New Articles every few days
- All original content found nowhere else on the web
- No Pop Up Google Sense ads – Our advertisers are photo related
- Download/stream video to any device
- NEW videos monthly
- Top well-known photographer contributors
- Posts from industry leaders
- Speciality Photography Workshops
- Mobile device scalable
- Exclusive video interviews
- Special vendor offers for members
- Hands On Product reviews
- FREE – User Forum. One of the most read user forums on the internet
- Access to our community Buy and Sell pages; for members only.
You may also like


