


by Mark Dubovoy

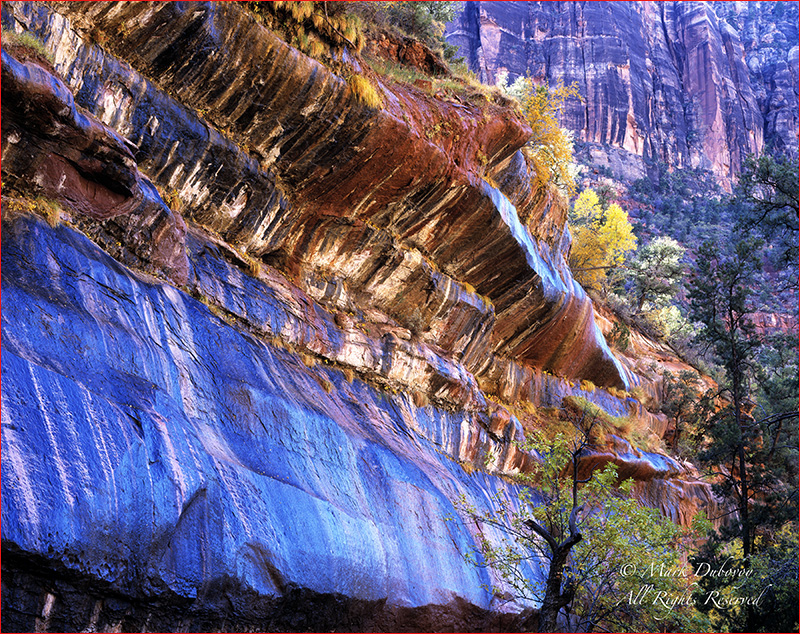
The Pond
I believe this image is an excellent example of The Unseen, as well as Hyper Reality
Foreword
Part one of this article focused on the importance of everything in photography, down to the smallest details. I specifically addressed the concepts of The Unseen and Hyper Reality. In part 2 of this article, I will give a number of examples showing how much the small details really count. I will also address a few more myths that need to be corrected.
Please note that although in all my previous articles I have always given technical information on each image. I have refrained from doing so in both parts of this essay. Suffice it to say that every image in Part 2 of this essay was taken with either a Medium Format or a Large Format camera (a view camera or a technical camera whenever possible). As such, all the images have a good dose of Hyper Reality. The main reason I am not giving specific technical information is that this essay is not about this brand of camera or that lens or some other piece of equipment.
Liberate yourself from the equipment and pay attention to the basic concepts instead!
“What counts are the little differences. “General Ideas” mean nothing.
Long live the details! A millimeter makes the difference”.
Henri Cartier-Bresson
A Millimeter Makes the Difference….
The above words by Henri Cartier-Bresson explain very succinctly one of the deepest insights into photography (and art in general). Even a quick look at his images immediately brings to the mind and the heart the fact that something special is happening. His images are indeed out of the ordinary. To me personally, one of the most striking things about his images is the fact that the more I peruse them and the more I study them, the more I realize the utter perfection in the details.
While some people seem to believe that good street shooting means taking tons of images and periodically getting lucky, at least in the case of Cartier-Bresson, nothing could be farther from the truth. Cartier-Bresson was an incredible perfectionist. Everything from the lighting to the composition to the exposures, to the smallest details in each and every image had to be as perfect as possible. And each and every print had to be superb and as close to identical as humanly possible to all other prints of the same image. This is a man that used to incessantly practice things like how to best grip the camera and how to best press the shutter release. Even the way the camera strap was held was a detail that had to be mastered to ultimate perfection. He was meticulous about weather, lighting and wind patterns before he went out shooting. He was even meticulous and constantly concerned about his own presence in the street. His images did not happen by lucky accidents while shooting tons of images hoping that one would work. He did not shoot like a crazy speed demon and he did not carry much equipment. Every move and every step in the process of making a street photograph had been carefully rehearsed and choreographed to perfection ahead of time, and he made sure his reflexes were lightning fast. All of this allowed him to make each release of the shutter really count. His images are the result of incredible amounts of practice, dedication and amazing attention to the smallest details.
The Underestimation Syndrome
In my experience, there seems to be a significant underestimation of the amount of time, dedication and attention to detail that are the hallmarks of most great artists.
I will never forget, when I met Ansel Adams in the early ’80s to participate in a workshop with him. He invited me to his darkroom and his work room where he was trying to determine the specific crop of a 16×20 inch print. There were two versions of the print. The exact crop on 3 out of the 4 sides had been determined. The difference in the crop on the fourth side was approximately 1/16th of an inch between the two versions of the print. He told me he had been agonizing over this 16th of an inch for several weeks. The point here is that Ansel would agonize for weeks over 1/16th of an inch on a crop line. And this is not even the tip of the iceberg. Anyone who saw his notebooks, experienced is critiques, spent time in his darkroom or spent time shooting with him knows that each and every detail was excruciatingly important and had to be determined and controlled as precisely as the human brain and the tools of the time permitted.
And again, even in my early experiences with some of the great photographers of our time, this pattern was repeated over and over again. Anyone who has seen John Sexton make a print by cutting photographic paper into little pieces and using different exposures and contrast for each little piece in different parts of the image, and then slowly building a printing recipe like a jigsaw puzzle, or anyone who has seen Jerry Uelsmann work with 8 or 10 enlargers simultaneously knows this pattern well. And this pattern is definitely not just a piece of past history. It is as timely and important today as it was back then.
Another typical example of this is a much more recent experience where I was shooting in an old mining town with Dick Garrod. We came upon an old machine shop with some very interesting multicolored cables hanging from a wall. Dick loves abstracts, so he immediately gravitated towards these cables. He put his view camera on the tripod and I went away to continue to shoot around the town. 4 1/2 hours later, I went looking for him. He was still trying to get the best camera position and camera movements for his photograph of the wires. He was almost done, but he was still moving things a few millimeters here and a few millimeters there. He finally took the shot. It is extraordinary, but it took Dick over 4 1/2 hours of hard work to make it so.
Anyone who looks at the amount of time, effort, money and perfection to detail that David La Chappelle spends on each single image, knows that it is simply astonishing.
And all of this does not apply just to the shooting part. It applies just as much to the editing side of things, and to printing. Again, anyone who has spent time with Joe Holmes, or Charlie Cramer or Stephen Johnson, or Bill Atkinson, knows that the amount of effort and the attention to detail in editing and printing is mind boggling.
Surprising?
Is this almost obsessive attention to detail surprising? Not really. Photographers, like other artists go through stages. There is a first stage where the craft itself and the technical details are not yet mastered. It is the same as someone starting to learn how to play the piano.
At a recent workshop, Michael Reichmann mentioned “The 10,000 hour rule”. What this rule states is that to master the basics of most worthwhile human endeavors takes 10,000 hours (roughly 4-5 years of pretty much full time attention). The point he was making is that one cannot grab a camera, take a course or two, or read a few books and be a good photographer. To master the basics takes 10,000 hours.
(For those readers that sometimes take things too literally, no, I am not saying it takes exactly 10,000 hours and not a minute less to master something. I am saying that I thoroughly agree that it takes years of time and dedication to become reasonably proficient).
Unfortunately, there is really no alternative. Famous opera singer Beverly Sills nailed it when she said: “There are no shortcuts to any place worth going”.
The second stage for an artist is what I would call the “bloom” phase. Once the basics are reasonably well mastered, then the artist can start to bloom. Technique and basic skills no longer get in the way, so the artist can start focusing on subject matter, style and a personal approach to the medium. This obviously applies not just to photographers, but also to painters, musicians, dancers, etc.
There are many other phases that follow. Good artists need to mature, experiment, succeed and fail and go through many more years of effort before they finally find the right place and the right combination of elements that makes them superb and different.
The interesting thing is that during this progression, each step of the way the details become more and more important. In fact, the smaller details start to count more and more. Ultimately, it is these details that determine the differentiation, the style and the true artistry of the individual. To put it simply, exposing or focusing an image correctly is not what makes an artist great or an artist stand out. Spending weeks agonizing over 1/16th of an inch, or years re-printing the same image until it is finally right is what makes the difference.
Finally, you will notice that controlling the details is critical to all these artists. In this sense, my favorite fashion photographer of all time, Richard Avedon, was dead on point when he said:
“I think all art is about control: The encounter between control and the uncontrollable”.
Dick’s Secret Canyon
Speaking of the uncontrollable, we cannot control the weather. The image above was 8 years in the making. I was first shown this location in Zion National Park by Dick Garrod. I was immediately taken by the place, but it was the wrong time of day and the light was no good. I had to leave to return home in just a few minutes, so the image would have to wait. I decided at that point that this shot needed to be taken in the afternoon in the Fall. I returned to the same spot in Zion repeatedly over the next 6 years, but I was unable to find a day when the light was what I wanted, or the colors of the trees were what I thought the image needed.
Eight years later, I returned to this location one more time. The light was bad again. It had been raining for days and it was cloudy, gray, dark and dreary. The colors in the trees were gorgeous and the damp cold air smelled of pure freshness, but the light sucked. The weather report called for clearing weather, so I decided to wait. After about an hour, I could tell the weather was beginning to break. I took time to carefully set up my camera. This probably took about half an hour to 45 minutes. Then, I waited another 20 minutes or so and as soon as sunlight broke through the clouds, the scene was absolutely magnificent. Better than I had ever imagined it. The sun was lighting the wall on the opposite side of the Canyon, and the reflected light from this wall was the main source of illumination for the wall I was shooting. Combined with the wetness from several days of rain, the wall, the trees and the vegetation had this fabulous glow. The amount of sunshine coming through the clouds was just right, not too soft, not too bright and not too harsh. The good light lasted only about 30 seconds, but I was ready and I got the shot. Every detail was now perfect and patience and dedication definitely paid off.
A Few More Words About Specs and Manufacturer Recommendations
In Part 1 of this article I mentioned that blindly believing technical specifications, manufacturers recommendations and marketing materials is not always a good idea. I bring this up again now, because many great artists at some point choose to ignore these things and follow their senses instead. They seem to truly push and modify their tools to the limit after the bloom phase, when they are in the experimental phase.
(Note: This kind of experimentation is usually not for beginners. In general, you should do your 10,000 hours first).
Case in point: Ansel Adams.
One of his favorite films was Tri-X, which Kodak rated at ISO 400. Kodak also had very specific recommendations for the chemistry, as well as development times, fixing procedures, rinses, etc.
When Ansel was dissatisfied and decided to make his own tests, he discovered that he got much better results using a different ISO. He typically rated Tri-X somewhere between ISO 160 and ISO 240 based on testing each emulsion according to his own methodology for testing film. This gave him far superior shadow detail versus using the film according to the manufacturer’s specifications. He also discovered that using dilutions, agitating procedures and processing times that were quite different from the manufacturer’s specifications he got better results. Finally, he developed (pun intended!) fixing and rinsing procedures for better archival permanence of the original negatives.
But the methodology needed to be refined further. This is a long story and there is not enough space in a short essay to go through it all. To summarize: As we all know, after many years of hard work, this culminated in the invention of the Zone System. Working with the Zone System one often ends up with complete departures in ISO settings, exposure (versus the standard exposure indicated by a light meter) and development times that are drastically different from the manufacturer’s recommendations.
This is what allowed Ansel to properly capture his images and make those magnificent prints. This is what gave him that gorgeous tonality, dynamic range and shadow detail.
In other words:If Ansel Adams had strictly followed the manufacturer’s recommendations and strictly adhered to the manufacturer’s technical specifications, we would never have seen his magnificent prints as they are. And this, would have been a sad loss for all humanity…
If this was not enough already: Had he strictly followed the manufacturer’s recommendations for washing prints after development, his prints would be in heavy decay mode by now. One of the reasons his prints survive in good condition is because he “disobeyed” the manufacturers and figured out a better recipe to neutralize the potentially harmful residual chemicals in the paper, as well as how to tone and wash his prints for much longer archival permanence.
If this is not proof that sticking to specs and manufacturer recommendations can sometimes be a very bad idea, I do not know what is!
I can give you literally dozens more examples, some are real nightmares, but let me conclude this section with another example that might be relevant to many readers. This example is about inkjet printing.
A couple of years after working with my first inkjet printer, I started to wonder if using the settings recommended by the manufacturer yielded optimum prints. What I found was that the answer was no. With most paper/ink combinations I was able to obtain better prints by using different settings. I started to change the media settings and change the ink density in the printer driver. I usually found that if I set the printer for higher ink delivery to the paper than the manufacturer’s recommendations, I obtained prints with higher D-Max, better color saturation, better tonal gradations and in general noticeably better to the eye. Of course, this necessitated making my own custom profiles for the new settings. As a side note, this peaked my curiosity and I decided to also make my own profiles with the standard settings and compare them to canned profiles. By canned profiles I refer to the profiles widely available for download by paper and printer manufacturers. What I found was that every canned profile I tested was inferior to my corresponding custom profile. I obviously have never tested all the papers, all the canned profiles and all the printers that exist today, but I would not be surprised if in the vast majority of cases this finding holds true.
A few years later, I was visiting with Bill Atkinson, who is well known as one of the top color management gurus in the world, and one of the best printers around. I was ecstatic when I found out that Bill was using different ink delivery, usually more ink and making custom profiles, just like I was, in order to obtain better inkjet prints. It was wonderful to find independent verification, particularly from someone as knowledgeable and dedicated as Bill.
A further comment is in order regarding prints. Ansel Adams was the first photographer I met who used to print his images differently depending on the final display conditions. If he knew that a print was going to be displayed in a gallery or in a museum, he would print it differently from a print that might end up in a home. This is because the brighter museum and gallery lights required the prints to be darker and with different contrast, versus a print that would be in a home.
Which brings me to the fact that I try to customize my inkjet prints to the expected viewing environment. I print differently for gallery lights, for tungsten lights, for fluorescent lights, for mixed light, etc. Obviously this necessitates a different profile for each type of display condition, but I find it to really be worth the difference.
Just another “small detail”? You bet!
One final war story on the topic of manufacturer’s recommendations comes to mind:
I will always remember when I used to process my own color transparency film, and I found that I needed significantly different development times for the main developer and the color developer versus what Kodak recommended in order to get optimum results. I called them up asking if they might know why my times were so different. Their reply was that their development time recommendations were based on Rochester water in the Spring, so they obviously did not apply to the water I was using. They also explained to me that the mineral content in the water varied during the seasons, so the optimum development times would vary throughout the year. Unfortunately, one could not use distilled water, because the emulsion would swell too much and crack.
This last paragraph is for me one more lasting memory that manufacturers specifications and recommendations are always developed with specific criteria that are often times not known by the user and some times not applicable to the user.
While I deeply respect manufacturers of fine products, I believe it is important to understand that a few measurements or a few specifications do not even remotely begin to tell us the true visual meaning of a product. Furthermore, manufacturers recommendations are just that. They are not the ultimate and only truth. They should be viewed as a guideline or a starting point, but not some sort of sacred thing that cannot be violated or modified.
Some “Small Detail” Examples:
Composition.
One way to show how very small details can make a huge difference in an image is to show what a very small thing can do to a composition.
Let’s look at two versions of the same image:

River and Daisy Geyser Version 1
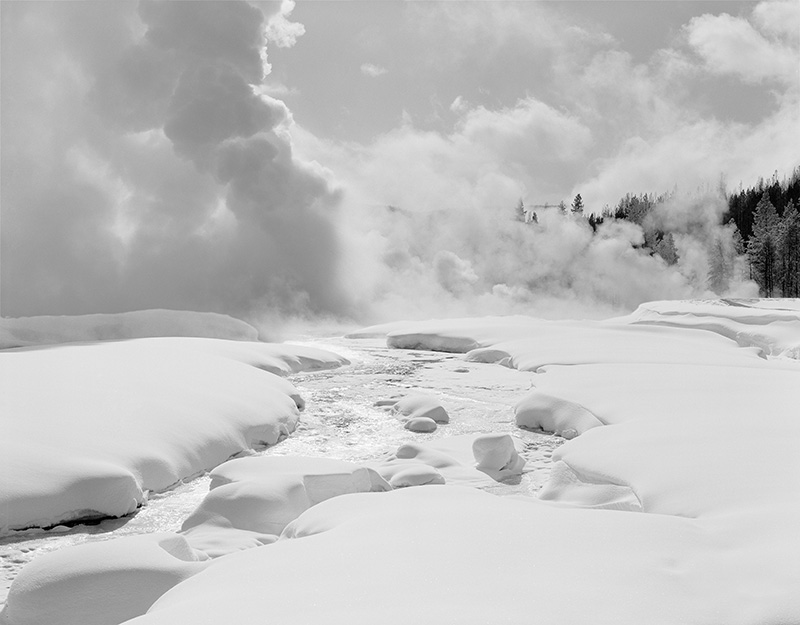
River an Daisy Geyser version 2
Can you see the difference between the two images?
The difference is a small detail. In version one, there is a dimple in the snow near the lower right corner. In version 2, I took out this dimple using Photoshop. To some, this would be a trivial difference and something not even deserving any attention. However, I encourage you to look at the images carefully again. If you see what I see, version one is perfectly balanced. The composition works very well. The image feels stable and the eye travels through it in comfortable fashion easily settling in the distant mystery of the steam and the trees. Version 2 on the other hand, feels completely out of balance. It feels like there is too much foreground. The eye does not travel through it comfortably, it gets jumpy. Enough said, version 2 does not work.
The small dimple in the snow makes the difference between an excellent image and something I would throw in the garbage.
For those that are curious, this image was shot in Yellowstone on a day where the temperature was minus 55 degrees Fahrenheit before taking into account the wind chill. It was so cold, that they closed the park and those of us stuck inside could only go out for brief periods of time with hot chemical packs on cross country skis. It was extremely difficult under those conditions to locate myself in a place that would catch that dimple in the snow, because there was a pool of superheated highly corrosive thermal water very close to the optimum location. The snow pack was totally unpredictable but I knew that the dimple was critical to the composition and decided to take the risk to get a bit too close for comfort to this superheated pool.
A Small Highlight
Here is an example where I think a small highlight makes all the difference in the world.
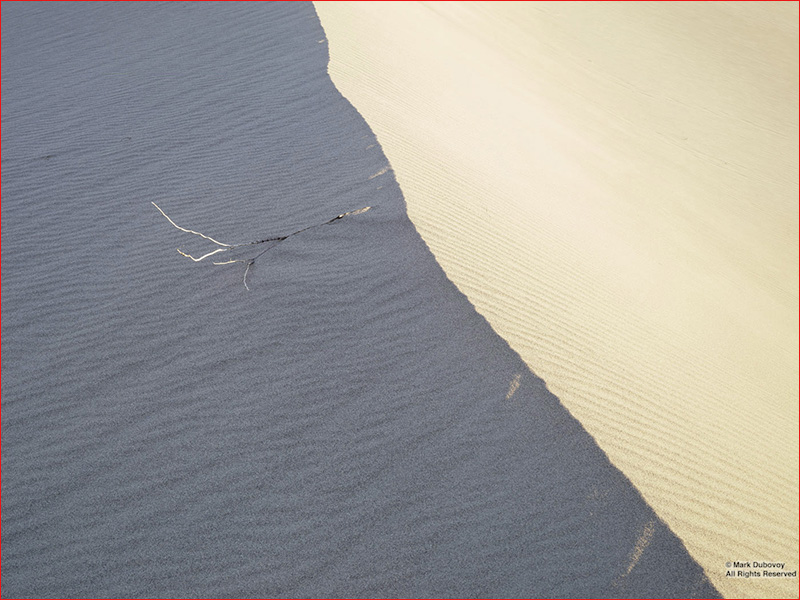
Dune and Dead Branch
This image was taken at sunrise in Death Valley. Since the sun was rising on my right, I was intrigued by the possibility of placing the camera in such a position that the right side of the dune would be illuminated, while the left side would still remain in the shade. This concept, combined with the dead branch determined my composition. I waited until the narrow limbs on the far left of the branch were illuminated by the sun, but before the rest of the branch was lit. I believe this decision was crucial in making the image work. If the branch had not been lit, or if I had waited until the whole branch was lit, the image would have been quite mediocre. It is this small detail that makes a wold of difference. Also notice that there are several areas where some sunlight has leaked into the left side. I like these areas very much. I was watching them like a hawk before releasing the shutter. I think they give the image more balance and a greater sense of believability, while still preserving that sense of The Unseen.
An Expression
We have all seen many images of icebergs. Some are truly stunning, while others are plain boring. While the iceberg I photographed in the image below was quite impressive, it lacked something else to put it in context and to make the image special. It lacked a special detail. This is where the two penguins come in.
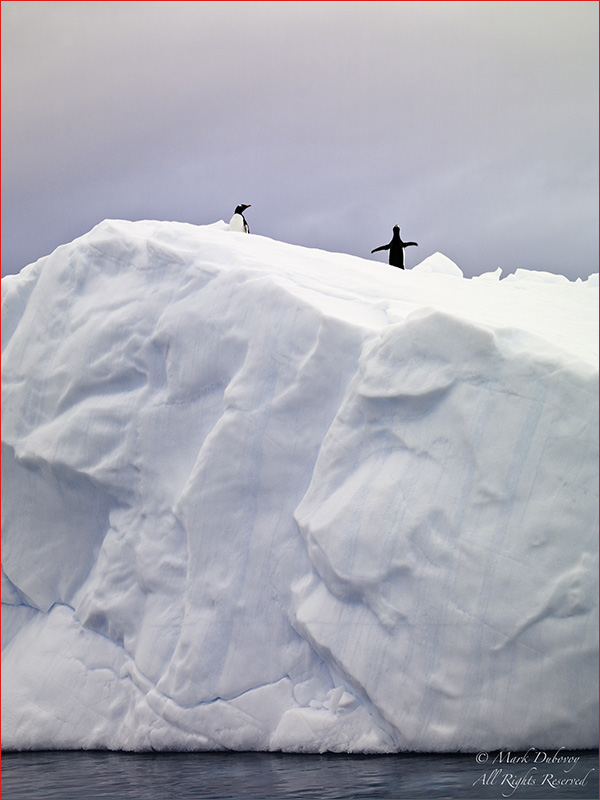
Two Penguins on Iceberg
While having two penguins in the image certainly makes it better, it is not enough. I was waiting for a magic moment. As the special moment happened, I was able to release the shutter fast enough to capture it. To me, the thing that makes this image special is the body and facial expressions of the penguins and the interplay between the two individuals.
Subtle Color and Weather
Sometimes an image of well known terrain or formations seen many times can rise above mediocrity if the composition is really good and if the weather, the light and the colors are special. The image below is such a case.
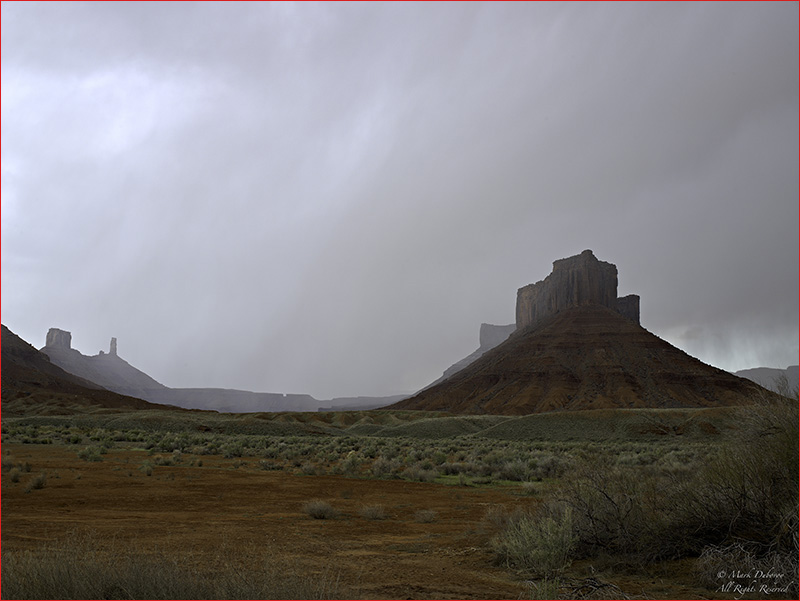
Butes From The Ranch
The interplay between the foreground, the middle ground and the background in this image was quite a challenge. It took me a long time to find the right camera position to capture the bushes and the shrubs properly, while at the same time preserving the feeling of huge uninhabited space in the middle ground and the background.. The light was quite subtle and constantly changing. Because of the huge dynamic range in the image, the exposure and the moment of exposure had to be just right. The weather was unusual and that adds to the mystery of The Unseen. It is too bad that I cannot display a real print of this image on the web. When properly printed on a top quality high gamut printer, the colors and all the subtle tonalities are really special. This is an image that I consider a collection of small details, with nothing being an obvious standout, but when all the details are properly combined the final result is a special print.
Camera Position
I cannot emphasize enough how important camera position is. Sometimes small fractions of an inch can make the difference between a masterpiece and total mediocrity. On a recent workshop I had a student that was shooting a nice landscape in beautiful light. He proudly showed me his image on the back screen of his camera. I immediately knew there was great potential here, but the camera position was wrong. I asked him to move his camera roughly one foot to the right and about a half a foot forward. When he saw his shot after that, he was amazed and kept shaking his head finding it hard to believe that such a small change had made his image that much better.
The image below is one of my examples where camera position made all the difference in the world. It took me approximately 6 1/2 hours of meticulous work to line up the glasses, light the scene and position the camera properly. It took hours to finally have the camera in the perfect spot. Cartier-Bresson was right, a millimeter can make all the difference. I will say no more and let the image speak for itself.

Wine Glasses
I hope that these brief examples will give you a good idea of why every detail in a photograph is so important.
Myths
While there are many myths in photography, there is not enough time or space to address more than a few. I will restrict myself to three common myths. Again, I sincerely hope that a few examples will give the reader enough food for thought to be able to address other myths on their own. My main objective in exposing some of these myths is to show that things that are often presented as the ultimate truth are neither the ultimate, nor the truth.
First Myth
If you have good color management and a properly calibrated display, your prints will look exactly like the image on your monitor.
First of all, this will never happen, unless you do Soft Proofing. But even with Soft Proofing there are some issues.
(For those not familiar with Soft Proofing, I highly recommend the Michael Reichmann/Jeff Schewe tutorial From Camera To Print and Screen).
Let us start by looking at the two images below. Step away from your monitor a few feet so you can clearly see both of the images in the central part of your field of vision. Does one of them look lighter than the other one?

To my eyes and most other people’s eyes, the image on the right looks lighter. It also seems to have lower contrast. However, they are exactly the same image. The only difference is that one is surrounded by white, while the other is surrounded by black. Therefore, your visual perception of the brightness and contrast of an image on the screen will vary depending on the Photoshop or Lightroom (or whatever other software you are using) surround background choices.
Right there you already know that the brightness and contrast of your print will not necessarily match what you see on the monitor, because the printer does not care whether you used the light gray or the dark gray or the black background in Photoshop or Lightroom. Furthermore, the monitor is an emissive device, while a print on paper is based on reflected light off the paper. They will never look the same. But, there is more. The color gamut of a good state of the art printer/paper combination is larger than the color gamut of the monitor. Therefore, there will be things on the print you cannot see on the monitor. I could keep on going, but I think I have already made the point.
While I believe that it is excruciatingly important to have a system that is properly calibrated and profiled, with excellent color management work-flow, what you see on the screen is only a guide to what you will get on the paper. The reason for a properly color managed work-flow with well calibrated and profiled devices, and the reason for Soft Proofing is to get close to a good print on the first try. But the only way to know what a print will really look like is to make one. And like the artists of yore, the only way to make a truly outstanding print is to keep looking at each print you make, tweak and re-print and continue to tweak and re- print until you reach the proper level of interpretation of your original.
One of the reasons I like digital technology so much, is that you can make these tweaks and you can always go back to prior versions with amazing consistency.
Second Myth
The depth of field scales in lenses are scientific, accurate and reliable.
Wrong! In fact, for digital photography the vast majority of depth of field scales are highly innacurate.
Depth of field is not an absolute concept. It is a subjective concept in which not only the photographer, but also the observer must be included. The concept of depth of field originated with the idea that one could close the lens diaphragm enough to produce “acceptably sharp” results. The real issue is what the words “acceptably sharp” mean.
In the old days of film, Kodak did a number of experiments with focus groups and concluded thatif an observer viewed a print at a distance of twice the diagonal, things looked acceptably sharp to an average observer if a photograph of a tiny dot produced a circle with a diameter of 30 microns or smaller on the film. For perfect sharpness, a tiny dot should be a tiny dot with negligible diameter on film, but the conclusion was that if the tiny dot was out of focus and it produced a circle no larger than 30 microns, observers of the day were satisfied that objects in the same plane as the dot looked “acceptably sharp”.
This 30 micron diameter circle was named a “30 micron Circle of Confusion”.
Pretty much all depth of field scales are based on this set of criteria. The exceptions are very rare.
(For those of you with a sense of humor, I have another definition of circle of confusion: A circle of confusion is a group of photographers having a round table discussion about depth of field).
Therefore, there are huge problems with depth of field scales. For starters, the sensor elements in many modern cameras are much smaller than 30 microns. Usually in the 5-6 Micron range for modern Pro level cameras. Therefore, the resolution of the camera far exceeds the 30 Micron circle, making a 30 Micron circle of confusion totally unacceptable. It is not unusual to find 15 to 30 photo sites inside this size circle . Second, there is no guarantee that the observer will stick to the twice the diagonal rule. What if the observer gets closer? Then the depth of field rules are out the window. Third, the criteria was based on standards that were acceptable many years ago, with old lenses, before digital photography, before HD television, before digital printing. I can assure you that what looked acceptably sharp to an observer back then is no longer acceptably sharp to an observer today.
So, the main problem with depth of field is that it is a subjective concept that is observer dependent, and most depth of field scales are based on archaic and outdated criteria that no longer apply.
The problem gets compounded, because when you buy a lens and you look at the depth of field scale, you have no idea what criteria the manufacturer used for that scale. In fact, I am told that Leica took out the depth of field scales in the lenses for the S2 system for all these reasons.
So, let me give you a rule of thumb: I find that in order to have acceptably sharp results, I need to close the lens at least 2 F/Stops more than what the typical depth of field scales indicate. However, each photographer will have to do their own experiments to determine what works for them.
It is also important to point out that as you close the lens down, diffraction starts to creep in. There are many situations where one is faced with this Yin and Yang: On the one hand, the desire to close the lens down significantly for more depth of field. On the other hand, diffraction softening the entire image if one closes the lens down beyond a certain F/Stop.
In my experience, diffraction creeps in at wider apertures than popular lore would lead you to believe. Obviously, diffraction is highly dependent on the specific lens and the way the diaphragm and the entire rest of the system is configured, so one size does not fit all. I have made some tests over the years, and based on my own empirical observations, I have developed some simple rules of thumb that usually keep me in “the safe zone”. Let’s define the onset of diffraction as a lens aperture where diffraction is already present but the effect is still so small that it is barely visible and for all practical purposes irrelevant. While shooting in the field: I think of F/4 as the onset of diffraction for small sensor cameras, F/8 for 35 mm full size sensors and F/11 for Medium Format. Smaller apertures will be outside of the “safe zone” and show visible amounts of diffraction. Again, these are my personal rules of thumb given my equipment and my tests. Other photographers may have different rules of thumb based on different systems or a different tolerance for the effects of diffraction.
The trade-off between depth of field an diffraction is an interesting trade-off that each photographer will have to determine for each image they make. In general, I prefer to give depth of field priority, but periodically I find situations where the lack of diffraction is more important than depth of field.
Third Myth
Hyperfocal distance. The Hyperfocal Distance has been touted for many years as the best focus point to achieve a desired depth of field. Unfortunately, it has been used quite a bit by landscape photographers that typically want to achieve depth of field from a specific near object all the way to the horizon. For example, if you want depth of field from, say 10 meters to infinity, you line up the infinity mark with one F/stop marking on the depth of field scale and you check the opposite mark. Chances are the opposite mark will not show 10 meters, so you keep rotating the focusing ring and looking at the different F/stop marks until one mark coincides with infinity and the other coincides with 10 meters or slightly less. Whatever F/stop corresponds to these two marks is the F/stop you use, and you leave the lens at this (hyperfocal distance) point of focus. You no longer turn the focusing ring.
As we now know, since the depth of field scales cannot be trusted, neither can the hyperfocal distance. However, the problem goes beyond this. Even if you happened to close the lens down by another 2 F/stops, you would still not be focused at the optimum point. This is because distant objects tend to blur very fast and once blurred it is impossible to retrieve appropriate resolution.
Notice I have used the word “resolution”. Harold Merklinger was the first person I know of that decided to approach the depth of field question from a much better (in my opinion) point of view. Instead of looking at the problem in a very subjective way (“acceptably sharp”), he decided to approach the issue in terms of resolution: What are the smallest objects that need to be resolved, and what are their specific distances? The appropriate F/stop and focus point should be determined by the answer to this question. His approach and his basic observations are in my estimation simply brilliant. They lead to some relatively simple and straightforward mathematics, and more importantly, some very good rules of thumb for use in the field. Harold’s ideas have been published extensively in the past, so no need to repeat them here. Those who would like to explore this further can do so by readinghis articles and books.
By using Harold Merklinger’s approach, it becomes evident that in the hypothetical landscape case presented here, one should focus the lens at infinity, not at the hyperfocal distance. And this certainly proves to be the case in practice.
There are two approaches I use successfully in the field. The first one is to focus the lens at infinity and then use Harold Merklinger’s guidelines for the appropriate lens aperture. This is probably the more accurate approach, but you need to do a little arithmetic in the field. An alternative practical approach that also seems to work is to focus the lens at infinity and then close the lens down 2-3 F/stops beyond what the scale indicates for depth of field down to 10 meters (or whatever the distance to the closest object of interest is).
Final Thoughts
I will conclude this essay by looking at one more image, and expressing some final thoughts.

Calla Lillies
This was a group of flowers that had been at my house in a vase for a while, and they were starting to die. They were so beautiful, that I decided to photograph them before they got thrown away. I was trying to line them all up, but the image was boring. I was also having trouble because the stems were beginning to get soft and the flowers would droop.
Then it hit me: These flowers were at the intersection between life and death. The word “intersection” gave me the idea to turn by 180 degrees the two flowes that were drooping the most. For me, it was this simple detail, a change in orientation producing an intersection of the stems, that transformed something boring and tasteless into something special. Not only does the composition work much better this way, more importantly, the message of the intersection between life and death, between different parts and different colors, as well as the artistic statement I was looking for improved dramatically.
Like Henri Cartier-Bresson said: Long live the details!
To summarize our brief explorations in this essay:
– Everything matters in photography. The details are crucial, and the more advanced and more proficient you become, the more these details count.
– There are no shortcuts; spend (and enjoy!) your “10,000 hours” to master the craft and then break out and really bloom as an artist.
– Explore The Unseen and try to find other ways to enhance your images. For me, it is Hyper Reality. For others it may be something else.
– Don’t just “take a picture”. Instead, try to tell a story, try to transmit a specific mood or feeling; look for meaning beyond just a pretty object or a good composition. As Cartier-Bresson said: “General Ideas Mean Nothing”.
– Trust your eye/brain system instead of numbers such as specs and single measurements. Do not succumb to marketing hype. Never underestimate the exquisite range and sensitivity of the human senses.
– Craftsmanship should be used to enhance your images, not to show itself off. The best photographs are those that show tremendous artistic talent, a powerful message, mastery of the craft and meticulous craftsmanship, all in perfect balance.
– More importantly, enjoy the process. For instance, I must confess that sometimes when I am out in nature and I spend hours observing a scene, carefully framing it and literally inhaling some of what this wonderful planet has to offer, whether I release the shutter or not seems irrelevant. In fact, sometimes I do not release the shutter and decide to simply enjoy the moment and embed it in my memory bank.
As fabulous and gratifying as looking at a final print can be, to me it is the process from initial idea through capture, editing and printing where the real passion and maximum enjoyment resides.
February, 2012


Elevate Your Vision


Read this story and all the best stories on The Luminous Landscape
The author has made this story available to Luminous Landscape members only. Upgrade to get instant access to this story and other benefits available only to members.
Why choose us?
Luminous-Landscape is a membership site. Our website contains over 5300 articles on almost every topic, camera, lens and printer you can imagine. Our membership model is simple, just $2 a month ($24.00 USD a year). This $24 gains you access to a wealth of information including all our past and future video tutorials on such topics as Lightroom, Capture One, Printing, file management and dozens of interviews and travel videos.
- New Articles every few days
- All original content found nowhere else on the web
- No Pop Up Google Sense ads – Our advertisers are photo related
- Download/stream video to any device
- NEW videos monthly
- Top well-known photographer contributors
- Posts from industry leaders
- Speciality Photography Workshops
- Mobile device scalable
- Exclusive video interviews
- Special vendor offers for members
- Hands On Product reviews
- FREE – User Forum. One of the most read user forums on the internet
- Access to our community Buy and Sell pages; for members only.
You may also like


