


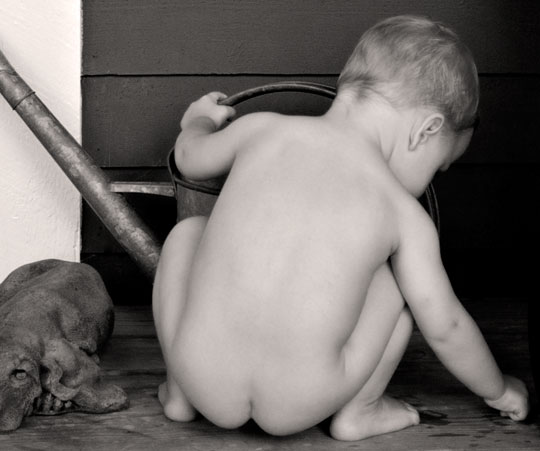
Baby and Watering Can — Muskoka, Ontario 2004
Panasonic LC1 @ ISO 100
80mm focal length equivalent. f/2.4 at 1/50 sec
On the Way to Art
Every photographer is a snapshooter at heart. I don’t know of a fine art photographer, regardless of their pretentious, who didn’t also take snapshots. Especially pictures of members of their family, and in particular children and babies. It simply goes with the territory of being a photographer and of having taking photographs as a way of life. It’s how we see the world and how we share it with others.
Most of the time these family photos and snapshots end up in an album, and occasionally, if they’re really good, as a framed print. But once in a very rare while an image can rise above its origins and become a fine art print. This essay is a detailed look at the esthetic as well as the technical decisions that went into the making ofBaby and Watering Can, seen above.
The Snapshot
A warm August day at my summer house. My 18 month old grand nephew Luca was visiting and running around the porch naked. I went in the house, retrieved a handy camera and started taking photographs as he played. For a moment he crouched in front of a galvanized watering can, and spying something on the ground beside him, reached for it.
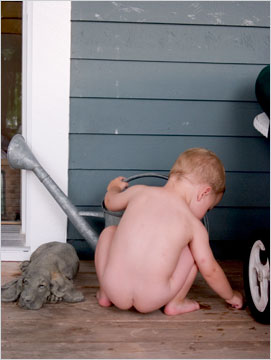
Figure 2
Figure 2 above shows the original file after only basic raw processing in Camera Raw. I knew as I took it that it was a special moment. I saw the reach of his right arm mirroring the angle of the water can’s spout. But what I didn’t mentally process till afterward were the other symmetries. These include the shape of his head and the water can’s handle; the shape of his buttocks and that of the stone dog beside him, and all of the other arcs and curves that repeat themselves throughout the picture.
A couple of weeks later I returned to my studio and started working on the image to produce a print that I felt paid due justice to the image. The process took about an hour. Below are the technical steps and thoughts that went into producing the final print.
Visualizing the Final Image
In Camera Raw within Photoshop, or Capture One, if that’s what I happen to be using, I am only concerned with extracting the maximum information possible from the file. This means primarily adjusting white balance, contrast and brightness, and then exporting the file into Photoshop CS in 16 bit mode. I do the rest of my work in 16 bit mode (until printing) and also do everything possible in Adjustment Layers, so that everything done can be adjusted or even undone, either during the initial editing process or at any time afterward.
Once the image is in Photoshop the first thing that I do is —nothing!I resist the temptation to start right in, and instead I make the file full-screen, sit back with a cup of something hot or cold, and think about it. How should it look? What is the photograph really about? What are its strengths? What are its weaknesses?
I saw several things all at once. One, was that the image would have to be cropped tightly. For the arm and the spout’s symmetry to become the dominant theme both would have to be reaching into opposite corners of the frame. What I didn’t like was that the framing as shot wasn’t plane parallel. The vertical white board was tilted to the right at the top, and the siding of the house slanted downward to the right. The floor boards were parallel to the bottom of the frame, but because I wasn’t exactly at 90 degrees to the house everything was slightly off kilter.
Finally, it was immediately obvious to me that the final print wanted to be in B&W. The photograph was about shapes, forms, symmetries and the wonderful curiosity of childhood. Pink baby skin tonalities would be a distraction. I also thought that as a monochrome print it would convey a greater feeling of timelessness.
Cropping
I usually crop an image right away. The main reason is that I want to work on something that doesn’t have extraneous bright or dark areas, or colour fields that aren’t part of the final images. These are distracting, and also can mislead when working on final colour balance or brightness settings.
But, in this case, before cropping the image I needed to adjust the perspective. This should be done to an uncropped image because these types of adjustments end up cropping the image to some extent by themselves, and there’s no point in losing more than you have to up front.
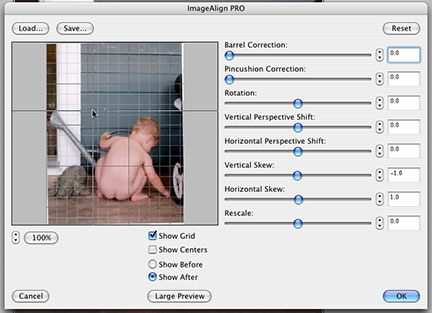
Figure 3
I used a plug-in called Imagealign. The job can be done using Photoshop’s basic tools, but this program makes the job quick and easy. All that was needed was a 1 degree shift on both the vertical and horizontal axis.
Cropping is an iterative process. The bottom and right side of the frame were straightforward. The foreground deck boards add nothing to the image. The wheel on the right might have been left in since it carries the circular shaped theme, but in the end I decided to remove it. Maybe it’s a bit tooliteralfor what I was trying to convey.
The left side of the frame was a problem. I knew that the window area would have to go, but I was sorry to then have to lose the dog’s face. I also regretted losing the watering can’s spoot, since it’s symmetrical with the child’s hand. But a bit of experimentation told me that what I wanted was as simple and uncluttered a final image as possible. The top of the frame came last, and there I simply decided to leave roughly the same amount of space as is found between the child’s hand and the right hand edge. This also allowed me to crop just below one of the board’s seams, removing another potentially distracting element.
Converting to B&W
Conversion to B&W was done using Channel Mixer in Photoshop. Here I used equal amounts of the green and red channels, leaving the blue channel out completely. There are some fine B&W conversion tools available, but I was able to get the tonalities that I wanted for this image just with Photoshop.
Fine Tuning
Almost there. Now, again on an Adjustment Layer, I used the Levels control to get the overall brightness and contrast to be just the way I wanted them. I then returned to the base layer and used the Healing Brush to remove a couple of blemishes on the child’s skin.
Next I used Local Contrast Enhancement using the USM tool, following by Input Sharpening using Photokit Sharpener.
The penultimate step was resizing for output. Since I had only started with a 5MP file to begin with, and had done some serious cropping, the image I was left with was only about 6X8″ at 240ppi. I used Photoshop’s Bicubic Interpolation Smoother to res the file up to its final print size of roughly 8X10″, which would go on an A3 sized sheet of paper.
At this stage I saved the file, then converted it to 8 bit mode, and flatten it for printing. I would normally then do Output Sharpening using Photokit, but after some experimenting I decided not to, preferring instead an to work with an ever-so-slightly soft image. The additional degree of sharpening would simply have made the image a bit grittier, since there’s very little fine detail worth sharpening to begin with.
Printing
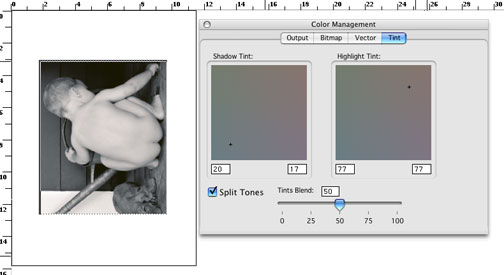
Figure 4
My preferred method of printing in B&W is to use the Imageprint RIP on my Epson 4000. This produced an extremely neutral print, but one which I felt was a bit cold for the subject matter. In the past in the chemical darkroom I would have selenium toned this image, and so in Imageprint I used the Tint control to do a split tone equivalent of selenium toning. I made the shadow areas somewhat cool and the highlight areas somewhat warm, as seen in Figure 4 above.
Since I can’t show you how the print actually looked I have simulated the tonality using Photoshop’s Photo Filter tool and the selection of the Sepia setting. It’s not identical to the final print, but close, and the ultimate result can be seen in the image below. This image will appear in my next portfolio and gallery show.
Baby and Watering Can — Muskoka, Ontaro 2004
Panasonic LC1 @ ISO 100
80mm focal length equivalent. f/2.4 at 1/50 sec
Updated: April 5, 2015


Elevate Your Vision


Read this story and all the best stories on The Luminous Landscape
The author has made this story available to Luminous Landscape members only. Upgrade to get instant access to this story and other benefits available only to members.
Why choose us?
Luminous-Landscape is a membership site. Our website contains over 5300 articles on almost every topic, camera, lens and printer you can imagine. Our membership model is simple, just $2 a month ($24.00 USD a year). This $24 gains you access to a wealth of information including all our past and future video tutorials on such topics as Lightroom, Capture One, Printing, file management and dozens of interviews and travel videos.
- New Articles every few days
- All original content found nowhere else on the web
- No Pop Up Google Sense ads – Our advertisers are photo related
- Download/stream video to any device
- NEW videos monthly
- Top well-known photographer contributors
- Posts from industry leaders
- Speciality Photography Workshops
- Mobile device scalable
- Exclusive video interviews
- Special vendor offers for members
- Hands On Product reviews
- FREE – User Forum. One of the most read user forums on the internet
- Access to our community Buy and Sell pages; for members only.
You may also like


