


Update:It wasannounced by Adobeon September 9, 2013 that Premier Pro CC will be able to handle native CinemaDNG files when the October 15th update becomes available. This is great news, and means that there’s no longer any need to use DaVinci Resolve (complex and clunky) or the techniques outlined below (slow and slower). But, since I wrote this some time ago, and it still might be of interest to some, here goes. Oh yes, what about Final Cut Pro X? When will it be able to handle CinemaDNG files? No idea. I assume eventually though. In the meantime I’m looking forward to working with my Blackmagic files directly in Premier.
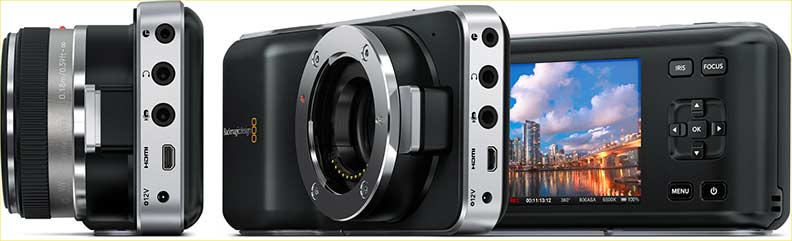
In July, 2013 I wrote about the just-released Blackmagic Pocket Cinema Camera. The BMPCC is the first video camera that can shoot RAW and that costs under $1,000. It has an “active” Micro Four Thirds lens mount and is thus able to use just about any MFT lens. As with all MFT cameras, many other lenses, such as Leica M glass may also be used via adapters. Dealers that I’ve spoken with in the US and Canada anticipate that the BMPCC is going to become a huge seller, the wait lists are already very long. A hands-on field review of the BMPCC will be found here toward the end of August, 2013 (now looking like mid-October).
The BMPCC as well as the full-sized 2.5K & 4K Black Magic Cinema Cameras can all shoot RAW video. The format that these cameras use is called CinemaDNG. This is simply a version of DNG raw that just about any imaging application that reads RAW, such as Lightroom, Camera Raw or Capture One, can handle. Many people shooting with Magic Lantern-hacked Canon DSLRs, also convert them to CinemaDNG.
CinemaDNG files are unlike any video file you may have heard of or used. A shot (say 20 seconds of action) is saved to the camera’s media as a subdirectory and inside that subdirectory are hundreds of stills. 24 or 30 of them per second of footage to be exact.
But now that you’ve got them, what do you do with them? Like any stills RAW file, these need to be processed; deBayered, deLinearized, colour corrected, sharpened and all the rest. No different than a RAW file shot with your Nikon or Canon. Blackmagic’s solution is a program calledDaVinci Resolve. DaVinci is the gold standard of colour grading programs and has long been used by Hollywood to color correct feature films. It used to cost tens of thousands of dollars. Then, in 2009 it was purchased by Blackmagic, and now is downloadable as a free Lite version and is also included with the BMPCC. The full $1,000 version is availablefreewith the purchase of aBlackmagic Cinema Camera 2.5Kor theBlackmagic Production Camera 4K. One of the only limitations of the “Lite” free version is that it’s limited to HD files. 2.5K and 4K files require the full version.
But there’s a problem. Resolve is a seriously complex program with a steep learning curve. Not impossible (I’m learning it, so it can’t be that difficult), but it’s not for someone who just wants to casually work with RAW files from their new BMPCC. It also places huge demands on ones video card and processor. You really need an NVidia CUDA based video card. The Apple Macbook Pro Retina is one of the few laptops that has this, and is thus suitable for editing & grading work in DaVinci Resolve.
But there is an alternative should your machine be less well endowed. An alternative which will appeal to still photographers wanting to get up to speed with shooting Cinema DNG. Surprise – it’s called Lightroom, or Camera Raw, and also the latest edition of Capture One.
NB: I am not suggesting that the procedures outlined below are the preferred workflows for CinemaDNG files. They aren’t. Round-tripping from DaVinci Resolve to your favourite NLE and back is a much more efficient way of working. But, until you get that process down pat (here is a good mini-tutorial) one of the alternatives that I outline below may be of use. They’re also helpful in understanding the nature of CinemaDNG files.
It’s an Ill Wind…
The establishing of wind turbine farms in south-central Ontario is quite controversial.
Many doubt the economic advantages, and also are concerned about the aesthetic and
health factors as well as the effect on the value of prime agricultural and rcreational land.
This brief film was shot on an afternoon’s drive in the Grand River area, a bucolic region
less than an hour’s drive from Toronto.
Grading CinemaDNG
Let’s get the word “grading” out of the way first. It’s simply a term from the film world that means colour correcting. That’s it. Nothing more exotic than that. Just as Lightroom is a fantastic tool for grading your Nikon, Canon or any other file, so it is for grading CinemaDNG files from any video camera that produces them. Here then is how it’s done.
Get a Sample File
I assume that you have a copy of Lightroom and know how to use it. If you need a bit of training, consider our very popular download video training tutorials at a special discount. Since you likely don’t yet have your BMPCC (though you may already have a BMCC) if you need to get a short clip to work with for practice you can download one from the Blackmagic sitehere. This ZIP file will unzip to a directory with 141 DNG files. This represents about 6 seconds of 24FPS footage.
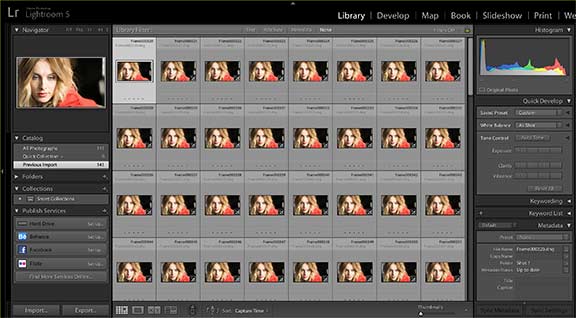
Fig 1 – in Lightroom
In Lightroom
In Lightroom, create a new Library and go toFile / Import Photos;then go to the just unzipped file directory and import all of the files. You screen will look something like the above.
Now, choose a frame that is representative of the whole lot, double click on it and go toDevelop. You can use all of the tools available in Lightroom to grade (colour correct) the file to your taste. When you’re done, switch back to the Library view and doEdit / Select All. Next click onSync Settings, chooseCheck AllthenSynchronize. At this point all 141 files will have the changes & corrections that you made to the one that you worked on in Develop.
By the way, it is at this point when actually working on your own files that you may want to save your develop settings as a Preset. Then any shots taken under similar lighting conditions and with similar subjects can be graded in a moment.
Now you need to Export the files. With them all still selected, go toFile / Exportand put them in a new subdirectory, set the export to full size JPGs, at 100% quality, in the Adobe RGB colour space.
That’s it for Lightroom. Skip ahead to Then In Final Cut Xbelow .
In Photoshop / Camera Raw / QuickTime
An advantage of using Camera Raw over Lightroom is that since Bridge is a browser instead of a catalog, there is no need to create Preview files. This is a time saver as well as a space saver.
Point Bridge at the directory containing a CinemaDNG sequence. Click on the first one, then CMD-A to Select all. Now double click on one of the images and all of them will open in Camera Raw. Next, select one that you wish to process and do so, correcting for colour, brightness, sharpening, etc.
Now press Select All at the top left of the screen, and then Synchronize. Sync everything.
Next, choose the export settings that you wish using the blue bar at the bottom of the screen. This may take some experimentation, but I recommend a large TIF file in 16 bit and ProRes RGB. JPGS can be used, and are smaller, but this will limit you to 8 bit mode.
Finally, press Save and put the files in a specific directory where you will find them later.
Now run QuickTime 7 Pro. If you don’t already have it it will cost you $29.95 from Apple as a download. Then File / Open Image Sequence and point to the first file in the directory of saved TIFFs. You will be asked to select a frame rate. Choose the one that the files were shot at, such as 23.976 FPS.
The first frame will load, and you might want to press CMD-3 to make it fit your screen. You could try and play the file now, but it will be very slow. Instead, you want to save it as a video file with whatever settings you prefer – Prores HQ is a good choice for optimum quality.
You now have an editable file of very high quality, and to save space you can delete the TIFF files. You still have the original CinemaDNG raws, and can always go back to them. The TIFFs are simply for use along the way to your master ProRes file.
In Capture One 7.1.3
In Preferences / Image choose one of the smaller preview file sizes. There’s no point in building large previews. Import all of the .DNG files and then choose one to correct. Once you’ve done this, in the thumbnail panel, Select All then File / Export / Varients. Select the TIFF format and export, the same process as in Lightroom. Select a representative image.
Make the image adjustments that you prefer than use the upward facing arrow to “Copy adjustments from primary varient. Next, Select All and choose the Downward facing arrow,Apply adjustments to all selected varients. Now you can do a Export Processing, selecting a new directory and saving the files as 16 bit TIFFs, in the Prophoto colour space.
Then In Final Cut X
I use Final Cut X as my editing program. You may use Premiere or something else. The steps that I take and explain below are for FCPX, but if you follow them you’ll likely be able to do the same things quite easily in any other NLE.
Create a New Project and a New Event. The project should have the characteristics of the files that were shot in your camera, ie: 24fps or 30FPS and the resolution as well.
In the new Event import the entire directory of JPGS that you exported from Lightroom, Camera Raw of Capture One. You’ll likely find, depending on the setting in your Preferences, that they will come in as stills with a duration of five seconds each. (From Camera Raw and Quicktime 7 Pro the file will be a video in the format that you selected). Not to worry. Next, select them all and place them on a new timeline. CMD-A then E.
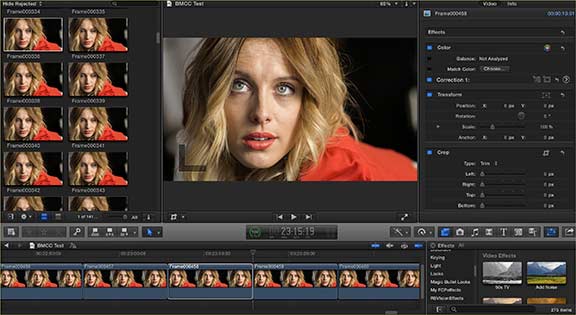
Fig 2 – in FCPX
Now, select the entire timeline. ThenModify / Change Duration.
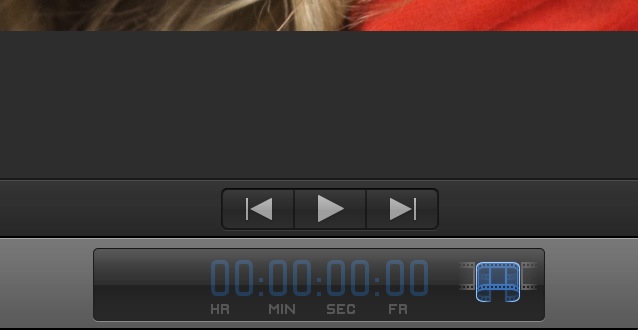
Fig 3 – Retiming Bar
Now press “1” and RETURN. The 1 means a length of 1 Frame for each of the frames instead of the 5 seconds (or whatever) that it came in as.
You now have your fully graded video file. Play it. Pretty cool huh?
The final step is to export this entire clip as a stand-alone video file. Just export as a new Master File in your preferred editing format, ProRes 422 for example. Then when you’ve graded all of your production’s clips, you can Import them into a new Event for the final editing of your project.
Just be aware that you’re going to want the biggest baddest computer that you can, because grading and editing these files takes real CPU horsepower and lots of storage.
I hope that this is found helpful. Do take the time though to learn how to round-trip between your NLE and DaVinci. It isn’t that hard. I’ll have a separate tutorial on it here soon.
Michael Reichmann
September, 2013


Elevate Your Vision


Read this story and all the best stories on The Luminous Landscape
The author has made this story available to Luminous Landscape members only. Upgrade to get instant access to this story and other benefits available only to members.
Why choose us?
Luminous-Landscape is a membership site. Our website contains over 5300 articles on almost every topic, camera, lens and printer you can imagine. Our membership model is simple, just $2 a month ($24.00 USD a year). This $24 gains you access to a wealth of information including all our past and future video tutorials on such topics as Lightroom, Capture One, Printing, file management and dozens of interviews and travel videos.
- New Articles every few days
- All original content found nowhere else on the web
- No Pop Up Google Sense ads – Our advertisers are photo related
- Download/stream video to any device
- NEW videos monthly
- Top well-known photographer contributors
- Posts from industry leaders
- Speciality Photography Workshops
- Mobile device scalable
- Exclusive video interviews
- Special vendor offers for members
- Hands On Product reviews
- FREE – User Forum. One of the most read user forums on the internet
- Access to our community Buy and Sell pages; for members only.
You may also like


