Inmy last article, I talked about tone compression using HDR, and the character that Tone Mapping can impart to an image.
HDR FOR TONAL COMPRESSION
From a practical standpoint, a modern digital sensor has about 7–9 stop tonal range. This doesn’t allow us to capture wide tonal range images accurately. What we end up with in this case is an image that must favor either the shadows, or the highlights.
By using multiple exposures and merging them, HDR allows us to extend that tonal range and capture detail all the way from the brightest highlights to the darkest shadows.
I refer to figure 1 again. In this image, we are able to see detail on the sunlit water, as well as in the shadows of the tree. If this had been shot with one capture, either the highlights would have been blown out, or the shadows would have blocked. This was shot as a 9 stop bracket, allowing good detail throughout.
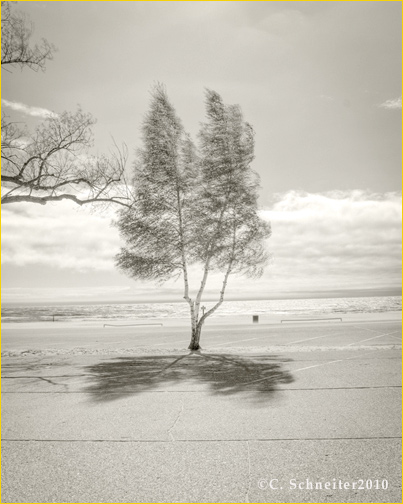
Figure 1.
This image was compressed using a 9 stop bracket, and merged to an HDR, then Tone Mapped.
BUT WHAT IF I DON’T HAVE A WIDE TONAL RANGE?
There are two types of contrast ranges: Global and Localized.
The image above is an example of controlling Global contrast to achieve continuous detail throughout the image. In this case, we want to make the entire contrast range fit our output. Without this treatment, either end of the tonal range might be compromised.
But there are times when we come upon a scene that seems to have a normal tonal range, yet when we look at the file, we find that shadows have no “meat” to them or highlights are hot and lifeless.
Figure 2 is one such image. Seemingly, it has a soft tonal range, but in fact is a very complex image, encompassing at least two separate tonal ranges. This is an example of localized contrast. In it, we have the bright highlights on the steam pipes of the train. We also have micro contrast areas deep down in the shadows, which need to have detail. Global contrast is represented in the entire overall tonal range of the bright highlights down to the deep shadows. However, without attention to the localized contrast in the shadows, they would have died,
Even though this image was captured on a cloudy day, it still benefits from an HDR treatment. It is monochromatic. Yet because of all of the minute highlights and dark areas, it has more contrast that one might think.
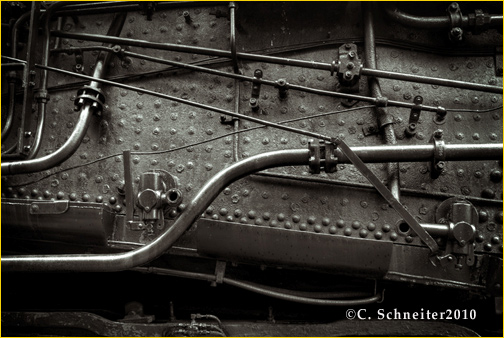
Figure 2
This image contains several individual contrast ranges.
We have one zone of the highlights, the midtone areas with highlight details, and the extreme shadows all of which have detail. The end result is a very satisfying image with much more of a “Film like” look than we would have had with a single capture. The light wraps into the dark areas, making it look more convincing.
SOFT LIGHT?
Below is another image shot the same day. In it, again, I am addressing both Global and Localized contrast, but the light is softer and more open. As I said, it was a cloudy day. A cloudy sky is like a giant softbox. Even though, the light is soft, it all comes from above. In the global sense the scene has a very long tonal range. Nothing seems too bright. Nothing seems too dark.
But look closely at Figure 3. There are minute cracks in the wood, and the cables around the pilings are fairly dark, If I hadn’t shot this as an HDR, those small areas would have blocked up, giving it a staccato contrasty look, Again, this was shot as a 5 stop bracket, merged and Tone Mapped. HDR treatment allowed the light to “wrap around” the dark areas, giving a much more realistic impression.
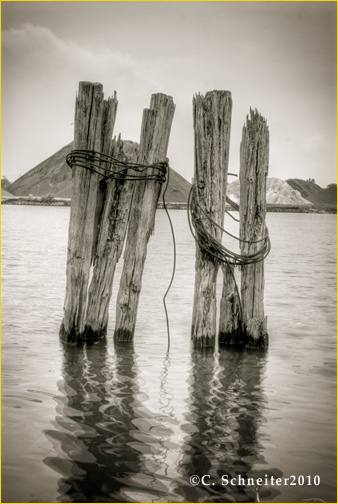
Figure 3
HDR allows the light to “wrap around” the dark areas, giving a convincing look.
One interesting artifact in this image are the multiple reflections in the water. Just as with the image of the tree above, HDR doesn’t deal with movement well. Because of the multiple exposures, highlights will multiply. In this case, I like it, and I really like the long, long tonal range, giving the image the feeling of a conventional Black and white print.
THEN WHY NOT JUST SHOOT FILM?
Anyone who knows me knows that I’m a firm believer in shooting digitally. I believe that we have much more control of a digital image than we ever had with film. I am committed to finding ways to control the digital file to more closely resemble a film image, but using the best aspects of the digital workflow to create a more accurate, cleaner image.
As with film, black and white imagery is dependent upon shape. Light gives us shape, and there are no colors to mask a poor image. You must still use bold lines and directional light to make an image work.
However, one thing that we have in a digital file that we don’t in a negative is the ability to use multiple colors in the scene to emphasize the items in that scene. With film, we had the choice of using one filter; a red filter to darken the sky, which shifted everything else, a green filter to lighten grass and foliage, a blue filter to lighten Sky lit areas. But these were global corrections.
With a digital file, we can use any combination of color changes in our black and white conversions. We can even do multiple conversions and overlay them, make corrections for individual areas, and erase what we don’t want, giving us the best quality available.
Regarding tonal control, I approach Photoshop much as I did in the darkroom. I use darkness and lightness to move the eye around the image, only now, I am able to surgically control my tones. I have several old images that were “almost” right in the darkroom, but in Photoshop, I’m able to dodge and burn and control contrast and color much better than I ever have.
Several years ago, I was in my old darkroom looking for something. Soon, I found myself turning things on… the safelights, the color processor, the enlargers.. I thought “Boy, I should shoot some film!” Then I thought “Why?” I just don’t have as much control in the darkroom!
Many have thought that the value of digital imagery is that it has made it so much easier for the general public to produce images. This may be true, but for those of us who are committed to making the best images possible, it is an invaluable tool.
AND ON AND ON
This article was written at the end of 2010. Since then, I’ve been busy. I’ve enlarged my canvas to a 44″ printer, requiring more resolution. Writing this article has made me rethink my workflow. This summer, in addition to beginning a workshop series, I am spending my time shooting color film, developing it, and scanning it. This way, I can take advantage of the obvious advantages of a digital workflow and scanned resolution, but also, in the case of black and white conversions, I can use the colors to control different areas of the image. I also am going to experiment with doing HDR merges of scanned negs. I’ll report my findings in my next article!
Christopher Schneiter
July, 2011
Christopher Schneiter Photographer
Firefly Photo Workshops
Soon to be launched
www.fireflyphotoworkshops.com
Read this story and all the best stories on The Luminous Landscape
The author has made this story available to Luminous Landscape members only. Upgrade to get instant access to this story and other benefits available only to members.
Why choose us?
Luminous-Landscape is a membership site. Our website contains over 5300 articles on almost every topic, camera, lens and printer you can imagine. Our membership model is simple, just $2 a month ($24.00 USD a year). This $24 gains you access to a wealth of information including all our past and future video tutorials on such topics as Lightroom, Capture One, Printing, file management and dozens of interviews and travel videos.
- New Articles every few days
- All original content found nowhere else on the web
- No Pop Up Google Sense ads – Our advertisers are photo related
- Download/stream video to any device
- NEW videos monthly
- Top well-known photographer contributors
- Posts from industry leaders
- Speciality Photography Workshops
- Mobile device scalable
- Exclusive video interviews
- Special vendor offers for members
- Hands On Product reviews
- FREE – User Forum. One of the most read user forums on the internet
- Access to our community Buy and Sell pages; for members only.


