Since first seeing HDR images a few years ago, I’ve been intrigued by its (the HDR Process) ability to extend tonal ranges, and tone mapping’s ability to almost inverse tones, making things like clouds darkerand more neutral.
However, I haven’t always been that enthusiastic about the use that many practitioners give it. All to often, HDR users seem compelled to make the images intentionally dramatic, lowering the quality until halos form around things and color is thrown out the window.
On the other hand, the fact is that HDR and tone mapping can be very good tools for conventional continuous tone applications. As an old Zone System guy, the first and most obvious use is in extending the tonal range in your images. In shooting digitally one thing I’ve missed is the ability to control my tonal range. I’ve wanted the ability shoot in high contrast situations without deterioration of the image. With HDR I have succeeded in shooting almost directly into the sun or bright highlights. If this had been attempted with a single capture, I would end up with either a silhouette or blown out highlights. With a wide, merged bracket, I can maintain both highlight and shadow detail.
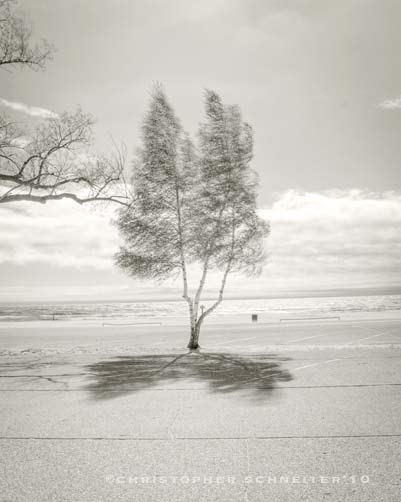 Figure 1
In Figure 1, the tree was shot with a 7 stop bracket, merged in Photoshop, and then tone mapped in Photomatix. I’ll elaborate on this later. I find that I get a much better result if I do the merging in Photoshop, then Photomatix tone-mapping. Now both the extreme highlight on the water and the shadows on the tree have lively detail. Note, no halos or reversed tones, just a sparkling B&W image. One drawback of HDR is that it doesn’t deal with movement too well, as seen in the leaves on the tree. I didn’t pursue this image further to try to remedy the movement in the leaves, but I learned volumes of information from its production. HDR is capable of producing genuine Digital Zone System images if used carefully. Even though I was able to achieve the desired tonal range, it’s important to not make images totally as a technical exercise. Nice effect, but still a mediocre image. I’ll shoot something else that has a long tonal range using this technique.
HDR NIGHTMARE
When I began working with HDR, I was frustrated. I would shoot, then bring home wide range bracketed images, merge them and end up with a huge mess. The tonal range would be mushy, low contrast. Colors would be really bad – sky blue always looked like blue plastic. Many colors, especially red would be oversaturated, and I was never satisfied with the results, until I tried merging in Photoshop.
NEITHER PHOTOSHOP NOR PHOTOMATIX IS A COMPLETE SOLUTION
Photoshop gives a very nice continuous tone merge. It extends the tonal range and can give you a nice result with the right light. If the contrast range matches the width of your bracket, you can make rich, open shadows with smooth, saturated highlights. If you have too wide a range, highlights can band, but the nice thing with Photoshop is that after merging, in the merge interface you can “turn off” items from the bracket to reduce the tonal range. This will eliminate the banding and give you a good result. I have found that it’s imperative that the highlights have enough density so that they won’t blow out. In the dialogue box, I set white point as dark as it will go, and merge in 16 bit. I’ll talk about brightening things up in a minute.
At best, Photomatix is a very crude instrument. When I merged in Photomatix, colors were distorted (as above) and the tonal range had a muddy look to it, making the images prone to the type of “HDRism” that I think of when HDR comes to mind. Even though I consider Photomatix merging to be vastly inferior to Photoshop (because of its soft, mushy nature and poor color reproduction), Its tone mapping will do things that Photoshop, even CS5, will not.
As I mentioned earlier, when I began doing my merges in Photoshop, I began to achieve satisfying results. Photoshop gave me a clean merge and a long tonal range, and, if desired, I could then apply Photomatix Tone mapping to get desired surface effects.
The other night I had the opportunity to do some merging in CS5. As I have grown accustomed to, I got the smooth results, with the advantage that in CS5, tone mapping is now included in the interface. It even has an “Edge Glow” control so that you can get those old HDR Halos just like “real” HDR ! I chose not to use that. Photoshop now has many of the same controls that Photomatix does, but the tone mapping is somehow different. It seems to remain smooth, almost no matter what you do.. This is great, unless you want a look different than continuous tone.
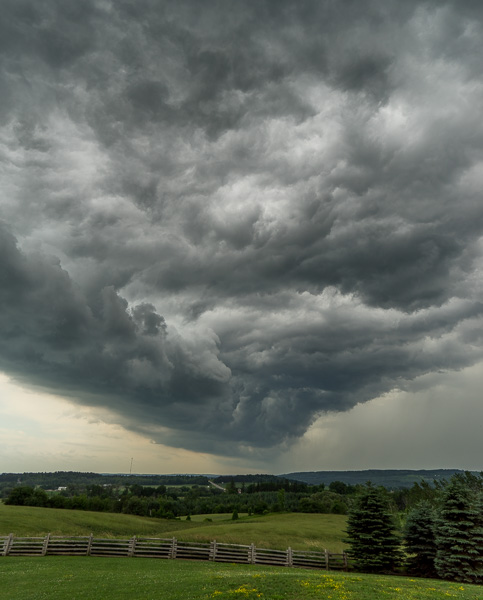
Photomatix, I’ve found, excels at what I call “surface effects”. Many images need more of a feeling of texture. Sometimes clouds need more of a dark and foreboding effect. This is when Photomatix can be the only tool that works.
USING OUR TOOLS FOR WHAT THEY DO BEST
So, we know that Photoshop will do a smooth merge, and Photomatix will provide “surface effects”. What do we do with them? Who says we have to either just use Photoshop or Photomatix?
As alluded to earlier, one drawback of merged files is that sometimes they can make tonal ranges too soft, with a tonal range that is just too long. After working a while with HDR and running into this, I remembered that TIFs can be opened in Camera Raw! This was a key realization. Re-importing into CameraRaw allows me to alter any area of the tonal range separately, allowing me to get the image exactly where I want it.
First, when I merge, I make sure that I set my white point pretty dark, usually as far as it can go.. I’ll explain this in a minute. After export from merge, I save the image as a TIF. This allows me to then open it in Camera Raw, and then contour the image to my liking. In Camera Raw, we have incredible tools to address each area of the tonal range. I lighten the image with the Brightness control, so as to not lighten the highlights too much. I use Fill to address shadows, Blacks to bump the extreme lower end, and Recover to keep the highlights under control. Another artifact of merging files is that colors may shift. I use Tint and Color Temperature to tweak the color, then open the file.
Once it’s open, I may apply tone mapping, where I can add a little of that “HDRish” surface effect that I was talking about. The image I worked on the other night was of rocks, but the Photomatix tone mapping allowed for extreme texture in the rocks and a three dimensional feeling. If needed, I can even re-save as a TIF, and re-open in Camera Raw to it tweak even more.
One thing a lot of people don’t know is that tone mapping can be used on single non-merged images. It can give the effects you want, but you can still use it on a single image.
In Figure 2, there was a nice blur from long exposure, but lacked a textural feel that I was looking for. After Camera Raw, I used the Photomatix plugin to pick up the contrast and “texture” of the surface of the water and added texture to the rocks.
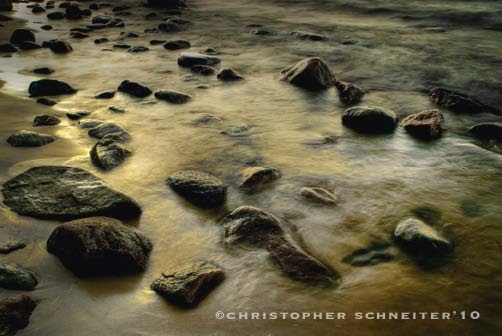
Figure 2
Let’s look at Figure 3. Sometimes you have an image where you’re dealing with possibly two different contrast ranges. HDR allows you to handle these. This is an image where I needed to have a wide rangeimage of the town’s street, and another of the Fireworks themselves. I wanted detail in the sky, the street , the signs, as well as the fireworks. This was done by doing an HDR of the street before the show, then a separate shot of the fireworks. These were then stripped together.

Figure 3
WHAT IF I OVER DO IT?
This can happen. Tone mapping is a very powerful tool. CS5 will give subtle effects, but Photomatix can ruin an image if you’re not careful. There are also times when you like the effect in one part of an image but not in another. This is where layers come in. It’s an easy matter to overlay your HDR or tone mapped image over a conventional continuous tone version of the same image, then either lower the opacity of the top layer to get less of the effect, or erase the areas that you don’t want.
Saturation can be a problem too. Simply make a Hue and Saturation layer and do selective desaturation of the colors that are over the top (red is the usual culprit). And if saturation is a problem in only one part of the image, you can erase everything but that spot.
ABOVE ALL, PLAY
In the end, it’s important to remember that all this equipment and these programs are just tools. We can use them alone or together to create any effect that we want.. I try not to use actions and instead only use basic filters. Actions are a huge industry right now but they keep you from learning how your process works and how you might use several different applications in conjunction with each other. In general, I only use sharpening, and sometimes blur.
Above all, PLAY! Try different things, use programs for things that maybe they weren’t intended to do. And remember, use your powers for good, not evil (NO HALOS!)!
January, 2010
About Christopher Schneiter
Bachelor of Fine Arts, Photographic Illustration, 1978, Rochester Institute of Technology
Adjunct Professor of Photography, Lansing Community College, Lansing, MI
www . christopherschneiter . com
Read this story and all the best stories on The Luminous Landscape
The author has made this story available to Luminous Landscape members only. Upgrade to get instant access to this story and other benefits available only to members.
Why choose us?
Luminous-Landscape is a membership site. Our website contains over 5300 articles on almost every topic, camera, lens and printer you can imagine. Our membership model is simple, just $2 a month ($24.00 USD a year). This $24 gains you access to a wealth of information including all our past and future video tutorials on such topics as Lightroom, Capture One, Printing, file management and dozens of interviews and travel videos.
- New Articles every few days
- All original content found nowhere else on the web
- No Pop Up Google Sense ads – Our advertisers are photo related
- Download/stream video to any device
- NEW videos monthly
- Top well-known photographer contributors
- Posts from industry leaders
- Speciality Photography Workshops
- Mobile device scalable
- Exclusive video interviews
- Special vendor offers for members
- Hands On Product reviews
- FREE – User Forum. One of the most read user forums on the internet
- Access to our community Buy and Sell pages; for members only.


