


Introduction
Alexandre Buisse inA Plea for HDRsaid it all. He speaks for me. One of my favourite photographic subjects is church interiors (no castles in this part of the world), and HDR is indispensable. But I don’t want my pictures to look like HDR. And I also want HDR to be just another part of my toolbox. Does anyone remember as far back as 2003? That was when we corrected exposure using multiple layers and blending modes in Photoshop, and when we created “fill flash” using clever masks. Now with Lightroom there are simple sliders for them all and more. I think of HDR as an extreme version of Lightroom’s Fill Light and Recovery combined, just a method to get back what I saw and I know was there. Until the “HDR slider” arrives I would like to have something similar and simple.
The tutorial is divided into two parts.
In the first part I will look at the problem of consistent colours in Photomatix Pro, and how it can be solved. The solution applies to any HDR program that creates unnatural but consistent colours. In the second part I will present a workflow “for the rest of us”, where I use what I found in the first part to effortlessly create a consistent suite of HDR images from one shoot – the HDR slider.
Part 1: The Colour Problem
Have a look at the three images below. The one in the middle is a normal exposure. The one to the left is Tone Compressor with all settings at zero, as neutral as possible. The one to the right is Details Enhancer with most settings at “wild”. Exception: Colour at 46%. The middle image has correct colours from a camera profile.
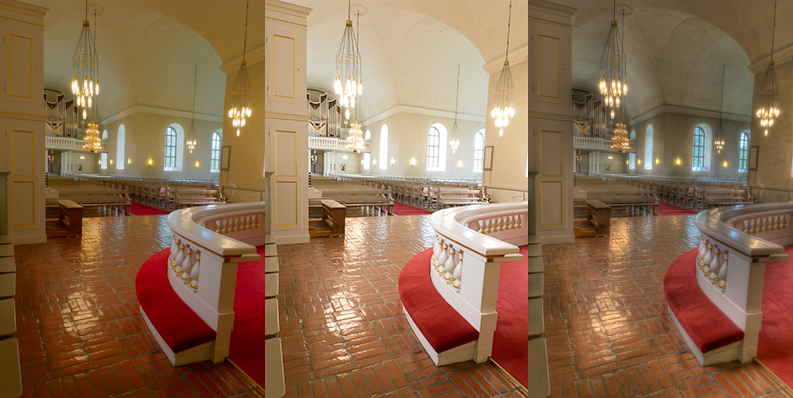
Fig. 1. Kuopio Cathedral, Finland
Photomatix exaggerates red. But red is not the only colour that Photomatix is particularly fond of. Yellow is also a favourite. And it is not only a question of simple saturation. To get rid of the red cast you have to reduce saturation to a point where the rest of the image is verging on b&w.
But does not this problem sound familiar? It is exactly the same as Adobe ACR, which exaggerates red for Canon, Nikon and Sony alike. The remedy was to calibrate our cameras. Or rather, calibrate ACR and Lightroom to interpret the camera correctly.
But can we calibrate Photomatix? Yes, we can.
Calibrating Photomatix
The calibration process here can be applied to any HDR program that produces consistent colour shifts.
The trick is to do exactly the same that we did with our cameras. Use a standardized colour chart, GretagMacbeth or QPcard 201. I have used the latter. Now we do not need the physical card itself, but we need a digital version with all the correct colour values. These values are readily available on the ’net, and using Qpcard 201, you even get one “for free” at the end of the calibration process. It is used as a target at the final visual comparison.
-
- I created one such card and saved it as DNG. See image below.
- Then I saved five TIFF versions of it from Photoshop, each 1 EV darker than the previous. I then ended up with “exposures” -4/-3/-2/-1/0.
- I tried several variations, but found -4/-2/0 to be closest to actual shooting. Note that this combination has -2 as the middle and presumably “normal” exposure.
- Then I simply ran this triplet through Photomatix.
- I converted the TIFF output to DNG in Lightroom and calibrated that file in Photoshop as if it were a raw file from a camera.
- Then I tried another setting and calibrated that one. And another. And another. Hmmm….
Long story short: Some settings in Photomatix produce consistent colour shifts and can be calibrated. Other settings produce dynamic colour shifts depending on the surrounding pixels. No surprise, Detail Enhancer can be one of these. To identify those settings that behave predictably we need to create two versions of the reference chart, namely one with black and one with white background.
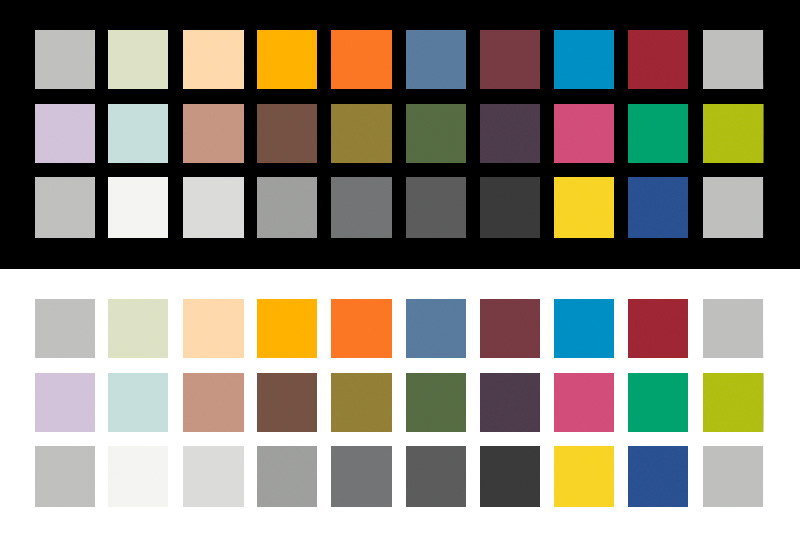
Fig. 2. Dual QPcard 201
The colour blotches are identical, but since half of them are surrounded by white and the other half by black, those Photomatix processes that treat colours dynamically (depending on pixel surroundings) will produce different colours for each identical pair.
After that it is only “guess and try”.
A simple verification procedure is to position the white half on top of the black half in Photoshop and set the top layer to Blend mode Difference. That should turn all the colour blotches to black if they are identical in the two layers.
Photomatix’ Exposure Fusion: Average is one obvious candidate for consistent colours, and yes, it worked. Unfortunately the images were too dark. Something brighter is needed.
Several algorithms produced consistent colours. A good one with bright colours was Tone Compressor with the following settings.
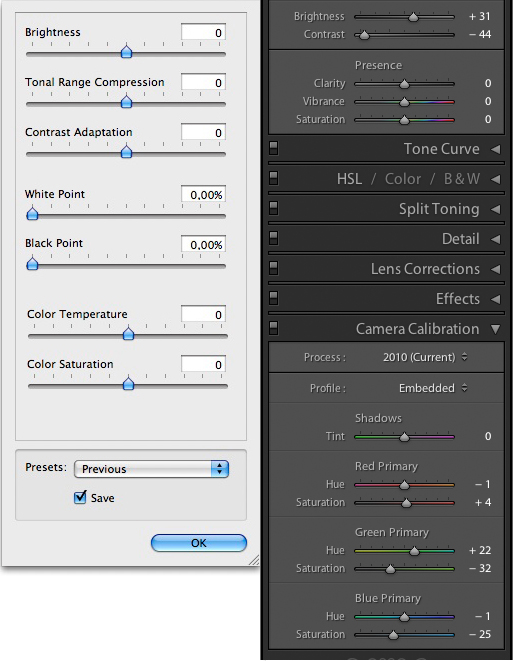
Fig. 3. Tone Compressor settings and profile for consistent colour rendition
Yes, the settings are all zero. You may choose any setting that works for you. This worked for me, and if you use my settings it will also work for you, since there is no sensor or production variance involved.
Now this may have sounded theoretical and perhaps slightly boring. But it will come to good use in the next part, which presents us with an actual, usable workflow. Obviously, I use it for my own pictures now.
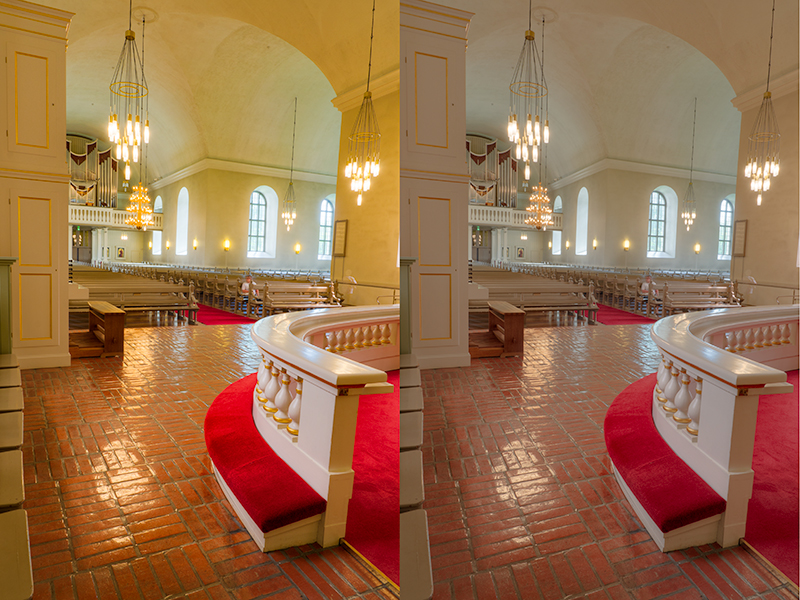
Fig. 4. Straight from Photomatix left, calibrated right
Interestingly, on the example above we can see that highlight detail has been recovered through colour calibration. Examples are the windows in the background and the lamps.
Part 2: The Workflow
I need a workflow. I cannot afford to spend hours on each individual image. What I really want is the “HDR Slider” that will let me create an HDR image with more or less HDR effect, preferably less. Well here it is. It sits inside Photoshop and we all know it.
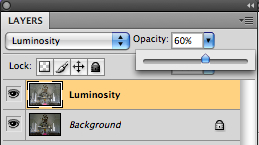
Fig. 5. The “HDR Slider”
The reason I spent so much effort on arriving at consistent colours is of course this slider. If I let Photomatix generate two files at the same time, then joining them together in Photoshop, I have what I wanted. Both files will register perfectly, since they are generated from the same alignment process, done only once.
- File one: Consistent colour, for instance Tone compressor with all settings at zero.
- File two: Wild and wacky HDR, or soft and blurry, whatever you fancy. I use Detail Enhancer with some extreme settings.
- File one goes into the Background layer.
- File two goes into the next layer, with a Blend mode of Luminosity, and the Opacity slider regulating the effect.
When these two layers are flattened and the file saved as TIFF, we can re-import it into Lightroom with the Photomatix Profile from Part 1. This is where I’d like to refer back to Alexandre Buisse, who says
“… there is one important trick that I should mention here: you should never try to obtain the final look of an image in the tone mapping phase, and instead just focus on bringing all the details back from shadows and highlights. You should aim for a low contrast (especially local contrast), low saturation image at this stage, and only afterward, in Photoshop and with local curves adjustments, bring back the full glory of the scene.”
And that is exactly what this workflow produces: good quality raw material for traditional post processing, as quoted above.
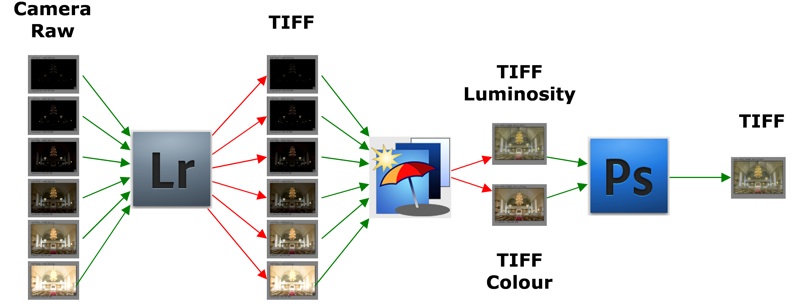
Fig. 6. The processing path
Automation
While working on this article I quickly discovered that even testing was a chore without some computer assistance. So I wrote two AppleScripts. The first renames the output from Photomatix to a strict naming standard. The second script runs Photoshop in batch, merging the Colour and the Luminance files, producing the TIFF files that can be processed manually at the end. And finally I got so fed up with selecting the files to import back into Lightroom that I wrote a third script for sorting them all.
The individual Steps of the Workflow
Here we’ll have a look at each step from start to finish. What works, what doesn’t and why.
Shooting
All “the other” tutorials go on and on about shooting and bracketing. You can read them. Again, I’m only after what concerns my workflow. Shooting HDR outdoors is usually ok handheld. We all have cameras with image stabilization now in 2011, and the software successfully aligns the images. My camera (Sony Alpha 700) can bracket -2/0/+2, which is enough for most “normal” scenes.
Indoors three exposures are not enough, and I shoot two bracketed series after each other. One is adjusted an additional -3EV, the other +3EV, resulting in a 6-exposure series of -5/-3/-1/+1/+3/+5. Fortunately the sequence does not matter to Photomatix, so the actual sequence may be for instance +3/+1/+5/-3/-5/-1. Since I have to pause between the two series and adjust the camera, it is obvious that a tripod is needed. The other obvious reason for a tripod is that exposure times easily exceed 30s at f/11.
You may prefer to always shoot the two series as -3/+3 in that sequence or alternate between the over/underexposure settings. Both have advantages. The advantage of alternating is that it is quicker. The next series can retain the settings of the last bracket of the previous series. The advantage of always following the same routine is just that (don’t underestimate the value of routine), plus another we will see in Lightroom later.
Talking about exposure times, you may end up in a situation where your camera will sabotage your bracketing attempts. My camera has a longest shutter time of 30s (unless you use Bulb), meaning that if the “0” exposure in the bracketing sequence exceeds 8s then the “+2” exposure (8s*2*2 = 32s, which is rounded to 30s) will not be +2, but perhaps reduced to +1.7 or less. If the “0” exposure is actually 30s then the sequence will become 2/0/0. In cases like this, manual exposure might be called for. Do some test runs with your camera in low light at home and learn how it behaves.
If the exposures are not evenly spaced and/or some of them are identical, Photomatix will be confused. As an experiment I took one sequence of 6 exposures and corrupted it afterwards, making two copies of the +3 exposure and two copies of the -3 exposure. I then created two different HDR images with Exposure Fusion: Adjust Default, both based on 8 exposures:
-5/-3/-3/-3/-1/+1/+3/+5 (“dark”)
and
-5/-3/-1/+1/+3/+3/+3/+5 (“light”)
The results were different. The histogram shows the difference between the two when compared in Photoshop. This also means that if the camera limits your longest exposure this will influence the result.
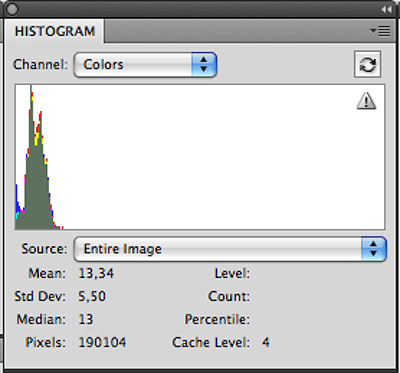
Fig. 7. Histogram showing difference between Light an Dark Version
It is best to use the same number of exposures for all series during one shoot. This is something that you will be grateful for when you return to Lightroom, which I’ll explain later. Do NOT think that this particular scene requires fewer exposures. Instead do everything in the same way. If you can organize the images into logical groups, for instance Inside and Outside, you may consider using 6 exposures in one group and 3 in the other. But try to avoid mixing. You will only create problems and aggravation for yourself.
Finally, having all series with an identical number of exposures makes Photomatix batch processing painless!
Lightroom Import
The only important thing about importing to Lightroom is your file naming scheme. Use filenames that create a sortable sequence. You may either use the image names straight out of the camera, or some datetime format. I recommend ExifRenamer on the Mac, and there are similar solutions for Windows. (I googled.) My naming standard is PYYYYMMDD_hhmmss_sss, where sss is a sequence number within the same second, always starting at 001. With a camera that shoots 5 fps that number can be from 001 to 005 of course. Lightroom supports generation of a similar filename except for the _sss part.
The reason for a sortable sequence is of course that files from the same series will appear in sequence both within the Lightroom Library browser and the OS file system.
Lightroom Lens Profiles
One reason I almost desperately wanted an Intel Mac was to get Lightroom 3, which does not support PowerPC. Processing in Photomatix (or perhaps every HDR application, I don’t know) emphasises chromatic aberration (CA). If you apply a lens profile in Lightroom, that problem spectacularly disappears!
Lightroom Library organization
Now here’s the reason why I recommend you stick to the same number of exposures within the same shoot or subject. It is how you view them in Lightroom!
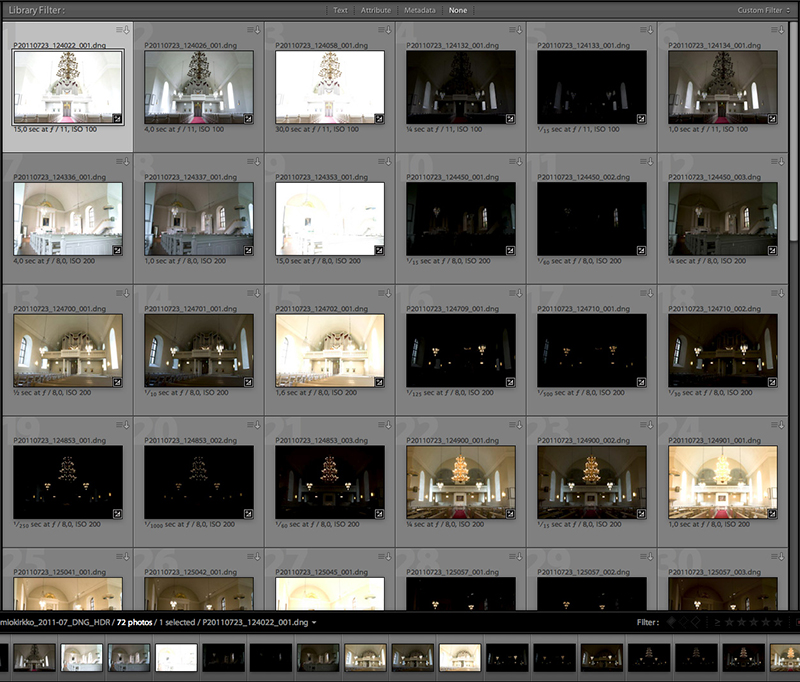
Fig. 8. 6-exposure series as seen in Lightroom
With an identical number of exposures for all series, you can adjust the viewing in Grid so that one series will correspond to one row in the Grid. We also see that for the first three series I shot the +3/-3 pattern, but then started alternating. It does not matter to Photomatix, but it might definitely matter to you. As we can see, the second exposure from the left is almost correct for the first three, and can be used as is. It is always useful to have a “real” reference shot, and following the routine instead of alternating gives us these reference shots nicely lined up vertically.
The other Organization advice is to assign separate folders to series with different number of exposures. Bracketing with 3 goes into the _3 folder, while bracketing with 6 goes into the _6 folder, etc. Viewing (and later, processing) becomes so much easier.
Series that do not conform to either go into separate folders. I have _2, _3, _5, _6.
It should also be obvious that if you delete a file you will upset the pattern in Grid view.
Lightroom export
If you google like I did, you will find statements to the effect that TIFF does only support sRGB. Don’t believe everything you find on the ’net. TIFF supports both Adobe RGB and ProPhoto RGB just fine. This is what HDRsoft claims, and this is also what I could confirm with a simple test using Lightroom and Photoshop.
(Curious about the comparison test? I took one particular image with green grass and red flowers and pushed the saturation mile high. I then exported that image twice, once as sRGB and once as ProPhoto RGB. I then opened them in Photoshop, placed them in layers above each other and set the top layer’s Blend Mode to Difference.)
The other thing about TIFF is what the HDRsoft FAQ for Photomatix says. (I have edited the text slightly.)
Do I need to process bracketed RAW files to TIFF format first?
-
- The answer depends on your needs and preferences. If the quality of raw demosaicing/debayering or proper white balance adjustments are important to you, it is better to first process your bracketed RAW files in your favorite RAW converter, and then combine the converted TIFF files in Photomatix.
The RAW conversion of Photomatix Pro and Photomatix Light is not as full-fledged and sophisticated as the RAW conversion done in Photoshop, Lightroom, Aperture, Bibble, DxO or other applications specialized in RAW conversion.
In general then, do your normal initial processing in Lightroom, then export to TIFF.
For each run of Photomatix, you use one set of TIFFs from Lightroom of course, each set with the same number of exposures. So for my 12 final images, I started with 72 TIFFs.
Photomatix
The Batch processing of Photomatix is quite powerful. From top left corner and down:
You may choose to save a version of the merged file. By doing that you can go back and try different tone mappings “at no cost”. I also ask Photomatix to create both a Tone map/Details Enhancer file and a Tone map/Tone Compressor file at the same time, using the same 6 base images. Aligning the images may be quite time consuming, and this process makes sure that I only need to align once.
For Settings, I set Strength, etc to 10 to “get the most out of it”. (Those of you who have purchased the Photomatix Spinal Tap Edition may try to set everything at 11…). Your mileage may vary.
.EXR files are smaller than .HDR files.
Click Run and go do something else.
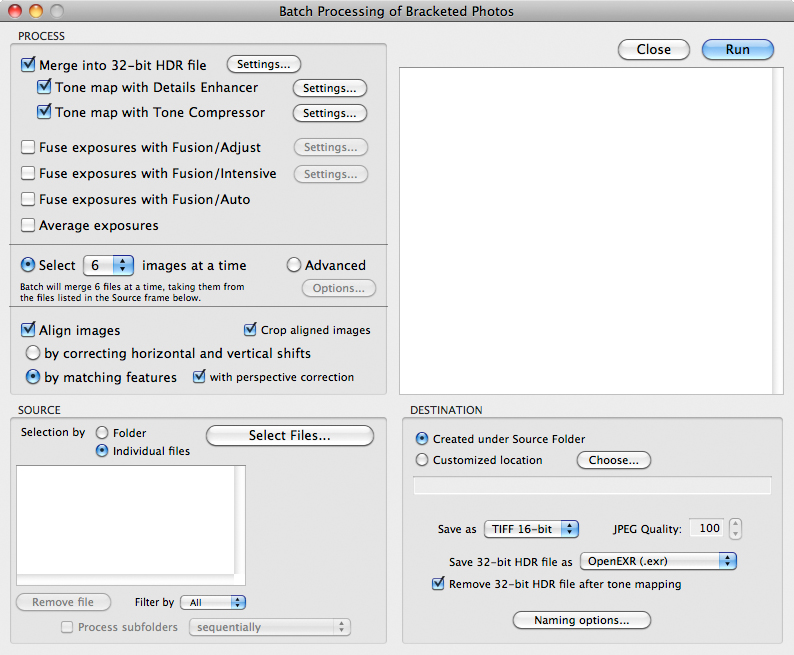
Fig. 9. Photomatix options for Batch Processing
After Photomatix has finished there will be triplets of almost identically named files in the ouput folder. The 32-bit EXR file will have no suffix (suffix, not extension), while the two other ones have one as you can see.

Fig. 10. Photomatix files after Batch Processing
Photoshop
This is how Photoshop is used when you do this manually.
- Open the Compressor.tif file. It contains the colour information.
- Open the corresponding Enhancer.tif file. It contains luminosity (or “contrast”) information.
- Holding down the shift key, drag the Background layer from the Enhancer file onto the editing (main) window of the Compressor file. This copies the layer and ensures that it is centred.
- Set Blend Mode of top layer to Luminosity.
- Adjust Opacity.
- Save as TIFF.
Scripting
As I said, I have written two scripts. The first script renames the output files from Photomatix to something more manageable.

Fig. 11. Photomatix files after renaming
The second script runs Photoshop in batch, doing exactly what was explained above, except it can produce several variations of the same picture. It has one prompt where you can enter whatever Opacity values you want. The values do not have to be evenly spaced, nor do they have to be three.
10,12,27,35,60 is just as valid as 80,90.
I started off with 25, 50, 75, but after some experimenting and experience I have found that a logarithmic sequence produces a very useful set. The volume knob on your hi-fi is logarithmic.
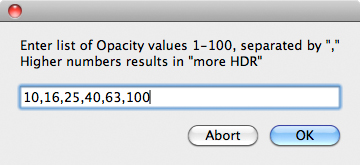
Fig. 12. Script prompting for Opacity values
After you have entered the values, the script will process all files dropped on it using these same settings.

Fig. 13. Photomatix files after processing in Photoshop
And Finally – Lightroom
You may not be entirely satisfied with the outcome. You are not even supposed to be! Re-import the final Photoshop image into Lightroom and make whatever changes you might fancy. Remember that these images are now really 16-bit, not 12 or 14 like the ones from our cameras. Also remember: When importing, use the Developer preset with the calibration values for Photomatix.
I tentatively re-import all files except .exr into Lightroom. When I feel that I’m finished with the images, I can discard the _Cmp and _Enh versions, since they can be easily recreated.
Warning: Do not use any Import settings for the _Cmp and _Enh versions, since that will disturb further use of them.
Final Examples
The following image has been processed “on automatic” and presents three variations to choose from, 25%, 50% and 75%. My preferred variation varies with the image. For the previous image from Kuopio Cathedral I would select something around 20%. For this image perhaps 50% is more suitable. The interior is from St Katariina Church, Turku. The images may perhaps seem slightly bland, which is just what I want. Lightroom takes care of the rest. The differences are more clearly visible at normal screen sizes. But note how the chandelier changes.
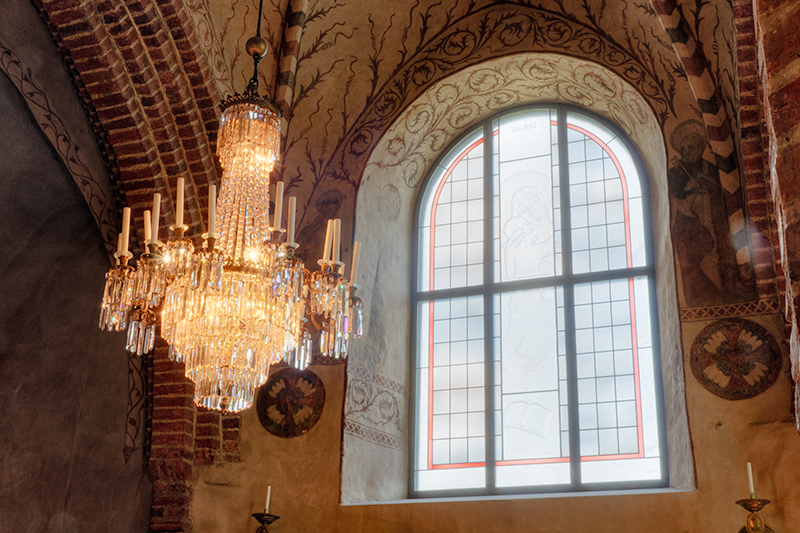
Fig. 14. 25%

Fig. 15. 50%
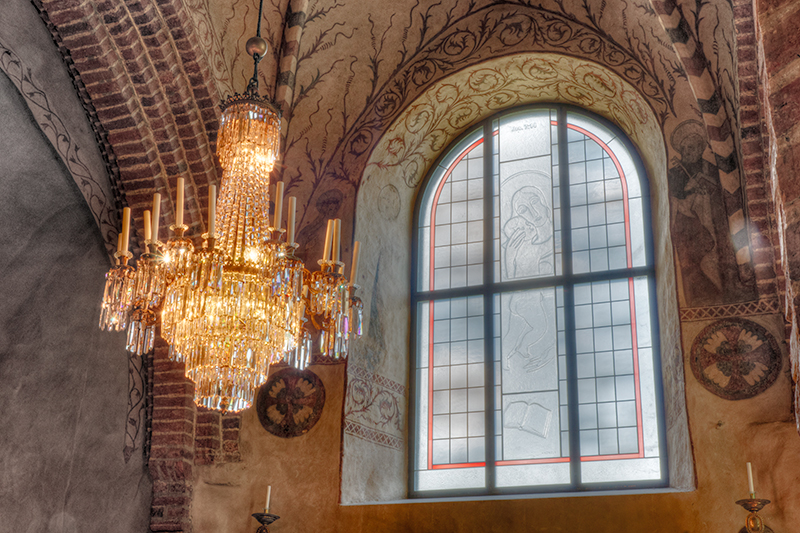
Fig. 16. 75%
And finally a finished image with all Lightroom adjustments applied. The “original” HDR is a 35% version. I seem to prefer between 20% and 35%.
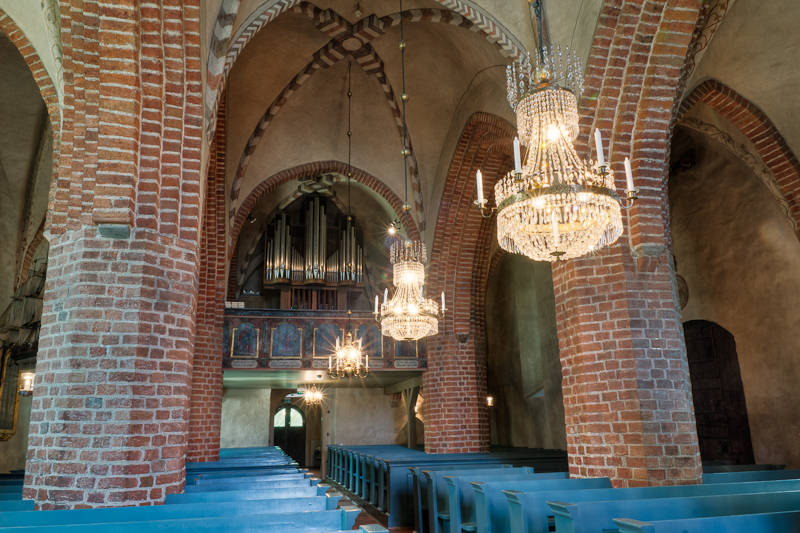
Fig. 17. A final image. Does it look like HDR? Not very much so
AppleScripts
The workflow was developed using
-
- Lightroom 2.7
- Photomatix Pro 4.1
- Photoshop CS4
- 6 year old Mac G5 with OS X 10.5.8 (Leopard)
In the time between the first version of this tutorial and its publishing I acquired an Intel MacBook Pro, and the workflow is now tested and running on
-
- OS X 10.6.8 (Snow Leopard)
- Lightroom 3.5
You will probably want to downloadthis small ZIP fileof the three scripts mentioned, plus a simple Excel sheet that computes logarithmic settings that you may want to use.
And to my Windows brethren: These scripts are so simple that I am sure half of you can whip them up in VBS in an hour. The difficult part is to get Photoshop to respond like you want it to. For instance, I found no way to convince Photoshop to flatten the image as part of the Save operation, so I had to create a copy and flatten that one instead before saving it. The source of the three scripts are included as separate files with CRLF line endings, so you should not face any problems reading them.
Photomatix Rename
Use after Photomatix to get standardised names
Photomatix to Photoshop
Use immediately after the one above to run the files through Photoshop
Photomatix Move Files
Use after Photoshop to sort the files into separate folders
Logarithmic scale
If you want to use another logarithmic setting for the second script, this Excel spreadsheet will compute it for you. Unfortunately, AppleScript does not support logarithms directly.
You can enter three parameters. They are red in the spreadsheet.
-
- Max Opacity
- Min Opacity
- The number of images within that range
The spreadsheet is locked with no password.
January, 2012
Author’s comment
The first draft of this article was submitted in September 2011. It therefore predates the announcement of HDR Expose 2 by several months.
From the Unified Color Technologies Press Release:
“Built upon Unified Color’s Beyond RGBTM color technology platform, both HDR Expose 2 and 32 Float v2 separate an image’s color component from its luminosity component, enabling photographers to adjust each independently; thereby preventing the tell-tale color shifts often associated with HDR photography and producing much more natural-looking tone mapped results.”
In other words, the people at Unified Color Technologies have been thinking in parallel with myself. In my opinion, this was a development whose time was ripe and that just “had to happen”. Expect the same in other products soon.
Vegard Brenna works as an IT architect in Oslo, Norway. He bought his first camera in 1968, his first SLR in 1973 and his first digital in 2001. He has earlier written a small handful of rather esoteric articles on Photoshop and the Konica Minolta A2. In addition to churches he enjoys portraits and of course nature. Some examples can be found at
http://s1221.photobucket.com/albums/dd472/Brevegard/.


Elevate Your Vision


Read this story and all the best stories on The Luminous Landscape
The author has made this story available to Luminous Landscape members only. Upgrade to get instant access to this story and other benefits available only to members.
Why choose us?
Luminous-Landscape is a membership site. Our website contains over 5300 articles on almost every topic, camera, lens and printer you can imagine. Our membership model is simple, just $2 a month ($24.00 USD a year). This $24 gains you access to a wealth of information including all our past and future video tutorials on such topics as Lightroom, Capture One, Printing, file management and dozens of interviews and travel videos.
- New Articles every few days
- All original content found nowhere else on the web
- No Pop Up Google Sense ads – Our advertisers are photo related
- Download/stream video to any device
- NEW videos monthly
- Top well-known photographer contributors
- Posts from industry leaders
- Speciality Photography Workshops
- Mobile device scalable
- Exclusive video interviews
- Special vendor offers for members
- Hands On Product reviews
- FREE – User Forum. One of the most read user forums on the internet
- Access to our community Buy and Sell pages; for members only.
You may also like


