


{
By: Jonathan Wienke
I’ve always been a little bit schizophrenic in my approach to color in photography. I have nothing against color in images, but I have a deep appreciation for really well-done B&W work. I love the creative flexibility of adjusting the mixture of the various color channels to create a really striking B&W image. As I refined my B&W technique, I began using linear RAW conversion because it allows one to easily make use of 100% of the dynamic range captured by the sensor. Linear RAW conversion is difficult to use for color images because no tone curves are applied to the image data; there is no profiling or color adjustment done during the conversion process. In addition, images converted in linear mode tend to be extremely dark, and require fairly radical gamma adjustment to get the image to look "right". But the slightly odd-looking color common to linearly converted RAW images is not an issue when the image is being converted to B&W. I discovered that if I normalized the color channels of a linear RAW conversion (basically "stretching" the values of each color channel so that they ranged from the minimum to the maximum values) and then applied a gamma adjustment of about 4 to 5, I would have a color image that, while frequently looking a bit odd in color, would always convert to a very nice B&W.
The greatest advantage of linear RAW conversion is that it allows the use of the entire dynamic range of the sensor. Most non-linear RAW converters have difficulty dealing with extremely bright highlights and deep shadows. In many cases, the output will be clipped to white or black before the actual RAW data is clipped. This can pose a serious problem when photographing subjects with an inherently wide dynamic range, such as a bride and groom wearing the typical white dress and black tuxedo. Keeping detail in the dress and the tuxedo from being clipped can be an extremely frustrating experience. But getting good color out of a linearly-converted RAW can be an even more frustrating experience.
After experimenting with linear and non-linear conversion for a while, I concluded that each method had its own strengths and weaknesses. Linearly converted RAWs always resulted in the best B&W images with the most highlight and shadow details, but non-linearly converted RAWs nearly always had the best color. At this point, the next logical step seemed to be to devise a way to blend these techniques to combine their advantages and eliminate their drawbacks. What follows is the solution that I devised to this problem.
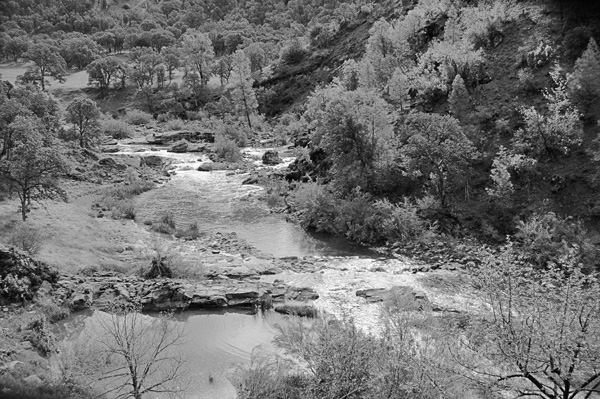
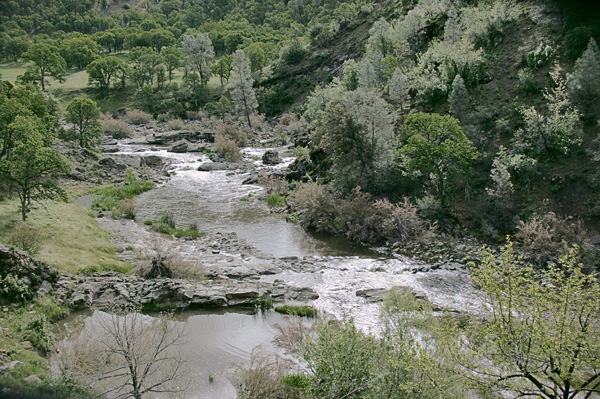
The image in the example below is backlit by the sun, making the white rapids want to wash out to white and lose detail. There is a tiny bit of clipping in the RAW data, but doing a non-linear RAW conversion results in most of the rapids being clipped to pure white. So what we are going to do is use a hybrid approach to get a good color image with the maximum amount of detail in the difficult-not-to-clip rapids. The first step is to do a 16-bit linear conversion of the RAW image. I’m going to use Canon’s File Viewer Utility, which has one of the worst user interfaces of any alleged "professional" photo processing program ever. It sucks, but it does work just fine for linear conversions. Here’s what it looks like initially in Photoshop:
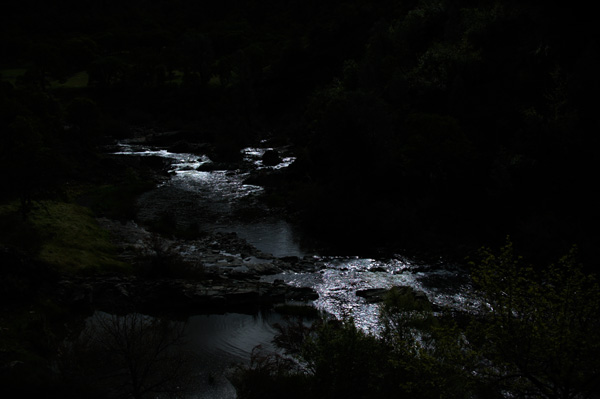
Beautiful isn’t it? Though it is a bit on the dark side. The first thing to do is to normalize the color channel data with a levels adjustment (Image/Adjustments/Levelsin Photoshop’s menu); click theOptionsbutton and use the following settings:
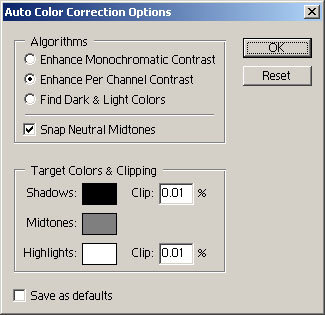
This stretches the distribution of each color channel individually so that 0.01% of each color channel is clipped to the maximum and minimum value. 0.01% clipping is not enough to become visually objectionable; a 1Ds image will only have about 2200 pixels clipped to either extreme in the entire image, and the pixels clipped can vary between color channels. The next step is to do another Levels adjustment to apply a sensible gamma adjustment:
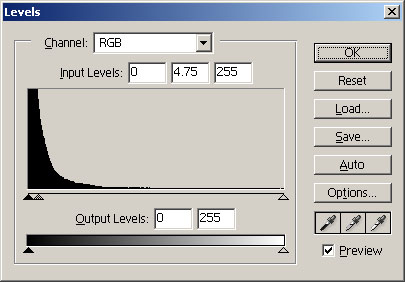
So after the level adjustments, the linearly-converted image looks like this:
The color here is actually unusually good for a linear conversion that hasn’t been extensively tweaked with curves and the color balance control. But the color doesn’t really matter at this stage, because we’re converting this to B&W. Here’s what we have after usingtheimagingfactory.com’s Convert To B&W Proto convert the image to B&W, switching to grayscale mode, and then running myMidtone Sharpen 16 Gray actionto apply some local contrast enhancement and sharpening:
Now we’ve got a really nice sharpened B&W version of the image and we could stop here. The exact technique used to make the sharpened B&W grayscale version of the image doesn’t really matter; feel free to use the techniques that work best for you for B&W conversion and sharpening. But the ultimate goal here is to make a good color rendering, and we’re only halfway there. This non-linear conversion was done with Adobe RAW Converter 1.0 with contrast set to minimum, and smoothing set to 20:
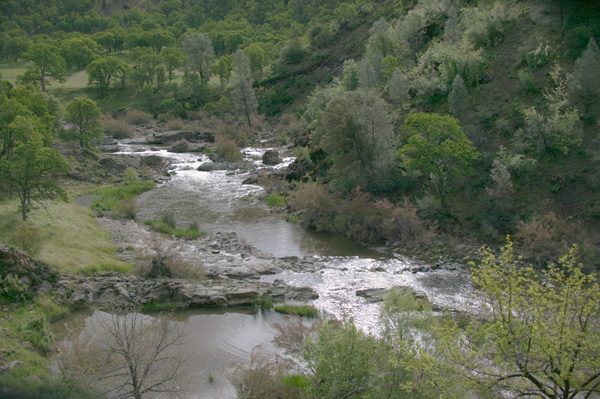
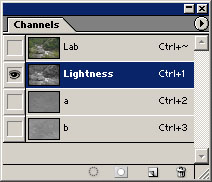
The goal of this conversion is to get the RGB color values to fall in the midtones as much as possible, so that the hue information can be extracted with the greatest possible accuracy. We don’t want any clipping if we can help it, and don’t care about luminance, just color hue and saturation level, which is why the noise removal setting is higher than usual. The reason for this is simple: the next step is to combine this insipid-looking color image and the B&W image together to get a really good color image. First, we make sure both the B&W and the color versions of the image are open in Photoshop. Next, we convert the color image to LAB mode, and select the Lightness channel.
Now we use theImage/Apply ImagePhotoshop menu command to apply the B&W image to the Lightness channel of the color image, using normal blending and 100% opacity.
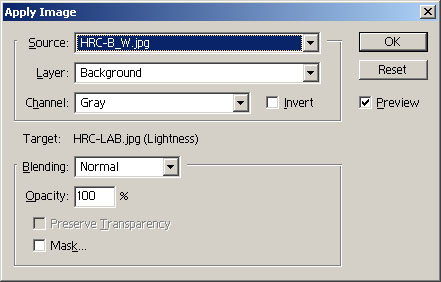
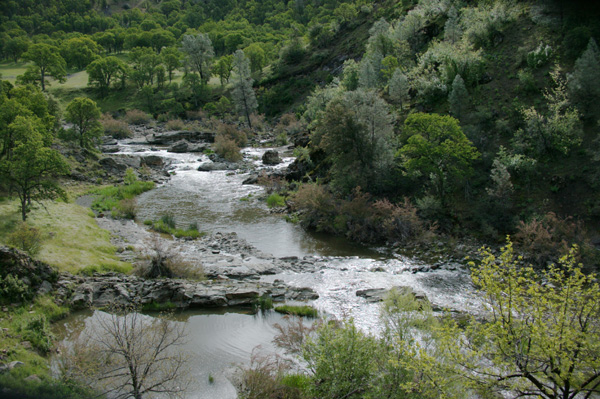
This transfers the luminance tonality and all of the sharpening done to the B&W image over to the color image in one simple step. And the overall color of the composite is much better than that of the linear conversion. So we have the best of both worlds by making separate conversions, then combining them together in a way that preserves their individual strengths and eliminates their weaknesses. And we end up with a good B&W version of the image, too. Bonus!
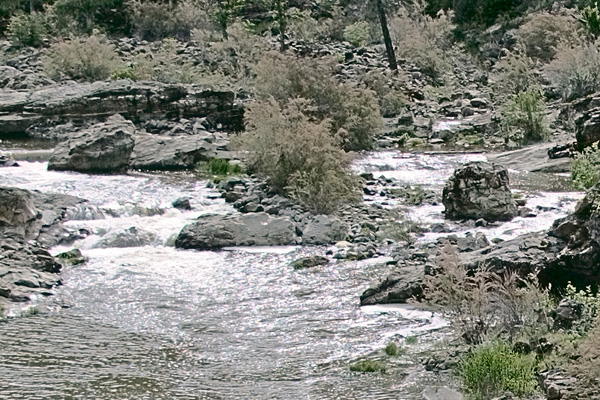
And as you can see in the magnified crop below, the highlight detail of the rapids has been preserved well:
At this point, I believe that the best way to get a good color image, especially when utilizing every last little bit of the sensor’s dynamic range is critical, is to make the best B&W rendering of it that you can, and then colorize the B&W rendering using the technique outlined above. You don’t have to use the RAW converters I mentioned to make this technique work; all you need is one that allows linear conversion and one that uses the standard method with tone curves or profiles.
To all RAW converter authors out there:
I’d really like to see a RAW converter that automates this process and has a B&W and color view that can be toggled. Start out in B&W view and have a control set similar to a cross between the Levels Options dialog in Photoshop (to normalize the linear RAW data and apply the appropriate gamma) andtheimagingfactory.com’s Convert To B&W Pro(to adjust the tonality from the color channels to get the desired look). Once the B&W is as you like it, you can either convert straight to B&W, or go on to the color view, in which the B&W view is locked in as the L channel and all adjustments made (using the standard tone curve paradigm) only affect the A&B channels. Allow color export in either LAB mode or to any of the common RGB color spaces. I would buy it; you are guaranteed to be able to use 100% of the dynamic range of the sensor in the converted output. And it would be a godsend for people who do a lot of B&W work.
Text and Photos © 2004 — Jonathan Wienke


Elevate Your Vision


Read this story and all the best stories on The Luminous Landscape
The author has made this story available to Luminous Landscape members only. Upgrade to get instant access to this story and other benefits available only to members.
Why choose us?
Luminous-Landscape is a membership site. Our website contains over 5300 articles on almost every topic, camera, lens and printer you can imagine. Our membership model is simple, just $2 a month ($24.00 USD a year). This $24 gains you access to a wealth of information including all our past and future video tutorials on such topics as Lightroom, Capture One, Printing, file management and dozens of interviews and travel videos.
- New Articles every few days
- All original content found nowhere else on the web
- No Pop Up Google Sense ads – Our advertisers are photo related
- Download/stream video to any device
- NEW videos monthly
- Top well-known photographer contributors
- Posts from industry leaders
- Speciality Photography Workshops
- Mobile device scalable
- Exclusive video interviews
- Special vendor offers for members
- Hands On Product reviews
- FREE – User Forum. One of the most read user forums on the internet
- Access to our community Buy and Sell pages; for members only.
You may also like


