


An Introduction to Ilfochrome Printing
Authors Note, (May ’99):
This article was originally published inPhoto TechniquesMagazinein early 1998. Since that time I have ceased doing Ilfochrome (Ciba) printing, largely due to the shift that I have made to digital image processing. I was also concerned about the long-term health hazards of chemical use — more than 20 years of Ciba printing in my case.
Also, the photographs used to illustrate the article in the magazine were reproduced from original Cibachrome prints. I have used the same images here, but for obvious reasons these are now straight from the scanned original transparencies, not scanned from prints.
Imagine wandering down to the darkroom before dinner and emerging within half an hour or so having produced an 11X14 color print from a favourite slide. In little more than the time for a Seinfeld episode you would have exposed the paper, run the full process and set the print out to dry. Oh yes, this includes set-up as well as clean-up time. Print quality? Stunningly brilliant colours and the highest image permanence of any readily accessible process can be yours with only modest equipment.
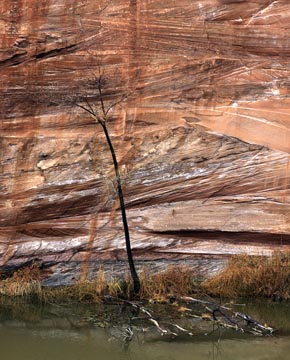 Bare Tree & Rock Face — Utah 1997
Mamiya 645 Pro, 150mm lens, Provia 100. Printed on CLM1K medium contrast paper. Remarkable tonality range and image sharpness are the hallmarks of Ilfochrome Classic prints.
Ilfochrome Classic, known until the past few years as Cibachrome before Ilford purchased the technology from Ciba-Geigy, has been the medium of choice for color photographers seeking archival prints with exceptional clarity and brilliance. Unfortunately the process is somewhat expensive, but otherwise it is exceptionally easy to work with. If you’re familiar with b&w darkroom technique you’ll be surprised to read that printing Ciba (as it’s called by many) is in many ways easier and less fuss that working in B&W. This is true, in part, because with even the simplest and least expensive processing equipment you’ll be working with lights on except when exposing the paper. If you’re familiar with RA process color negative printing, you will be in for a treat, since achieving good color balance when printing from transparencies can be much more intuitive and more fun than working with orange masked negatives.
With this article I hope to show how simple and relatively inexpensive getting into printing Ilfochrome can be. Ilford publishes a book titledIlfochrome / Cibachrome IIA, Ilford catalogue # 725634, which lists for about $20. You should buy this when you get your first package of chemistry and paper. Most retailers who handle Ilfochrome either stock it or can order it for you. It contains color charts and tips that will prove invaluable.
Equipment
If you already have a color head enlarger and a drum processor of some sort, you’re in business. Many B&W darkroom workers already have enlargers with dichroic color heads and use them for variable contrast paper. If you don’t own a drum processor, you’re still in good shape. Although you wouldn’t want to use trays for color printing, a manual drum and motorised roller base will cost no more than a couple of hundred dollars. Bessler, Ilford and Unicolor all make suitable gear. In many ways it is more convenient for occasional use than the more automated, and expensive, systems from Jobo and Durst, and we’ll soon see how and why.
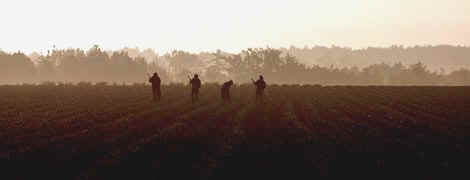 The Gleaners — Ontario 1996
Mamiya 645, 300mm lens. Provia 100. Printed on CLM1K medium contrast paper. The original transparency had a strong yellow/green color cast from early morning light filtering through a fog bank. Strong contrast plus a little creative filtration control made the image graphically stronger.
Exposure & Contrast
Printing from a transparency has the distinct advantage that you can easily preview what your final print should look like. The transparency is the ultimate arbiter of your final print. Once you have established the correct exposure and filtration that makes a good looking print, using your equipment and technique, you’ll be able to make an excellent print almost any time in the future from almost any slide.
But, since all your future work will depend on overcoming one challenge — making a first almost perfectly exposed print — you’re going to experience some frustration along the way. This is because every enlarger, color head, lens and paper batch combination has its own unique set of characteristics. Once that first acceptable print is in the bag though, whenever you change paper batch or print size it takes but a simple calculation to zero back in on the right exposure and color balance. But, before making that first test print, let’s understand filtration.
(Use your browsersBACKbutton to return here after viewing enlarged frame)
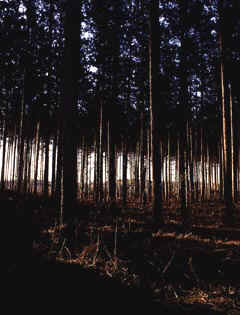 Forest at Dawn — Ontario 1996
Mamiya 645, 55mm lens. Provia 100. Printed on CPS1K standard contrast paper. An extremely high contrast image made almost graphic in combination with Ilfochrome’s inherent high contrast.
Color Filtration
The color of the light from your enlarger has to be adjusted to compensate for the transparency, the color head, the bulb and the paper batch. Jump right in. Try an 8"X10" print with an exposure of 20 seconds @ f/5.6, and with filtration set the same as the "Basic Filter Guide" numbers on your paper package. For example, set your filters to 25cc Yellow and 15cc Magenta if the package indicates Y25, M15 and C0. Remember, never have all three colours dialled in, because you’ll only be adding some neutral density, making exposures unnecessarily longer.
The biggest challenge in Ilfochrome printing is contrast control. All forms of reversal printing have this problem. There are many ways to control contrast but none of them are fast, easy or inexpensive. Among popular contrast control methods for advanced Ciba printers are the creation of "unsharp masks", altered developer chemistry, and more recently digital manipulation of an intermediate transparency.
For now, we’ll stick to paper selection as a means of contrast control. There are three grades in the "Classic" glossy paper that is the standard for exhibition prints; CPS1K is the so-called standard paper (AKA high-contrast), CLM1K is described as medium contrast, and there is a so-called low contrast paper designated CF1K. The medium contrast CLM1K is the most popular and the only one available in packages of less than 100 sheets. While Ilford’s low contrast paper is somewhat less contrasty, it also appears to have less color saturation, and therefore isn’t as popular.
Once the print is dry (prints are somewhat magenta in color while wet), judge the color and exposure against the original transparency on a light box. Exposure will likely be off, and now is the time to remember that printing transparencies is like exposing film. If the print is too light, REDUCE the exposure; if too dark INCREASE the exposure.
As for color balance, the trick to remember is that if there is too much of a certain color, reduce that color,or increase it’s compliment. For example, if there is too much green, increase magenta; too much yellow, reduce yellow. Refer to your Ilfochrome book’s color charts to ensure that you understand the relationship between the primary subtractive colours (cyan, magenta, yellow) and the primary additive colours, (red, blue, green).
Unlike when printing color negatives in reversal printing you’ll find that a 5cc shift is small and only a 10cc shift starts to be significant. Consequently, once you have a standard exposure and filtration for your equipment set-up, just about any slide will print with similar color balance. That’s why zeroing in that first print is so important.
The only major variable will be when you buy different packages of paper. You’ll have to accommodate the fact that the color balance of the paper has changed. This is easier than it sounds. The way to do this is to take the filtration numbers from the previous package, subtract your standard filtration and then add the new package’s filtration. Here’s an example. (Remember your junior high math, and handling negative numbers?)
First Package: Y25 M15 C0
Your Standard: Y10 M30 C0 (subtract)
———————-
Subtotal: Y15 M-15 C0
New Package: Y5 M20 C0 (add)
———————-
Final Total: Y20 M5 C0 (your new filter standard)
This will get you close enough that just one or two prints will nail down your new standard filtration settings for the next paper package. Naturally, you are not obliged to print the slide so that its colours are a clone of the original. Make than sunset yellower or that snow scene bluer. Creativity is the soul of printing.
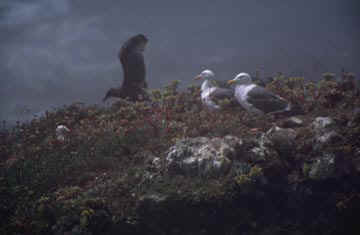 Nesting Gulls in Fog — The Sea Ranch, CA 1995
Nikon F4, 300mm lens with 2X extender. Provia 100. Printed on CLM1K medium contrast paper. Though shot under extreme low contrast conditions, (fog and a long lens with extender) there is enough "snap" from medium contrast paper to render a strong image.
Time, Temperature and Chemistry
In Ilfochrome printing time, temperature and agitation are critical. The motorised drum roller takes care of the latter, and good technique can take care of achieving consistent process timing. But, temperature control can be difficult to achieve without one of the more expensive automatic processors.
There is a way though, and while it appears to have fallen into neglect for many years, Mr. Simon Ratowski, the inventor of the drum processor, developed it. This technique is called the "drift though" method and it permits manual drum processors without any automatic temperature control to achieve highly consistent results. It works as follows.
Ilfochrome processing has 3 chemicals — developer, bleach and fixer. They come on a 2 X 1-litre kit, in other words — enough chemicals to make two separate 1-litre batches. The developer and bleach are both easily mixed powders and the fixer is a liquid. Try mixing the chemistry a few hours or more beforehand so that by the time you go to use them, they are all at room temperature. (By the way, these chemicals should only be used in a well-ventilated darkroom. The bleach contain formaldehyde and you should be cautious about breath it in).
You can use Ilfochrome chemistry at temperatures ranging from 68 to 86 degrees F. The difference is those processing times range between 4 and 2 minutes depending on the temperature that you use. Which would you rather do? But, if you’re going to use the chemicals at room temperature, do you have a choice? The answer is yes, you do.
A pre-soak in water is required before the developer, and recommended between the developer and the bleach process. The trick is to use heated water for these so that the room temperature chemistry (regardless of what temperature that might be) ends up working at the desired temperature. And, since there’s no point in running at anything but the highest temperature, let’s do that.
If you’re going to be processing an 8"X10" print in a typical drum you will need to use 16oz of hot water for a pre-rinse, and 16 oz for the rinse after the developer. You’ll use 3oz of each of the three chemicals and then discard them after use. This leads to consistent results since you’re always using fresh chemistry.
The formula for determining what temperature that water should be is to double the process temperature and then subtract the room temperature. So, since we want to use the highest process temperature of 86F, doubling this gives 172. If the room temperature is currently 72 degrees, subtract this and you end up with a pre-wash water temperature of 100F.
Run the hot and cold water tap with a 32oz wide mouth container under it and a thermometer reading the water temperature. When you have the water at exactly 100F pour 16oz into the drum and rotate it for 1 minute. Now use 3oz of the room temperature developer followed by the rest of the water as a 30-second rinse, and then successively the bleach and the fixer for 2 minutes each. Remember that consistency is the most important habit to develop. If you drain the liquids as soon as the clock show that time’s up, fine. If you start to drain the drum so that the last drop is out at the time signal, that’s fine to. Just do it the same way each and every time you process a print.
When the fixer is done you can open the tank and start to wash the print. Because Ilfochrome is on a plastic base the paper retains very little chemistry and washing needn’t take long. A couple of minutes in an open tray or several changes of water in the drum is all it needs. Air drying also happens swiftly and the paper has almost no curl at all when dry.
Clean up is simple. Make sure that your chemical bottles are well stoppered, rinse the drum and set it out to dry. To make multiple prints in a session, either have an extra drum or two or you can use a hair dryer to speed drying of the inside of the drum.
Wet prints appear somewhat magenta so don’t do a final judgment of color balance until the print is dry. The best way to dry prints is to place them in a drying rack — the type used for drying RC prints, though a hair dryer can speed the process. But, even when wet you’ll be able to judge how close you’ve come on exposure and balance. It may take several prints to achieve, but when you have a standard set, you will be able to pop a slide into the enlarger and run off a print in less time that it takes to say, "Why didn’t I start to do this before"?
If you enjoyed this article, as well as the hundreds of other tutorials, features,
reviews and essays on this site, you can support its continued growth
and discover an exciting new photographic resource by …


Elevate Your Vision


Read this story and all the best stories on The Luminous Landscape
The author has made this story available to Luminous Landscape members only. Upgrade to get instant access to this story and other benefits available only to members.
Why choose us?
Luminous-Landscape is a membership site. Our website contains over 5300 articles on almost every topic, camera, lens and printer you can imagine. Our membership model is simple, just $2 a month ($24.00 USD a year). This $24 gains you access to a wealth of information including all our past and future video tutorials on such topics as Lightroom, Capture One, Printing, file management and dozens of interviews and travel videos.
- New Articles every few days
- All original content found nowhere else on the web
- No Pop Up Google Sense ads – Our advertisers are photo related
- Download/stream video to any device
- NEW videos monthly
- Top well-known photographer contributors
- Posts from industry leaders
- Speciality Photography Workshops
- Mobile device scalable
- Exclusive video interviews
- Special vendor offers for members
- Hands On Product reviews
- FREE – User Forum. One of the most read user forums on the internet
- Access to our community Buy and Sell pages; for members only.
You may also like


