A Question
Let’s start with a question.
Is absolutely accurate colour from your digital camera or digital camera back important for you? I’m not talking aboutgoodcolour, orprettycolour. I meanaccuratecolour! Is it worth U.S. $475 to you to get almost totally accurate colour from your D-SLR? If the answer isyes, read on. If the answer isno, read on anyway, because the day may come when you do need totally accurate colour reproduction.
With digital cameras in almost every photographer’s present or future, understanding how and why they are profiled isn’t a bad thing to have in the back of your mind.
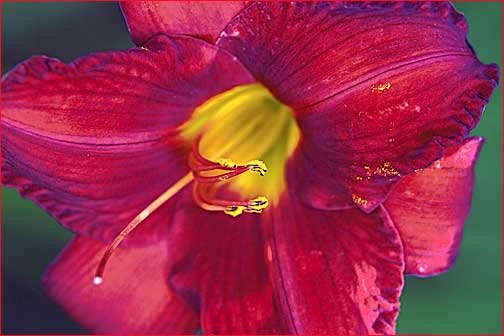 Intense Flower
Photographed with Canon D60 & 70-200mm f/2.8L IS lens with EF12 extension Tube@ ISO 400,
custom profiled with inCAMERA
Building The Profiling Chain
Before we take a close look atinCAMERA Professional, what it does and why you may need it, you need to understand a bit about the concept ofprofiling.
Every device that records or displays colour does so differently. The CCD or CMOS chip in your camera sees differently than the imaging chip in your scanner. Your particular monitor displays colours differently than does another monitor, even of the same brand. Of course your printer similarly creates colour prints that because of difference between printer brands, heads, inks and papers will not be exactly as displayed on you monitor, even if your monitor is profiled.
Wouldn’t it be nice if one could attach an instruction sheet to each image that told the next device along the chain‚ from camera (or scanner) to screen, to processing program, to printer‚ exactly what the precise colour characteristics of the other devices were like. In other words, it might say to the next device, "I don’t know howyousee red exactly, but this is the wayIsee it".
That in fact is what a profile is and does. It is a specially formatted text file, usually with the extension.ICCor.ICM, that various professional level photographic and imaging products know how to read. This file tells them how the previous device in the chain recorded colours.
Thus, if your digital camera is profiled, and your monitor is profiled, and your printer is profiled‚ in theory (and usually in practice) you should get highly accurate colour.
Now, you may not need accurate colour. We all wantgoodcolour, butaccuratecolour is mainly important to people photographing fashion, commercial products, advertising etc. The soap maker wants his soap box to be exactly the right colour in the magazine ad. How can you as the photographer guarantee this?
Fine art and other serious photographers are also keen on accurate colour, simply for the sake of things being "right". Beautiful isn’t enough.Accurateandpreciseis also wanted.
One final word on profiling in general before we look at whatinCAMERAis and does. Unless your monitor is accurately profiled you will not be able to accurately see what your wonderfully profiled camera is producing.inCAMERAalso provides the capability of profiling your monitor using various devices, as well as by eye, (though this feature is not covered in this review). You may also want to read my article onMonitor Profiling.
The Colour Chart
In addition to purchasinginCAMERAyou’ll need to buy aGetragMacbeth ColorChecker. This is an industry-standard 8.5 X 11" card with 24 specially designed colour patches that reflect light the same way in all parts of the colour spectrum. It costs about $80. It is the industry standard colour reference chart and if you don’t already own one you will find it to be one of the most useful accessories that a colour photographer can own when testing and calibrating photographic systems. You will also want to buy aKodak Gray Cardif you don’t already have one. Both of these are easily available from most major photographic stores and supply houses.
Profiling Workflow
The following is the workflow that I used when profiling aCanon D60. It will be very similar for aD30or1D. Other D-SLRs or digital camera backs may have differences, but will likely be quite similar. This is not exactly the workflow suggested byPictographics, but it’s one that I’ve found works reliably for me.
You will need to create profiles for each major lighting condition that you work in, in the same way as when you are profiling a printer you need to do so for each type of paper that you use.
Since I use myCanon D60(and D30 before it) primarily for wildlife and nature work I have created two primary profiles‚cloudy / shadeandhazy / bright. If I wanted to I could create profiles for many more unique lighting situations, but I’m not that neurotic. I find that these two do the job nicely for 90% of the situations that I shoot in.
If I worked in a studio I would create profiles for tungsten light and studio flash. If I shot indoor sports I’d profile for fluorescent and other types of arena lighting. In other words, you should create separate profiles for every major lighting condition that you work in.
Set your camera to shoot in RAW mode. Find a spot to work in that is in the type of light that you expect to shoot in. In a studio, that’s easy. For outdoor situations find a spot like a garage door to which you can attach theWhite Card,Gray CardandColorChecker. I use push-pins. Make sure that the light is as even as possible and that there are no reflections or shadows.
You now need to create aCustom White Balance. On the D60 this is done by photographing a white card in the same light that you will be shooting in and calibrating for. Set the camera so that the card almost fills the entire frame. Set focus to manual and exposure to manual. Set the exposure so that you areoverexposingthe white card by exactlytwo stopsfrom the meter reading. Focus and take a photograph.
PressMenuon the camera’s rear panel and selectCustom White Balance. Scroll to the picture that you took of the white card and pressSET. Exit theMenumode by touching the shutter release and now press theWB(White Balance) button on the camera’s top panel while rotating the rear control wheel until theCustom White Balanceicon is selected.
Now, replace the white card with aKodak Gray Card. If you haven’t touched the exposure since you shot the white card you’ll probably find that the meter is now reading almost exactly correctly. If not, fine tune the exposure for theGray Card.
Next, substitute theMacbeth ColorCheckercard for theKodak Gray Card. Again, exposure for theColorCheckershould be almost the same as for theGray Card. Check focus and take a photograph of theColorChecker.
Time to move to the computer.
Using your favourite RAW converter program (I currently useYarkPlus) to turn the RAW file of theColorCheckerinto a 16 bit TIFF. You can work in 8 bit, but 16 bit will give more accurate results. Of course you can shoot in any proprietary file format you care to, but you need to bring the file intoinCAMERAas a TIFF.
Run theinCAMERAsoftware and selectProfile / New / Digital Camera. Find the TIFF file of theMacbeth ColorCheckand load it. Your screen will look something like this.
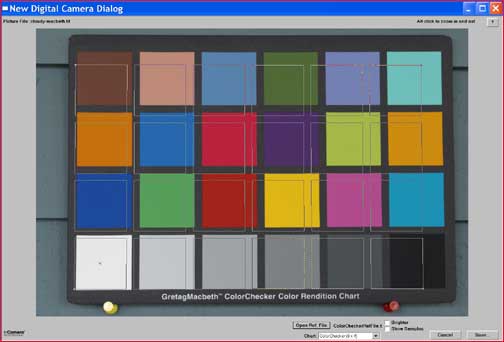 Fig 1.
There are two selections that you need to now make. One is to choose the type ofColorCheckerthat you have‚ there are two. (Buy the less expensive 4X6 chart. The 20X12 DC version is overkill). The second step is to select the appropriateReference Filefrom the ones provided.
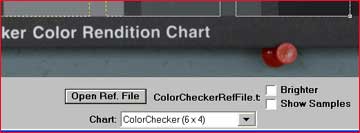 Fig 2.
TheReference Fileis a critical item because it contains the mathematical equivalents to the colours in the chart. In other words it knows what values ofRed,BlueandGreenare contained in each of the coloured chips on the chart. Now, what needs to happen is for you to allow the program to compare what it thinks those values should be, based on theReference File, with what your camera actually recorded.
You will notice inFigure #1that there is a ghost outline of the squares of the chart. All you have to do is grab the handles at each of the four corners and position the ghost outline so that it exactly covers the chart’s squares. ClickSaveand the program will now compare each of the values that are stored in theReference Filewith what is found in the colour chips. From this it will create a difference file and save it. This difference file is in fact the profile. It describes how this particular camera sees each of the 24 representative colours under this specific lighting condition.
But the file thatinCAMERAproduces is a.PCRfile. This is a proprietary format used byPictographics. It a small file with a lot of information, but unfortunately it isn’t one that any other program can use. You therefore need to convert it to an.ICCor.ICMfile for use on your PC or Macintosh.
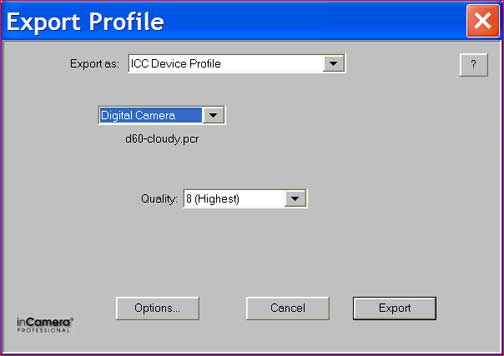 Fig 3.
You do this by with theProfile / Exportfunction as seen above inFigure #3. This takes the .PCR file created byinCAMERAand turns it into an industry standard.ICMfile if you’re working on a PC, or a.ICCfile if you’re working on a Mac.
You’ll need to store the ICC or ICM file in the proper directory. On aWindows XPmachine, for example, that’s inwindows / systems32 / spool / drives / color ‚ at least on my machine.
That’s basically it. The next step is to see how to apply these profiles to your usual image workflow.
Image Workflow
Now that you’ve created a custom profile for your camera you need to apply it to each photographic file before you start work on it as usual inPhotoshop. You do this in one of two ways. Both are pretty easy. The first is to automatically append the profile to the file from within your favourite RAW conversion program or camera file exporter.YarcPlusandBreezeBrowserdo this for Canon digital SLRs, and other similar programs for Nikon likely do it as well (though I have no personal experience with these).
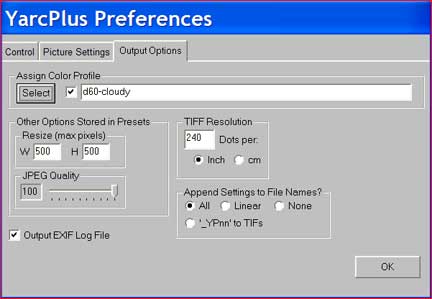 Fig. 4
Above you see thePreferencesscreen fromYarcPlus. It shows that I have selected a profile that I created calledd60-cloudyto be applied to RAW files that are to be converted.
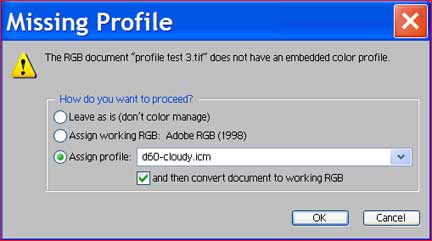 Fig 5.
Or, you can apply the profile to the incoming file in as it comes intoPhotoshopby using the following dialog. I have been describing the workflow from a Canon RAW file, but of courseinCAMERAcan profile many different kinds of cameras which use many types of file formats, so if your favourite file import / conversion program doesn’t have the capability of exporting a file with an attached profile, using this technique as the file comes intoPhotoshopis an equally viable alternative.
Evaluating The Results
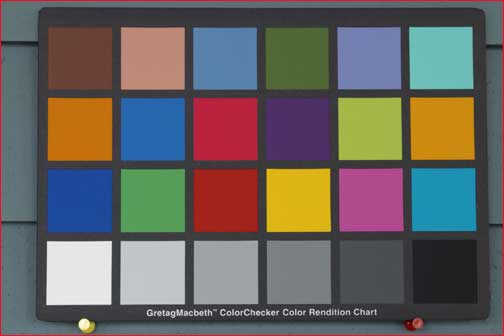 Fig. 6
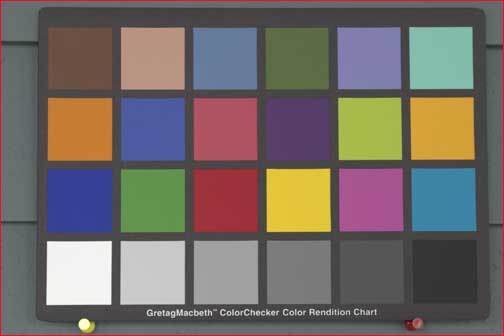 Fig. 7
Both sample files are uncorrected, unsharpened and unchanged in any way other than having a profile applied or not.
Figure #6shows theColorCheckerprior to applying the profile created.Figure #7shows it with the profile applied. Depending on the accuracy of your monitor you may or may not be able to see the differences.Incidentally, I have found the Canon D60 to be very accurate; much more accurate than the D30 was.
What you will see is that the profiled frame definitely looks less contrasty. The explanation for this is given onPictographic‘s web site as follows…
Q:After assigning the profile to an image, it tends to look "flat." Why is that?
A:We have found that exact reproduction of the ColorChecker patch colors produces a flat image. You may easily remedy this by intentionally distorting the patch colors for the sake of making an image look more pleasing to the eye. This may be done in Photoshop by loading a curve such as this one in the Image/Adjust/Curves dialog.
Applying The Curve
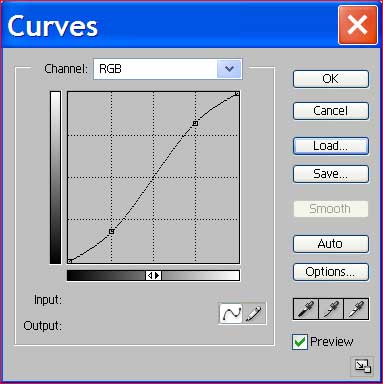 Fig. 8
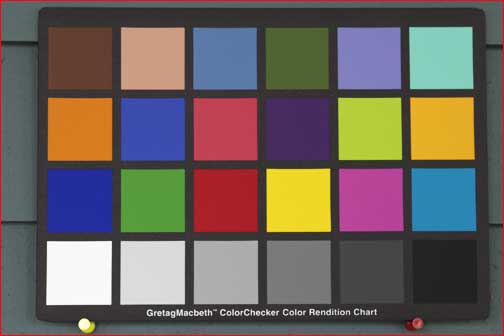 Fig. 9
The curve that you can create, or more easily download, is seen above asFigure 8and the final corrected file is beside it asFigure 9. As can be seen it is now much more visually appealing.
The proof of course is in the pudding, or more exactly in the numbers. Looking at the unprofiled image if I pass the cursor over the fourth gray square from the left on the bottom row, for example, I typically get the following readings;R=122. G=128. B=131. If this square was really neutral gray the readings should be identical.
If I now pass the info cursor over the same square on the profiled file I typically getR=120. G=121. B=121.Clearly almost perfectly neutral. And, the coloured squares will similarly be found to be equally accurate.
Using the Camera Profile Editor
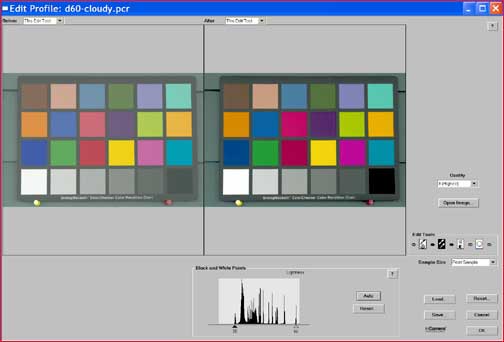 Fig. 10
 Fig. 11
In addition to creating camera profiles you can also edit them. This means loading the already created .PCR file and then resaving it with attached edits. You then need to re-Export this to a .ICC or .ICM file.
The edit screen as seen inFigure 10shows you a before and after view of the test image, andFigure 11shows the four tools available;neutrality, black & white point settings, brightnessandcontrastand finallyhue-based editing ‚ where each individual hue can be controlled without affecting other hues or gray balance. Whew.
I found the profile editor to be most useful as an alternative method of correcting the low contrast nature of the created profiles. We saw earlier that applying an appropriate Curve inPhotoshopdoes the trick, but so can setting the black and white points in the editor. This way when the profile is applied during import intoPhotoshop(or in your camera exporter / RAW converter) it comes in ready to go, without the need to apply a curve.
The black / white point setting method not as satisfactory as using a Curve, and the additional advantage to the Curve method is that it can be adjusted on an image-by-image basis, whereas the black/white point profile edit is fixed. But, in some instances it may be more convenient.
The Job is Done
While from reading the above it may sound like this is a long and involved process, in fact it can be done in less than 10-15 minutes, including shooting the test file. And of course, once you have created profiles for your camera under each of the typical lighting conditions in which you work you won’t have to do this again until you change cameras.
Beefs
inCAMERAis an excellent program that does extremely well what it proports to do. But, it is not without its flaws.For example; the file navigation menus have no memory. In other words, even if you always go to a specific directory to find a certain type of file, the program acts as if this was its first day on the job. There’s little excuse for this, as most programs (such as Photoshop) have the ability to do this, and it’s a real time saver for the user.
The manual is generally excellent, with good directions and a well written background on profiling in general. One item that is misses completely though is that the program creates .PCR files, and that these need to be converted to .ICM or .ICC files before they can be used. Of course there’s coverage of theExportfunction that does this, but nowhere is it mentioned that it actually needs to be done. Given that the version that I reviewed is V3.1, it makes me wonder why no one has corrected this till now.
Conclusion
As stated at the beginning of this seemingly interminable review‚ whether or not you need to custom profile your digital camera or back will depend in large measure on the extent to which you need dead-accurate colour. Once again,pleasingcolour andaccuratecolour are not necessarily the same thing. Frankly, as a landscape, nature and wildlife photographer I have less need of the kind of accuracy thatinCAMERAand similar products can provide than if I was shooting fashion or products. Then it would be an absolute must.
Ultimately it comes down to needs and price. At nearly U.S. $500inCAMERAis not inexpensive, and you still have to buy aMacbeth ColorCheckerfor another $75 or so. But, compared to some printer profiling packages it’s really not that expensive.
A couple of years ago when a 6MP digital SLR cost over $10,000 spending this much to be able to profile it was not a concern. Even today with $10,000 to $20,000 medium format and large format digital backs used in studios it is a minor additional cost. But, the world is changing. With cameras such as theNikon D100andCanon D60,six megapixel cameras are now below $2,000 street price, and are bound to become even less expensive.
These cameras are selling by the tens of thousands each month. At $500 with color chartinCAMERAis likely to prove too expensive for most of these buyers. At $100 it would fly out the door. In the meantime, if accurate colour is important to the way you work, and the price isn’t an impediment, I can recommendinCAMERAhighly.
Update‚ September 18, 2002
Pictographicshas announced a special promotion oninCAMERA.The price has been reduced to $375, and until September 30, 2002, there is an additional $75 rebate.
Ian LyonsatComputer Darkroomalso has acomprehensive reviewofinCAMERAon his site.
Read this story and all the best stories on The Luminous Landscape
The author has made this story available to Luminous Landscape members only. Upgrade to get instant access to this story and other benefits available only to members.
Why choose us?
Luminous-Landscape is a membership site. Our website contains over 5300 articles on almost every topic, camera, lens and printer you can imagine. Our membership model is simple, just $2 a month ($24.00 USD a year). This $24 gains you access to a wealth of information including all our past and future video tutorials on such topics as Lightroom, Capture One, Printing, file management and dozens of interviews and travel videos.
- New Articles every few days
- All original content found nowhere else on the web
- No Pop Up Google Sense ads – Our advertisers are photo related
- Download/stream video to any device
- NEW videos monthly
- Top well-known photographer contributors
- Posts from industry leaders
- Speciality Photography Workshops
- Mobile device scalable
- Exclusive video interviews
- Special vendor offers for members
- Hands On Product reviews
- FREE – User Forum. One of the most read user forums on the internet
- Access to our community Buy and Sell pages; for members only.


