


There are now, or will be by early April, 2004, a total of five crossover digicams using the Sony 8 Megapixel 2/3" imaging chip. These include theSony F828,Olympus C-8080,Canon Pro 1, Nikon 8700, and the subject of this review theKonica Minolta A2. Since these five cameras all use the same chip, and most have fairly similarly configured lenses, it is very interesting to have a look at how these cameras differ, not only in their design, features and construction, but also in the image quality that they are able to obtain.
Engineers as Photographers
After some 40 years as a photographer, and almost half that time writing equipment reviews, it never ceases to amaze me how dumb camera designers can sometimes be. I am convinced that at several companies in Japan the folks that design cameras likely never actually take photographs with their creations — otherwise there’s no explanation for some of the stupid and ill-conceived designs that we sometimes get.
But I’m happy to say that at Minolta the design engineers appear not only to be photographers, but enthusiastic ones at that. Controls on the A2 are well placed and easy to use. Unusual for a digital camera, almost every function can be controlled without going through menus on the rear LCD. I’ll have more thoughts on this later in the review.
The A2 is the first Minolta that I’ve looked at in quite a few years. I made my living for a while with aMinolta SRT-101(this was in the early 70’s), and always considered their cameras to be well designed, with excellent lenses. The newDimage A2crossover digital camera upholds that tradition.

Moonrise over the Boynton Pinnacle. Arizona. March, 2004
Minolta A2 @ ISO 64
Apart from The Crowd
Before launching into the usual analysis of the camera, its features and its capabilities, here is a brief list of some of the features that cause the A2 to really stand out from its competitors..
— Anti-Shake. Image stabilization at all focal lengths, that allows for hand-holding at 1-2 stops lower than without. Unique to the A2 at this time
— Automatic switching between the rear LCD and the electronic viewfinder when the camera is raised to ones eye to shoot. Again, unique to the A2.
— The ability to shoot up to three RAW frames in quick succession without the camera freezing. This is currently the only digicam able to achieve this
— Built in sensor on the grip to activate autofocus, as well as a similar activation sensor in the eyepiece of the viewfinder
— A 922,000 pixel electronic viewfinder — offering nearly four times the resolution of that found on any other camera
These are just the items which are unique. A full description of some of the camera’s other important features are detailed below. But the point needs to be made that these features are not fluff — the kind of things that the marketing types like to hype in the ads but which don’t really add much to a camera’s functionality. Each of these features really does contribute to being able to take and produce better photographs with the A2.
Build and Material Quality
This is an area where the A2 disappoints. The camera it feels a bit "plasticy" in comparison to the Sony F828, the Olympus C-8080 and some of the other contenders in this category. The A2 is hefty enough, and feels all-of-a-piece, but is just not quite in the top ranks when it comes to the materials used on the body. The fit and finish are fine though, and the grip is nicely textured.
For example, the memory card door doesn’t have a latch. It’s spring loaded though, so there’s little danger of it opening accidentally. Similarly, the flash has to be opened manually rather than having a more elegant pop-up capability. The slightly poorer choice of build materials and slightly lower quality of fit and finish are likely more of an esthetic concern than of practical importance, but is an area where I would like to see Minolta upgrade this camera in a future edition.
Ergonomics
I can’t seriously fault the A2 when it comes to usability. All of the important controls fall to hand nicely. There’s a bit of a learning curve, but once you’ve mastered it the controls are very initiative and logical. Most major controls can also be adjusted with gloves on, something that I can’t say that often, and that I wish more camera makers would pay attention to.
As with some DSLRs there are two separate control wheels on the A2, one right behind the shutter release and the other on the top rear of the body where your thumb naturally falls. This allows for simultaneous control of two variables, such as both aperture and shutter speed when in Manual mode. When there’s only one variable to be controlled either wheel will do the job.
The Lens
The A2’s lens is a 7.2-50.8mm f/2.8-f.3.5 zoom. This is equivalent to a 28-200mm lens in 135 terms. It is not quite as fast as the Sony F828’s lens, but is commensurately smaller. Unlike the Sony’s lens, which doesn’t change length much at all, the A2’s extends quite a bit at the long end of its range. The front element is non-rotating, which does makes the use of a polarizer straightforward. The thread is a standard 49mm.
I’m not that pleased with the feel of the zoom ring. It isn’t as smooth as it might be. Again, quality of materials and finish seems to be a bit lower than that of the Sony F828. There is also a real manual focusing ring, that may be fly-by-wire, but that regardless does a nice job when needed. When manual focusing the camera can be set to magnify the image on-screen. Because of the high resolution EVF this is one of the few digicams that actually can be manually focused with little difficulty.

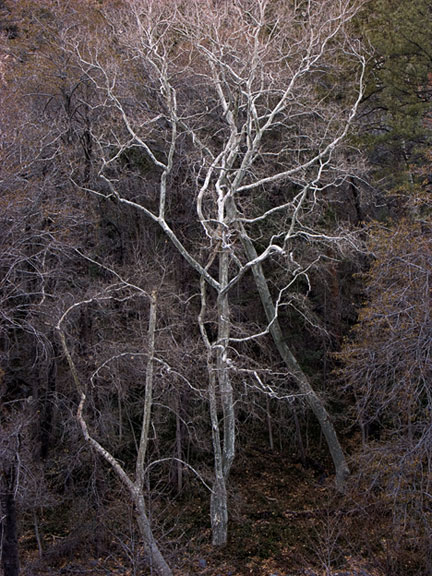
Tree and Cliff. Boynton Canyon — Arizona. March, 2004
Minolta A2 @ ISO 64
Automatic Viewfinder / LCD Switching
The A2 is not the first Minolta camera to feature this, but it’s the first one that I’ve used, and it’s a joy. While you can move a switch to change from the Electronic Viewfinder (EVF) to the rear LCD, there is a thirdAutomaticposition on this switch. When activated, if the camera is against your eye the EVF is live. Remove it and the view switches automatically to the rear LCD. How logical. How convenient. Unless Minolta has a patent on this it is beyond me why other camera makers haven’t adopted it.
They Both Tilt
Most digicams have rear LCDs that tilt up or down to aid in waist-level or overhead viewing. But the A2’s EVF also swivels upward. This can be very useful when the camera is tripod mounted just below eye level. In field testing I also found that with the A2 around my neck while hiking the rubber eyepiece of the EVF juts out a bit from the rear of the camera and therefore pokes you in the chest or stomach. But by swiveling the EVF upwards this can be eliminated.
I was a bit disappointed to see though that the rear LCD only swivels on one axis, It doesn’t rotate sideways, which would be nice for when shooting in portrait orientation. Canon’s design is much better in this regard.
A 1 Megapixel Viewfinder
The A2 has the highest resolution electronic viewfinder (EVF) of any camera currently (March, 2004) on the market, at nearly 1 Megapixel. Four times that of anything else. This is also the most viewable EVF that I’ve yet seen on any digital camera. It is still a long way from offering an SLR’s clarity, but the difference is clearly noticeable, and makes looking at a screen rather than an SLR’s superior optical view that much more useful and pleasurable. This is particularly noticeable with the on-screen text and graphics, which are dramatically crisper and more legible than anything that I’ve seen before.
Don’t imagine though that this is anywhere near as useful as the view though an SLR. The real issue is not even resolution. It’s contrast. When viewing a high contrast scene though an optical viewfinder the eye’s normal ability to see into both the shadows and the highlight areas is the same as when looking at the scene directly. Through an electronic viewfinder you are not looking at the scene, you are looking at a video image of the scene. This makes a real-time histogram that much more important to have, because the eye is totally unable to judge what will fall within the dynamic range of the imaging chip and what won’t. Indeed in a high contrast situation the shadows become essentially invisible. There may even be detail in the shadows that the imaging chip can record, but it’s invisible in the EVF because of its contrast limitations. This is an inherent limitations of all EVF’s, and is unlikely to be overcome soon.
There is also a user selectable electronically generated viewfinder grid and cross hair. The grid is particularly useful for making sure that the horizon is straight and that building walls line up. It’s unobtrusive, and I leave it on all the time. I wish all cameras offered this.
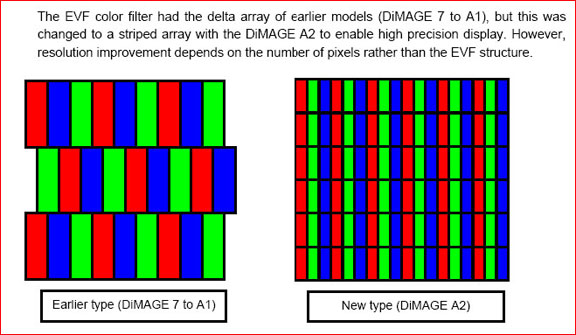
Since this review first appeared online a few people wrote to say that there is some discussion on various message boards to the effect that the A2’s viewfinder isn’t a "real" 922,000 pixels. After discussion with Minolta’s technical representatives they reiterate that this is not the case. But what a company says and the truth may not always be the same thing.Read thisand make up your own mind.
The Death of Menus
One of the curses of digicams is that their user interface is highly "modal" in design. By this I mean that certain things can only be set while the camera is in the right "mode". The joy of a camera following traditional design, like theLeica Digilux 2, on the other hand, is that a single mechanical control does just one thing, and is always available. The aperture ring changes the F stop, the shutter speed dial changes the shutter speed, etc, etc. But with many (if not most) cameras today you have to set it to the right "mode" before certain settings can be changed.
As well, most digicams require that you make your setting selections from an on-screen menu. Since making these changes is very awkward while looking through the EFV, it means taking the camera away from the eye, moving a switch to change to the rear LCD display, moving the shooting mode dial to SET-UP, and making the changes by navigating through a series of menus. When done, move the mode dial back to the shooting mode desired, press the button back to the EVF position and go back to shooting. Oh yes, and if you forget to set the camera back to M, P, A or S from the Set-Up position — good luck. It won’t shoot.
In the meantime the alien mothership that was about to land on top of the polar bear has completed its assignment is now headed back to Uranus. There goes yourPulitzer Prize. Argggg!!!
Like I said, the Minolta A2 appears to have been designed by engineers who are also photographers, because none of this frustrating nonsense is necessary. Firstly, there is no Set-Up position on the shooting mode dial. This curse is inflicted on photographers by a number of manufacturers, including Nikon, Kodak, Olympus and Pentax. But with the Minolta A2, regardless of what setting you’re making, if you touch the shutter release the view though the lens appears and the camera is ready to shoot in an instant.
While everythingcanbe set via menus, virtually every shooting control on the A2 can also be set with an external control and the top mounted monochrome LCD. Just as the A2’s million pixel EVF is a breakthrough in digicam design, so to is its top-panel mono-LCD. It is large, and has a very finely detail display. This allows it to show a great deal of data, and Minolta uses it to good effect.
To set a wide range of shooting controls simply press the appropriate button, turn the appropriate wheel, and the changes and options are displayed on the small top-panel LCD. Simple and straightforward. Kudos to Minolta for this. It makes a photographer’s ability to make necessary adjustments that much simpler and faster.

Green Shutters — Toronto, February, 2004
Minolta A2 @ ISO 64. 11mm (45mm Eqv)
Shooting in the RAW
The Minolta A2 is the first non-DSLR that I have seen or tested that can walk and chew gum at the same time. By this I mean that it can shoot more than one RAW frame without locking-up and preventing the user from doing anything else (including taking another shot) until the buffer has cleared. With the A2 you can take up to three frames in rapid succession before you are prevented from continuing shooting, but just as with a DSLR, as soon as the buffer has cleared enough space you can take another frame. The frame counter in either the EVF or LCD turns from white to yellow when the buffer is full. As soon as it turns white again enough space has been cleared in the buffer and you can take another frame.
Remarkably, one is able to review the just-shot RAW file using theQuick View (QV)button immediately after taking it, even while the camera is busy saving it to disk. Indeed you can also review other frames, change shooting settings and do almost anything else. Even turn the power off. The camera will happily continue saving the current RAW file to disk. You can even review any of the three RAW frames while they are being buffered and saved to the CF card and delete them in process. The A2 not only canwalk and chew guma the same time, it candance and singsimultaneously. This all shows that Minolta has put a much more intelligent microprocessor and larger buffer in the A2 than has any other manufacturer of digicams that I’ve yet seen. DSLR owners will wonder what I’m raving on about, since most DSLRs can do some if not all of the above, but there hasn’t been a digicam other than the Minolta A1 and its predecessors that I’m aware of that is this sophisticated in its shooting and file handling capability.
The only limitation of shooting multiple RAW frames is that the camera can’t handle the RAW+JPG combination in this mode. The processor likely doesn’t have the horsepower to do JPG conversion as well as simultaneously saving the large RAW files.
Note though that being able to shoot multiple RAW files in quick succession requires that the camera be put intoContinuous Advancerather thanSingle Framemode, something that Minolta should fix in the next update. This is not really hardship though, since that’s the way I use my DSLRs in any event. When shooting this way one just has to be careful not to press on the shutter release for too long, so that additional frames aren’t accidentally taken.
High Speed Shooting
There are three Continuous shooting modes. The basic mode allows a maximum of up to 3 frames at 1.8fps. If the camera is in continuous autofocus mode it will continue to focus between shots. In High-Speed Continuous Advance up to three frames can be taken at 2.7fps, but focus is locked after the first frame.
There is a low-res (VGA) Ultra-High Speed mode that shoots at 7fps for up to 100 frames in Extra Fine JPG mode (more with higher compression JPGs), but because of the low resolution I have no need for this and didn’t test it.
Software
I didn’t spend much time with Minolta’sDimage Viewer. It appears like a pleasant little file viewer and RAW converter. Indeed some of the RAW controls have greater depth then has been seen elsewhere (such as Sony’s very primitive RAW software), but after it locked up on two separate computers (Windows XP Pro) while trying to do RAW conversions I uninstalled it and moved on. I then loaded the Minolta software on my Mac under OSX and found that it installed 403 separate files, including multiple copies of the application, each with a slightly different time stamp.
After installation it wouldn’t recognize .MRW files (Minolta’s RAW file format). But then I rebooted and it ran fine. Not terribly elegant.
I did the rest of my testing of RAW files with Adobe Camera RAW for CS, which supports supports the A2. I could see little difference between output images, other than the fact that CR ran smoothly and quickly, while DiMAGE Viewer either wouldn’t install or ran slowly (as do most manufacturer’s RAW converters). Life is simply too short to waste time with this type of flaky product.
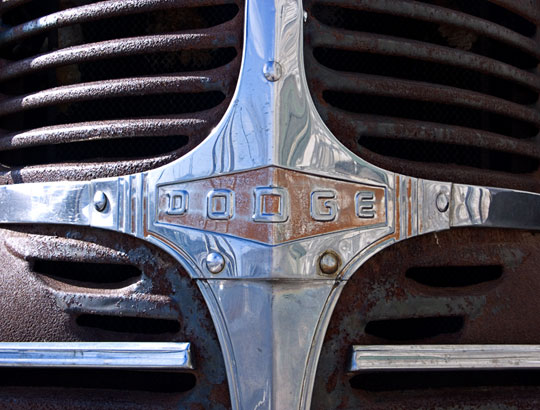
The Old Dodge. Toronto — February, 2004
Minolta A2 @ ISO 64. 20mm (80mm Eqv)
Playback Modes
Many cameras have a quick playback button that allows you to call up the last frame shot for review. The A2 has this, but unlike with almost every other camera you can also perform everything to do with reviewing images in this mode, not just look at the most recent frame. Move through previous frames, check histograms and shooting data, look at thumbnail views, magnify, delete the viewed frame, and so on. But touch the shutter release and you’re instantly shooting again. This is the way that DSLRs work and the way that digicamsshouldwork, though many don’t. Again, Minolta gets it right.
There is also a separate viewing mode that almost seems redundant in light of the QV mode’s capabilities, but when used it allows you to Delete All, Format a card, change folder names, Lock and Copy files.
Flash
There is the usual built-in pop-up flash — but it doesn’t pop up. It’s a minor thing, but one has to manually raise the flash when required. Most cameras in this price range do so automatically, or at least have a release button. This seems a bit out of character with the A2’s otherwise exemplary design. Flash coverage is good, but be aware that as with most such digicams the lens shade needs to be removed to avoid darkening of the bottom of the frame at wide-angle settings. The flash is just not far enough above the axis of the lens to clear the petal-shaped lens shade at wide focal lengths.
Of course there is a built-in flash hot shoe, and any of the Maxxum flash units may be used. Minolta has a very extensive and well designed flash system, including wireless triggering capability, and the A2 ties into it nicely. When set appropriately the A2’s flash can act as a wireless trigger with Minolta’s system flash units. Nice.
But, not so nice is the fact that Minolta’s hot shoe is non-standard. In other words you not only can’t attach a non-Minolta flash, but you also can’t use other accessories (such as bubble levels) that mount on a camera’s hot shoe. The Minolta hot-shoe design is indeed superior to a standard one, but it’s a real pain not to be able to use accessories, or a less expensive flash unit.
Wonder or wonders, there is an actual PC flash socket. When was the last time you saw a digicam (or many a DSLR for that matter) that recognized the needs of studio photographers? Clearly Minolta expects that pros will be using this camera and have addressed one of their pet peeves.
Antishake
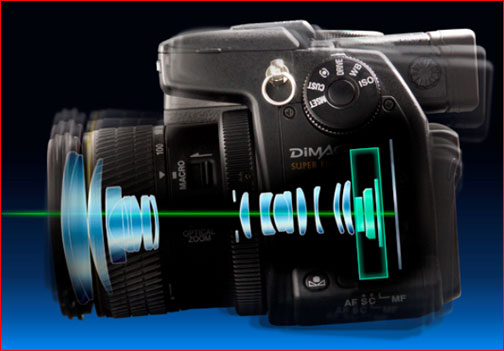
The A2 is the first camera that I’m aware of to have image stabilization built into the body itself. In this design the chip itself is moved to compensate for vibration, rather than moving lens elements, as used in other manufacturer’s designs. Minolta claims up to a 3 stop shutter speed advantage. I didn’t perform any rigorous tests, but my sense is that at least 2 stops of improvement is visible.
While the system can be turned off to save battery power, there is no need to do so if the camera is on a tripod. When not needed it doesn’t interfere. There is also an indication in the viewfinder of where the system is on or off, and whether the camera is utilizing it or not.
Buttons and Knobs
I won’t provide here a knob and button catalog. Other sites do this much better than me and I find it boring to write, as well as to read about. If you really want to see what everything is all about you can always download the camera’s complete user manual as aPDF file.
But I do want to comment on what I regard as a well designed approach to letting the user get the job of adjusting the camera’s features accomplished with a minimum of fuss and confusion.
The Function Dial on the left side of the camera provides access to settings for ISO, White Balance, Drive Mode, Metering Mode and also a custom position which you can program to be whatever you want. With this knob set to the thing that you want to change, simply press the center button within the knob and the item you want to adjust now appears on either the EVF or the LCDandthe top panel mono-LCD.
By now turning either the top or rear control wheel you can adjust that parameter. There’s no need to step through a series of on-screen menus to find and then make these adjustments, though you can access many of them that way if you wish.
On the rear of the camera there is a straightforward four-way controller with center button, for navigating menus. As mentioned above there is no Set-Up position on the mode dial (thank you Minolta!). To access all menus settings just press the rear Menu button and navigate with the arrow buttons. Finished? Just touch the shutter release and return to shooting.
There is one button on the rear panel that I feel could be somewhat better positioned. An exposure compensation button is located just below the main power button, and even after two weeks of shooting I often found myself pressing the power button and turning the camera off when all I wanted to do was dial in some exposure compensation.
TheExposure Lockbutton is nicely separated and unlikely to be confused with anything else.
Custom Memories
Digital cameras of all types have become so feature-rich and complicated that making changes to a set of functions to accommodate different types of shooting conditions can become tedious — assuming you even remember where in a series of nested menus to find the controls that you want to adjust. Camera makers are increasingly therefore adding one or more custom setting groups, which allow you to pre-set the camera to a certain configuration of settings and then instantly switch to it.
The A2 one-ups the competition by offering not only 5 separate custom memories for such settings, but also makes recording and retrieving them simple and intuitive. Once again I feel that Minolta’s engineers have shown that they probably actually go out andusetheir own cameras. It shows.
The Manual
The A2’s manual runs about 175 pages. It is very clearly laid out and most explanations are easy to follow. The index isn’t as comprehensive as one could wish, and some advanced concepts could be explained in greater depth.
It’s Got a Beat
Some very early purchasers of the A2 have reported a diagonal noise pattern. It turns out that this artifact varies in seriousness from camera to camera. It appears to be caused by some form of electronic "leakage" from within the camera’s circuitry that "beats" with the image at a fixed frequency.
Thomas Knoll, the author of Adobe’sCamera RAWutility forPhotoshop CShas identified the problem, and "fixes" it in an upcoming release ofCamera RAW. This means that any shots taken in RAW mode with an A2 that exhibit this beat frequency noise pattern can be automatically cleaned up when the file is converted byCR. This version ofCRis currently in beta testing, will likely become available to registeredPhotoshop CSusers some time in the second quarter of 2004. There is no cure for JPG or TIFF files that display this problem. I am also not aware of any fix for this from Minolta.
Sidebar:This situation serves as an excellent example of one reason why photographers should always shoot in RAW mode if at all possible. In addition to the standard purpose of gaining additional image quality and control, the fact that the camera’s RAW and unprocessed data is available for possible future software to massage and correct should be a compelling enough reason to shoot in RAW.
Firmware
In discussion with a technical representative of Minolta I have learned that in Canada, at least, there was a firmware upgrade before any cameras shipped that is designed to enable the use of wide angle and telephoto adaptors. You can check your camera by looking at the Firmware version number. Press Menu and go to the Blue Set up screen #1. Hold down the center OK button on the multicontroler and while doing so press the Info button. This will display the primary version number. Now, with that screen visible press the AEL button and the Info button again simultaneously. This will show a screen with various numbers. The upgradable firmware version is the first set of numbers displayed.
The version with this fix isr034or higher. I al told that this upgrade does nothing to image quality and does not address any other issues.
Also please note that firmware upgrades can be downloaded from various Minolta web sites. But be careful. Do not download a version from a web site in another geographic region. For example, Americans should not download a firmware upgrade from Europe or Japan. You could turn your camera into an expensive paperweight, and this will not be covered by warranty.
BP-400 Vertical Battery Grip
Accessory battery grips are quite common for DSLRs, but equally uncommon with digicams. The BP-400 for the Minolta A2 costs approximately $100 and offers several distinct advantages to photographers. Firstly, there is the extra grip area, and the availability of a vertical shutter release. Those with large hands as well as anyone frequently shooting verticals will appreciate this. Unfortunately secondary controls are not duplicated, as they are on similar grips for DSLRs, so making some adjustments when the camera is held vertically can be difficult.
The grip holds two Minolta rechargable NP-400 lithium-ion batteries, the same ones as used in the camera. This obviously doubles the already high battery capacity. Supplied with the BP-400 is a small insert that allows for the use of AA batteries as an alternative. These can be either disposable alkaline’s or rechargeable Nmih.
Minolta indicates that a set of six rechargeable AA batteries will give about half the shooting power of the dedicated lithiums. They don’t rate the shooting potential of disposable alkalines, but a quick test showed me that after about 25 frames at temperatures slightly above freezing the battery warning indicator turned red. Maybe a half dozen more frames could be taken.
The advantage of being able to use readily available AA batteries is not they they provide a regular alternative to rechargeable batteries, but rather that they can be used in an emergency. For example, I once went on a 4 days shoot in a remote location with the Canon D60. My checked bag containing the battery charger went astray, and took a couple of days to catch up with me. By carefully husbanding battery resources I was able to keep shooting, but another day without the charger and my ability to continue working would have come to an end. Spare proprietary camera battery chargers are not exactly something that one can readily find, even in a big city, let alone a more remote area.
If a camera can accept disposables, even though battery life may be brief, it still is a handy emergency backup. Minolta has again shown their thoughtfulness of design. And, speaking of thoughtful design, the BP-400 comes complete with a palm strap — one of the best designed straps of its kind that I’ve seen fromanycamera.
Purple Fringing
Purple fringing, also known by its technical namebichrominance, has been the source of much discussion among photographers. It is quite distinct from chromatic aberration — though both are often seen under the same circumstances — namely strong back light areas of high contrast, such as shiny chrome or back-lit tree branches.
Though there has been much debate about what causes PF (it now appears that microlenses on the surface of the sensor may be the major cause, especially when combined with small photo-sites, such as the 3 micron sensors on the Sony 8MP chip design), there is little agreement about how serious a problem it is. Some photographers find it everywhere, others are rarely bothered by it.
I’m in the latter group. Early in 2004 I used a Sony F828 extensively including on an African Safari workshop. Over a three month period I shot some 3,000 frames with the Sony. Out of all those photographs I think I saw PF on maybe half a dozen.
What does this have to do with the Minolta A2? Since it uses the same Sony chip, and presumably with the same micro-lenses applied, it likely should display the same degree of PF as did the Sony, and possibly the other new 8MP cameras as well. Frankly, I just don’t see it. By way of testing I did lots of shots of trees with backlit leaves and shiny chrome on cars with nary a sign of the dreaded PF. I did see some traditional chromatic aberration, but it is minor and easily corrected, as seen further on in this review.
ISO and Noise
This generation of eight megapixel digicams are inherently noisy. Notterriblynoise, but noisier than 6MP DSLRs and 5MP digicams. It’s fair to say that at ISO 64 and 100 noise is essentially invisible, except on very large prints, images which are slightly to moderately underexposed, or images with large smooth areas such as clear sky. ISO 200 has some visible noise on the A2, but not if the image is properly exposed and has lots of detail. An example is shown below.

Dry Creek Bed and Boulder — Sedona, Arizona. March, 2004
Minolta A2 @ ISO 200

Detail at 100% magnification
The above photograph of a boulder in a dry creek bed was hand-held at 1/15th second, f/4 and at 7.2mm (28mm equiv). I was hiking without a tripod and I needed to boost the ISO so that I could get a sharp image. The A2’s anti-shake did an excellent job of eliminating blurring, even at this low shutter speed.
This frame and the 100% detail shown below it have only had a small amount of noise reduction done inAdobe Camera RAW. It was not subsequently processed by any third party noise reduction program. As you can see, because it is finely detailed, with little in the way of smooth areas, the noise hardly shows at all.
But ISO 400 and 800 are both pretty bad, and useful for documentation but not most esthetic purposes. The use of a good noise reduction program, likeNoise NinjaorNeatimagewill help greatly though.
Image Quality, Noise and Sharpening
As discussed above, and while manufacturers won’t admit it, and neither will many users, the reality is that the current generation of 8Mp digicams are moderately noisy. Certainly this is the case in comparison with current 6MP DSLRs and even the better 5MP digicams. The reason for this is the smaller photosites. Indeed, even at ISO 64, which is the lowest speed that the A2 offers, there is some very slight noise visible. But where technology creates a problem it often is able to correct it as well.
If you are working in RAW mode and using Adobe’sCamera RAW, the raw file processing part ofPhotoshop CS, then you need to experiment with the appropriateLuminance SmoothingandColor Noise Reductionsettings under theDetailstab. I find that a setting for both of 50 does a very nice job of reducing noise. Of course you may also want to use a competent noise reduction program such asNoise Ninja.
This noise elimination has a tendency to reduce accutance (edge sharpness) and so appropriate Sharpening is subsequently necessary. For this I highly recommendPhotokit Sharpener Pro.
Many newcomers to digital photography are frustrated by the fact that cameras like the A2 produce images that are not as sharp straight out of the camera as they expect them to be. Of course this has nothing to do with any lack of resolution, but rather with the fact that these particular files need an appropriate amount of USM to look their best, and the amount they need tends to be at least 50% higher than one might be used to from other cameras. When properly sharpened and noise reduced these files are excellent, but it does take some work to get them to that state. As a consequence, beginners and those not familiar and comfortable with image post-processing may become frustrated with their initial results, and so cameras like the A2 may not be the best choice for someone unwilling to make the effort.
Workflow
Here is my suggested workflow for achieving the highest quality images from the Minolta A2. This isn’t the only way to work. It’s simply the way that I have found works best for me.
— shoot at ISO 64 when possible
— shoot in RAW mode
— use aLuminance SmoothingandColor Noise Reductionof approximately 50 for each setting inAdobe Camera RAW
— check at 100% and adjust for any chromatic aberration inCamera RAW. The amount needed will vary by focal length and subject matter
— work in 16 bit mode as long as possible
— start inPhotoshopwithLocal Contrast Enhancement
— useNoise Ninjaor a similar competent noise reduction program
— use a sophisticated sharpening program such asPhotokit Sharpener. My usual settings for prints shot with the A2 are as follows…
*Capture Sharpener:Digital High Res / Medium Edge
*Output Sharpener:Inkjet / paper and sizeselection is needed

Moonset. Sedona, Arizona — March, 2004
Minolta A2 @ ISO 64
The value of appropriate image processing can be seen in the example photograph above and the enlargements at 100% below.


Both of these versions of the moon detail at 100% magnification were processed identically, except that the one on the right titledPartially Processeddid not have any adjustment for chromatic aberration inAdobe Camera RAW, and it also was not run throughNoise Ninja. Even though the shot was at ISO 64, because there was such a large expanse of mid-tone area I felt that noise processing would be required.
As you can see there is some noticeable CA on the partially processed frame that has virtually disappeared, and also the noise level is noticeably reduced. Both of these steps combine to create a much greater impression of detail and resolution. (Other post processing was otherwise identical with everything done on Layers, which were then copied between images).
This photograph was taken tripod mounted, 1/250 sec, f/6.3, 51mm (200mm equiv), in RAW mode.
Lot’s More
Reviewing a contemporary digicam, especially one as feature-rich as the Minolta A2, can sometimes turn into an exhausting exercise. There are simply too many features to innumerate and discuss. Below is therefore an abbreviated list of some of the features which I regard as either interesting or worthwhile, though it is by no means intended to be comprehensive.
— a real-time histogram is available if desired
— there is a built-in intervalometer
— the camera has a movie mode as well as audio recording capability
— there is exposure bracketing as well as effects bracketing
— exposure and flash compensation can be individually set in 1/3rd step intervals
— Bulb exposures up to 30 seconds are possible
— Adobe RGB colour made is available, either tagged and imbedded
— software is available for both Mac and PC platforms
— the camera uses Compactflash cards including Microdrives, and supports FAT 32 for cards over 2GB
— USB 2 and video out in both NTSC and PAL modes
— Pictbridge is supported
— a sensor on the hand grip activates full-time autofocus when the camera is held, or this can be set so that it AF activates when the camera is held up to ones eye. Both save battery power intelligently.
— camera operation is essentially noiseless. Sound effects (beeps) for setting controls can be deactivated as can the electronic shutter sound, which also can be set to different levels and tones. The camera can be made essentially silent in operation.
— various parameters, such as whether menu selection default toYesorCancel, are user selectable
— folders can be named using an onscreen keyboard, and also the camera can be set to automatically create a new folder each day, and name it with that day’s date
— image files can be copied between memory card using the camera’s built-in buffer memory. The camera will prompt for the correct card to be swapped until all required files have been copied
— the A2 can switch to an amplified viewfinder mode for use in low light conditions, in which the display becomes B&W but of higher gain
— the viewfinder can be set to view the image in B&W for previewing monochrome images
— depth of field preview is available, as well as viewfinder image magnification in record as well as playback modes
Enough! I told you there were a lot of features. In fact I haven’t even touched on at least a dozen others available in this feature-rich camera.
Image Quality
As discussed in my recent essayThe Case of the Nit Picking Pixel Peepers, features and handling are just one part of the equation. Image quality is of equal importance and one without the other does not a good camera make.
My test bench results are detailed below in theDxO Analyzersection and the linked test results. But tests don’t tell the full story. Here then are my subjective impressions of the A2’s image quality.
Oak Trees. Oak Canyon, Arizona. March, 2004
Minolta A2 @ ISO 64
It’s hard to really fault the A2’s image quality. Images are crisp, fully detailed, and at ISOs of 64 or 100 virtually noise free. Up to ISO 200 can be used if a noise reduction program is used in post processing. Chromatic aberration is hardly visible, and I’ve seen no evidence of purple fringing.
Prints up to A3 in size are easily made, and even seriously cropped frames can produce very nice 8X10" prints.
While a 6MP DSLR will produce somewhat better images, they will not print as large without ressing up, and for may users the difference will not be that significant.
Colour Accuracy
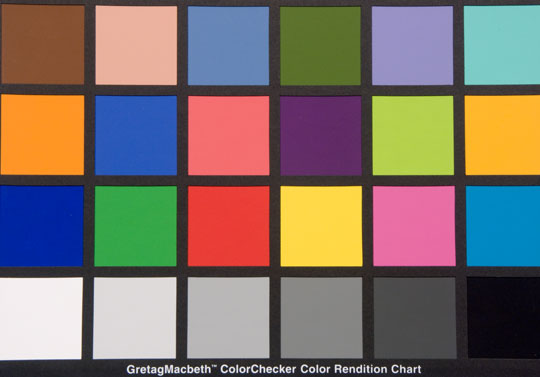
As always with viewing colour charts online, please go by what I say, not by what you see.
Even if you have a profiled and calibrated screen, because this file has been converted to sRGB
from Adobe RBG there will be differences between what I see on my Sony Artisan monitor and what you may see.
It’s always informative to shoot a Macbeth ColorChecker chart and see how well a particular camera handles the issue of colour accuracy. The methodology is simple. Photograph the chart under controlled lighting conditions and then load it into the RAW converter. Click on the 18% gray square with the gray point selector (to set the colour balance) and see what happens to all of the colours.
The Minolta A2 is provides a very accurate colour palette. The skin tone (second from the upper left) is pinker than it should be, and the greens lack the correct depth of colour. Red is also somewhat muted and the bluish-green square (upper right) is more blue than green, again showing something of a lack in green reproduction. But other than a slightly lower saturation in these and a few other colours the A2 does a very nice job. Nothing that can’t be corrected with either a custom profile or a bit of work in Photoshop.
DxO Analyzer Test Report
TheKonica Minolta A2has been subjected to optical analysis with theDxO Analyzersystem andthese results are found here.
Here is a brief verbal assessment of how the Minolta A2 compares to the Sony F828 in terms of image quality. At the time of publication of this review the Sony is the only other 8MP digicam which I have run throughDxO Analyzer.
—Distortion and Chromatic Aberration:
The Sony measures somewhat better in this regard, but in practice the Minolta does not display either distortion or CA to any greater extent in prints. I have no test forPurple Fringing, but in empirical testing I found that while it can be quite noticeable on the Sony I have never observed it on the Minolta.
—Vignetting
The Minolta measures a bit better, but again, there’s little difference to be seen in most practical situations
—Noise
The Sony and the Minolta measure similarly, but at high ISOs the Minolta has the advantage
—Blur
The Minolta measures quite a bit better than the Sony .
Final Comments
TheKonica Minolta A2is an exceptional camera. From a feature / function point of view it’s the best digicam that I’ve yet seen. In terms of build quality, the Sony F828 and the Olympus C-8080 appear to be better constructed and are of heavier-duty materials, with a somewhat superior fit and finish.
Of course the natural question that people will now ask is —what about a comparison with a 6MP DSLR like the Canon Digital Rebel 300D or the Nikon D70?
I’ll do such a comparison soon, but not today. In the meantime I’m comfortable in saying that just about every 6MP DSLR on the market will produce superior image quality to the 8MP cameras that I’ve tested so far. Their files will be sharper and have less noise.
On the other hand a camera like the Minolta A2 is much less expensive (given the lens that’s incorporated), as well as considerably smaller and lighter. There are no sensor dust problems to consider either. As a vacation or "occasional" camera it would be hard to beat right now. It could also be a very suitable camera for someone wanting to test the digital waters with an all-in-one solution. I don’t think though that the A2, or any of the 8MP cameras that I’ve tested or seen so far, will satisfy a photographer who isreallyquality conscious and who wants to be able to make prints bigger than about 10X12".
There’s no easy answer. For some a DSLR will always be preferable because of its optical viewfinder. Other photographers will enjoy the real-time histogram, or movie mode, or any number of other features which the Minolta offers. One size does not fit all. But the A2 sure is one enjoyable camera to use.
Postscript
I’d like to add a brief postscript on the issue of product quality, as well as product testing by buyers. My final test results with the Minolta A2 were obtained with the third camera to come into my possession. The first had a faulty Antishake system, and the second was substantially soft — possibly due to a lens element flaw. The third camera is perfect so far, and is producing excellent results.
This is probably not indicative of what one can expect from Minolta, and I’ve seen it before over the years with products from other companies. This can be especially problematic with new models as well as very early production cameras. I therefore urge purchasers to immediately test any new camera. You don’t need to do anything too scientific — just do some photography with it, as you normally would, and have a look at results on screen and on prints. Test all the features and also check image quality.
If the camera (or lens) does not appear to be up to snuff, return it to the dealer for an exchange, or refund. Or contact the manufacturer. Most will be very pleased to work with you to ensure that the product that you end up with is one that makes you happy. Minolta could not have been more cooperative in this regard.
Update:
Four follow-up articles are now online. These include theMinolta A2 on Location, in which I describes my experience using this 8 Megapixel digicam during an April 2003 trip to Spain. The second related article is on theSeville Fairand the third is on attending abullfight in Seville. (View discretion advised). The fourth is simply titledUmbrellas. The A2 was used on all of these shoots.


Elevate Your Vision


Read this story and all the best stories on The Luminous Landscape
The author has made this story available to Luminous Landscape members only. Upgrade to get instant access to this story and other benefits available only to members.
Why choose us?
Luminous-Landscape is a membership site. Our website contains over 5300 articles on almost every topic, camera, lens and printer you can imagine. Our membership model is simple, just $2 a month ($24.00 USD a year). This $24 gains you access to a wealth of information including all our past and future video tutorials on such topics as Lightroom, Capture One, Printing, file management and dozens of interviews and travel videos.
- New Articles every few days
- All original content found nowhere else on the web
- No Pop Up Google Sense ads – Our advertisers are photo related
- Download/stream video to any device
- NEW videos monthly
- Top well-known photographer contributors
- Posts from industry leaders
- Speciality Photography Workshops
- Mobile device scalable
- Exclusive video interviews
- Special vendor offers for members
- Hands On Product reviews
- FREE – User Forum. One of the most read user forums on the internet
- Access to our community Buy and Sell pages; for members only.
You may also like


