


Unmanned aerial vehicles (UAVs) have recently been receiving a lot of attention in the press, both good and bad. UAVs (remotely piloted vehicles, drones) have been popular for decades as a hobby, with the primary goal just being the fun of remotely controlling model aircraft, including model airplanes, helicopters and multi-rotor copters. But just in the past couple of years, circumstances have come together that are attracting the attention of serious photographers. First, the flight control systems of multi-rotor copters (quad, hex and octo) have become sophisticated enough that it is relatively easy to learn to fly them. Second, companies are starting to build multi-rotor copters that are large enough to carry useful cameras. Finally, gimbal stabilization systems are available for multi-rotor copters and various cameras so that professional quality video and still image photography is now within reach of most photographers.
Let’s start with a short discussion of definitions and terminology. As a photographer, my interest is in multi-rotor copters that carry cameras. Should we call these machines drones? I don’t think this is the best choice for a couple of reasons. First, the term “drone” is very general, and could incorporate everything from a $40 toy micro-copter that fits in the palm of your hand to a military drone that is a weapon and costs tens of millions of dollars. Second, the term “drone” has been the recipient of a fair amount of bad press over the past few months, and that is not likely to change in the near term. So what do we call the machines we are interested it? I like the term “flying camera”. So to me, the definition of a flying camera is a multi-rotor copter that carries a camera. So flying cameras range from a small quadcopter with a “toy camera” that costs less than $100, to an octocopter with a professional 3-D gimbal (more on what this means later) and a Red Epic video camera that costs around $30,000 (with camera).
Before we get into a discussion of the details of flying cameras, let’s first address the question of why we should care, as photographers. One of my favorite quotes from Michael Reichmann is: “The world does not need another picture of <insert photographic cliché here>”. The ability to use flying cameras for landscape photography opens up a whole new perspective. Up until now, most landscape photography has been done less than about 10 feet above ground level. OK, maybe 20 feet, if you have a platform on top of your Land Rover. A flying camera provides you with a 400 foot high (or higher) tripod! It opens up the third dimension in landscape photography that has, until now, been largely inaccessible. To say that things look a lot different from the air is the understatement of the year.
Flying cameras can be divided into three main categories: quadcopters, hexacopters and octocopters, the names, of course, denoting how many rotors the aircraft has. Generally, the more rotors, the higher the payload, in terms of being able to fly bigger and better camera systems. The next really significant item is whether or not the flying camera has a gimbal, and what type (1-D, 2-D or 3-D). A gimbal is a device that is mounted on the copter, to which the camera is attached. The gimbal uses gyroscopes and accelerometers to compensate for copter movements to provide a more stable platform for the camera.
Multi-rotor copter movement can be classified in terms of rotation around 3 axes: pitch, roll and yaw, as shown in Figure 1. If one is referring to the camera movement, the equivalent names of the axes are tilt (pitch), roll (roll) and pan (yaw), as shown in Figure 2.
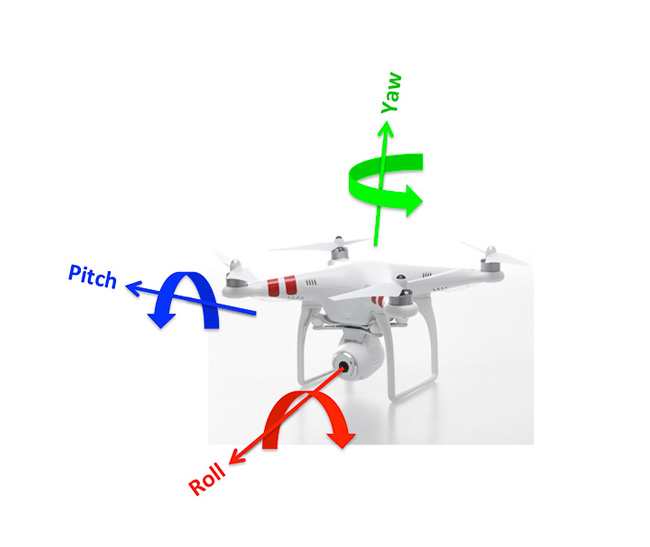
Figure 1 Copter Axes


Figure 2 Camera Axes
A 1-D gimbal stabilizes pitch, a 2-D gimbal stabilizes pitch and roll, and a 3-D gimbal stabilizes pitch, roll and yaw. An example of a flying camera with a 1-D gimbal is the Dji Phantom 2 Vision, as shown below.

Dji Phantom 2 Vision
A 2-D gimbal typically provides stabilization of the pitch and roll axes. An example of a 2-D gimbal is the Dji Zenmuse H3-2D gimbal, which is typically flown on a Dji Phantom 2 quadcopter, as shown below.

Dji Phantom 2 with Zenmuse H3-2D Gimbal
Finally, a 3-D gimbal stabilizes all three axes: pitch, roll and yaw. The Dji Phantom 2 Vision + has 3-D stabilization with a built-in camera which is ready-to-fly out of the box (see below).

Dji Phantom 2 Vision +
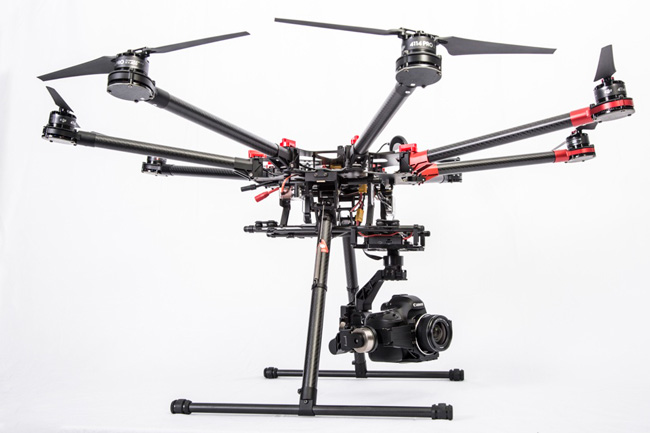
In addition to providing still image and video stabilization, a gimbal can be configured to provide active control over one or more camera axes. If only one axis of active control is provided, it is generally the tilt axis, which allows the pilot/photographer to tilt the camera somewhere between horizontal and vertical (looking down). The Dji Phantom 2 Vision is a copter which has active control over the tilt axis (although it is very poor). When 2-axis active control is provided, it is generally the pan and tilt axes. Levers on the left and right sides of the transmitter/controller are used to actively control pan and tilt. In this configuration, the roll is stabilized, but no active control is provided. An example of this is the Zenmuse Z-15 gimbal mounted on a Dji Spreading Wings S1000 octocopter, in the “single-pilot” mode (Figures 6 and 7).

Figure 6 Dji Spreading Wings S1000 Octocopter Folded for Storage

Figure 7 Dji Spreading Wings S1000 Octocopter in Flight (photo by Jeff Foster)
The “single-pilot” mode refers to a one-controller/copter combination where one person flies the aircraft and actively controls the pan and tilt of the camera/gimbal combination. The “dual-pilot” mode is where there are two pilots (pilot and photographer) with two separate controllers. One controller is operated by the copter pilot and controls the copter itself. A second and completely independent controller is used by the photographer, and provides active control over all three camera/gimbal axes. The “dual-pilot” mode is generally used for complex video sequences that would be encountered filming movies.
Flight control of a flying camera is most often with an RC aircraft radio transmitter. It has two joysticks: the left joystick controls throttle (up/down joystick movement) and yaw (right/left joystick movement). The right joystick controls forward/backward motion (up/down joystick) and left/right motion (left/right joystick). The right joystick is often referred to as the “cyclic”, after the analogous (more or less) control on a helicopter. Figure 8 shows the controller with the joysticks labeled with their respective functions and Figure 9 shows a close up detail of the right side of the controller with the lever that controls camera tilt. A similar lever is on the left side which controls camera pan.

Figure 8 Controller (Futaba T14SG)

Figure 9 Lever to Control Camera Tilt
Typical advanced RC hobbyist helicopters are very difficult to learn to fly, as they are inherently unstable. By contrast, the new flying cameras (within the past two years) are relatively easy to learn to fly. They have built-in gyroscopes, accelerometers and GPS, providing stable flight characteristics. With proper calibration, a modern flying camera can maintain a position in space to plus or minus about 3 to 6 feet (1 – 2 meters). If the pilot gets confused or disoriented, all he/she has to do is to let the joysticks self-center and the copter will come to a stop within a few feet/meters and hover until further flight commands are provided. Many of the flying cameras with on-board GPS have a “go-home” mode. The copter records the GPS coordinates of its takeoff position, and if it looses communication with the transmitter, it will rise to a specific height (typically about 30 feet (10 meters) above ground level), return to “home position” and land itself. The current generation of multi-rotor copters that have a “go-home” mode do not have a collision avoidance system, so it is possible that the copter may run into something on the way home. As a result, one should take back active control over the copter as soon as communication is regained between the controller and the copter.
Most modern flying cameras also have the ability to transmit what the camera is seeing to a monitor, either attached to the controller or mounted on a tripod. This is achieved through either (a) an extended-range Wi-Fi transmitter/receiver combination or (b) through a radio-frequency (RF) video transmitter/receiver combination. The RF transmitter is onboard the copter and connected to the camera. On the ground, the pilot has a smartphone or tablet, in the case of the extended Wi-Fi, or a combination monitor/receiver (usually 7 inch), in the case of RF communication. Another viewing option that is gaining popularity is “first-person view” (FPV) goggles. FPV goggles are worn as glasses and have screens for one or both eyes that project an image in front of the viewer. This latter option is very immersing, and therefore can be disorienting, and is best experienced in a comfortable sitting position. Another important option is an on-screen data (OSD) display system. These systems have an onboard circuit that connect to the flight controller and send telemetry flight parameters to the video transmitter. Typical data include horizontal and vertical speed, distance and azimuth from the takeoff point, battery voltage and number of locked GPS satellites. The battery voltage is used to determine remaining flight time.
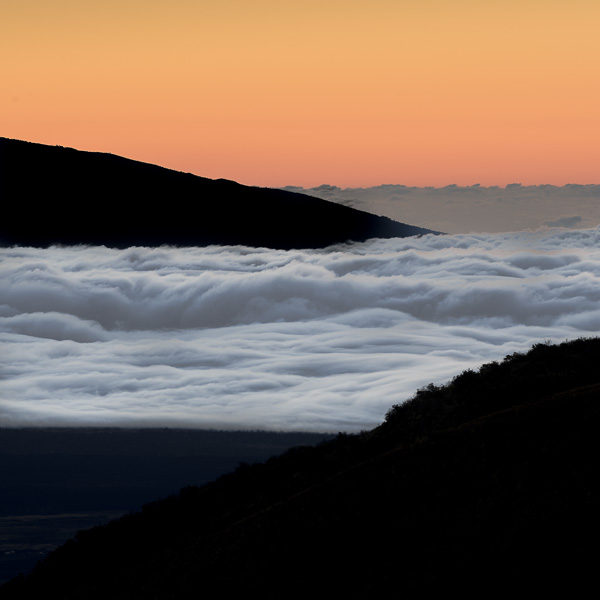
The main advantages of a quadcopter flying camera is that it is typically small (diameter of about 18 inches (46 cm), and lightweight (less than 5 pounds, 2.3 kg). With a custom insert, a quadcopter can be carried in a typical full-size camera bag, with the entire package (quadcopter, camera, gimbal, 4 batteries, controller, extra rotors) weighing less than 15 pounds (7 kg). The main disadvantage is the relatively small/lightweight payload (e.g. camera/gimbal combination) that it can carry. The typical camera that is flown on quadcopters is the GoPro Hero 3/3+ with a Zenmuse H3-2D or H3-3D gimbal. This camera produces 14 MP still images, 1080p/60fps video, and even has a 4K/15 fps mode. The Dji Phantom 2 Vision + has its own built-in camera with specs that are similar to the GoPro, 14 MP still images, however, video is limited to 1080p/30 fps. Although the GoPro and the Vision + cameras are capable of producing high quality images and video, the lenses of both are very wide angle with a pronounced fish-eye effect. The fish-eye can be removed with lens profiles in Lightroom or Photoshop, but there is no free lunch, so fish-eye is traded for edge distortion. Below are a couple of images I took at Mono Lake in California in April, 2014 (a little over a month ago as this is being written). The images were taken with a Dji Phantom 2 Vision with its built-in camera, which is roughly equivalent to a GoPro Hero 3. I have removed the fish-eye with the Lightroom lens profile, but the distortion around the edges is apparent. Russell Brown, of Adobe Systems has an excellent tutorial on post-processing GoPro and Phantom 2 Vision images here:

Figure 10 Mono Lake Image 1

Figure 11 Mono Lake Image 2
Hexacopters and octocopters can be configured and flown with very high quality 3-D active gimbals and DSLR cameras, or even a Red Epic, for the ultimate in video quality. I recently acquired a Dji Spreading Wings 1000 octocopter, with a Zenmuse Z-15 gimbal, configured for a Canon 5D Mark III, fitted with a Canon EF 24mm f/2.8 IS USM lens. I am a Nikon (and Phase One) shooter “on the ground”, so why did I choose this camera to fly on the S1000? The simple answer is: at this time, the 5D MIII (or MII) is the only choice, both in terms of camera and lens! The gimbal and camera combination balance is very sensitive; even putting a lens cap on the camera causes it to tilt down slightly!
Image and video quality on the Dji S1000 is a function of the camera that is flown. The Canon 5D MIII can, of course, produce professional quality still images and video. I have had my S1000 for less than a month, so I am still in the testing phase, in terms of determining the best settings for various situations, not to mention being new to the Canon platform. The first thing I did was to find “true infinity” on the lens and fix it at that point with electrician’s tape. The manual says to use shutter priority with 1/50 to 1/100th second exposure, or manual mode with the same shutter speed, but setting the aperture according to external readings. I have found that these shutter speeds are too slow to guarantee sharp images free of motion blur. Currently, I am using 1/500th second with shutter priority, letting the camera determine aperture as the exposure is taken. Camera exposure is obtained one of two ways. If you are only interested in taking still images, set the camera to Live View. There is a shutter switch on the transmitter/controller. One flip of the switch (it returns to the original position) will take one still image. So, in practice, you can frame your shot with the monitor (on the ground) and take a shot. If you want to shoot video, or a combination of video and still images, set the camera to live view and start recording. The camera will record video throughout the entire flight and will record a still image every time you flip the shutter switch on the transmitter/controller. I have found that it is very easy to take a series of 5-7 shots, panning the camera, and stitching the images together for a panorama in Photoshop. For a more in-depth “first-look” at the Dji S1000, you can view a 13 minute interview with me by Jeff Foster on the Pro Video Coalition website:
I haven’t had a chance yet to get any portfolio quality images with the S1000, as I have only had it for a few weeks and it is still in the “shakedown cruise” mode. You can see some of the videos I have taken with the Phantom 2 and the first video I took with the S1000 on my Vimeo site:
The natural, entry-level way to get started with landscape aerial photography is with a quadcopter such as the Dji Phantom 2 Vision +. Your initial investment will be under $1,500 and the Phantom contains everything you need to get started, and is completely ready-to-fly, right out of the box. I think it is fair to say that it is pretty user friendly. I found that I could achieve a reasonably competent skill level after flying it for around five hours (15-20- flights).
Once you have mastered quadcopters such as the above-mentioned configuration, you may find that you would like to have professional-quality still images and video, meaning that you will need a hexacopter or an octocopter such as the Dji Spreading Wings S1000. The complete system (excluding camera) will cost you around $10,000 – $14,000. Many photographers are used to spending this kind of money (and lots more) to equip themselves with top-of-the-line DSLRs and lenses. But let me tell you from experience, when you move into this category of flying camera, it is a little like being in the Donner Party, trying to cross the Sierra Nevada mountain range in mid-winter with record-setting snowstorms. You really are a pioneer in uncharted territory! You can buy the basic copter from Dji (or a dealer) and buy all the avionics and other parts, and figure out how to put it all together. There are lots of choices to be made: what flight controller? (A2, Woo-Kong, Naza-M); what controller transmitter? (some are longer range); what video downlink system? (dual diversity, Dji Lightbridge, others). I counted nine different video downlink systems (other than diversity and Dji Lightbridge) on one website alone. Another difficulty is that when there are instructions at all, they are usually difficult to understand because of poor English.
If you build it yourself, you are risking a big investment; to get it wrong means a significant probability of an expensive crash. You can also purchase a “ready-to-fly” system from a dealer/builder. But if you think you are going to get expert, experienced service and advice from such dealer/builders, think again. These folks are, at most, a few months ahead of you and I! They are still on the steep part of the learning curve. When you call them to sort out a problem, they may have the answer, but it is just as likely that you are the first person to call them with that specific problem!

So what is it like to actually do landscape photography from a flying camera platform? Over and above the logistical details of having a tripod that flies with dozens-to-hundreds of moving parts, there is a bigger challenge just in figuring out what to shoot, from what angle, etc. Your camera is in the air for about 15-20 minutes. Also, the 7 inch “diversity” monitors, and the images that you get on a smartphone with extended Wi-Fi are often difficult to see and interpret. I have found that it is very helpful to go up on a reconnaissance flight, take video and stills, and then have a look at them on the laptop. At that point, I get a better feel for how the area looks from the air, and I can go back in the air for a second flight with a much better idea of the shot I want to get. That part is really not much different from how most of us do landscape photography – it often takes a few visits to an area before you get to know it well enough to get a really good shot. The main difference is that your time in the air is limited, which is obviously not the case if you are shooting from the ground. There is a new video downlink system that just came out (not even in stock at most places yet) called the Dji Lightbridge. The ground-based receiver has high definition HDMI out, so it can be used with any HD monitor. It also has significantly longer range than the current “diversity” systems. The diversity systems generally have a range of around 1500 feet (500 meters) and the Lightbridge promises to at least double that.

Finally, I need to say a few words about safety. Actually, nothing is more important than safety when it comes to operating flying cameras. Even the quadcopters can cause serious injury and the larger hex and octocopters are capable of much worse damage. Do not fly around people (except the group actively working with and/or helping you). Do not fly around animals and do not harass wildlife. Develop checklists and regular inspections to be sure that all systems are functioning properly before takeoff. Pay special attention to fasteners that are critical for flight.
For many, the difficulties and risks involved with being an early adopter will be outweighed by the potential this new medium holds in store for landscape photographers. Open up the third dimension of landscape photography and get into the air!
If you have any questions about landscape aerial photography and/or multi-rotor copters/flying cameras, please send me an email
Stephen Wheatcraft:

Stephen (Steve) Wheatcraft is a Professor Emeritus of Hydrologic Sciences at the University of Nevada, Reno for many years. He has been seriously interested in landscape/nature photography for about 15 years. He goes out as often as he can in the western states, especially California and Nevada. He has done photography in a variety of exotic places from Svalbard (80 degrees north latitude) and Iceland to New Zealand, and from the U.S. and Canada as far away as Kazakhstan. He is currently a featured artist at the Sierra Arts Foundation in Reno Nevada. His work has been collected and is on exhibition at the Jane and Arthur Stieren Center for Exhibitions at the McNay Art Museum in San Antonio, Texas.
Recently, Steve has become very interested in using multi-rotor copters to bring the third dimension to landscape photography. He has done areal photography using quadcopters and octocopters in California and Nevada, including the Alabama Hills, near Lone Pine, California and Mono Lake, near Lee Vining, California and at Lake Tahoe.


Elevate Your Vision


Read this story and all the best stories on The Luminous Landscape
The author has made this story available to Luminous Landscape members only. Upgrade to get instant access to this story and other benefits available only to members.
Why choose us?
Luminous-Landscape is a membership site. Our website contains over 5300 articles on almost every topic, camera, lens and printer you can imagine. Our membership model is simple, just $2 a month ($24.00 USD a year). This $24 gains you access to a wealth of information including all our past and future video tutorials on such topics as Lightroom, Capture One, Printing, file management and dozens of interviews and travel videos.
- New Articles every few days
- All original content found nowhere else on the web
- No Pop Up Google Sense ads – Our advertisers are photo related
- Download/stream video to any device
- NEW videos monthly
- Top well-known photographer contributors
- Posts from industry leaders
- Speciality Photography Workshops
- Mobile device scalable
- Exclusive video interviews
- Special vendor offers for members
- Hands On Product reviews
- FREE – User Forum. One of the most read user forums on the internet
- Access to our community Buy and Sell pages; for members only.
You may also like


