


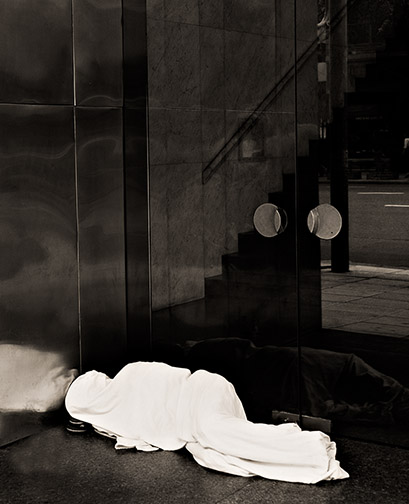
Shrouded Figure and Doorway – Buenos Aires, Argentina. December, 2005
Canon 5D and 24-105mm f/4L IS lens @ ISO 500
We had landed in Buenos Aires late the night before to begin myDecember, 2005 Antarctic Expedition / Workshop,after a much-delayed flight from Toronto that had taken 24 hours instead of the usual 12. After just a few hours sleep construction next door to our hotel woke us up much too early. After breakfast we headed out for a walk and some fresh air, with a day to spend exploring this new city. Still somewhat bleary-eyed, as we turned the corner from our hotel I noticed this shrouded figure in an office building doorway. At first I was taken aback, but then quickly took a few frames, and we moved on.
I had been startled by what I’d seen. This person looked more like a corpse than a sleeping street-person. But there were some clues (as will be seen in a moment) that this was indeed someone sleeping rather than a dead body.
The mental image of what I’d seen haunted me all day. That evening I loaded the file into Photoshop on my laptop. I saw that it had potential, but there were challenges, and so I put it aside. It was quite literally the first photograph of many thousands that I took over the following two weeks spent in Argentine and Antarctica, and it ended up being literally the last one that I turned my attention to from that shoot more than two weeks after our return.
____________________________________________________________________________________
Doing What I Don’t Do
While I have never added anything to an image that wasn’t there, I don’t have a problem in my fine-art images in removing things. I believe that it’s a photographer’s prerogative, evennecessityto remove things. That’s what we do. Painters start with a blank canvas and add. We start with the realitywe perceivein front of us and then start to remove. The standard tools that we use to remove the things that we don’t want to appear in our images include – where we stand to take the shot, the focal length of the lens we use, what we choose to be in focus or out of focus, how we frame the image – with its implication of what we leave out of the frame, the format of the media we are working with, how we crop the image afterward, and so forth. These are the means that all photographers use when they create an image. We choose what to show, and implicit in that choice is also what we choose not to show.
After having worked in the chemical darkroom for some 35 years, both as a working professional photographer and as a fine-art printer and teacher, I have developed certain habits. These habits morphed about 10 years ago into my current digital workflowmodus operandi.What I mean by this is that when doing my Photoshop work I usually only use the typical image processing procedures that photographers have used for decades – if not the past century or so; adjusting brightness, contrast, saturation and cropping. That’s about it, except that instead of the burning and dodging that was done with my hands under the enlarger, I now use local adjustment tools. These include the cloning tool and the healing brush.
Do I remove dust on the sensor using the cloning tool? Of course. Do I use the healing brush to remove a tiny bird that appears as an annoying spec in an otherwise clean and clear sky? Yes, without a qualm. Do I use the cloning tool to remove a Coke can laying in the foreground of an otherwise pristine landscape photograph, that I didn’t notice when I took the shot? Yes. But, here’s where some people will part company with what I do.
If I had noticed the can before I took the shot I would have walked over and picked it up. If I couldn’t pick it up (maybe it was behind a fence that I couldn’t or wouldn’t climb) I might reposition the camera. Or change the focal length of the lens. Or focus the lens so that it was so out of focus as to not be recognizable.
What about using the healing bush to remove an ugly pimple on the nose of someone sitting for their portrait, or putting a soft focus filter in front of the lens when shooting a middle aged woman who may be concerned about wrinkles? What about removing red eye? It was real. It was there, just as real as any other flaw caused by ambient light, such as an ugly shadow. Would you not lighten the shadow to make it less ugly? Or reposition the sitter, if you could. Or move a light? All of these are tampering withwhat was there.
The point of all this is – where does one draw the line? Tough question isn’t it?
Now let’s turn our attention back to the image seen at the top of the page. What is its relevance to the issues have just examined?
Below is the frameas shot. It has not been cropped, cloned, or adjusted in any way. It’s astraightrendition of the raw file.
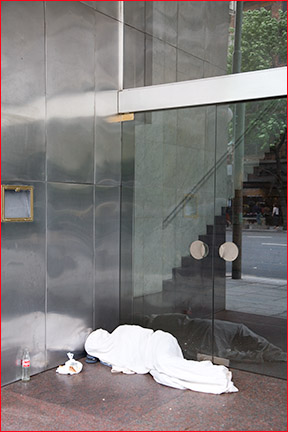
So, now you see the issue. You see unvarnished truth, as it were. But is it the truth? Who’s truth is it?
The image the I "saw" and the image that the camera captured were not the same. I had a strong visceral response to this shrouded figure. Frankly, I went from seeing the figure to taking the photograph in just a moment or two. I’ve written that it haunted me all day. But when I looked at the photograph on my laptop’s screen that evening for the first time, I was disappointed. It looked somewhat mundane, not at all what I had "seen" in my mind’s eye, at least on an emotional level.
So, about a month later I returned to the image. This time I knew that what I needed to do was to turn this photograph into the best interpretation of what I had seen as my skills would allow. My job was not to be a forensic photographer producing accurate evidence for a coroner’s inquest. Rather, it was to try and share my emotional response to what I had seen with others, which is after all the job of the artist. At least I believe so.
____________________________________________________________________________________
The Edit
The steps taken between the raw file and the finished fine-art print were straightforward. I knew that I wanted to reduce the image to its most basic elements. The shrouded figure, and the highly impersonal office building doorway. Almost everything else would have to go. The steps taken were, of course, to crop the image as tightly as possible – removing everything that wasn’tfigureordoorway, but not cropping so tightly as to not allow the image to "breathe". A hint of the reflected steet beyond also needed to be retained, for context.
The conversion to a sepia-toned black and white rather than retaining colour was a simple choice. There was little colour to begin with, and what there was didn’t add any factual or emotional value. The choice of tint colour was simply a matter of personal taste.
Darkening the overall image was a means of causing the figure to become even more removed from mundane reality. The whites are about 225 in value, still retaining lots of texture and detail. But in contrast (literally) to the rest of the image the separation of tones makes the figure almost float.
My biggest problem was the pop bottle and the plastic bag. The bottle was conveniently cropped just out of frame, but there was no way that I could crop out the bag. I stared at it for a while, deciding what to do, and in the end I cloned it out. My reasoning was that if I had thought of doing it at the time, and had had the guts to do it, I might have walked over and moved it. But I didn’t. So, I felt it acceptable to do so using a more contemporary technique, the clone tool. In the days before Photoshop I might have air-brushed it out of the shot.
While I was at it I also removed some of the litter on the ground. The more I did this, the more I continued to do it, because by doing so what I saw was that I was alsoremovingthis almost surreal scene even further from reality – more toward my initial emotional response to the scene than the camera’s literal rendition.
So there you have it. A behind the scenes look at how one image was created. No, this isn’t the way I usually work. 95% of the time I am after reproducing the world that I see as faithfully as I can. I take pleasure in recording the world and showing it to others in as "believable" a manner as possible.
But sometimes, as withShrouded Figure and Doorway, creating aninterpretationof what I have seen becomes more important to me, and when this happens I am comfortable using whatever tools are available for the task, in the chemical or the dry darkroom.
In the end, we all must make decisions for ourselves about the tools we will use to create our photographs and our art. But as part of the process of making those decisions, we need to reflect on the choices that are available to us. I hope that this essay has shed some light for you on how one photographer approaches these questions, and that it has also raised some questions about your own approach to capturing and interpretingreality.
____________________________________________________________________________________
Another Example
As I was finishing this essay I was looking though my work to find other examples of this approach. While most of my street photography, and especially landscape and nature work is quite literal, I have used this style in the past.
Below, is an example produced in 2000, from a scanned film original. In this instance I simply darkened all of the areas that were already in shadow, and heightened the contrast so as to further isolate the figure, and to obscure the areas which I didn’t want to distract from the strong graphic nature of the image. It is much as you would see it if you were squinting into the strong outside light.
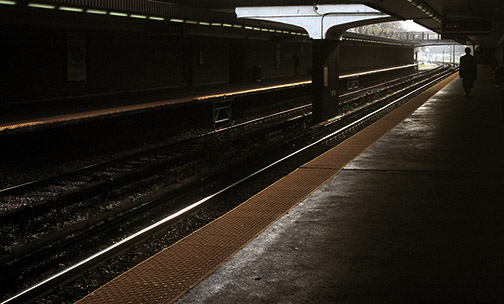
Subway Convergence. Toronto, 2000
Leica M7 with Tri-Elmar. Provia 100
February, 2006


Elevate Your Vision


Read this story and all the best stories on The Luminous Landscape
The author has made this story available to Luminous Landscape members only. Upgrade to get instant access to this story and other benefits available only to members.
Why choose us?
Luminous-Landscape is a membership site. Our website contains over 5300 articles on almost every topic, camera, lens and printer you can imagine. Our membership model is simple, just $2 a month ($24.00 USD a year). This $24 gains you access to a wealth of information including all our past and future video tutorials on such topics as Lightroom, Capture One, Printing, file management and dozens of interviews and travel videos.
- New Articles every few days
- All original content found nowhere else on the web
- No Pop Up Google Sense ads – Our advertisers are photo related
- Download/stream video to any device
- NEW videos monthly
- Top well-known photographer contributors
- Posts from industry leaders
- Speciality Photography Workshops
- Mobile device scalable
- Exclusive video interviews
- Special vendor offers for members
- Hands On Product reviews
- FREE – User Forum. One of the most read user forums on the internet
- Access to our community Buy and Sell pages; for members only.
You may also like


