


Delivering a Karate Chop to Digital Noise
![]()
Every now and then a new product comes along that redefines expectations. In software-based noise reduction such a product isNoise NinjafromPicturecode. Last yet it wasPhotokit Sharpener Pro, which revolutionized image sharpening, and now it’s the whimsically namedNoise Ninja.
I tested this program and began using it shortly after in first came out in 2003, and though it became a standard tool which I use daily and also teach in my workshops and seminars, I somehow neglected to write a review. It slipped though the cracks, likely because it had simply become a basic tool that I use almost every day, and I therefore took it for granted.
I was reminded of my oversight when I ran intoJim Christian, the program’s author and publisher, at PMA in Las Vegas in February of 2004. We chatted for a while about the program and where he was going with it, and I promised that my review would appear soon. We’ll it’s been about a month since that promise, so here it is.
_______________________________________________
The Only Constant is Change
Before jumping into my review — a few words on the subject of constant change in the software industry. Digital image processing is new. Up until a few years ago it was the domain of those with specialized interests and needs. Today it is mainstream and practiced by millions worldwide. This has had two effect; a race to develop new products, and a continuing reduction in price and an increase in functionality.
I mention this because whenever I review and praise a new software product like this one, some wag will make a snide comment online that I’m touting the latest and greatest, and that it was only 3 or 6 months ago that"whatever"was the favourite de jour. Yup, that’s right. I do, and it is.
Much as some folks don’t like it, new products are constantly coming to market, and if one becomes available that does a certain job better or faster than the previous one, then it’s worthy of our attention. My personal goal is to produce the finest prints that I can from my images, and I go to extraordinary lengths to accomplish this."OK", isn’t good enough. And so I’m always on the lookout for better tools, and in the case of noise reduction that something better isNoise Ninja.
_______________________________________________
The World is Noisy Place
Noise is a fact of life in digital imaging. Cameras and digital backs with 6-11 Megapixel sensors and photo-sites of 7-9 Microns can be virtually noiseless at low ISOs. But once the ISO gets to 400 and above noise starts to creep in. Digicams, especially those with high pixel counts and small photo-sites can start to show noise at anything above their lowest sensitivity setting. Not necessarily terrible noise, but there none-the-less. Sort of like the way film used to look, and not the clean essentially grainless look that quality digital images display.
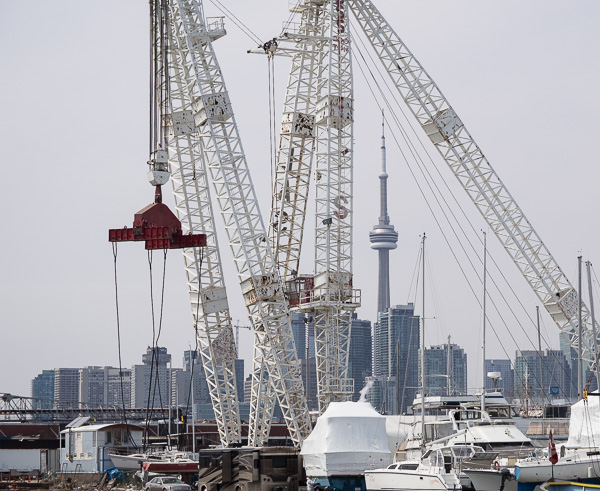
Fig. 1
Full Frame. ISO 100
InFigure 1above we see the full frame of a photograph taken by a current-model 5 megapixel digicam. Below inFigure 2is a 100% crop showing a corner of the tower and some clear sky. The sky isn’t perfectly free of noise, but in an 8X10" print what little noise there is is negligible.

Fig.2
Below inFigure 3is a comparison of the same shot taken at ISO 200 and 400, with and withoutNoise Ninjaprocessing.

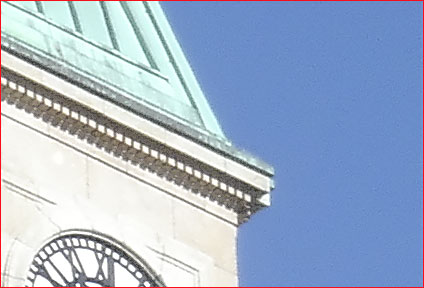

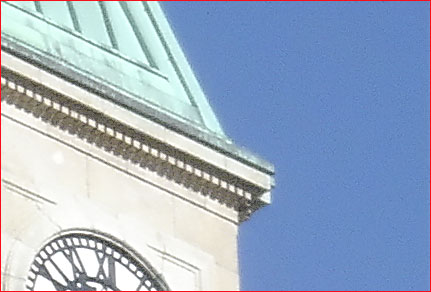
Figure 3
As can be seen, the noise has been removed to such an extent in the ISO 200 image that it actually appears to be slightly cleaner than the one at ISO 100. The filtered ISO 400 image is as clean as the unfiltered ISO 200 image, and in any event is capable of making very clean looking prints.
Though most cameras are almost noise free at low ISO, many professionals will run these files throughNoise Ninjajust be certain of removinganytrace of noise. While not noticeable in small to moderate sized prints, if you’re making big enlargements it really can produce a cleaner file and better prints.
_______________________________________________
Processing Without Profiles
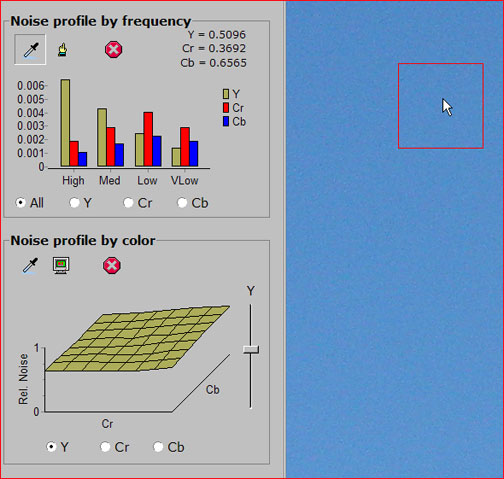
Figure 4
InFigure 4above you see part of the user interface and some of the sky in the ISO 400 image. To process this image you select the eyedropper tool from theNoise Profile by Frequencybox and click on an area which contains noise but no detail. The bar graph shows an analysis of the noise, but this need not concern you. The next step is to choose the eyedropper tool from theNoise profile by colorbox and click on several areas of different colour that display noise but no detail.
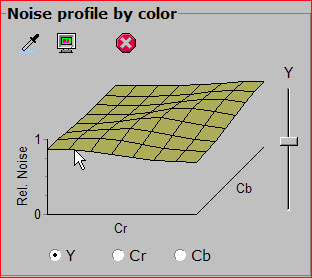
Figure 5
Figure 5shows what happens to the profile after you have selected a number of different clear areas of different colour. It has become much more complex, and shows a greater understanding of the noise characteristics of the camera and the way different colours display it. You can now refine this profile even further though the use of various in-built tools. If you’re interested in how this is accomplished the program’s on-line Help contains comprehensive details.
All that’s left to do now is to press theRemove Noisebutton and then export the filtered file back into your image processing program.
_______________________________________________
Processing With Profiles
Working to profile each image doesn’t take long, but it doesn’t produce as comprehensive a profile as one might wish. It also can be problematic if the particular image that you’re working on doesn’t have enough clear undetailed areas to analyze.
A much preferable way of working is to create a series of permanent custom profiles for your camera’s various ISO settings. Then, when you load any new image for processing simply select the appropriate profile, process, and you’re done.
Creating custom profiles is easy using the provide test chart file. Simply photograph the 8X10" chart which contains 150 coloured squares. Load the file intoNoise Ninjaand select one of the gray squares. Click on it. Next select the Auto-Scan button.
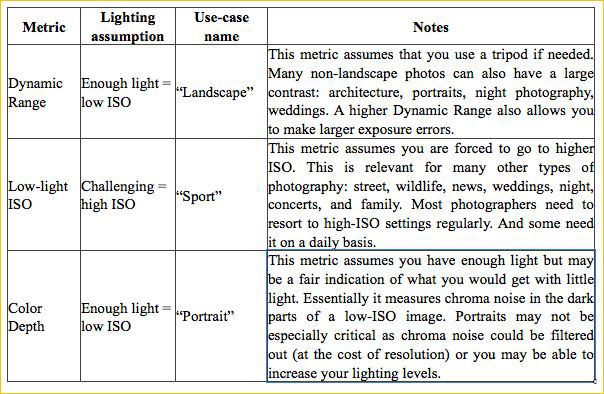
Figure 6
The program now analyzes as many as 81 individual tiny areas within each coloured square (more than 12,000 points on the entire cart). This gives the profile a very comprehensive and accurate understanding of how your particular camera and chip record noise at that particular ISO, and for each of the 150 target colours. You now save the profile under a unique name, such asmycamera-iso100, and then the next time you want to profile an image shot with that camera at that ISO simply call up the profile, pressRemove Noiseand then save the file under a new name. That’s it.
Well, actually that’s not quite it, becauseNoise Ninjaoffers the tweakers in the audience a broad range of capabilities to custom adjust almost every aspect of their noise profiles and output.
Creating a custom profiles takes all of about 10 minutes per ISO setting, and if that’s too much for you there are pre-made profiles available on thePicturecodeweb site for many popular cameras.
_______________________________________________
Summary
Noise Ninjacomes in two version. AHome Licenceis available for U.S. $29, which handles 8 bit files, and does not allow batch processing. There is also aProfessional Licensefor $69 that handles 16 bit files and features full batch processing. For the small difference in price theProfessionalversion is definitely the one to get.
WhileNoise Ninjais currently only available for Windows, a Mac version is under development and should be available soon, (Q2, 2004). Jim says that he’s also working on aPhotoshopplug-in version, which I’m eagerly awaiting. In the meantime you candownload Noise Ninjaand try out it out before you decide to buy. But, you likely will make the purchase because the program is simply that good.
Highly recommended.
_______________________________________________


Elevate Your Vision


Read this story and all the best stories on The Luminous Landscape
The author has made this story available to Luminous Landscape members only. Upgrade to get instant access to this story and other benefits available only to members.
Why choose us?
Luminous-Landscape is a membership site. Our website contains over 5300 articles on almost every topic, camera, lens and printer you can imagine. Our membership model is simple, just $2 a month ($24.00 USD a year). This $24 gains you access to a wealth of information including all our past and future video tutorials on such topics as Lightroom, Capture One, Printing, file management and dozens of interviews and travel videos.
- New Articles every few days
- All original content found nowhere else on the web
- No Pop Up Google Sense ads – Our advertisers are photo related
- Download/stream video to any device
- NEW videos monthly
- Top well-known photographer contributors
- Posts from industry leaders
- Speciality Photography Workshops
- Mobile device scalable
- Exclusive video interviews
- Special vendor offers for members
- Hands On Product reviews
- FREE – User Forum. One of the most read user forums on the internet
- Access to our community Buy and Sell pages; for members only.
You may also like


