


Introduction
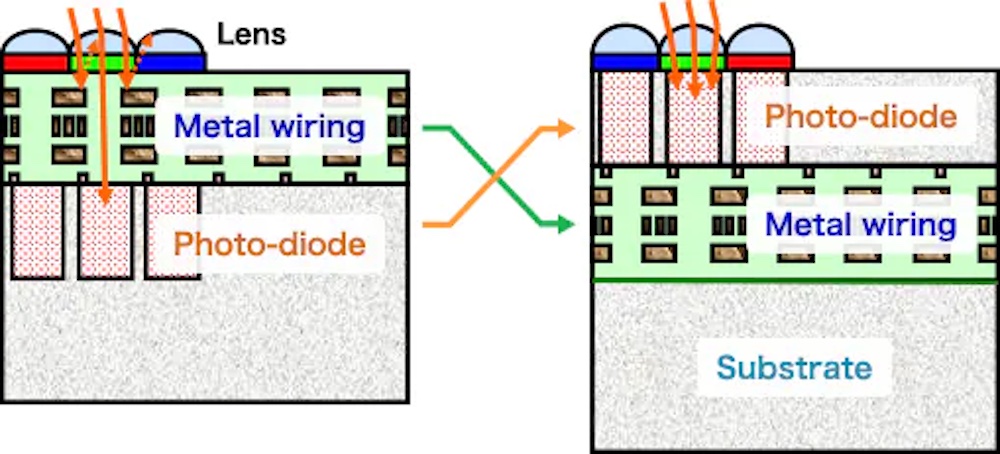
In the previous part of this series, we looked at the behavior of the image sensor itself, at sensor technology and size and their effects on resolution and dynamic range. We will start this section directly above the image sensor, in the stack of optical materials that are sometimes colloquially called sensor “toppings”. These are manufactured separately from the sensor, and it is quite possible to have the same base sensor with different toppings creating significantly different images. In a few cases, especially in Phase One and Leica cameras (but also astrophotography-oriented variants of several Canon and Nikon models), it is possible to order the same sensor with different toppings, with significant effects on not just image quality, but the type of image the sensor produces. There are also cases where third-party companies remove elements of the sensor toppings, producing a camera with different capabilities than the manufacturer originally intended. Infrared and monochrome conversions are the most popular removals. From the lens mount back to the sensor itself, the light passes through an average of four layers. The topmost layer is a protective cover glass/ IR and UV filter. Its function is both to protect the layers below from damage and to filter out ultraviolet and infrared light before it reaches the sensor, since image sensors are sensitive to light beyond the human visual range. Cameras converted for IR photography or astrophotography have this cover layer replaced by one with different properties that might filter out some visible light or transmit certain IR or UV wavelengths.. The second layer, which is often omitted on higher-resolution cameras, is the anti-aliasing filter. Neither of these upper layers are represented on the diagram below. The topmost layer on the diagram is either the second or third layer on the sensor – it is the microlenses that focus the light on to the light- sensitive photodiodes. On this diagram, they are the blue bubbles at the top. The final layer before reaching the sensor itself is the color filter that allows a fundamentally monochrome image sensor to record a color image. On a modern, back-side illuminated sensor, the light then reaches the photodiodes that actually record the image. On an older, front-side illuminated sensor, the light actually passes through a layer of wiring before reaching the photodiodes – some light hits the wiring and is reflected, while some finds gaps and reaches the photodiodes. Why is “has to pass through the wires” FRONT-side??? Ask a chip designer!
Cover Glass, IR and UV filtration
The cover glass is the topmost piece of the sensor stack, and probably the simplest. It is essentially a UV filter like you might put on a lens, and it’s a good one. It’s generally also the IR-cut filter, so it will appear transparent in visible light, while being engineered to block both IR and UV light. While nobody publishes the light transmission of sensor cover glasses, good UV and IR filters are routinely well over 99% transmissive, and cover glasses should be in that range. The cover glass is relatively small, and it’s permanently mounted to an expensive piece of equipment, so there’s no reason to skimp.
When you clean your sensor, what you’re really cleaning is the cover glass, and it’s actually no more or less delicate than its close relative the UV filter on your lens. It is, however, much more expensive to replace, because it is difficult to get off the rest of the sensor stack. If you scratch a UV filter on a lens, even if it’s a nice multicoated one, it’s a 30 second job to replace, and, unless it’s a 105mm, 112mm or even 127mm filter on an exotic telephoto or wide-angle lens, it’s less than $100. If you scratch a sensor cover glass, it generally can be replaced, but it has to be taken off the sensor professionally and very carefully, in a specialized clean room. It’s a job for a well-equipped service facility.. The glass itself may well be under $100, even with its specialized coatings, but the service to change it is likely to be expensive, and generally requires sending the camera out (unless you live in a city with a sophisticated camera repair facility). One exception is that some digital backs have easily replaceable cover glasses, because the glass is so much more exposed with the back off the camera.
If it’s clean and well-chosen, the cover glass should have essentially no impact on your image. Its goal is to stay out of the way, and it’s generally very good at it. I haven’t heard of a camera in years where the cover glass had a significant impact on the image, but it has happened. Early Leica digital rangefinders used a cover glass that was too transparent in the infrared, and they had a habit of turning certain black and dark blue or green objects (especially fabrics) purple. These objects reflect a lot of infrared light, which confuses white balance if it gets through to the sensor. Cameras with weak IR filters occasionally popped up in the early days of digital – but I haven’t heard of one in a decade or more . The Leica debacle was in the mid-2000s, and there were a few more over the next few years, but I can’t recall one since 2010 or so. For the most part, the cover glass just stays out of the way – keep it clean, but don’t scratch it, and it’ll be happy to remain transparent.
The reason Leica’s IR filter was overly weak is an interesting one – it was an attempt to solve another design conundrum. Leica was trying to thin the filter stack, to avoid problems with vignetting caused by older lenses that illuminated the edges of the sensor at steep angles, and they made the IR filter too weak. Older Leica M lenses have long been a problem on digital cameras, because they have especially steep ray angles at the edges, and they are mounted close to the sensor. Film doesn’t care whether light arrives perpendicular to the film or at a steep angle – if the light-sensitive particle is exposed, it’s all good. The light-sensitive pixel in a digital camera, however, is under a number of layers of toppings, and it’s at the bottom of a well on the sensor itself. These distances are small, but they’re not nonexistent, and a photon that arrives at too steep an angle can strike the side of the well instead of the light-sensitive pixel at the bottom. SLR lenses designed before digital sensors became common can also have steep angles, but they are mounted enough farther from the sensor that the problem is at least somewhat mitigated – and there are fewer old SLR lenses that people really love than old M lenses. Lenses designed for digital cameras transmit light much closer to parallel, so it arrives perpendicular to the sensor. Essentially all mirrorless lenses are modern designs that combat the problem through optical design – mirrorless cameras as we know them are essentially a digital phenomenon. I hedge because of the Contax G series, which were a lot like mirrorless digital cameras in many ways (they used an optical viewfinder – but so do Fujifilm X-Pros) – but they took film. Leica has tried various approaches to this problem – more on another one under microlenses…
Color Filtration
Moving on to a layer that certainly does not stay out of the way, the color filter layer has a very significant effect on image quality – it reduces resolution compared to a monochrome version of the same sensor, and it largely defines color. Color as seen when we open the raw file in processing software, prior to adjustment, is a combination of multiple factors – but the color filtration on the sensor is a significant one. It interacts with the color transmission of the lens (no, lenses are not perfectly transparent to all colors – even good ones introduce subtle color casts, while cheap ones can be wildly colored). It interacts with any filters present over the lens (again, every filter has a slight cast), and with other elements of the filter stack over the sensor. Finally, it interacts with the color profile for your camera in your raw processing software. Even among all of these factors, the three primaries the manufacturer chooses for the color filter array have a significant influence.

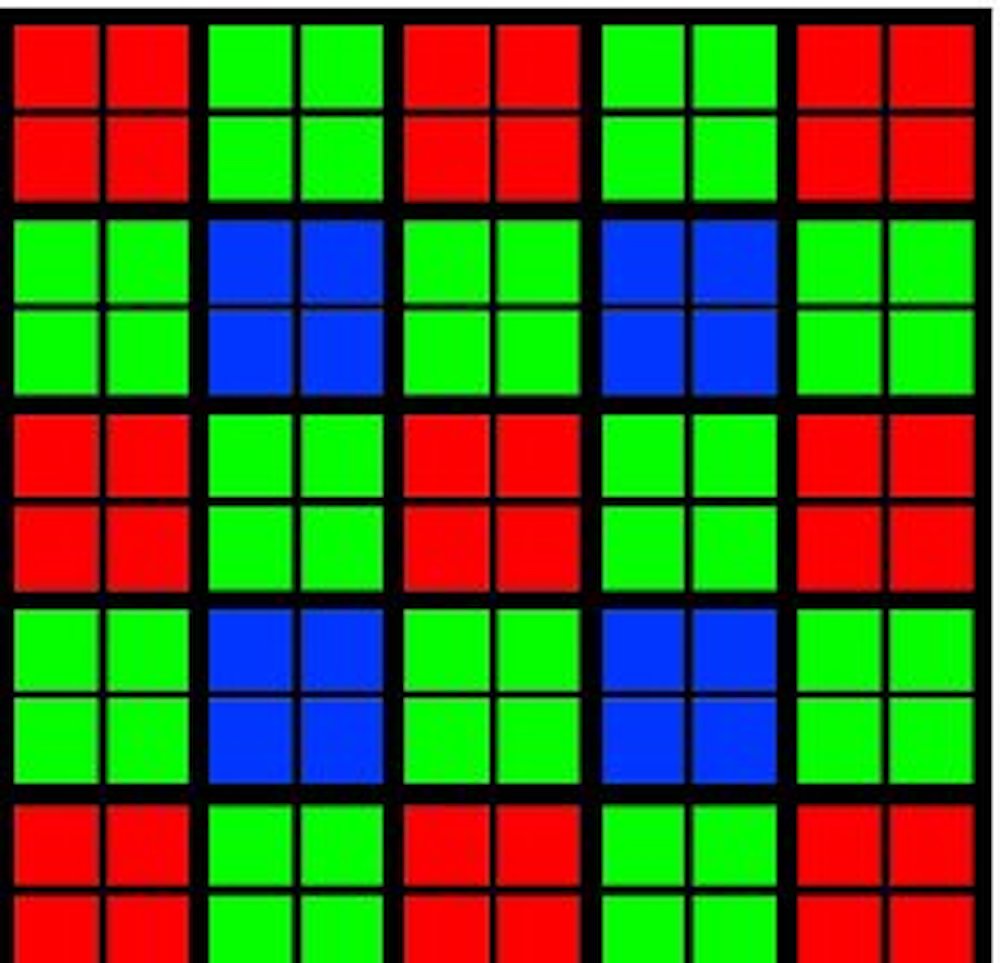
On most cameras, the color filter uses a Bayer pattern – the first line of pixels is colored green, blue, green, blue… The second line is colored red, green, red, green, etc. It looks like a chessboard except that, while the green squares are the black squares on a chessboard, half of the white squares are red and the other half are blue. When the camera (in the case of JPEG output) or the raw processor processes the image, it gets the missing color information for each pixel from its neighbors. The total resolution of this setup is somewhere in between half the quoted resolution (the green pixels are the primary contributors to detail) and the full quoted resolution, because the red and blue pixels contribute to detail as well as color.
Fujifilm is famous for their X-Trans sensors – or, more accurately, for their X-Trans color filters that sit on top of conventional sensors. Instead of using a 2×2 pattern where every 4-pixel block contains two green pixels, a red pixel and a blue pixel, they use a 6×6 pixel pattern containing 20 green, 8 red, and 8 blue pixels. Fujifilm claims three advantages. First, from the way the colors are arranged, each row and each column contains all three colors, so they can reconstruct the color more accurately. Second, since the color pattern is more random, it’s less likely to interact with repeating detail in the subject to produce moiré patterns. Third, the pattern is closer to the patterns of dye clumps in film, so color noise will look more like film grain. In real-world use, Fujifilm’s claims seem to bear out – an X-Trans image will often look a little better than an image from a conventional Bayer variant of the same sensor, but there are also disadvantages. Some raw processors (especially older versions of Lightroom) have trouble with the more complex calculations needed to interpolate color from the X-Trans pattern, and some software won’t even try (DxO until recently and many plug-ins).
There are variations on the standard Bayer filter – high resolution cellphones and a couple of non-phone cameras use what’s called a Quad-Bayer pattern where four pixels (or in a very few cases, 9 pixels – I guess that’s 9x-Bayer?) in a square share each color patch, and are generally binned together in the image. When you see it in a non-phone camera like the OM-1 or the Sony A7S III, the resolution is quoted as the resolution of the filter. The OM-1 has an 80 million (sub)pixel sensor with a 20 mp filter and is considered a 20 mp camera since the subpixels are so small (80 million pixels on a Micro 4/3 sensor are equivalent to a density of 320 million on full-frame, six times what any current full-frame camera uses) that reading them out separately would merely increase noise. The subpixels are used in focusing, and in some of the computational photography effects the OM-1 can do, but the camera reads out at 20 mp, and is properly considered a slightly unusual 20 mp camera, including by its manufacturer. The A7S III’s 48 million subpixels are actually a reasonable size and could be filtered and read out conventionally, but Sony treats them as subpixels to produce optimal resolution and noise for 4K video.
Sony’s own A1 has a very similar resolution with a conventional Bayer filter, and its 4K video mode bins the pixels just like the A7S III, but it has a problem because each binned pixel contains a variety of color information – it’s not as clean as if the four parts of each binned pixel were all the same color. Canon’s EOS-R5 and Nikon’s Z9 (again, very similar resolution around 50 mp) process an 8K image and then scale it down in their best 4K modes, a process called oversampling that produces more detail than binning mixed-color pixels, but requires a lot of processing power in the camera. The R5 in particular is vulnerable to overheating while doing this, and one of the reasons the Z9 is big is to keep it cool – there’s a lot of heat sink in there.
Smartphones cheat on counting their resolution – the models that use Quad-Bayer “48 mp” or even 9x-Bayer “108 mp” sensors count the resolution by counting every subpixel, even though the images are almost always produced at the resolution of the filter (12 mp). They are using the subpixels just as the OM-1 does – for focusing and computation – but they count them as contributors to resolution. In order not to be completely dishonest, they almost always include a mode that reads the subpixels out separately and performs some mathematical gymnastics to grab color from non-adjacent pixels. The subpixels are so small that the image is terribly noisy, the color interpolation is not as accurate as conventional Bayer, and the image, while reporting a high resolution, is generally of poor quality. Smartphones are 12 mp compact cameras with superb internal processing – end of story (except for a couple of models rarely seen in North America that use a 108 mp sensor and a Quad-Bayer filter, producing 27 million noisy pixels in the output).
Quad-Bayer and X-Trans are the most common variations on the Bayer pattern, but they aren’t the only ones. Sony has occasionally made filters with two different green color filters (green and emerald), or with some unfiltered white pixels. As far as I know, these filters have only ever been used in compact and video cameras with no raw mode, so they’re always processing the unusual patterns internally – raw processors have never had to deal with it. Fujifilm (yes, them again) has used sensors with multiple sizes of pixels, octagonal pixels, and pixels laid out in diagonal rows (although not in many years) – and raw processors have had to deal with those, with mixed results. Fujifilm did something unusual for them on the GFX series – they used a conventional Bayer filter, claiming that the resolution was high enough that X-Trans no longer makes a difference.
A large part of why a lot of photographers swear by Canon for skin tones, or Nikon or Fujifilm for landscapes, or Sony for neutral colors that edit well, is that the red, green and blue pigments in their color filter arrays are slightly different. The Bayer pattern is the same (except in the case of X-Trans), but the transmission spectra of the pigments vary – Fujifilm green is not exactly Sony green, and Canon red isn’t quite Nikon red. Fujifilm X and GFX colors are very similar, even though the X cameras use XTrans arrays while the GFX series uses a conventional Bayer array. Fujifilm is specifying the primary color pigments in both cases, and they are likely to be the same ones, or at least very similar.
Even two cameras from different manufacturers using the exact same sensor will very often use a different filter stack, and the color filter array is an important part of that difference. The ubiquitous Sony 24 mp APS-C sensor appeared in cameras from (at least) Sony, Nikon, Fujifilm and Pentax. The 50 mp medium format sensor made the rounds at Hasselblad, Fujifilm, Pentax and Phase One. Sony, Nikon and Pentax shared the 36 mp full-frame sensor. These are all previous generation sensors nearing the end of their production lives or out of production, so they’ve had a chance to migrate into a lot of cameras. In the current generation, no single size of the 3.76 µm “standard pixel” sensors is as widespread, but among the four sizes, they are used by Fujifilm (APS-C, 33x44mm medium format), Pentax (APS-C), Sony (full-frame), Sigma (full-frame), Hasselblad (33x44mm medium format) and Phase One (54x40mm medium format). These cameras have very different color renderings, and a lot of that is in the sensor color filter arrays – the differences carry over into raw files, so it isn’t just the way the manufacturer chooses to process the images in-camera.
The most dramatic example of a different color filter array affecting color rendition is a camera so exotic the majority of us will never see one – but it is the only case I know of where the same camera was made available with two different Bayer color filter arrays intended for conventional photography. There have been other cases of differently filtered cameras, but one of the two has been made for a special purpose (monochrome, infrared, astrophotography…). Phase One offered their IQ3 100 mp back with two different color filters – a standard model (probably very high-quality as most Phase One gear is, and should be for the price) and what they call a Trichromatic filter, which features much “cleaner” color (sharper peaks in spectral response, and less overlap in response between the three filter colors).
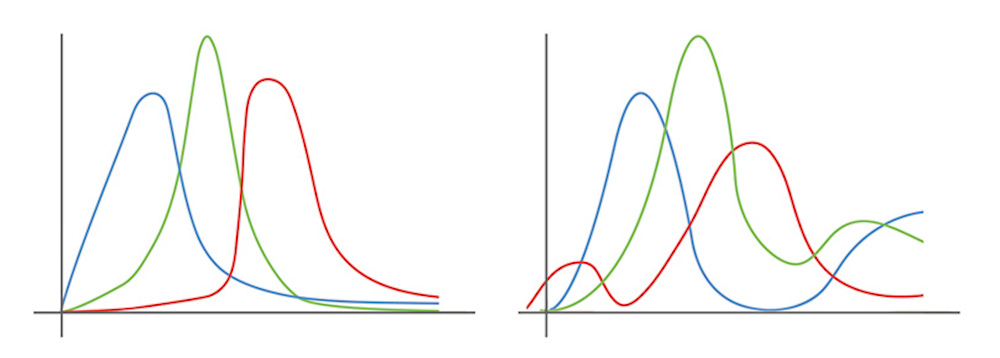
A previous article on The Luminous Landscape, written by Doug Peterson, who has worked for and with Phase One for years, includes the spectral response curves of both filters (reproduced above). They are very notably different, and sample images I have seen from the two backs confirm that it has a significant effect on the image as it appears at the beginning of the editing process. Another interesting difference is that the Trichromatic is about 2/3 of a stop darker than the conventional filter – the minimum ISO of the back with the conventional filter is 50, while the Trichromatic goes down to ISO 35. It is very unlikely that Phase One would have tweaked the sensor gain when changing the filter (if they could reach ISO 35 with very low gain, why not enable it on all backs), leaving the density of the filter as the likely source of the difference. Phase One also offered the same back with no color filter at all as the Achromatic, and that has a minimum ISO of 200, suggesting that color filtration cuts a couple of stops of light (which is reasonable when you consider the filter factors of on-lens color filters used in black and white photography).
The Trichromatic was a multi-thousand dollar upgrade from the conventional model when both were available new, and current used prices show the Trichromatic commanding a thousand dollar premium or more. I have never seen spectral response curves for any other set of color filters, but my suspicion is that they would be more similar to the “conventional” version of the Phase One IQ3. The high price of the Trichromatic upgrade suggests that the superior filtration probably isn’t cheap to manufacture, although Phase One’s low production volumes could also be a factor and the additional 2/3 stop of light loss may be a consideration for many manufacturers.
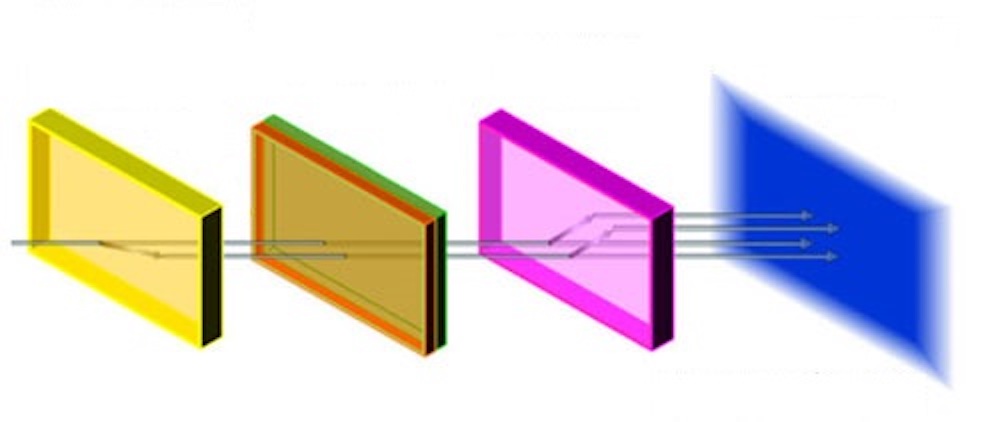
There are at least two other approaches to getting color out of a fundamentally monochrome image sensor, beyond using a patterned color filter array (Bayer or a variation like Quad-Bayer or X-Trans) that filters each pixel to a particular color. Many video cameras historically used three separate imaging chips, with each chip filtered to a single color. Since the filters cover a chip rather than a pixel, they can use dichroic filters which provide a better separation of colors. The combination of separated color sensors and dichroic filtration makes processing easier and provides cleaner color, but it has a huge disadvantage in the bulkiness of the optics required. The three chips have to be mounted EXACTLY the same distance from the lens mount, and a beamsplitter prism has to divide the light between them.
Even using smartphone-sized sensors, the sensor/prism/filter block is a couple of inches on a side and full of precision optics. Something as small as 1” sensors, smaller than Micro 4/3, would be prohibitively large in a 3 sensor configuration, and are vanishingly rare in 3 sensor video cameras if they exist at all (there may have been a 1” 3 chip cinema camera or two, since cinema cameras live on huge supports). Only one 3 chip DSLR for still photography ever reached series production – the very early Minolta RD-175, which was bulky despite using tiny 4x6mm imaging chips. Even an APS-C camera would be absolutely enormous (probably Mamiya RB-67 size or larger), and would require unique lenses since the distance from lens mount to sensor(s) is much longer than in any single-chip design. The advantages of, say a 3-chip camera using the 26 mp APS-C sensor are easily overcome by a much smaller, simpler and probably less expensive camera using the 102 mp medium format version of the same sensor. Some broadcast cameras are still using 3-chip designs, generally using phone-sized sensors, but most newer models are using larger single chips. One advantage of a 3-chip camera for sports coverage in particular is that very powerful telephoto zoom lenses are possible since the actual focal lengths are not that long. A 500 mm lens on a chip less than a centimeter on a side is equivalent to something like a 2500 mm lens on full-frame.
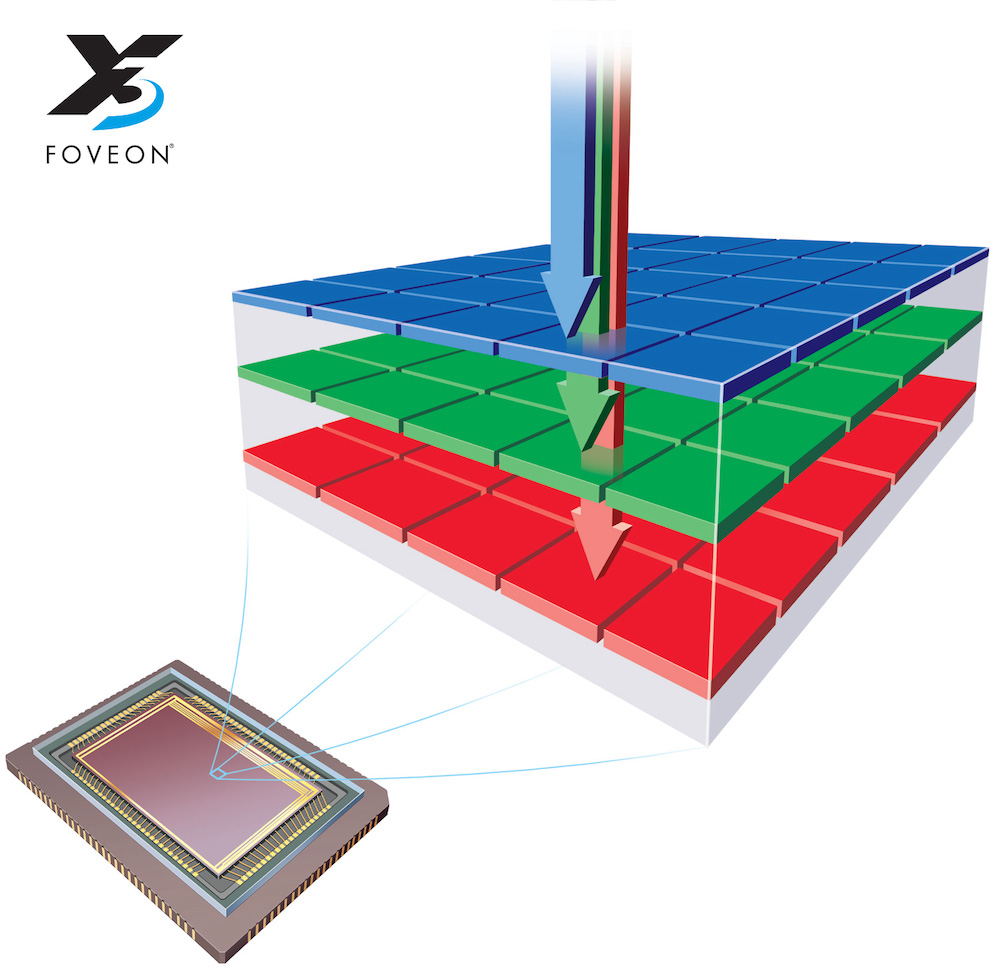
Since 3 chip optical systems are unlikely to work for most still photo applications, a small company called Foveon (now a division of Sigma) has been working on an alternative. They actually stack three light sensitive photodiodes at each pixel! Silicon absorbs light, but not all wavelengths equally (at very shallow depths of few microns – a millimeter thick piece of silicon is as opaque as you’d expect, but layers on an image sensor can be microns thick). Light actually passes through one or two layers to register on a lower layer. The uppermost layer is sensitive to blue light, while the layer below has the short (blue) wavelengths filtered out and is sensitive to green light. The third, lowest, layer has both short and middle (green) wavelengths filtered out, and is sensitive to red light.
Foveon claims every photodiode as part of the resolution – in the basic design outlined above, three times the number of pixels on a given layer. Some more recent Foveon sensors have used different numbers of pixels on the different layers, and Foveon claims the resolution of those variations as the sum of the total pixels on all three layers – and they cheekily claim equivalence to an even higher resolution. In practice, a Foveon sensor at optimum ISO has an apparent resolution higher than a Bayer sensor with the same spatial resolution (number of pixels on the Foveon’s single densest layer), but less than a Bayer sensor with the same number of total pixels (counting all three layers in the Foveon). Foveon sensors to date have tended to have relatively low spatial resolution, although they claim impressive total resolution numbers.
Different sources claim different real resolutions – pretty much nobody outside of Foveon accepts counting every photodiode as equivalent to a Bayer sensor. Even the lowest claims for Bayer sensors account for half of the pixels being green, so excluding the red and blue pixels entirely would still give a resolution of half the spatial resolution (Foveon’s method of counting demotes the Bayer sensor to 1/3 of its spatial resolution). Most sources say that the red and blue pixels do contribute to resolution, while accepting some loss from the demosaicing process. What’s the real detail capture of a Bayer sensor? Maybe more like 2/3 of the spatial resolution??? Assuming that a Foveon sensor captures its full spatial resolution, a 24 mp (x3) Foveon sensor would then be somewhat like a 36 mp Bayer sensor, while Foveon claims 72 mp.
In theory, it’s a good idea – it works much like color film, where three layers are spread out over the whole area of the film. In practice, Foveon sensors have been hampered by two things. One is that they aren’t getting the resolution they need (so far). The highest resolution Foveon we’ve seen is a Sigma SD Quattro H using an APS-H sensor (weird 1.3x crop right in between APS-C and full-frame, mostly used by Canon on old EOS-1D series cameras) with 25.5 megapixels in the highest resolution layer plus two 6.4 megapixel layers below. The total adds up to 38.25 mp, while Sigma claims equivalence to a 51 mp Bayer sensor. In practice, it significantly out-resolves a 26 mp APS-C Fujifilm X-T4 on dpreview’s test scene (which tests resolution and color, but NOT dynamic range – read on). It is roughly comparable to an older 36 mp full-frame Nikon D810, and loses clearly to a 45 mp full-frame D850 and a 50 mp medium format Fujifilm GFX 50S. Right where you’d expect it to be, based on sensor size and pixel count, but nowhere near the claims sometimes made for Foveon sensors. Foveon is sometimes compared to medium format, and it’s not close, even to the older 50 mp sensor they’re probably thinking of.
The second problem is that all Foveon sensors we have seen so far have an incredibly narrow performance window. Again, taking that SD Quattro H sensor that’s pretty close to a D810 at ISO 100, let’s start turning the ISO up. Even at ISO 200, it’s comparable to a D810 – at ISO 800! Turn it up to 400, and it’s more like a D810 at ISO 3200 or an X-T4 at 1600. Sigma optimistically marks an ISO of 1600 – and that’s a little ways behind an X-T4 at 6400… Incredibly, they allow a maximum ISO of 6400, which is actually less usable than the D810 at ISO 51200, losing almost all of the color into a grainy semi-monochrome mess.
Given that poor high ISO performance, it’s worth checking into its dynamic range – is it going to muddy up the shadows even at base ISO? Neither DxOMark nor Photons to Photos has ever tested a SD Quattro H, nor any Foveon camera for that matter. Dpreview has performed some limited dynamic range testing by underexposing their test scene, and the results are extremely underwhelming. It has less than 10 stops of engineering dynamic range. Real, useful photographic dynamic range even at base ISO? 8 stops? A bit less? This is cell phone territory, or REALLY old DSLR territory. Maybe it has the resolution of a D810 under perfect conditions, but it has the dynamic range of an old EOS-D30, about four stops less than the D810.
The reason for the poor ISO and dynamic range performance of the Foveon sensor may be inherent to its design. Since each layer partially masks the ones below it, not a lot of light reaches the lowest layer. Foveon has tried to compensate by using large pixels on the lower layers, but it doesn’t seem to be enough. Even the top layer has a lower dynamic range than most modern sensors, and by the time you reach that red layer on the bottom (imaging through two layers of silicon), the image down there is noisy in the best of conditions and quickly veers towards “nonexistent” as conditions deteriorate.
A really viable Foveon sensor would have to have resolution equivalent to a full-frame pixel monster of the same generation – the notably slow Foveon sensor is not likely to start shooting 12 fps and put itself in contention with faster cameras that sell themselves on versatility! That would probably take a single-layer resolution of about 40 mp, to be close to the 61 mp standard pixel sensor. Additionally, it would have to have reasonable dynamic range at low ISOs – at least three stops more than the SD Quattro H, maybe closer to four? Is this possible? If they can get the dynamic range up, that should also help higher ISO performance. Is it worth designing and building a limited production sensor, even if they can get the performance to a competitive level – or is Foveon going to end up in the category of neat ideas that can’t be built?
Anti-Aliasing (low-pass) Filters
The next interesting layer in the sensor stack is the anti-aliasing or low-pass filter, if it’s present. A digital sensor can’t reproduce a pattern of lines more closely spaced than two pixels apart (this is called the Nyquist frequency, and it’s a fairly clean calculation if you are photographing black and white line art – it gets more complex when you’re dealing with gray scales, and more complex still if you’re dealing with color). When you have detail, especially repeating detail, that is smaller than the Nyquist frequency, the sensor will not record it correctly – and it might record it incorrectly, causing aliasing (jagged lines) and moiré (interference patterns. An anti-aliasing or low-pass filter (they’re two names for the same thing) is designed to blur details smaller than the Nyquist frequency – you’d rather have a slightly blurry image of tiny details than an aliased image or a moiré pattern. A perfect filter would blur only details smaller than the Nyquist frequency, while leaving all detail larger than the Nyquist frequency alone. Of course, a perfect filter doesn’t exist, and Nyquist frequency isn’t simple in color continuous-tone images, so there’s no way to get it exactly right. The higher the resolution of the camera, the more detrimental the anti-aliasing filter is likely to be, and the higher the resolution of the camera, the less the filter is needed – since it will take finer and finer detail to produce aliasing and moiré, and the patterns, if produced at all, will be smaller and harder to see.
In the early days of digital photography, resolutions were relatively low and pretty much every camera featured an anti-aliasing filter. Kodak tried eliminating it on the 14 megapixel DCS-14n and its successors the DCS Pro SLR/n and SLR/c in the early to mid 2000s, and it did create the sharpest images seen outside of medium format at the time, but at the cost of a lot of artifacts – both aliasing and moiré. Those cameras failed for a variety of reasons, the artifacts among them (but a lousy and always-on noise reduction algorithm, poor performance and limited dynamic range also played important roles), and the anti-aliasing filter wasn’t touched again until the end of 2008. Nikon’s 24 mp D3x didn’t eliminate the anti-aliasing filter entirely, but it was known for using one that was unusually weak and had an unusually steep cut-off (it was particularly good at NOT blurring detail that the camera could record). The filter was was also, at least by reputation, unusually expensive – Nikon didn’t ever explain why the D3x was so expensive, but the superb sensor filtration was often considered a likely culprit. There was a noticeable difference in sharpness between images from the D3x and images from the Sony A900, which was released at almost exactly the same time, and almost certainly used the same sensor with different filtration. The D3x was also the first mainstream camera with 14-bit output, which allowed it to record a little bit of extra dynamic range over the A900. Between its various tweaks, the D3x held the DSLR image quality crown for quite a while, and it was finally dethroned by Nikon’s own D800 and D800e, which tweaked the anti-aliasing filter again.
The D800 had a weak, but otherwise conventional anti-aliasing filter. The D800e took a different approach – anti-aliasing filters have two layers, one of which separates horizontal detail to provide a slight vertical blur, and the other of which separates vertical detail to blur the image horizontally. The D800 has both components, like any other camera. The D800e has the first component, but instead of the second, it has a filter that recombines horizontal detail, canceling the effect of the first. Why? Why not just take out the filter entirely? Nikon has never said – but one likely guess is that autofocus on a DSLR depends on the distance from the lens to the focus sensor being exactly the same as the distance from the distance from the lens to the image sensor. If the filter stack was different in thickness, the focus sensor would have to move as well, even if by a fraction of a millimeter. It would be far easier to build the two cameras together if they had exactly the same filter thickness. Why a cancelled filter, instead of a piece of flat optical glass of the same thickness? That one isn’t something I can explain! With the lessons Nikon learned from the D800e, they pulled the filter out of the D810 entirely – and the D850, Z7, Z7 II and Z9 have all continued to omit it.
The current status of anti-aliasing filters is that the higher the resolution and pixel density of the camera, the less likely it is to include one – leading to a bit more of a sharpness boost than expected around 25-30 mp, where the transition takes place. Almost all 24 mp full-frame cameras have an anti-aliasing filter. A lot of 24 mp APS-C cameras, which have higher pixel densities, do not. Most full-frame pixel monsters (anything above ~40 mp) do not have an anti-aliasing filter, although the EOS-R5 does. No X-Trans camera uses an anti-aliasing filter, as Fujifilm claims that the X-Trans color filter breaks up repeating patterns enough that it’s not necessary, plus most recent models have enough pixel density (>24 mp on an APS-C sensor) that many Bayer-filtered cameras would also exclude the anti-aliasing filter. As far as I know, no recent medium-format camera has featured an anti-aliasing filter.
If you either want a camera with an anti-aliasing filter (you photograph a lot of patterned subjects, especially fabrics) or you want one without a filter (you care about maximum detail, and have very sharp lenses), these guidelines will tell you where to start – research individual cameras you are interested in. As a landscape photographer, I personally prefer no anti-aliasing filter, and haven’t owned a camera with one in years. I’ve seen very few moiré patterns in the type of work I do.. It is easy to find cameras with whatever configuration you want for your style of photography (although not every brand offers every permutation of resolution and filtration – it may be hard to find a Nikon with a filter, or a Canon without).
Medium format sensors have rarely used anti-aliasing filters, although a few older digital backs actually had removable filters. Use the filter when photographing fabric (a notorious source of moiré patterns), but take it off to photograph landscapes. Modern medium format sensors are high enough resolution that all manufacturers I know of leave the filter off. Below medium format, removable filters are vanishingly rare – did one or two cameras use one in the earliest days of full frame? Pentax uses the image stabilizer to simulate a low-pass filter in one or two models, and that can be turned off. Beyond that, the decision of the manufacturer is final.
Microlenses
The last standard item in the filter stack is a layer of microlenses. The primary function of microlenses is to concentrate the light hitting the sensor on the light-sensitive photodiodes. Only a certain portion of each pixel on the sensor is sensitive to light – there is wiring and other circuitry between the photodiodes, even on modern BSI sensors. BSI (Back-side Illuminated) is confusingly named – what it means is that the light hits the sensor from the side opposite most of the wiring and auxiliary circuitry (to me, that seems like it should be the front side – but it doesn’t to a chip designer). Illuminating the sensor from the side opposite the wiring helps more of the light to strike a photodiode, but there is still a good deal of space between them. Microlenses sit on each pixel and concentrate the light on the photodiode, and at their most basic, that’s all they do. At least essentially every modern digital camera uses a microlens array (there may be an exception or two) – and, if you only use lenses designed for digital and don’t use shift movements, the primary effect of microlenses is to increase light gathering efficiency.
For many of us, that’s where the story of microlenses ends – they get us a stop or two of extra light, without turning up the gain and increasing noise. Their negative effect on image quality is very minor (they have a slight effect on purple fringing, much more noticeable on older cameras). Where microlenses become more challenging is when the light is hitting the sensor at a steep angle near the edges of the image. Light that hits the microlens at a steep angle can reflect off and not register, or it can end up in an adjacent pixel, causing color casts because the adjacent pixel will be filtered to a different color by the Bayer (or equivalent) filter.
It’s rarely a problem with telephoto or even normal lenses, because those lenses naturally send the light to the sensor in a fairly parallel pattern where each photon will strike the microlens more or less perpendicular to the sensor. . Wide-angle lenses can be designed to do the same thing – “designed for digital” lenses are often complex wide-angles (and zooms with some or all of their range in the wide realm)that have fairly parallel rear projection. They use a retrofocus or reverse-telephoto design where the lens is physically much longer than the focal length. SLR wide-angles have to be retrofocus, because the rear element of a simpler design would have to be too close to the sensor (or film) – inside the mirror box. Simple non-retrofocus wide angle lenses work on cameras without a mirror – except that they have the dreaded steep angles that cause problems with digital sensors. Most mirrorless cameras are relatively new – and lens manufacturers just make retrofocus lenses (with more design freedom than they did for SLRs, because the mounts are wider and there’s no mirror).
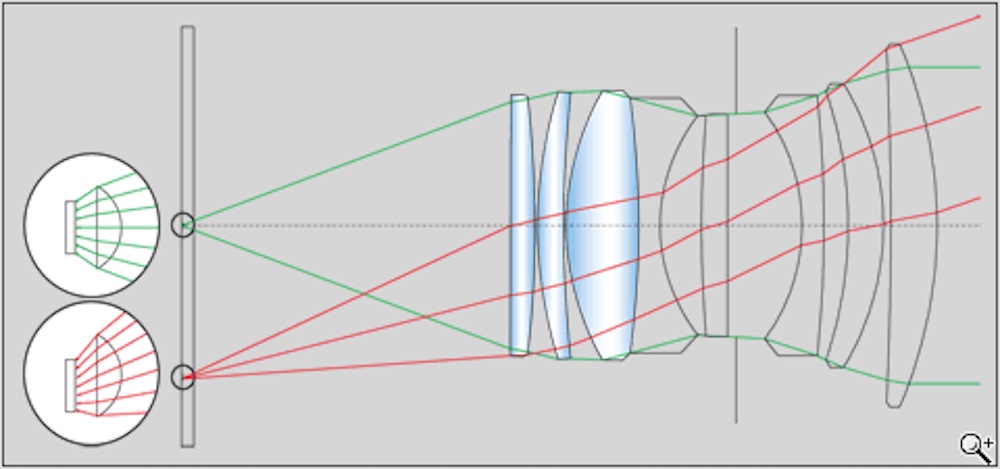
The problem comes in with digital cameras that use pre-digital lenses – hello Leica, I’m looking at you. Most Leica M lenses are pre-digital designs, and there’s no mirror, so they use short back focus distances and steep rear projection. Even newer M lenses are often updates of old classics, and they are designed to be compact (eliminating highly corrected retrofocus designs with a lot of elements). In order to compensate, Leica often uses microlenses that are not identical across the sensor. Close to the center of the sensor, they are parallel to the pixels (the usual design), while the lenses at the edges of the sensor are slightly offset to capture light coming in at an angle. There are very few telephoto lenses for Leica M cameras, so the offsetmicrolenses don’t adversely affect other lenses. Other cameras using Leica M lenses (and other older lenses) on adapters don’t use offset microlenses, and often have issues with color fringing or vignetting at the edges of the frame. Most cameras don’t have the freedom to tilt the microlenses, because most modern lenses are designed with much more perpendicular ray angles, where offset microlenses would be counterproductive.
Even more extreme than Leica M lenses, tilt/shift lenses can interact oddly with microlenses – the light rays from a tilted or shifted lens come in far from perpendicular to the sensor. Many tilt/shift lenses have a great deal of color fringing and/or vignetting when tilted or shifted, and photographers using movements on technical cameras with digital backs have generally had to take a reference image of a white surface with the same lens settings as the actual image, so they can subtract the distortion. Phase One claims that their relatively new IQ4 150 back/XT camera combination works with movements and without a reference image, at least in many circumstances.
I have never seen a clear indication of how they do that, but it is likely that the camera/back combination’s unique ability to record the position of the shifted lens in metadata and pass it to Capture One (another Phase One product) allows them to employ correction profiles without needing to create reference images every time. Tilt/shift lenses for DSLRs also manage to avoid reference images much of the time (although they are vulnerable to fringing and vignetting) – can they moderate the effects enough to correct them without a reference image this due to their relatively long back focal distances? DSLRs also tend to have less trouble with steep angles in older lens designs than mirrorless cameras or rangefinders, and that is due to the longer back focus distance. So far, there is no major manufacturer tilt/shift lens designed for any mirrorless system – although Fujifilm has not one but two coming soon for GFX. It will be interesting to see how the upcoming GF lenses do with fringing and vignetting. Fujifilm could easily do what Phase One has with electronic communication, but they don’t also write the raw conversion software, so it would be up to Adobe, Phase One (due to Capture One) and DxO to use the correction data the lenses might provide.
Phase detection pixels
There is one final feature of the sensor stack that can show up in images, and that is the pixels used for phase-detection autofocus. Phase-detection pixels are no different from any other pixel on the sensor, but they have prisms facing in different directions over them in the filter stack. They work essentially like a split-image rangefinder in a manual-focus camera, where the AF system can “see” how far lines crossing adjacent pixel groups with different prism orientations are split by, and know how much to move the lens to bring them into alignment. There are not enough phase detection pixels on any sensor to materially affect resolution, but they need to be compensated for as the file is processed (even a raw file receives limited processing, and one thing that should be done is to compensate for the phase detection pixels with data from surrounding pixels). Done right, it should be impossible to see the phase detection pixels in the final image, but it is sometimes done wrong, with the phase detection pixels showing up as horizontal banding, especially in deep shadows and in areas of little contrast, and on images with a lot of shadow recovery. Some cameras have PDAF banding, some don’t, and it can often be fixed in firmware (the original GFX 100 had it, the GFX 100s never has, and a later firmware version fixed it on the original GFX 100).
Beyond the Sensor – the rest of the camera body
There are a few features of the camera body that are not directly in the optical path but contribute to image quality. Most of what the camera does contributes to capturing the image, rather than to its ultimate quality. Again, this is assuming that what we are taking out of the camera is a raw file – an in-camera jpeg relies very heavily on image processing within the camera.
The film-era saying that a camera is merely a light-tight box doesn’t quite hold true of a digital camera, even if we put the sensor and its toppings into the category of “film” instead of camera. The shutter can directly affect the image, in ways that it didn’t in film photography (and also in ways that meant that a reflex camera actually wasn’t just a light-tight box in the film era). No film camera ever featured an in-body image stabilizer, and stabilization has a major effect on image quality – generally, but not always, positive. Finally, the very high resolutions of modern digital cameras mean that the tolerances needed in the light-tight box are tighter than they’ve ever been, and tiny misalignments are more important than ever.
In the “it needs to be a really good light-tight box” category is mount alignment. With the high resolution of modern sensors, the distance from lens to sensor needs to be exactly correct, and the mount needs to be exactly parallel. That’s always been true, but the smaller and higher resolution the film or image sensor is, the more critical it is. Large-format lensboards are generally not incredibly precise, and neither are film holders, but the physical size of the film covers up a lot of error. The resolution per square millimeter of large-format film is often terrible, but there are a lot of square millimeters. 8×10” film has more than 50 times the area of 35mm, but usually gets more like 20 or 30 times the detail, although some very precise monorail cameras (with certain lenses and specialty film holders) are a partial exception. 40 mp APS-C doesn’t give you that luxury – you’re trying to cram a lot of detail into not very much area. A lot of attention has been paid to sample variation in lenses, where elements may not be exactly parallel or centered, while much less attention has been paid to the same thing happening in camera bodies.
LensRentals went through their inventory at one point and were surprised how many cameras had mounts that were just a little bit “out”. Admittedly, LensRentals’ cameras see a lot of use, and some very hard use, including people renting cameras they also own, so their own camera doesn’t end up on a risky shoot (see LensRentals’ annual “please don’t take our cameras to Burning Man” blog post). The problem gets worse when you start adding lens mounts – your Nikon FTZ mount adapter is probably the right length, and it’s probably darned close to parallel – but what about that eBay adapter that puts treasured old Zeiss Contax lenses on your mirrorless camera? It’s more likely to be a bit out of spec than the Nikon (or Canon) adapter is… The best situation (other than no adapters) is a camera, lens and adapter all made by one company – they know everything about what they’re trying to adapt, and they have a huge incentive to get it right. I’ve used the Nikon FTZ extensively without problems, and I strongly suspect the various Canon EF to RF adapters are also excellent. Another “probably excellent” combination is the various Sigma mount converters – Sigma lens and converter to Sony (or L-mount) body. Sigma made a lot of the gear, and they have a strong reputation to protect.
On the other end of the spectrum, an adapter that is only available through eBay, Kickstarter or Amazon Marketplace (all of which function as elaborate liability shields for fly-by-night manufacturers) from a brand you’ve never heard of is much riskier. At the extreme, a rig with a mount adapter, an extension tube and a teleconverter has no less than four lens mounts – what are the chances that they are ALL perfect? Any adapter that has glass in it (a teleconverter is the most common example, but a Speed Booster is just a reverse teleconverter) also functions as a lens, and the quality of that extra lens affects the quality of the image. Even without lenses altering the magnification, an adapter with something like a variable neutral density filter in it adds optics, and even one containing only an aperture diaphragm (often seen in manual adapters for electronic lenses) is adding something new to the optical path.
The Shutter
In the film era, most photographers didn’t necessarily think much about the impact of the shutter on image quality (unless they shot a Pentax 67), but it was there. Digital has made it more obvious, because the resolution of a modern digital sensor per unit area is so much higher than any film. If we take an APS-C sensor and a 6×9 cm film frame as an example, the APS-C sensor has an area of 384 mm2, while the film has an area of 4704 mm2. They are capturing a similar amount of image detail, but the digital sensor is doing it in less than 10% of the area. A tiny vibration is going to affect the digital image much more. Some film cameras had enough “shutter shock” (vibration caused by the movement of a focal plane shutter) and “mirror slap” (vibration caused by the movement of the mirror in a SLR) to affect even the relatively low-resolution film. The Pentax 67 had a huge focal plane shutter and an equally enormous mirror, and it had recoil from both causes more befitting a rifle than a camera. Early models didn’t have a mirror lock-up, and were nearly impossible to keep steady, whether handheld or on a tripod. Once the mirror lock-up was added, best practice was to use mirror lock-up on every image – fortunately, it is a big, heavy camera that usually lived on a tripod and was rarely used for fast action (it also had the slowest flash sync ever seen until some electronic shutters beat its dubious record of 1/30 second). A lot of Pentax 67 shooters loved to use it on wooden tripods, because wood helped absorb the shutter shock.
By the digital era, mirrors were better damped, and shutters were less shock-prone than in the Pentax 67’s heyday. Sensors are so much higher resolution per unit area that the issues can show up even if you don’t feel the camera jump in your hand. The highest-resolution DSLRs generally had a feature called mirror prefire or mirror delay, where the mirror was released a fraction of a second before the shutter. It was usable even handheld, although it increased viewfinder blackout significantly (by definition). The highest resolution DSLR I have ever used extensively was a Nikon D800e, and I set mirror prefire to 0.2 second even handheld (I’d use even longer delays or a true mirror lock-up on a tripod). Almost all high-resolution DSLRs have mirror prefire options, and they’re essential for best performance. Most cameras we’re using today, and the vast majority of those we’re buying new don’t have movable mirrors, which is an enormous advantage from a vibration viewpoint, and it also increases autofocus precision. The only DSLRs I can think of that many LuLa readers might buy new are the Nikon D850 and a few medium format models from Hasselblad and Phase One. Canon is discontinuing DSLRs at a rapid pace, Sony has already discontinued their last model, and the D850 is by far Nikon’s most interesting model for more contemplative photography.
Mirror slap tended to obscure the effects of shutter shock, but small, light, high-resolution mirrorless cameras are affected by vibration from the shutter mechanism itself (early models in the Sony A7r series are notorious for an underdamped shutter). Shutter shock shows up at a particular range of shutter speeds – it depends on the camera, but the worst of it is often between 1/30 and 1/250 second or so. It’s worse with long lenses, because everything is magnified. It’s worse the bigger (and less damped) the shutter is compared to the size of the camera. DSLRs also have shutter shock, but they tend to be bigger and heavier, and, unless you are using mirror prefire or lockup, the mirror adds more vibration than the shutter. The original A7r was probably the poster child for shutter shock, for a number of reasons…
The old A7r is about the smallest and lightest full-frame digital camera ever made. It’s only 65% the weight of its newest descendent, the A7r V – people forget how tiny it was. Much of the weight was added going from the 465 gram A7r to the 625 gram A7r II, then the A7r III added another 50 grams of battery, the A7r IV was darned near identical to the A7r III, and the A7r V has bulked up by another 50 grams to 723. For perspective, most higher-end APS-C cameras and even many Micro 43 cameras are heavier than the old A7r. Every APS-C Fujifilm APS-C flagship after the X-T1 is heavier than the original A7r – the X-T4 weighs 607 grams. The A7r V is actually much closer in weight to current medium format mirrorless cameras than it is to its own predecessor (the GFX 100s is 177 grams heavier than the A7r V, while the Hasselblad X2D is 172 grams heavier, while the A7r V is 258 grams heavier than the original). The reason I say “about the smallest and lightest…” is that the Sigma fp and fp L are smaller and lighter than the original A7r, but they removed the viewfinder and even the shutter to get there.
In addition to its small size and light weight, the old A7r lacked a critically important feature for eliminating shutter shock. Almost every high-resolution camera since then has featured an electronic shutter as an option, and that allows for electronic first-curtain shutter. Full electronic shutter has a lot of disadvantages, and is really only viable for most purposes on the newest stacked-sensor cameras, but electronic first-curtain shutter (the mechanical shutter opens, then the sensor is electronically fired, then the mechanical shutter closes to end the exposure) combines the advantages of electronic and mechanical shutter. It doesn’t have the negative dynamic range, rolling shutter or flash sync impacts of full electronic shutter, but it eliminates most of the vibration of mechanical shutter. The shutter still vibrates, but it vibrates as it ENDS the exposure – AFTER the picture is taken!
My take on electronic first-curtain shutter is ”if your camera has it, use it” (most do). It almost completely eliminates shutter shock (the “almost” is that in really fast sequences, the vibration from ending ONE exposure can affect the NEXT exposure. Electronic first-curtain shutter also doesn’t allow the fastest shutter speeds, but many modern cameras have a useful “hybrid shutter” mode, where the camera uses electronic first-curtain if possible, then uses mechanical shutter at the fastest speeds (where the shutter opens and closes too fast to be affected by vibrations anyway). If you have hybrid shutter, just leave it on all the time – I haven’t found a disadvantage yet. If you have electronic first-curtain, but not hybrid shutter, it’s worth remembering to keep it on unless you need speeds in excess of 1/2000 second or so.
Fully electronic shutter is a novelty mode on most cameras so far, but it’s going to become more and more common as sensors get faster. On stacked-sensor cameras, the sensor readout is fast enough that fully electronic shutter is more than a novelty. The Nikon Z9 has one of the quickest readouts around, and depends entirely on its electronic shutter – the mechanical “shutter” is only a protective curtain. Other stacked-sensor cameras like the Sony A1 and A9, Canon EOS-R3, Fujifilm X-H2S and OM System OM-1 can also use the electronic shutter full-time with very few disadvantages, but they retain a mechanical shutter as an option. Sigma’s odd fp and fp L use slow, non-stacked sensors, but they forgot the mechanical shutter (they are the cameras that took over the Pentax 67 Award for uselessly slow flash sync – 1/15 second). The advantages of electronic shutter are that there is no vibration at all, it can be very precise since there are no moving parts, and shutter speeds can get incredibly fast (the fastest I’ve seen is 1/180,000 second) because you can scan the sensor as little as one line at a time (mechanical shutters are limited both as to how fast they can move and how narrow the slit scanning the sensor can get). Most electronic shutters aren’t actually all that fast – they get very high speeds by scanning with a really narrow slit, but it still takes quite a while to scan the whole sensor. Every high-speed shutter scans to get its highest speeds – the fastest speed where the leading blade fully clears the sensor before the trailing blade starts its travel (the flash sync speed – since the flash has to fire when the shutter is fully open) is 1/400 second on the Sony A1. Most cameras are around 1/200 or 1/250, while medium format cameras (unless they use leaf shutters in the lenses) are down around 1/90 or 1/125 with their larger shutters. Electronic shutters often only fully open at 1/30 second or slower, except for the stacked sensors, which are comparable to mechanical shutters. There are two huge disadvantages to the very slow fully open times/sync speeds. The first is that electronic shutter flash sync is usually very slow, and is disabled on a lot of cameras (attaching the flash forces the mechanical shutter on). The poor Sigmas that don’t have a mechanical shutter just use a 1/15 second flash sync. The second is all sorts of motion artifacts that happen as the shutter scans the frame. If you fire a mechanical shutter at 1/4000 second, the trailing blade will start shortly after the leading blade, and the sensor will be illuminated one part at a time by the slit between them – but the whole exposure will be complete in about 1/250 second.

If you fire a very slow electronic shutter at 1/4000 second, the shutter will start to turn off almost immediately after it starts to turn on, causing a very narrow slit (perhaps only a few lines of pixels wide) to be on at any given time. That narrow slit will take 1/15 or 1/30 second to expose the whole frame, instead of 1/250 second or so. Each pixel still gets an exposure of 1/4000 second, but the whole frame takes much longer to be completed. Motion will still be stopped on the pixel level (no blur), but objects may well have moved between the beginning and the end of the exposure, causing odd leaning and curving artifacts on vertical detail (rolling shutter). Wheels will be egg-shaped, because they weren’t in the same place when the exposure began and ended. Vertical lines on a moving object will lean, since the top of the line was captured in a different place from the bottom of the line. Things like fans and propellors will be curved, since they are rotating while being scanned. Flickering lights will cause strange banding, since one part of the frame is captured with the light bright, and another part is captured with the light dim. This can all theoretically happen with a mechanical shutter that is also scanning the frame one part at a time, but mechanical shutters are fast enough that it’s rarely noticeable (airplane propellors are one thing that can can spin fast enough to show curvature even with a fast mechanical shutter). Fast electronic shutters as found on stacked-sensor cameras are like mechanical shutters in this regard – rolling shutter CAN happen, but rarely does, because the scan rate is fast enough.
Image Stabilization
The last thing in the camera body that actually affects the captured image is the image stabilizer. Modern image stabilizers are little short of amazing – pixel-sharp handheld images are possible at 1/10 of a second or so with a moderate focal length lens, even on a very high resolution sensor. Images that are sharp enough for some purposes are possible much slower than that, even at half a second and sometimes a full second or longer with the right combination of camera, lens and subject. Several things have changed for the better from the early days of image stabilization. First, you now rarely need to turn the stabilizer off. The early models would go crazy if left on while on a tripod. It wouldn’t hurt the camera, but it would actually blur the image. With current stabilizers, you actually want them on if you’re using a tripod with the head unlocked (birding or sports photography, for example). If you have the tripod fully locked down (contemplative landscape, product photography, architecture), there’s no reason to have the stabilizer on, but not a lot of reason to turn it off, either – modern stabilizers have gotten very good at getting out of the way when not needed. In a similar vein, many modern stabilization systems have a mode that automatically detects whether or not you’re trying to pan. There are still panning and non-panning modes, but there’s also an auto mode, and they’re getting better all the time.

Image stabilization has gotten so good that subject motion has become much more of an issue than it was ten years ago. Handheld shutter speeds to defeat camera motion were generally high enough to stop most (non-obvious) subject motion as well. If you were always shooting at 1/125 or 1/250 second, the only things moving fast enough to be a problem in the image were OBVIOUSLY moving, and could be accounted for. Shooting at 1/10 second, many things we didn’t really think of as moving are. Wind is a classic example – it doesn’t take much of a breeze to induce subject motion at a shutter speed that a modern image stabilizer is perfectly capable of handling. Shutter speeds for birds in flight are still as high as they ever were, because subject motion often requires 1/500 second or so.
Exposure and White Balance
Tools like autofocus, exposure and white balance keep getting better. They aren’t directly in the imaging pipeline, because you could have set the same thing by hand and come up with the same final image. 1/250 at f8 is 1/250 at f8, whether guessed or chosen by an evaluative meter. The biggest challenge with the excellent automatic systems is preserving creative choice. I almost always leave my cameras set on single-point focus, except when photographing wildlife. I’m perfectly willing to let the camera measure the distance and set the lens – that’s purely a mechanical function. On the other hand, I want to pick the focal point in the image myself, because that’s a creative decision. My setting to accomplish both of these goals is single-point AF, moving the focal point with the joystick. A decade ago, that setting wouldn’t have been possible, because there was a good chance that no focus point covered the part of the frame I wanted to focus on. Essentially every modern mirrorless camera has enough focus points spread out across the frame in such a way that you can focus anywhere.
I always use automatic white balance, and I always rebalance in post-processing. The automatic system isn’t perfect, and I pretty much never keep its recommendation exactly, but it’s almost always close enough for a starting point. The days of wacky white balance where the camera’s interpretation would have a strong green or magenta cast that made it almost impossible to see what was really there in the image are gone. The case where it may make sense to use a preset or manual white balance to get closer to the final image is if you’re actually using the jpeg for anything. I shoot raw plus jpeg, but only to have a preview in choosing what images to process farther. Any image that goes anywhere is an export from an edited raw file, not an out-of-camera jpeg. If your workflow is different in that regard, you might well want to handle white balance differently. White balance is different from exposure or focus in that it doesn’t actually affect the image captured – it’s strictly a setting that affects how the jpeg is created in camera.
If you overexpose an image by five stops, highlights are likely to clip, and some information won’t be captured. With many modern cameras, that’s actually not true of underexposure in a particular sense. Cameras do this automatically in extended DR or HDR mode, but it’s also possible to do manually with more control. What you (or the camera) is doing is exposing to keep the highlights from clipping, then brightening the shadows. With a so-called ISO-less sensor (often Sony and Sony-related designs), you get the same shadow information by exposing at 1/60 at f8, ISO 400 and then pulling the exposure up three stops in post-processing as you do by exposing at 1/60 at f8, ISO 3200. The higher ISO isn’t actually changing the sensor gain – it’s simply saying “shift the displayed image three stops to the right”. What you can do instead of pulling the exposure up three stops (which is what setting the ISO to 3200 would have done) is pull only the shadows (or any combination of shadows and midtones you want) up by three stops. You can also decide to pull the shadows up by the full three stops, and certain midtones up by a stop and a half, for example.
Of course (and this is important), you DO get different shadows by shooting at 1/60 second at f2.8 at ISO 400– that actually adds three stops of light, while changing the ISO doesn’t add any light. There IS a catch – many cameras have dual gain. Most ISOs are simply a value that tells the camera how to display the image, but there is one ISO value that inserts an extra amplifier and actually changes the captured data. The way to find out where the dual gain value is on your particular camera is to look at the dynamic range curve on Photons to Photos.
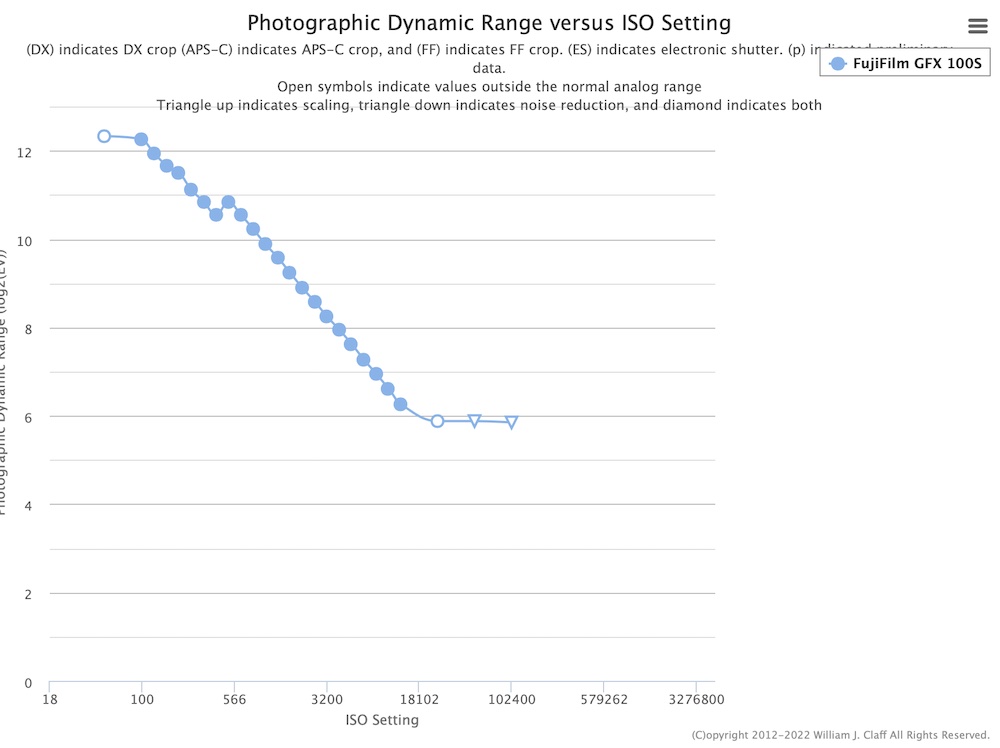
There will be an ISO value where the dynamic range “jumps” – a fully ISO-less sensor would be a single 45-degree line, while many real-world cameras have two lines with a jump between them. Once you’ve found the jump, you know your camera’s two true ISOs. One is the base or low extended ISO where dynamic range is greatest (on the example chart below, it’s 50 or 100 – they’re so close that which one doesn’t matter). The second is the ISO where dynamic range jumps (ISO 500 here) – that’s a value where an extra amplifier gives a bit more shadow detail (at the cost of some noise).
There’s an (even) geekier chart that shows the shadow improvement directly – it’s called the Photographic Dynamic Range Shadow Improvement chart. Looking at this chart for the same camera, we can see that the lower ISOs almost don’t matter (there’s a tiny difference of about 1/3 stop from ISO 100 to ISO 400, so you’ll get about 1/3 stop more in the shadows by shooting at ISO 400 than you would by shooting at ISO 100 underexposed two stops and brightening (you will lose highlight protection by shooting at ISO 400, so there’s a tradeoff). There’s a big jump in the shadows from ISO 400 to 500, then nothing at all. ISO 500 wildly underexposed, then brightened, has exactly the same shadows as ISO 12800 correctly exposed.
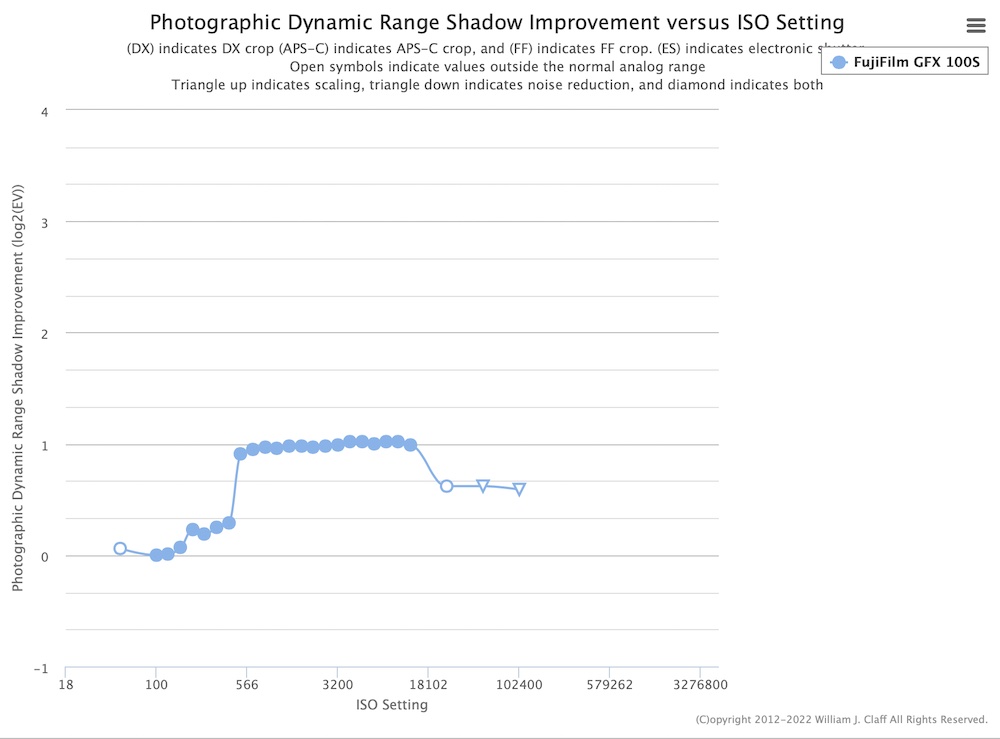
There’s actually an advantage to shooting at a lower ISO underexposed, rather than at a higher ISO correctly exposed (with the same amount of exposure). As long as you don’t cross the jump (or any jumps on cameras with more than one), you don’t gain anything in the shadows by using a higher ISO and the same exposure. You have more dynamic range at the lower ISO, so you can keep the highlights in, then brighten only the shadows later. Of course the disadvantage is that you can’t see anything in the viewfinder if you are five or six stops underexposed. Once you know where your camera’s highest true ISO is (on mine, it’s ISO 500), don’t be afraid to protect your highlights by shooting a couple of stops underexposed instead of using the ISO the meter indicates if it would help the highlights – you can brighten those shadows afterwards. There’s actually no reason on this camera not to shoot a scene that should use ISO 12800 at ISO 500 with the same exposure (4 2/3 stops underexposed), except the viewfinder and the jpeg. In most cases, there isn’t a highlight so bright that you need to go THAT far, unless the sun’s in the frame – but a couple of stops can be helpful, and most modern cameras will take a couple of stops easily…
What you don’t want to do is to shoot underexposed at the SAME ISO – that actually denies light to the shadows. Shooting underexposed instead of raising the ISO is effectively shooting at a better version (highlights) of the ISO you’d have used, but it’s NOT equivalent to shooting correctly exposed at the lower ISO. If you have a choice of 1/100 second at f8 at ISO 100 or 1/400 second at f8 at ISO 100 two stops under, the 1/100 second exposure will have better shadow detail. If you HAVE to use 1/400 due to subject motion, and f8 is fixed due to depth of field, you may want to set ISO 100 and shoot two stops under, rather than setting ISO 400 and shooting correctly exposed. It’s still going to be an ISO 400 shot in the shadows (but with highlight protection), not the ISO 100 shot the full exposure would have given. This is how “extended DR” settings on cameras work – they shoot a couple of ISO steps lower than indicated, then brighten the shadows while leaving the highlights alone. Shooting a lower ISO underexposed is equivalent to “extended DR” mode, except that the creative control remains in the photographer’s hands.
HDR settings on cameras and phones are different, in that they actually shoot multiple images at different exposures and (sometimes) combine them in camera. Phones, with their fast processors and low resolutions, can do this seamlessly enough that the photographer doesn’t notice, and can compensate for motion. A few Olympus/OM System cameras can almost do the phone version of HDR, combining handheld images with an AI algorithm, while most other cameras that feature an HDR mode are tripod-only, or are more restricted in how they combine images. Even the OM cameras noticeably take multiple shots, and it’s a special mode – it’s not iPhone kind of seamless, where it’s just slipped in (and it probably shouldn’t be) It is interesting that Micro 4/3, with fundamental image quality that lags most other camera systems, is the first system to use phone-style computational photography to try and make up for it.
30,000 words or so later, we’ve covered most of the factors that affect image quality in the raw files from a DSLR or mirrorless camera – well, the ones in the camera body, anyway. Lenses next, and quite a bit has changed there in the past decade and a half. The still current AF-S Nikkor 50mm f1.4G (introduced in 2008) was a well regarded normal lens before the most recent wave of lenses came along. Eight elements in seven groups, modified double-Gauss design with one ED element… One of the latest, and one of the best “classic” 50mm lenses… The next fast 50 Nikon designed was the 50mm f1.2S for the Z mount – 17 elements in 15 groups, nothing vaguely symmetrical about it… It has three aspherical and two ED elements, along with multiple elements with exotic coatings. Even the Z-mount 50mm f1.8S, a slower lens, is much more complex than the old 50mm f1.4, and a much better performer.


Dan Wells
December 2022


Elevate Your Vision


Read this story and all the best stories on The Luminous Landscape
The author has made this story available to Luminous Landscape members only. Upgrade to get instant access to this story and other benefits available only to members.
Why choose us?
Luminous-Landscape is a membership site. Our website contains over 5300 articles on almost every topic, camera, lens and printer you can imagine. Our membership model is simple, just $2 a month ($24.00 USD a year). This $24 gains you access to a wealth of information including all our past and future video tutorials on such topics as Lightroom, Capture One, Printing, file management and dozens of interviews and travel videos.
- New Articles every few days
- All original content found nowhere else on the web
- No Pop Up Google Sense ads – Our advertisers are photo related
- Download/stream video to any device
- NEW videos monthly
- Top well-known photographer contributors
- Posts from industry leaders
- Speciality Photography Workshops
- Mobile device scalable
- Exclusive video interviews
- Special vendor offers for members
- Hands On Product reviews
- FREE – User Forum. One of the most read user forums on the internet
- Access to our community Buy and Sell pages; for members only.
You may also like


