The world’s of still photography and film making (video) and are quite separate artistic activities, yet they are very close in some of their tools and techniques. But unless a still photographer also has an interest in creating video content these world’s seldom intersect.
For most photographers producing video means acquiring a video camera, editing software, and the like, and then proceeding on a track either parallel to ones photography, or even one that veers off in an alternate direction. But that needn’t be the case. Virtually all photographers today have all the tools needed to create remarkable videos from their existing still photographs. These include a computer, a CD or DVD burner, a television set and a DVD player. The only thing that’s missing is a very inexpensive and easy to use software program calledPhoto to Movie.
___________________________________________________________________
Then
My first gallery exhibition was during my university days, back in the mid-’60s. I had been participating in and photographing"Ban-the-Bomb"marches in Montreal during a long, hot summer, and when a gallery owner saw my work I was invited to have a one man show. it was the gallery’s first photographic exhibition– a rarity in the ’60s, and quite an ego trip for someone barely out of their teens.
A producer for theCanadian Broadcasting Corporationattended the show and the images from it were subsequently turned into a half hour documentary film. The technique that was used was to film large prints using two studio video cameras, zooming, dissolving and cutting between cameras, "live" to tape. This was quite a few years before the "Ken Burns" style of film making came on the scene and then became a popularized method of bringing still images, especially historical ones, to the screen.
I recall that the process of shooting the prints, sequencing them, animating motions, and then getting it right was quite tedious. I sat in on much of the production process. To produce a 21 minute documentary from several hundred prints took a couple of weeks. Today the process is dramatically easier and faster. Instead of filming prints we work with our already digitized files, whether digital originals or film scans.
___________________________________________________________________
Now
There are any number of inexpensive programs for producing video slide shows. Many of the popular DVD burning programs include such capability. But, most are limited to simply sequencing one image after the other and including a simple transition effect between then, such as a dissolve. This gets pretty boring to watch after a while. High-end video editing programs such asFinal Cut Proprovide complete flexibility in importing still images, enlarging them, and creating transitions, but it’s tedious work and the program is quite expensive. Few photographers will buy a professional non linear editing program for $500 to $1,500 just to create some animated stills. And specialized programs like Apple’sMotionprovide wondrous capabilities, but are also expensive, and difficult to learn.
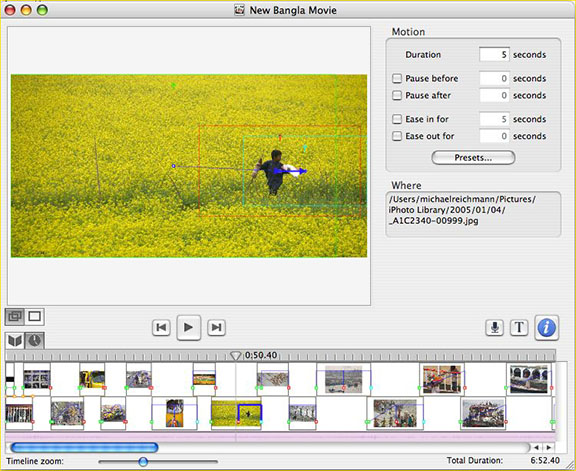
Figure 1
There’s a simpler way, and one that’s a lot less expensive than using a high-end video editing program. It’s calledPhoto to MoviefromLQGraphics.At just $49.95, it is available for both Macs and PCs, and with a downloadable demo version available, this is quite possibly the easiest and least expensive way to animate still images for video output. But, just because it is neither expensive and nor difficult to use doesn’t mean that it’s simplistic or limited in its capabilities. Indeed it is capable of producing animations of still images that rival those from some of the more expensive NLE programs.
In Figure 1above we see the program’s primary screen. It has two main sections; the edit window at top left, and the timeline along the bottom. One simply opens a Windows or Mac file browser window and drags images onto the edit window. You can even use Adobe Bridge.Photo to Moviewill automatically scale them as needed, so no fussing with resolution and file sizes needs to be done. These files can be in any of the major file formats, including Photoshop .PSD files, so no time needs to be wasted scaling, resizing or converting files prior to use withinPhoto to Movie.
Photo to Movieworks with the concept ofKey Frames. AKey Framein this case is simply a starting point from which a motion begins. So, by way of example, you’ll see inFigure 2below that a green frame has been drawn around the entire image, except for the extreeme right hand side. Within this there is a red frame and then partially within that another blue-greenKey Frame. These coloured frames are placed on the image automatically by the software, and new ones are added as you need them. You are free to place them and size them and sequence them as you wish.
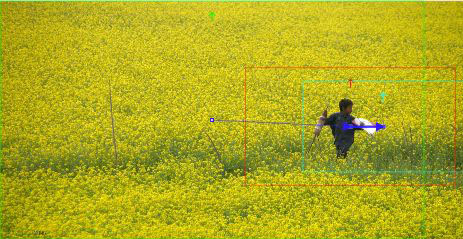
Figure 2
By placing theseKey Framesas illustrated above I have told the program that I want the sequence on this image to start with a wide shot of almost the whole picture (the big green frame) and then to zoom in and pan over to the area covered by the red rectangle. Once it reaches there and the red rectangle outlined area is now full-frame I want it to pan and zoom into the area covered by the smaller blue-green rectangle.
To the right of the Edit Window you see an area where you can specify the length of the total time spent on this image as well as how long you want the time betweenKey Framesto be. So, if you wanted a fast zoom-in between the green and the red, you could set it to 2 seconds, and then you could set a slower motion for the transition between the red and the blue-green. You can also specify whether the program should pause at the end of each motion and the beginning of the next one.
In addition to making these settings, and also how many key frames there may be on a single image, you can also set the type of transition between images. This can be a range of the usual effects including cuts, dissolves and fades, as well as a number of somewhat gimmicky special effects.
One control element that adds considerable sophistication to the program is the availability of Bezier curves rather than simply linear movements as the image is panned.
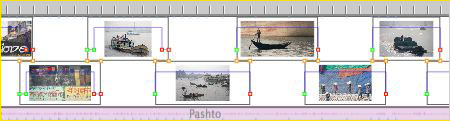
Figure 3
All of the timings can be controlled graphically on the Timeline as well. The Timeline shows not only the sequence of images that you have created but also the ways in which they are linked, the transitions, and the Key Frames. By grabbing the handles you can alter these settings in the same way as setting them numerically in the tabbed Settings window at top right.
You can also add a sound track. This can be as simple as dragging and dropping a music track fromItunes, or any MP3 file that happens to be residing on your hand disk. As long as you aren’t going to be displaying your "movie" commercially you can use whatever music you like from your favourite artist or composer. If you wish you can even plug a microphone into your computer and record avoice-overdirectly to the sound track.
Finally, the can create titles within the program and animate them as well. This means that other than your original digital photographs, nothing more is needed for you to create attractive, even professional grade videos of your images.
___________________________________________________________________
Formats & Sizes
As mentioned above,Photo to Moviecan accept a wide range of photographic file formats and image sizes. If you wish to do extreeme movements, you’ll want to use as high res a file as possible. The program lets you crop or zoom down to 100% pixel size. Thus, the higher res the image that you import the greater the detail and magnification possible.
Output is toQuicktimeformat, and can range from a tiny e-mail or web suitable size all the way up to 1080 Hi-Def. These are then usable as stand-alone files, or, if you’re planning a more ambitious production, can be imported into almost any non linear editing system for integration into a larger project.
This is quite exciting. It means that for $50, along with your existing images and some creative work, you can produce video that will be usable on aBlu-RayorHD-DVDwhen they become a reality in 2006. Of course these can be output today to standard-definition NTSC or PAL video to be put on a normal DVD.
Do be aware of size issues though. For example, a 13 second-long test clip that I’m working on as I write this, exports to a 1.1 Megabyte file at e-mail suitable size. But, that same 13 second clip exports to a 172 Megabyte file when set to High Def video output. That’s 13 Megabytes / second. Rendering times can also be quite long at large sizes and lengths, so as with all contemporary AV projects, the faster the computer and the bigger the hard disk used, the happier you’ll be.
The bottom line?Photo to MoviefromLQGraphicsis highly recommended!
September – 2005


Elevate Your Vision


Read this story and all the best stories on The Luminous Landscape
The author has made this story available to Luminous Landscape members only. Upgrade to get instant access to this story and other benefits available only to members.
Why choose us?
Luminous-Landscape is a membership site. Our website contains over 5300 articles on almost every topic, camera, lens and printer you can imagine. Our membership model is simple, just $2 a month ($24.00 USD a year). This $24 gains you access to a wealth of information including all our past and future video tutorials on such topics as Lightroom, Capture One, Printing, file management and dozens of interviews and travel videos.
- New Articles every few days
- All original content found nowhere else on the web
- No Pop Up Google Sense ads – Our advertisers are photo related
- Download/stream video to any device
- NEW videos monthly
- Top well-known photographer contributors
- Posts from industry leaders
- Speciality Photography Workshops
- Mobile device scalable
- Exclusive video interviews
- Special vendor offers for members
- Hands On Product reviews
- FREE – User Forum. One of the most read user forums on the internet
- Access to our community Buy and Sell pages; for members only.
You may also like