


______________________________
Shooting stage performances is quite a challenge for a photographer. Different dancers quickly move across the stage under low or changing light performing poses and dance figures in a fraction of a second. Such conditions place a strong demand on a photographer’s skills and equipment.
Dance shows have so much action going on around the stage that it is impossible to capture all interesting moments in one session. So you won’t get bored even if you shoot the same show more than one time. Besides, you can use a slightly different approach every time and achieve very different photographic results. Because of the fast dance movements it is as good as impossible to exactly know how the photos will look later, which can mean positive as well as negative surprises when watching them later.
The suggestions below are based on my experiences of shooting flamenco and belly dance shows. The example photos were taken at four performances of a flamenco group calledDuende Flamencoin 2005. One of the shows had bright daylight, a second one had a mixture of evening light and stage lights, a third had medium bright stage lights and the last event took place under very poor and colored light. So the photos cover many possible light conditions. Four of the photos were even taken at ISO 3200 and were strongly color corrected.
I usually assume the worst case in this article: extreme low light. If you are lucky enough to shoot at daylight or with very bright stage lights, you will have much less problems achieving good results. Although I refer to dance performances these tips can also be applied for shooting any kind of performances on stage or under low light.
______________________________________
Camera and Lenses
If you want the best results, don’t use anything else than a DSLR camera for doing dance photos under low light conditions. SLRs with high-ISO films will give you very grainy results and force you to waste precious time with exchanging films. Digital consumer cameras will disappoint even more. If you use a modern DSLR with a big sensor, e.g. a full-frame DSLR, you will be able to shoot at ISO 3200 with acceptable noise.
If you are lucky, you may be able to shoot a dance show at daylight.
Usually you will be shooting dance shows under poor light conditions, so it helps a lot to have fast prime lenses (e.g. 50mm and 100mm or alternatively 50mm, 85mm and 135mm) with apertures between 1.4 and 2.0 at hand. The two or three extra stops that you gain with a prime lens can sometimes make the difference between unusable and usable shots under extremely poor light. A fast prime lens also allows you to use lower ISO values for less noise with better lighting and lets your blur away the background more effectively. On the other hand a wide open aperture can cause a very narrow depth of field, which means that you have to be much more careful with focusing.
You can also use zoom lenses with minimum apertures of 2.8. Zoom lenses have the advantage that you are not forced to exchange them as often as prime lenses. If you want to do different types of shots from wide angle to tele with high-quality lenses, you need more than one lens for best image quality. A basic equipment would be a 28-70mm/2.8 lens and a 70-200/2.8 lens. You can also try less expensive 4.0 lenses for tele shots (e.g. 70-200/4 or 70-300/4-5.6).
For close-up shots with a tele lens it helps a lot to have an image stabilization built into your lens or your camera. Long focal ranges demand a shorter exposure time because hand shake is a bigger problem with them. So image stabilization helps you to achieve shake free shots at 1/60 seconds even at a focal range of 200 to 300mm. Without image stabilization you may not be able to do close-up shots under very bad light conditions.
______________________________________
Flash or Available Light?
Generally I would not recommend using a flash for shooting dance photos. You will have to wait for the flash to charge, which in turn means that you may miss some great photos. Constant flashing also annoys the dancers and audience. Even more important is that a flash can destroy the light mood. If there is a large stage, a flash attached to the camera may only lighten a part of the scene. The harsh frontal light of the flash may also add ugly drop shadows. Often the stage ceiling is too dark or high, which makes bounced flashing for more balanced illumination impossible.
However, there are always exceptions to the rule. For example, you could use a flash for group shots at the end or for a few shots when the dancers stand still for a moment. If you get permission, you could turn the stage into a photo studio. You could place one or two camera flashes or studio flash units on tripods around the stage and trigger them wirelessly or with the camera flash. But you should only use them for a few shots to avoid disturbing the show.
Taking photos without any flash, which is the standard approach, also means some problems. Usually you will be shooting indoors at artificial light. The bad lighting conditions may force you to use a fast lens and turn up the ISO value on your digital camera. If you only need to do small size prints, the high-ISO noise will be as good as invisible. For poster size prints you can use tools likeNeat ImageorNoise Ninjato eliminate most of the noise.
Another issue is white balance. If you want to take as many photos as possible and in fast succession, you have to shoot JPG instead of RAW files. You can manually white balance your camera by focusing a white wall or sheet of paper, although some cameras may not do the best white balancing job. Alternatively you can switch to incandescent white balance or choose a fitting color temperature value. On the other hand if the stage lights change their color repeatedly, using automatic white balance may be your best option. Luckily there is software, e.g.ColorWasheroriColor EditLab Pro, that can quickly and effectively fix the colors in your JPG files later. It is nevertheless a good idea to check the RGB histograms of a few test shots to see if your white balance settings doesn’t cause a blown out red channel or a highly suppressed blue channel.
______________________________________
Single Shot or Burst?
Nice occasions for single shots are the beginning or end of a dance when the dancers strike an impressive pose and keep it for several seconds. But during dancing most movements are performed within fractions of a second, which is too fast for a photographer to react in time. Of course, you could try to memorize some parts of the choreography and already plan which dance steps to shoot ahead of time, but such preparations are very time consuming. So I recommend a technique which I would describe as calculated burst shots.
This method requires that you have your camera set to burst mode and press down the shutter for one, two or three seconds if you see a dancer perform an interesting pose. Most dances repeat various steps, so if you recognize the beginning of an interesting dance step or passage, you can press down the shutter and keep it pressed until the passage ends.

To get a feeling for the most impressive dance poses and steps you only need to look at videos or photos of such performances. You can also view the show, memorize some poses and start shooting on the second performance. Of course, you can try your luck and start shooting right away. After a few shootings and reviewing your photos, you should get a better feeling for the dance movements anyway.
If you shoot in burst mode, you have to think about bringing enough memory cards with you, because you can easily end up with several hundred photos. Nothing is as frustrating as running out of memory cards in the middle of a show. For example, I only managed to take almost 2000 photos during a three hour show by transferring full memory cards to a hard drive while shooting and reusing the memory cards.
______________________________________
Camera Settings
Probably the most important camera setting when it comes to dance photography is shutter priority mode. As a start you should try an exposure time of 1/125 second and turn up the ISO until your camera indicates that the exposure is right. Sometimes you will have to go to down to 1/60 and up to ISO 3200 if there is very little light. Under good lighting you should consider using a 1/250 or shorter exposure time.
Sometimes the light is so poor that you won’t even achieve 1/60 second without underexposure. In such a case I would recommend that you risk underexposure. Later you can still turn up the brightness in the Levels dialog in Photoshop or in your RAW Converter. Basically doing that is similar to the push processing technique known from analog photography. This way you can theoretically achieve ISO values beyond 3200. For example if the digital photo was shot at ISO 3200 with one stop underexposure and you push it digitally, it is as if the photo was taken at ISO 6400. This technique means more noise, but at least you achieve photos without smeared faces and movements.
With an adequate ISO value your camera will most likely choose the largest aperture in shutter priority mode. If you use an aperture of 2.0 or lower with a prime lens, the depth of field can get very narrow, especially if you are located close to the dancers. So it may be a good idea to turn up the ISO value even more to make the camera choose a smaller aperture. Alternatively if the stage lighting is constant and you don’t do a lot of zooming, you can also switch to manual mode to get more predictable results.
For metering in shutter priority mode choosing evaluative metering mode is often a good idea. You should nevertheless check your histogram. Sometimes bright reflections on dresses or stage items can mislead it and result in underexposed shots. In such a case you need to use an appropriate exposure compensation. If the dress is much darker or brighter than the face of the dancer, the face may not get properly exposed. To avoid that you can also meter the face of a dancer in spot metering mode and add between +1 and +2 exposure compensation.
Letting the camera automatically choose focus points is quite convenient, but will produce a certain percentage of unfocused shots. It is better to manually choose a focus point that lies on the face of a dancer. If dancers move very quickly and often change position, it is more convenient to use the center focus point and reposition the camera after holding down the shutter half way. After a few burst shots the position of the dancers will have changed, so you need to refocus again. If you follow a dancer with your camera, you can let your camera track the movement and automatically adjust focus. If you want to capture two or more dancer that move in different directions, automatic tracking won’t help.
In low light the auto focus system of your camera may hunt a bit and waste precious seconds. If the position of the dancers doesn’t change dramatically, it is a good idea to switch to manual focus to keep the camera from refocusing again with every shutter press. Sometimes it may also save time to focus manually.
______________________________________
Getting Everything Into Perspective
If you don’t want your photos to look ordinary, don’t just randomly take a free seat or position around the stage. If you invest some thoughts about perspective before the show starts, you have a good chance of producing more unique photos.
If you can freely move around the stage, it may be a good idea to take some test shots from different perspectives before the show. Looking at these test shots on the display of your digital camera you can think about which perspectives to choose and what type of photos to make at what position.

Test shots for investigating possible perspectives:
1. Left Side: Fine for side shots
2. Left Diagonal From Behind: Nice for wide angle shots that show the dancers as well as the audience
3. Frontal Left: OK for full body shots.
4. Frontal: Stage decoration hides the dancer’s feet. Only for upper body shots.
5. Frontal Right: Some disturbing elements in the left part of the view. Better zoom in.
6. Right Side: The background is too dark and unattractive for wide angle. OK for close up shots.
One of the best perspectives is the frontal perspective, because the dancers usually orientate themselves towards the audience. Frontal side views can contain too many stage elements, which may distract from the main subject. A side perspective can be nice. Diagonal side views can also be interesting for capturing the stage action together with the audience. Even if you have these proven perspectives in mind, don’t hesitate to try unusual positions from time to time. For example, I once made the most impressive shots during a flamenco concert from behind the stage with back lighting from the frontal stage lights.
Try to get a seat in the middle of the first row or position yourself right in front of the stage. This way you can make frontal shots and also move around for different perspectives. However, don’t move around the stage all of the time, otherwise you may miss some great shots and annoy some spectators. So try fewer and more thoughtful position changes.
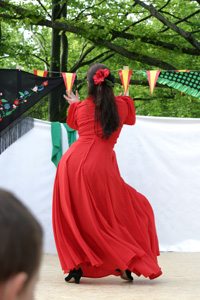
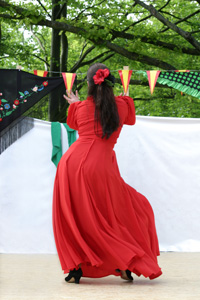
A low perspective makes the dancers look more impressive
You can also vary perspective in the vertical direction. Many people take photos of other persons at eye-level, which forces them to tilt down the camera if the subject isn’t that far away. It is often better to have the camera aimed at the middle of your subject at a right angle. Placing your camera in a lower position definitely improves the look of dance shots. It makes the dancers appear larger and more impressive. Shooting at eye-level or from a heightened position can have the contrary effect.
When shooting dance shows, you often don’t even have to get on your knees for a lower perspective. Dance stages are usually up to one meter above ground. Sometimes you are forced to shoot from a lower position anyway, because otherwise you would block the view of the spectators. If you rest your elbows on the raised stage floor, you can get an impressive perspective and also stabilize your hands.
______________________________________
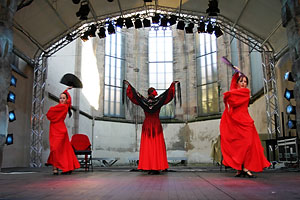
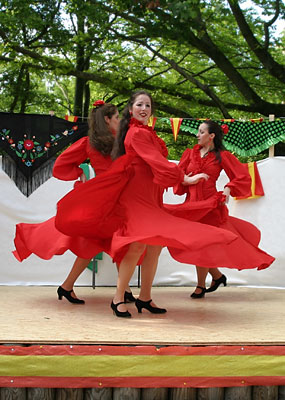
Side and frontal wide angle shots
Types of Photos
Many wide angle shots of the whole stage or a group of dancers need to be sorted out, because often not all dancers have the perfect pose and facial expression at the same time. Additionally there are many elements in such shots that distract the viewer from the dancers. As a result these photos usually don’t have such an emotional impact than photos of single dancers in front of a relatively neutral background.
Nevertheless, such wide angle shots are important for the documentation of a dance event and to give the viewer an introduction to the other photos. You can try to neutralize distracting elements by carefully choosing perspective, focal length and aperture. A wide open aperture can blur away the background and the right perspective and focal length keep unwanted items out of view. Better shoot such photos at the beginning or the end of a dance when the dancers have a symmetric stage position and keep a pose for several seconds.
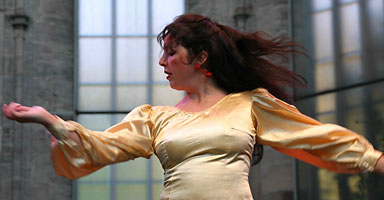
Left to right: Portrait, Full Dancer, Detail Shot, Upper Body Panorama.
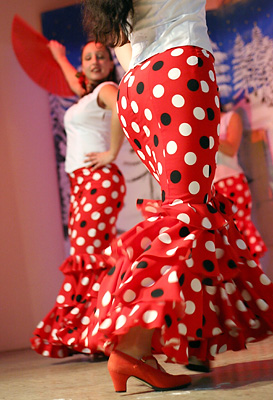
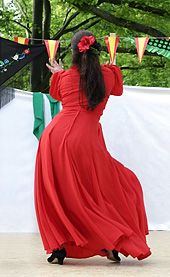
More tight cropped shots of a single dancer invoke more emotion. Typical shots show the whole dancer (or the whole body of two close dancers), the upper body (or the legs) or a portrait with head and shoulders only. You can zoom even closer and show only abstract details like a hand, the feet, the hair, a fan or a flying skirt. However, they often move faster than the rest of the body, so it is more difficult to capture them.
You can crop photos later in Photoshop, but it is always good to already choose the right focal range and image section during shooting. Choosing a more tight section usually makes a photo more expressive, but if you crop away too much of a photo in Photoshop, you may not be able to print it at a larger size.
______________________________________
Motion Effects
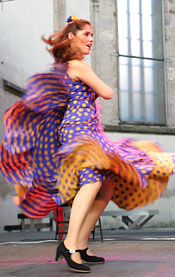
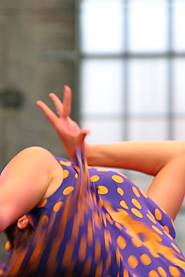
Fast movements can already produce nice motion effects at exposure times of 1/60 (left photo).
It gets more abstract and blurred at 1/30 (middle), 1/20 (right image) or slower.
Although it is often better to use a short exposure time to freeze motion, you can give some of your dance photos a special touch by intentionally prolonging the exposure time. By doing that you are basically capturing multiple frames of the same action in one photograph. For fast movements you already get nice motion effects with 1/60 second. But normally you have to use even slower exposure times up to 1/10 second.
To achieve nice photos with motion effects and avoid totally smeared images you have to make sure that your camera is steadied. You can do that by using a tripod, resting your elbows firmly on something or at least pressing your arms against your chest. Of course it is more comfortable using a lens with image stabilization, which allows you to do shake-free shots with an exposure time that is up to three stops longer.
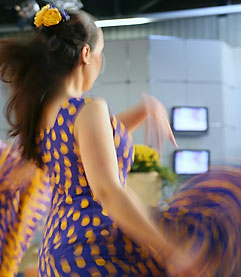
Motion effect shots look best if only a part of the dancer, e.g. the dress, arms or legs, is motion blurred while other parts, e.g. the face, are still sharp. If you like experimental shots, you can also try to achieve completely blurred photos by moving the camera or zooming your lens during exposure.
More difficult to achieve are motions effects that are created with the help of a flash. The idea behind it is to have the flash freeze the motion while creating a motion trail with the light that comes from the stage lights. To achieve such an effect, you have to use a longer exposure time (up to several seconds at ISO 100) than your camera would normally use for flashing. It is also recommended to make your camera trigger the flash on the second curtain, otherwise the motion trails will overlay the sharp image from the flash. Please notice that he motion trail will have an orange color from the incandescent stage lights whereas the sharp areas will have a neutral color from the flash. This can produce a nice color effect, but sometimes you don’t want to have it. You can avoid it by placing a orange foil over the flash head to make the light of the flash match the stage light.
Keep in mind that the percentage of bad shots will certainly be much higher with such long-exposure techniques, because the results are unpredictable. Motion effects can also be digitally added later in Photoshop, but it involves a huge amount of work with layers and masks to make them look realistic.
_____________________________________
Photoshopping
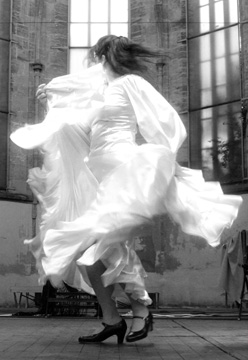
Photoshop can be a big help for improving your dance photos. For example, you can remove distracting stage elements with the clone tool or healing brush, fight noise in high-ISO shots, color correct photos and add special effects. You can also turn your photos into high-contrast B/W images (like the photo at the top of the page), which is the traditional look of flamenco photos.
Initial photo (left) and vanished head after processing in Photoshop (right)
In the example above a boy ran into view, which doesn’t fit into this otherwise great photo. Although the head covers a relatively large area, I managed to remove it by copying image areas from the right side and brushing a bit with the clone tool.
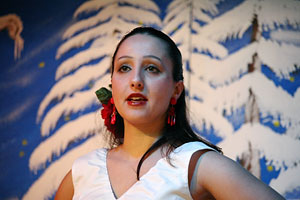

Initial color corrected photo (left) and result after processing it in Photoshop (right)
In the second example I cropped the color photo to turn it into a portrait. After that it was converted to B/W by using the information from the red channel mostly to achieve a brighter skin tone. The stage background was brushed away and the skin was softened. The eyes and lips were strongly sharpened to make their highlights more visible. Finally, the shadow below the left eye was brushed away.
Photoshop gives you the chance of fixing imperfections in otherwise nice photos. It may require a lot of practice, but it is certainly worth it, because you can greatly improve or even rescue some of your dance photos.
______________________________________
Conclusion
There is no best way to shoot a dance performance. Every session requires different techniques. It is up to you to decide which approach you want to use for a certain event. Don’t use the same approach every time, otherwise your photos will look all the same. Better practice a wide range of techniques and choose from that pool as you see fit.
Expressive dance styles like flamenco and belly dance are probably more difficult to shoot, but are also more rewarding. Usually you will be able to produce better shots with professional dancers, although there are a lot of great amateur dancers, which are easier to approach and more grateful for your photos. Better only shoot dance shows that inspire you. If you are not fascinated by a dance performance your photos will certainly show it.
A famous choreographer once said: “Great dancers are not great because of their technique, they are great because of their passion”. I would like to say the same for photography. Mastering photographic techniques is only a question of time and practice. But for developing your own photographic style and producing truly unique photos you need some creativity and a passion for your photographic subject. So don’t let yourself be discouraged by technical aspects if you want to express the fascination of a certain subject in your photos.
May, 2006
_____________________________________
Harald Heim is 32 and lives in Nuremberg, Germany. He started as a psychologist, got into software development, tried himself as a journalist and became an enthusiastic photographer. He wrote numerous articles for the Digital Photography Techniques and Digital Photo Effects magazine and for graphics.com. He created various plugin products, applications and image collections. He runs The Plugin Site atwww.thepluginsite.comand publishes the popular Plugin Newsletter. He also dances flamenco and already performed a few times on stage. You can contact himhere.
_____________________________________


Elevate Your Vision


Read this story and all the best stories on The Luminous Landscape
The author has made this story available to Luminous Landscape members only. Upgrade to get instant access to this story and other benefits available only to members.
Why choose us?
Luminous-Landscape is a membership site. Our website contains over 5300 articles on almost every topic, camera, lens and printer you can imagine. Our membership model is simple, just $2 a month ($24.00 USD a year). This $24 gains you access to a wealth of information including all our past and future video tutorials on such topics as Lightroom, Capture One, Printing, file management and dozens of interviews and travel videos.
- New Articles every few days
- All original content found nowhere else on the web
- No Pop Up Google Sense ads – Our advertisers are photo related
- Download/stream video to any device
- NEW videos monthly
- Top well-known photographer contributors
- Posts from industry leaders
- Speciality Photography Workshops
- Mobile device scalable
- Exclusive video interviews
- Special vendor offers for members
- Hands On Product reviews
- FREE – User Forum. One of the most read user forums on the internet
- Access to our community Buy and Sell pages; for members only.
You may also like


