


PowerStitch V1.0 is an extremely powerful program that enables the combining or “stitching” of photographs. These can create either panoramas, such as the one below, or large composite images‚ permitting small format cameras to create images with image quality equaling that from larger formats.
With the advent of digital image processing new capabilities have arisen that simply weren’t possible with traditional darkroom tools. The sophisticated image compositing that PowerStitch is capable of is but one example of this. While there are quite a number of programs available to stitch images together, none has the ability of PowerStitch to effectively remove distortions.
Update: November, 2000
The following announcement has appeared on the Enroute Software web site. This is a shame, and it means that if you would like to purchase a copy of this exceptional software you’d better do so soon, since I know of no comparable alternative.
To our valued customers:
Enroute, Inc. has made a strategic decision to concentrate its efforts in the emerging immersive video market with our FirstPerson TM products and discontinue sales and development of our still imaging products QuickStitch TM , QuickStitch 360 and PowerStitch TM .Effective November 1, 2000, Enroute will begin selling out its product inventory. Sales of both physical and electronic products will cease with the purchase of the last physical product, or on January 24, 2001, whichever comes first. All products purchased during this time will be supported with our full 90-day warranty as outlined in our Software License Agreement. Please contact our toll-free support line at 1-800-656-5426.
An Example
A personal project of mine is photographing sunsets from the deck of my country place on Lake Muskoka in Ontario, Canada. Not necessarily great art, but enjoyable nonetheless. I’ve always been frustrated by being limited in my ability to capture the span of this and similar vistas. Even a camera like the XPan doesn’t give the right combination of reach and breadth. A wide angle lens alone would simply make the subject smaller. What’s needed is a combined telephoto / wide angle capability. PowerStitch permits this, and a whole lot more.
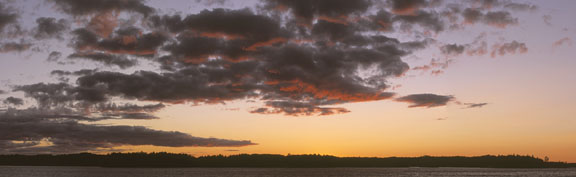 Muskoka Sunset Panorama #1, 2000
Clicking on this image will display a 17″ wide version. It’s worth viewing to appreciate the resolution and detail made possible with this technique.
A 1280 X 762 display is needed to view this image without scrolling.
This photograph is made up of 4 horizontal 35mm frames. When taken, each was overlapped with the other by approximately 50%. Each scan was approximately 35MB in size and were produced with an Imacon FlexTight scanner at 3,200 DPI. The final combined file, after rendering and cropping is 95MB. This is big enough to make a print 3 feet wide at 300 DPI.
Photographed with a Canon EOS-1V and 100~400mm IS lens @ 100mm on Provia 100F, comprising 4 frames composited in PowerStitch.
Digital Darning
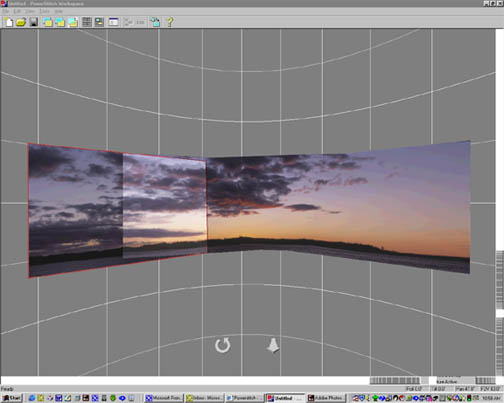
PowerStitch provides a powerful yet intuitive user interface. Images to be stitched are loaded into what appears to be a 3-D workspace. Groupings of tools allow each image to be moved on a grid and aligned with each other. This is a manual process and it’s worth taking the time to get the positioning and other parameters correct. Rather than being tedious, it’s fun. As I was learning the program using the 4 files in the example above, I found that they could all be critically aligned within less than 15 minutes.
Once the files have been aligned by hand a quick preview run is done to test how it looks. This takes less than 1 minute. Once you’re satisfied with the effect the files need to beRendered. The program told me that these 4 – 35MB files would take 75 minutes to render into a single composite image. On my 600Mz Pentium III with 762MB of RAM it took 25 minutes.
The result, as seen above, is essentially perfect. There are absolutely no distortions of any kind and there is nothing that indicates that this photograph is a blending of 4 separate images‚ even when critically examined in PhotoShop at actual pixels resolution.
Limitations
This is an expensive program at $399.00 U.S. You have to be serious about doing this type of photography to lay out this much money for utility software. On the other hand, if you need it‚ there’s nothing else on the market with this much power. It’s thePhotoShopof stitching programs.
Here are the hardware requirements:
Pentium (or 100% Compatible) Processor
Windows 98/98SE
DirectX 6.1
64 MB RAM
Hardware Direct3D acceleration
Free Disk Space = 5 x uncompressed total input image size.
Note the disk space requirement. 4 – 25MB images in a composite would need 500MB of free disk space while the program is working on the file. This is a processor and disk intensive program to say the least! The final file will end up as being somewhat less than 100MB in size, (using this example)‚ still quite large. Don’t create files bigger than what you can subsequently load into your favourite image editing software.
Here are the graphic cards that are currently (July, 2000) supported.This is very important. You must have an AGP capable video card. If you do not have one of these cards, the programwill notwork!
ATI Rage Fury
16-bit color – 800×600, 1024×768, 1152×864, 1280×1024, 1600×1200
32-bit color – 800×600, 1024×768, 1152×864, 1280×1024, 1600×1200
Diamond Viper V770
16-bit color – 800×600, 1024×768, 1152×864, 1280×1024, 1600×1200
32-bit color – 800×600, 1024×768, 1152×864, 1280×1024, 1600×1200
Matrox Millennium G400
16-bit color – 800×600, 1024×768, 1152×864, 1280×1024, 1600×1200
32-bit color – 800×600, 1024×768, 1152×864, 1280×1024, 1600×1200
S3 3D Blaster Savage 4
16-bit color – 800×600, 1024×768, 1152×864, 1280×1024, 1600×1200
32-bit color – 800×600, 1024×768, 1152×864, 1280×1024
Cards Also Tested
ASUS V3400TNT
16-bit color – 800×600, 1024×768, 1152×864, 1280×1024, 1600×1200
32-bit color – 800×600, 1024×768, 1152×864
ATI Rage 128VR
16-bit color – 800×600, 1024×768, 1152×864, 1280×1024
32-bit color – 800×600
Matrox Marvel G200
16-bit color – 800×600, 1024×768, 1152×864, 1280×1024, 1600×1200
32-bit color – same as 16-bit for DirectX 6.1, problems on DirectX 7.0 and 7.0a
Matrox Millennium G200
16-bit color – 800×600, 1024×768, 1152×864, 1280×1024
32-bit color – 800×600, 1024×768
Real3D Starfighter AGP
16-bit color – 800×600, 1024×768, 1152×864, 1280×1024
Another Example
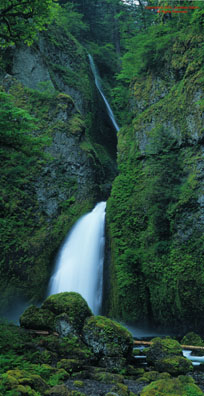 Wahcella Falls, © 2000 Jonathan Sachs
This enchanting photograph is another example created with PowerStitch Jonathan Sachs.
It was created from two images shot with a Pentax 6×7 camera using the Pentax 165mm lens. The two images were scanned at 1600 dpi using an Imacon FlexTight Photo scanner, yielding roughly 40MB files. They were combined using rectilinear perspective. The waterfall is Wahcella Falls along the Columbia River Gorge in Oregon.
Jonathan Sachs, a contributor to this site, is president of Digital Light & Color ‚ a software development company he founded in 1993. Mr. Sachs was previously cofounder of Lotus Development Corporation. His comparison of Fuji Velvia Vs. Provia 100F can be found here.
Shooting with PowerStitch in Mind
Of course you need to avoid anything that moves between frames. A car, plane or person that appears in two separate places in a scene is a bit difficult to explain away, though it can likely be cloned out in PhotoShop afterward.
It is suggested that you shoot vertical frames, since these will help minimize angular distortion. (The program does a great job in correcting such distortions, but it produces the best results if you give it all the help that you can beforehand.)
You should also expose each frame of the composite with the same exposure and avoid using a polarizer‚ otherwise the sky will appear very uneven. A split neutral density filter will work, but don’t change its position between frames.
When scanning, similarly don’t change the scanner settings between scans. Also, trim each frame so that there are no black borders before loading them into PowerStitch.
It should also be stated that PowerStitch can also be used with original files from digital cameras‚ not just scanned transparencies and negatives. When used this way its ability to create distortion-free composite images can be very powerful, and useful in overcoming the resolution limitations of current equipment.
To do its distortion correction job properly the program requires that manual alignment of each picture comprising the composite be done with the program set to thehorizontalfield of view for the focal length of the lens used. In other words, if you took the sequence of shots with a 50mm lens on a 35mm camera then you want to set the program’sField of Viewcontrol to about 40 degrees while doing preliminary alignment.
I’m surprised that the developers of PowerStitch didn’t provide a calculator for this since it isn’t a number that most people are aware of. You could always look these up from manufacturers literature, but that’s tedious.
Here are the numbers for the lenses that I use. If you want you can go online and use Rui Salgueiro’s Field-of-View Calculatorto calculate your own.
Medium Format‚ (6X6) Lenses
Focal Length Field of View
35mm 77 degrees
40mm 70 degrees
45mm 64 degrees
90mm 35 degrees
180mm 18 degrees
300mm 11 degreesMedium Format‚ (6X7) Lenses
Focal Length Field of View
43 mm 92 degrees
50mm 50 degrees
65mm 69 degrees
80mm 58 degrees
150mm 33 degrees35mm Lenses‚ Canon
Focal Length Field of View
17mm 93 degrees
20mm 84 degrees
24mm 74 degrees
28mm 65 degrees
35mm 54 degrees
50mm 40 degrees
70mm 29 degrees
100mm 20 degrees
135mm 15 degrees
180mm 11 degrees
300mm 7 degrees
400mm 5 degreesHasselblad XPan
Focal Length Field of View
30mm 95 degrees
45mm 72 degrees
90mm 40 degreesFuji GX617
Focal Length Field of View
90mm 85 degrees
105mm 76 degrees
180mm 49 degrees
300mm 31 degrees
What’s The Fuss?
As the first edition of this review is written (July 2000) there are a couple of reviews of PowerStitch that have appeared in print. One is in Outdoor Photographer (Aug., 2000) and the other inGeorge Lepp’s The Natural Image, (Vol. 16, No.1). This edition of George’s very fine journal focuses on Panoramics, and contains a wealth of information on various camera systems and other products related to panoramic photography. Both of these magazines have hyperlinks that can be found on my LINKS page.
Examples
May, 2001
Though PowerStitch is now defunct there are many other perfectly adequate programs for stitching panoramics. In fact most digital cameras now come with such software included somewhere on their installation CD. The examples below therefore could easily have been done with any of these programs.
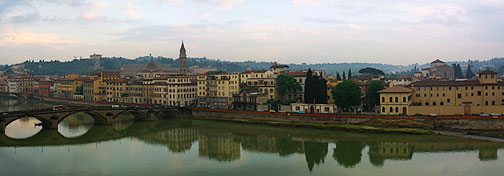 Arno, Florence: May 2001
Photographed with a Canon D30 and 28~135mm f/3.5L IS lens at ISO 100
This photograph of the south bank of the Arno River as it runs through Florence, Italy was taken from my hotel balcony. It was just before sunset and the muted colours nicely match the feel of the city’s palette.
Three frames shot at about a 35mm focal length were used, and were overlapped when shooting by about 30%.
 Arno, Florence: May 2001
Photographed with a Canon D30 and 28~135mm f/3.5L IS lens at ISO 100
Though only 3 frames were used in the first image above I actually shot a 7 frame sequence covering 180 degrees. This photograph was stitched from all seven frames. While it’s fun it is really too wide, and the perspective is consequently confusing.
If you click on it to see a larger image you will have to scroll to see the whole thing as that version is about 15″ wide.
These photographs are part of a small series taken in May, 2001 in Florence, Rome and Tuscany.


Elevate Your Vision


Read this story and all the best stories on The Luminous Landscape
The author has made this story available to Luminous Landscape members only. Upgrade to get instant access to this story and other benefits available only to members.
Why choose us?
Luminous-Landscape is a membership site. Our website contains over 5300 articles on almost every topic, camera, lens and printer you can imagine. Our membership model is simple, just $2 a month ($24.00 USD a year). This $24 gains you access to a wealth of information including all our past and future video tutorials on such topics as Lightroom, Capture One, Printing, file management and dozens of interviews and travel videos.
- New Articles every few days
- All original content found nowhere else on the web
- No Pop Up Google Sense ads – Our advertisers are photo related
- Download/stream video to any device
- NEW videos monthly
- Top well-known photographer contributors
- Posts from industry leaders
- Speciality Photography Workshops
- Mobile device scalable
- Exclusive video interviews
- Special vendor offers for members
- Hands On Product reviews
- FREE – User Forum. One of the most read user forums on the internet
- Access to our community Buy and Sell pages; for members only.
You may also like


