Terry A. McDonald – www.luxBorealis.com
We shoot raw files to extract as much information from a scene as is technically possible. Photographers choose raw capture because they place a higher value on quality, legacy, and individual vision than on having ’ready-made’ machine JPEGs, compressed and sharpened. Over the decades I’ve been working in digital, I have yet to meet an image file that didn’t benefit from editing, and raw is the place to start. But are we getting the most from our raw files?
I’ve been using Lightroom for as long as it has existed, and Photoshop before that. Naturally, I’m curious—is Lightroom extracting all the data it can and optimizing it to provide the highest image quality possible from my sensor? I’ve spent a lot of time, effort and money to get that raw file, I want to ensure I’m getting the most bang for my buck. The only guarantee of that is through testing.
This is the first in a series of investigations examining how to extract the highest quality from a M43 20.1 megapixel OM-1 sensor. At 5184x3888pixels, the sensor is ideal for making 13×17” fine art prints at 300ppi and two-page spreads in photo books, but in doing so, I want to ensure I’m getting the highest IQ possible.
Method
I’ve subjected the same six images to six different treatments. Each result is output to three commonly-used sizes: (1) for web use; (2) for 4K TV use and smaller prints; and (3) for larger prints and publication. The images were selected to push the sensor while representing different styles of my photography: landscapes shot during the day and evening; travel photography, and birds and wildlife
Photos
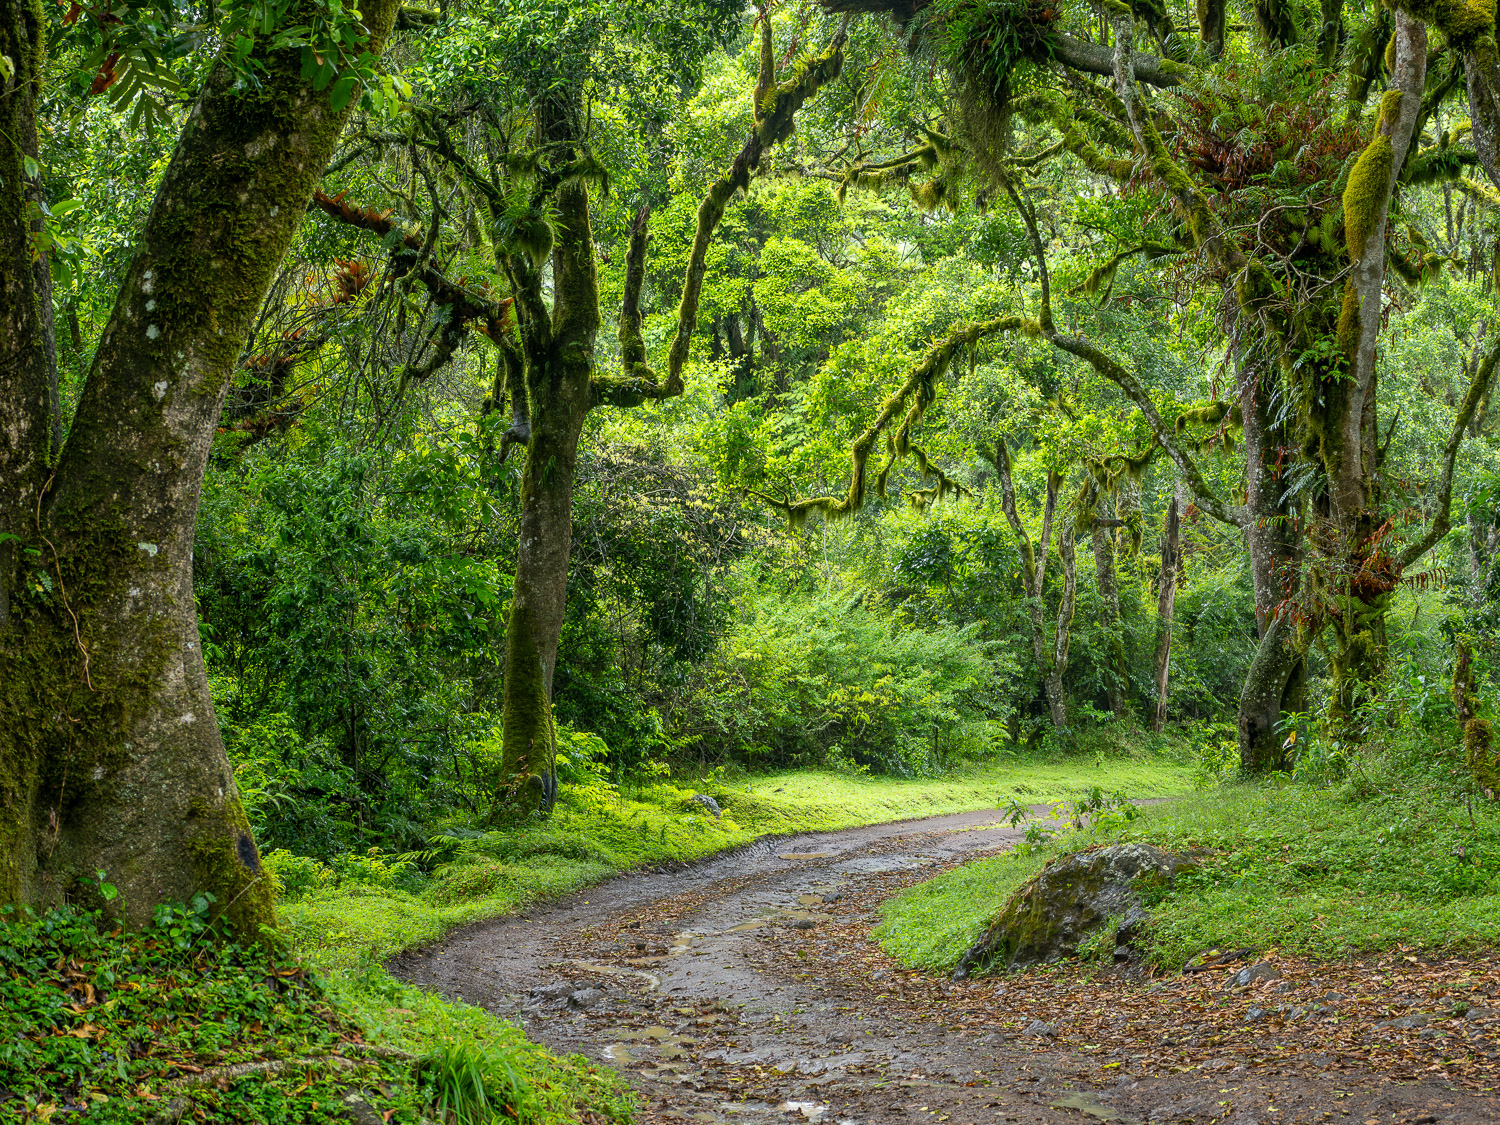
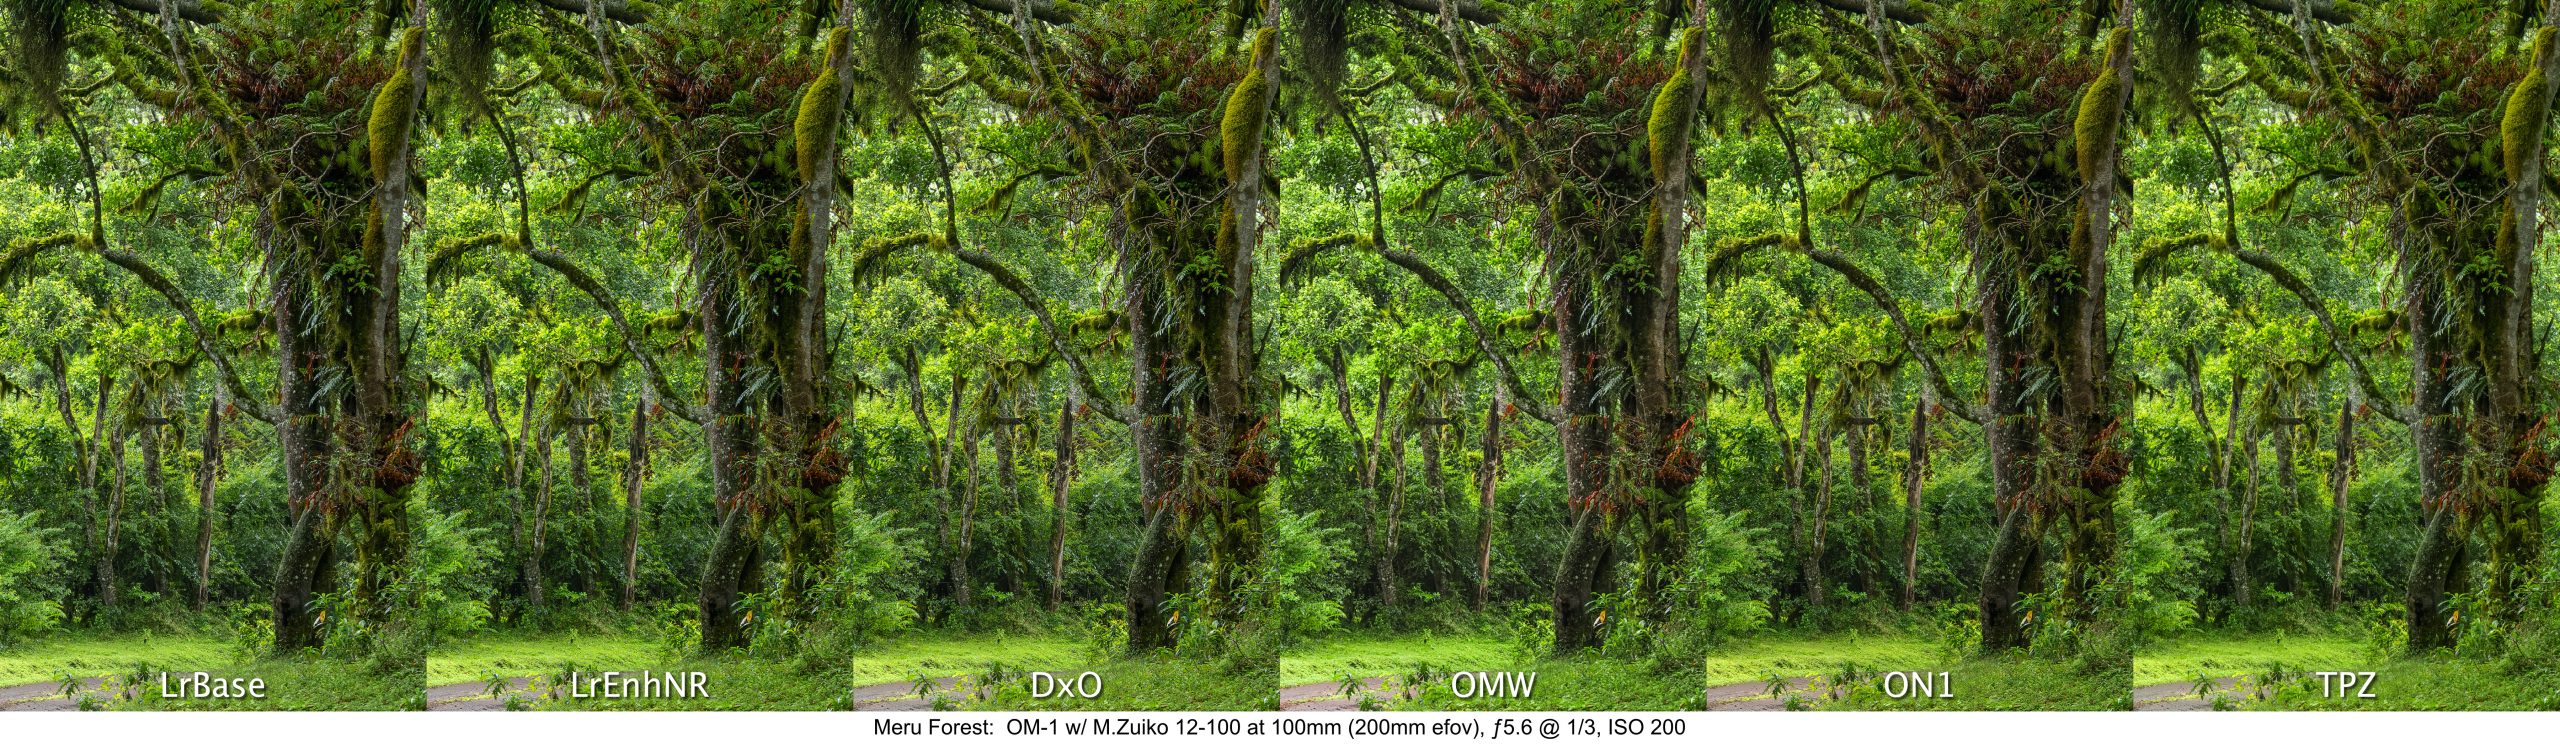
- Meru Forest is a highly detailed landscape, using the full 5184x3888px frame, made in the deep shade of the cloud forest on the slopes of Mount Meru, Tanzania. I used an M.Zuiko 12-100mm ƒ4 PRO IS lens at 35mm (70mm efov), handheld at ƒ5.6 @ ⅓ sec. at ISO 200. Due to the OM-1’s excellent integrated IBIS plus the IS of the lens, the slow shutter speed has not resulted in any loss of detail from either camera or foliage movement
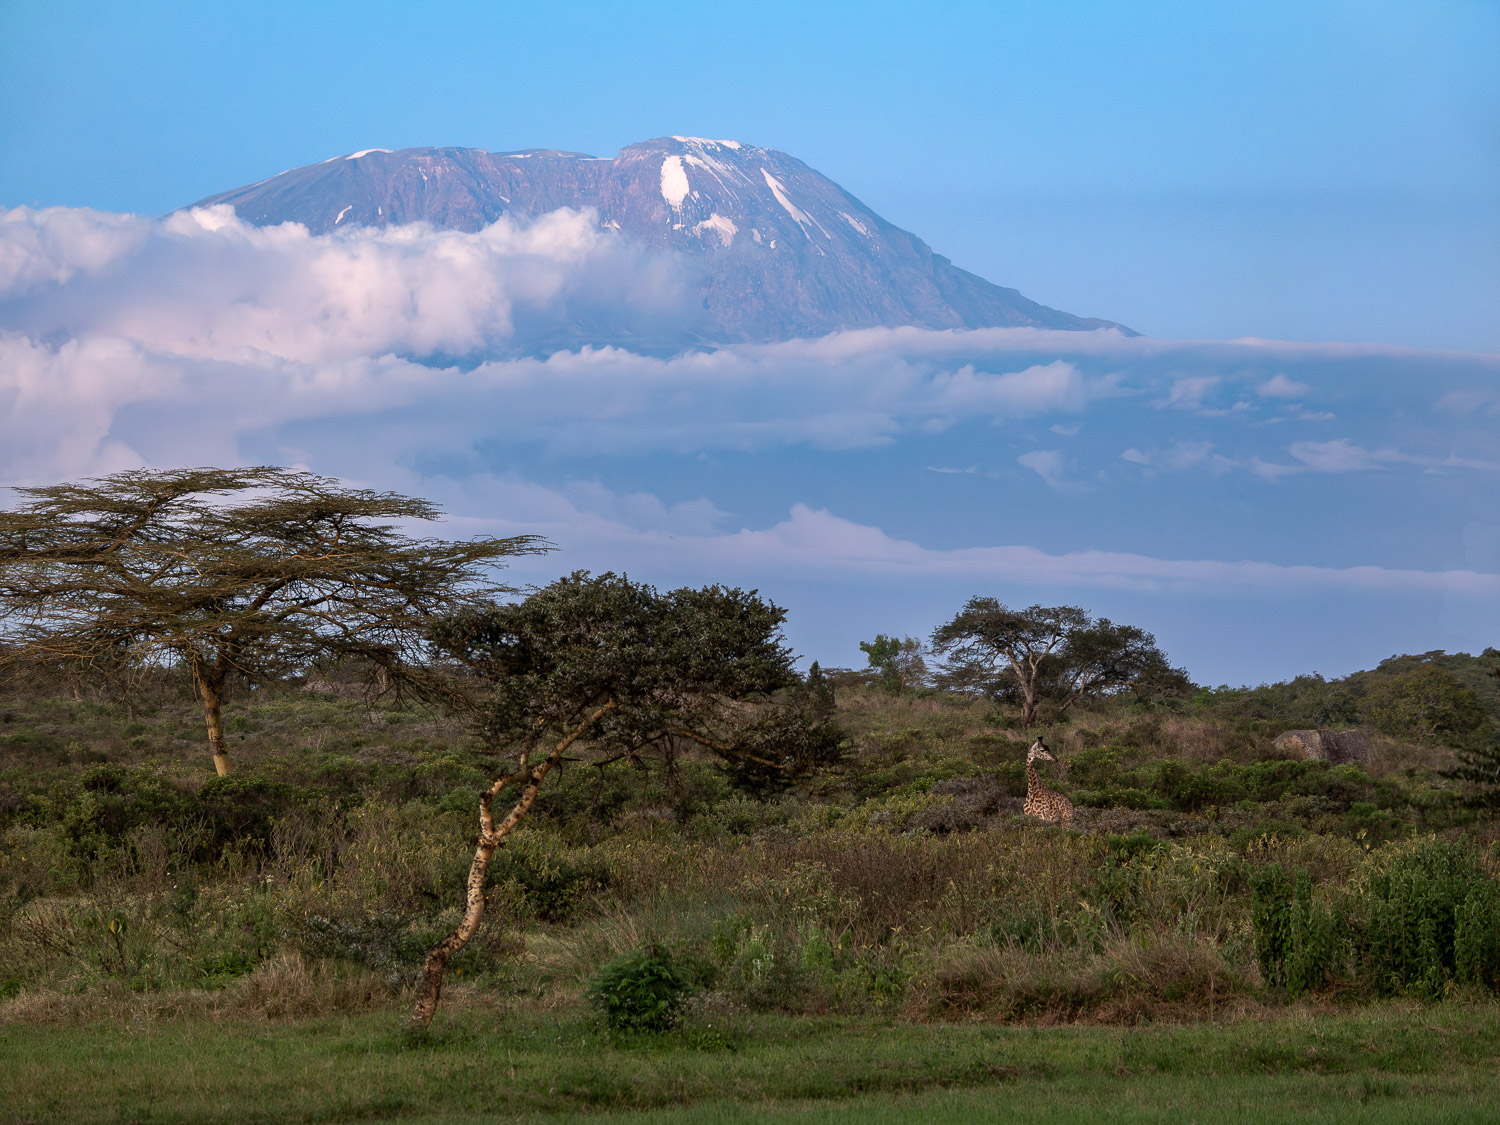
- Kilimanjaro Blues is a blue-hour landscape using the full 5184x3888px frame. It was made using the same 12-100 zoom, handheld at 100mm (200mm efov), ƒ5.6 @ ⅓ sec., ISO 800. Note: the same ƒ5.6 @ ⅓ exposure as above is not a typo; it just worked out that way! You might scoff at using a photo taken at ⅓ sec. but I rarely shoot landscapes in ’perfect’ light. Secondly, the photo is sharp, edge to edge. This and the Meru Forest photo are also two of the few landscapes I made where I did not use Handheld High Res mode.
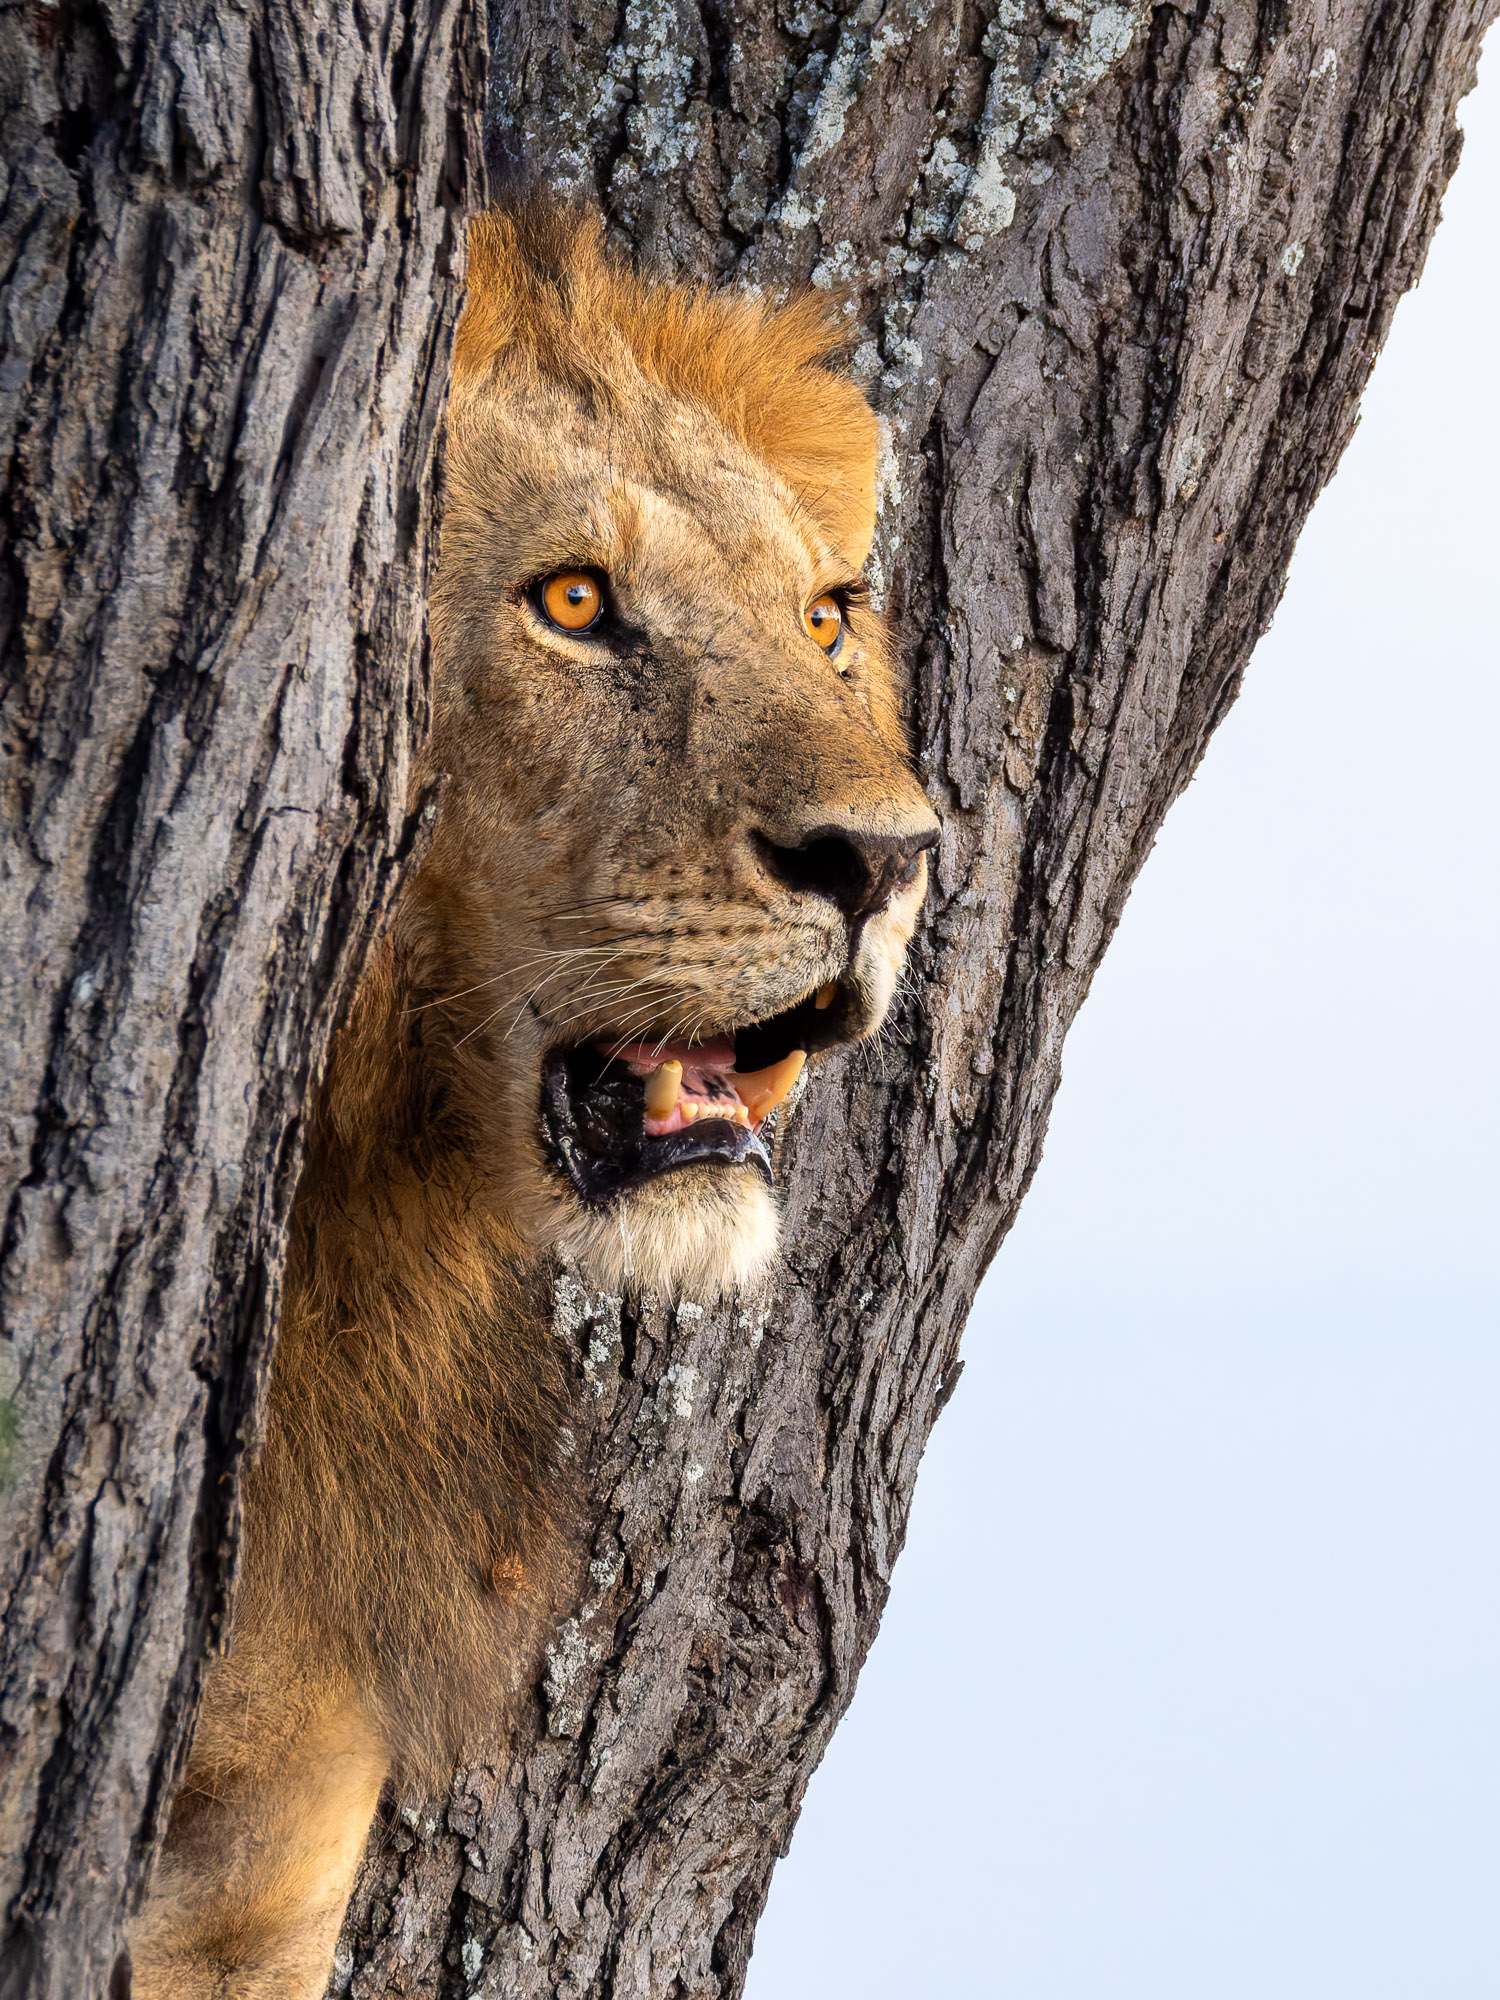
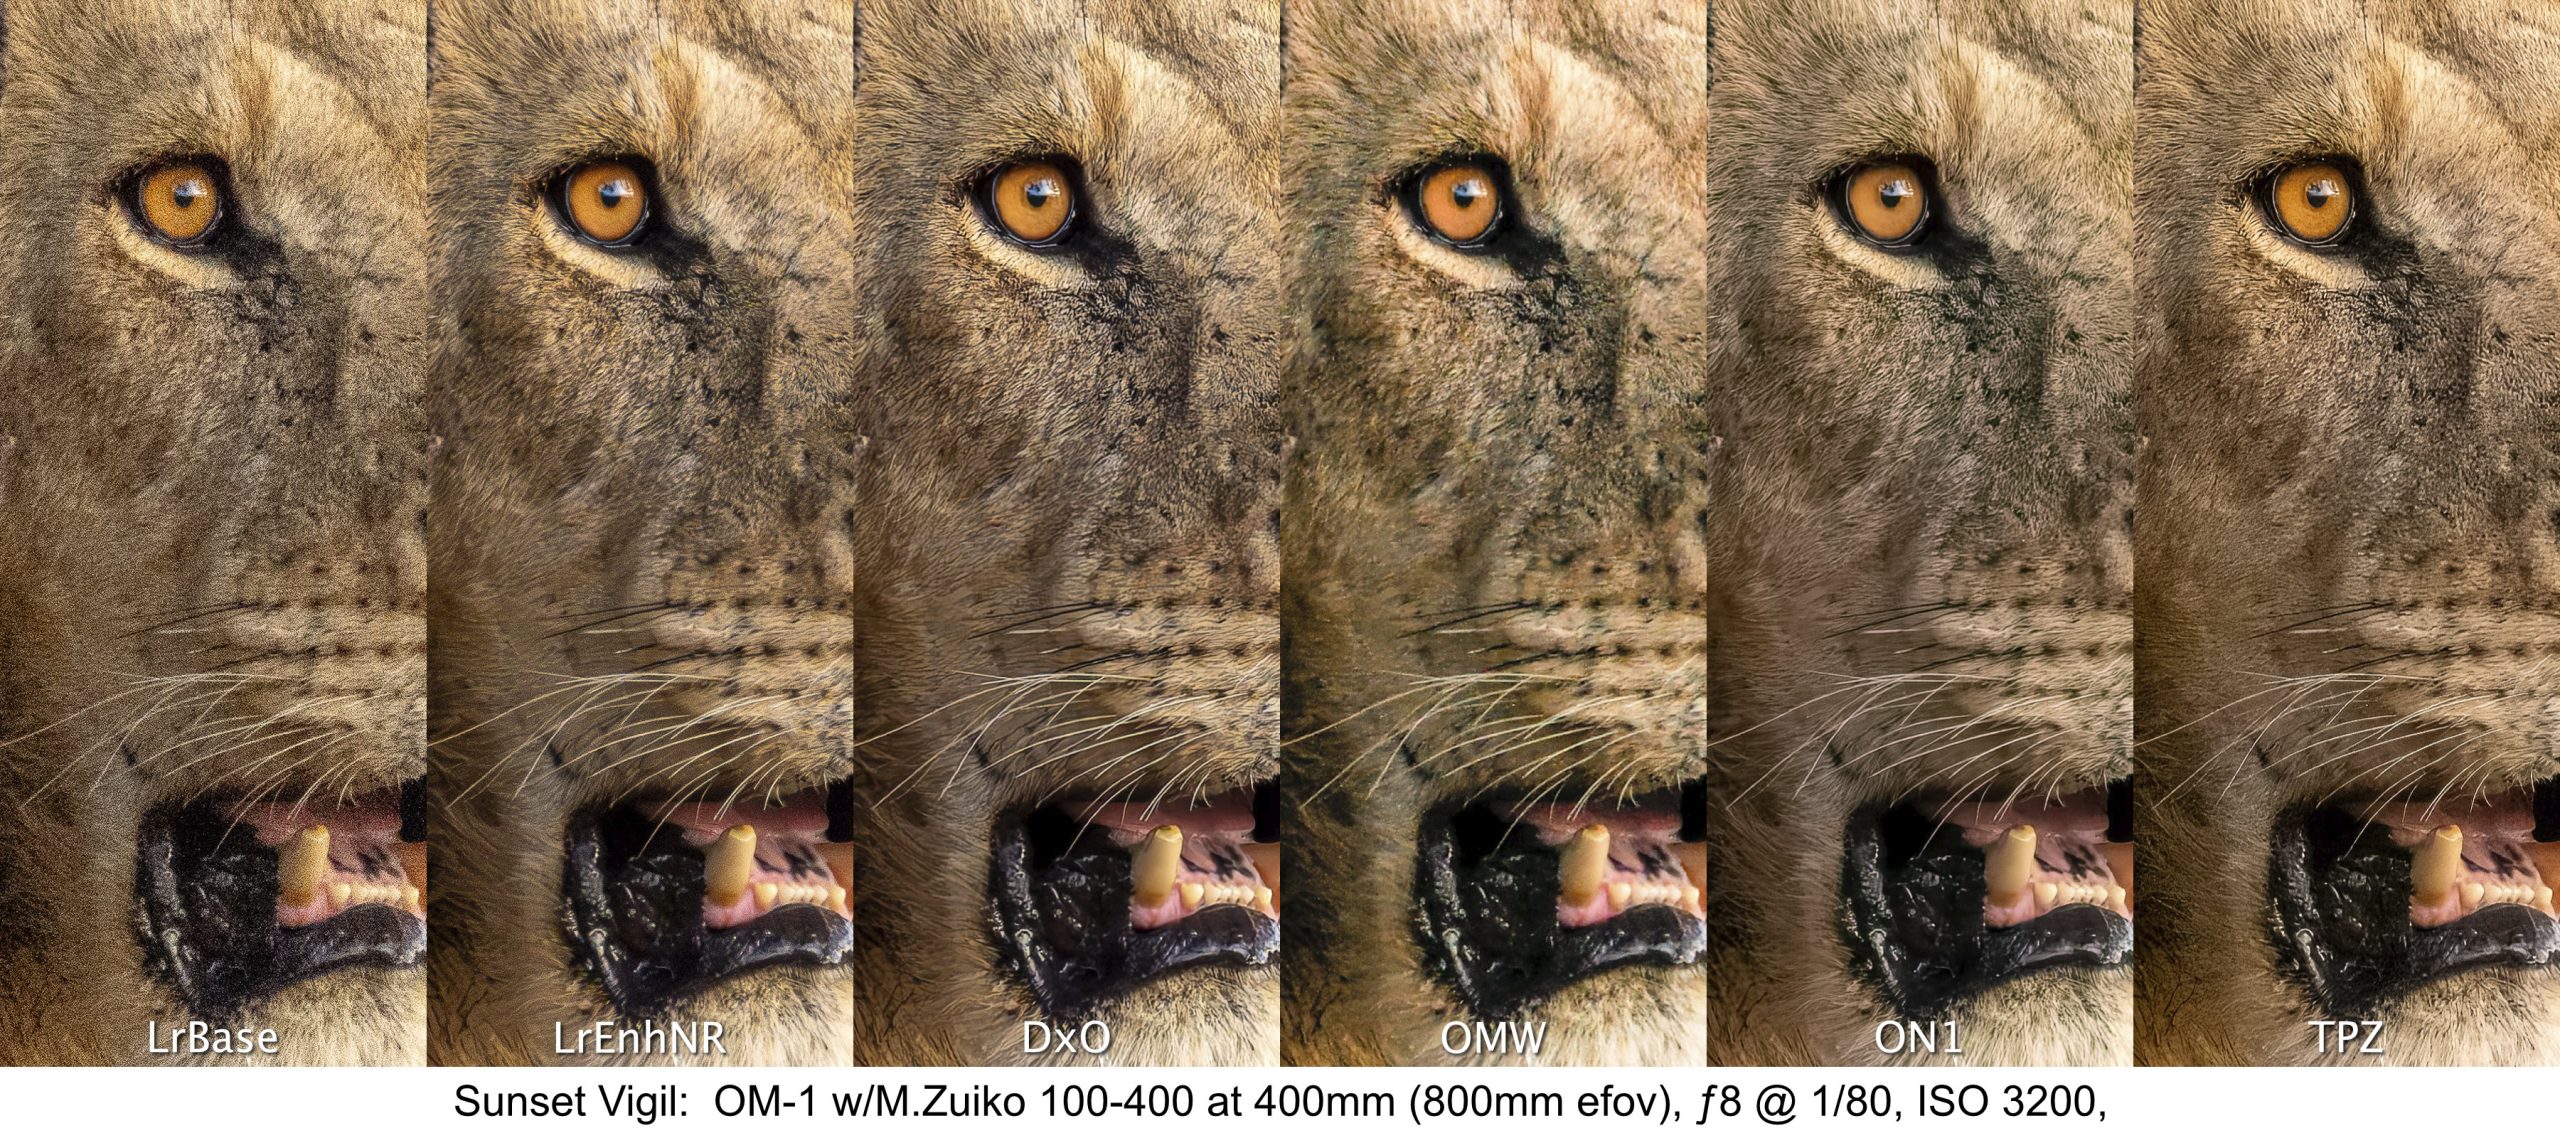
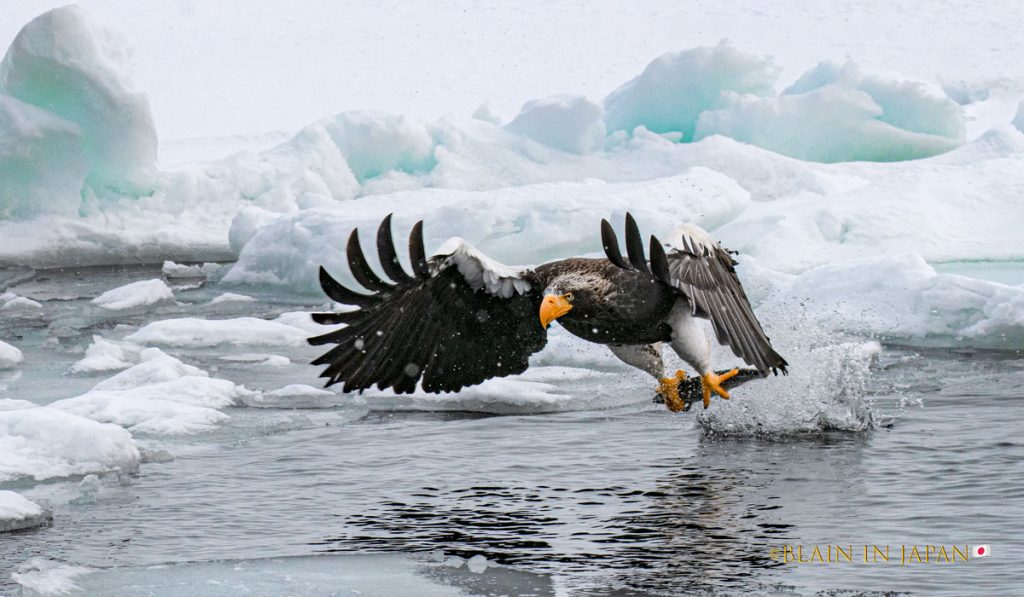
- Sunset Vigil, Lion, Tarangire National Park, Tanzania is a highly detailed shot with an M.Zuiko 100-400mm ƒ5-6.3 IS at 292mm (584mm efov), handheld at ƒ8 @ 1/80, ISO 3200. The fur, whiskers, eye and teeth are tack sharp, despite it being a centre crop of 2741x3655px from a horizontal frame. ISO 3200 should put the apps to the test to smooth out noise without losing fine detail.
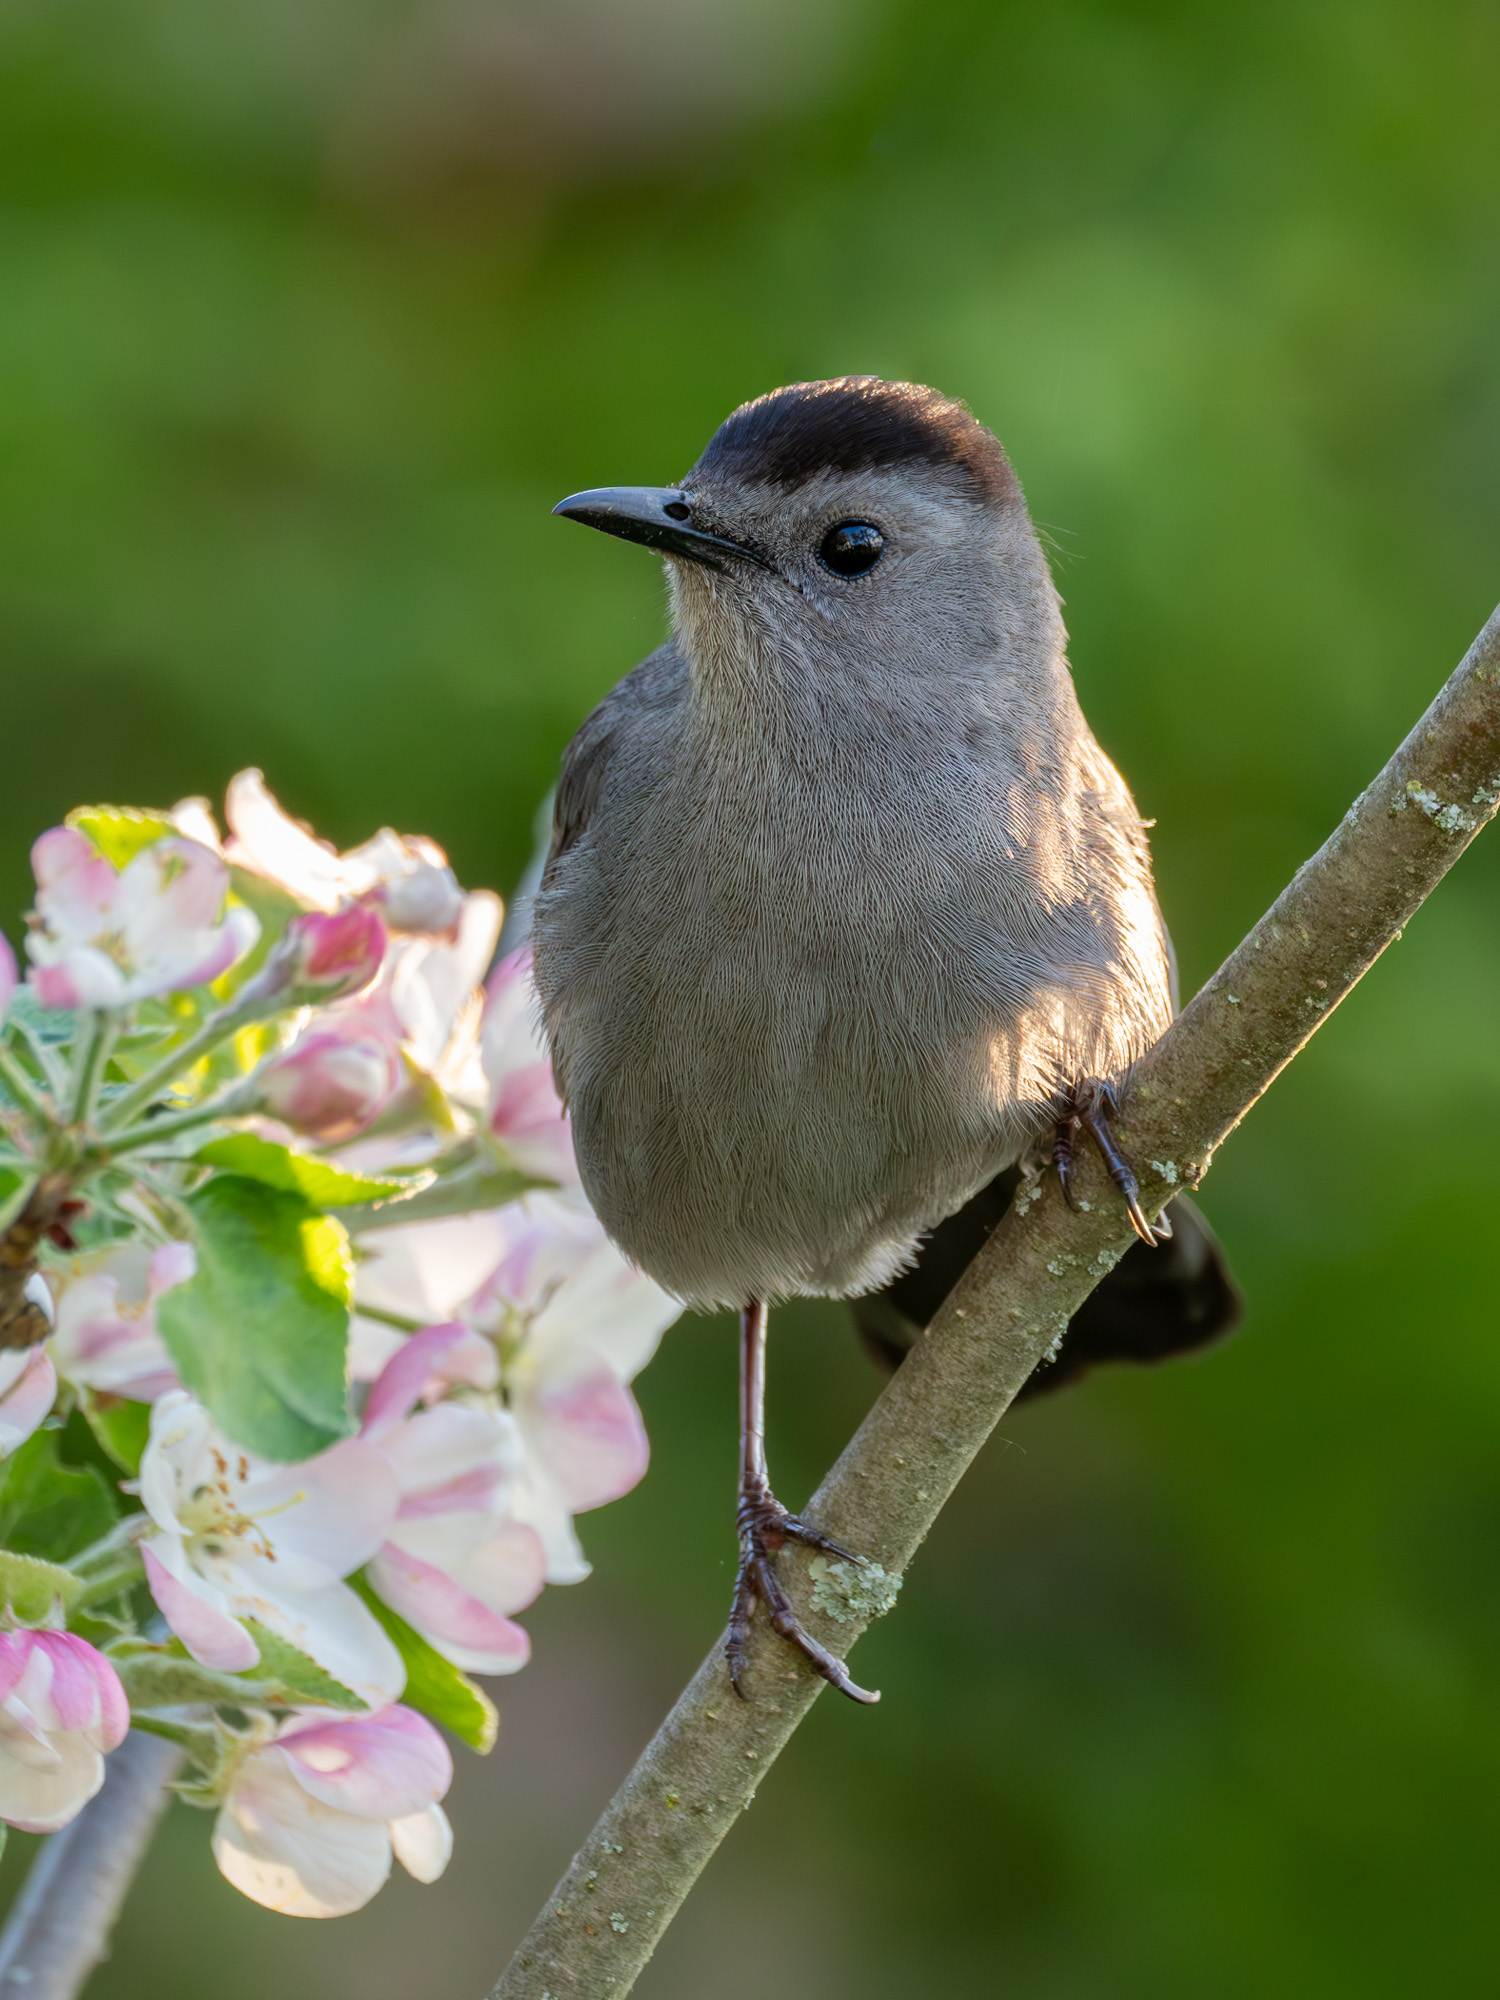
- Grey Catbird, Ontario. Feather detail has always been mission-critical with wildlife photographers. This was made with the same 100-400 at 400mm (800mm efov), ƒ8 @ 1/200, ISO 3200, and is a 3152×4203 crop from a vertical frame. According to the internet pundits. the ones who disregard M43, these two ISO 3200 images should suffer from dreadful noise and loss of detail.
Additional Comparisons:
I hadn’t intended to test higher ISOs as I rarely shoot above 3200. But, given the results from
the ISO 3200 photos, I felt I should give high-ISO a shot, if only for a sense of completion. I
will discuss the results of these two shots separately, after discussing the
other 4 together.
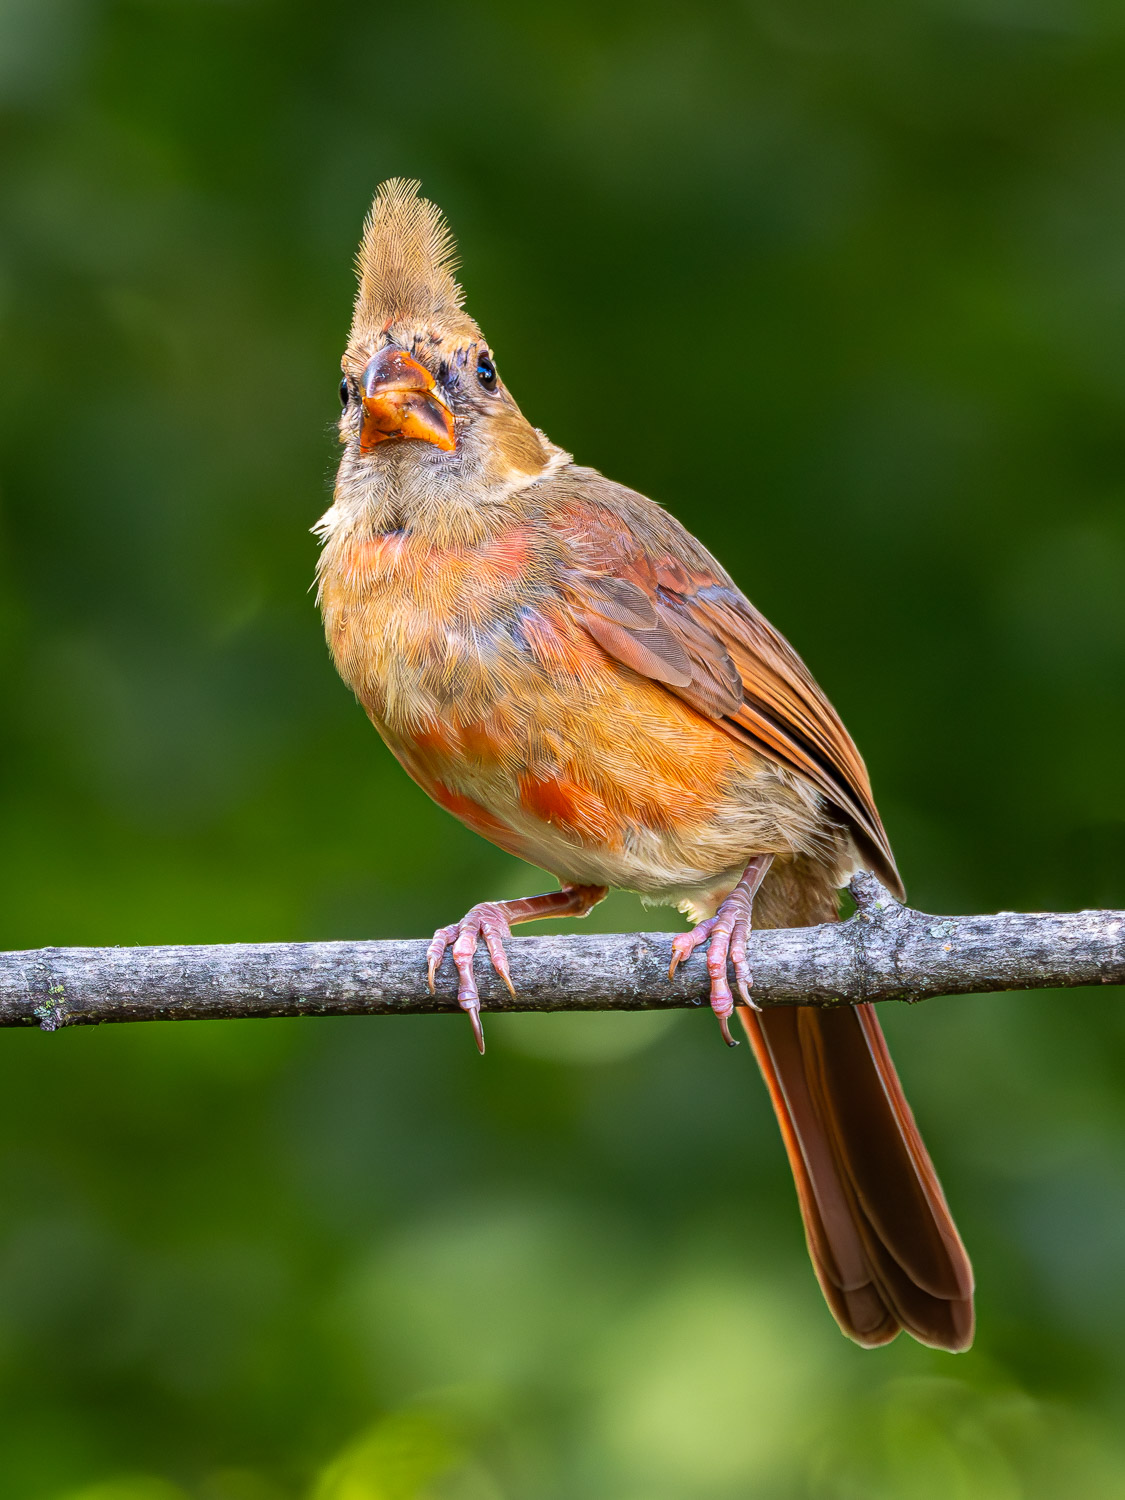
- Junior (Immature Northern Cardinal) is an ISO 6400 le with lots of feather detail. It is one of the few shots I’ve made with an ISO that high, simply because I rarely need it and, being on old lm guy, I was sceptical of the quality of high ISOs. This is a 2538x3384px vertical crop, made with the 100-400 at 400mm (800 efov), ƒ8 @ 1/320.
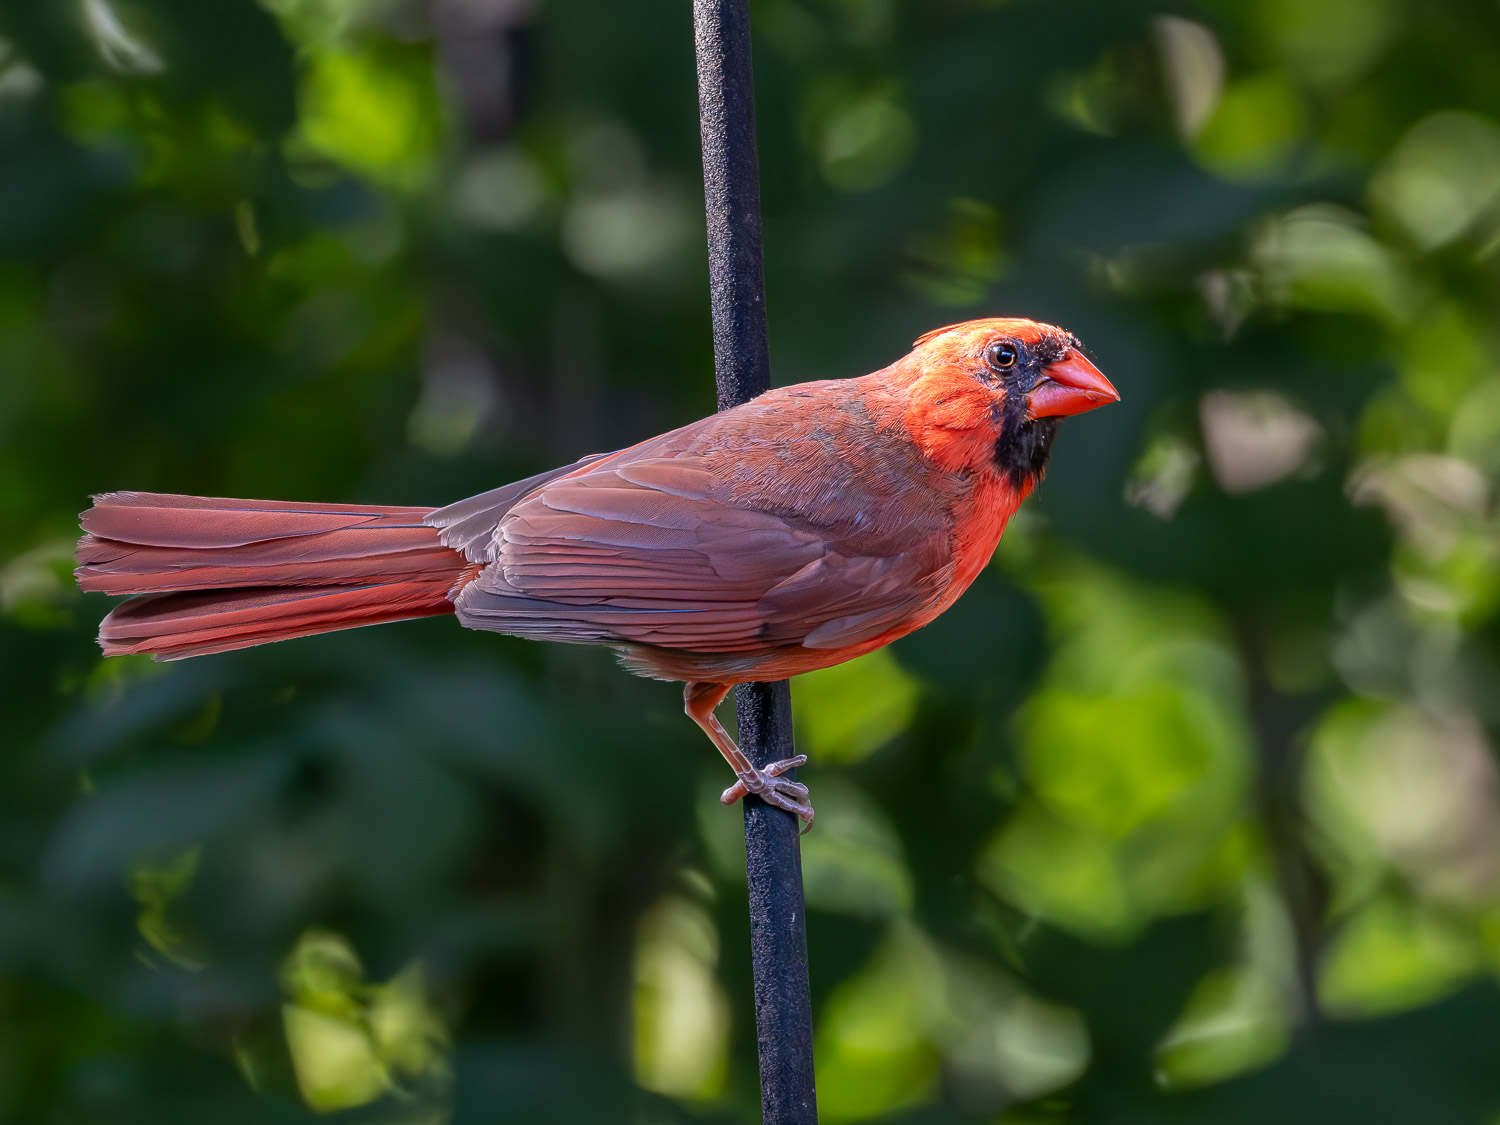
- Dad (male Northern Cardinal). This ’grab shot’ would not normally make the cut. Taken in the deep shade of our back yard, the Cardinal is moulting and looks plain without his crest. He is also perched awkwardly on the bird feeder stand. However, it is one of the few shots I’ve made at ISO 12800. I used the 100-400 at 400mm (800mm efov); ƒ8 @ 1/640.
Raw Treatments
The five raw treatments are all commonly available, industry-standard apps for raw file demosaicing, denoising, and detail sharpening that are easily integrated into a Lightroom workflow. All processing was done on an M116” MacBook Pro with 16GB of RAM.
- LrBase are raw files processed normally through Lightroom CC (v8.1). I edit only enough to breathe life back into the machine image—to re-create my experience and my vision in the field. This changes neither the original intent of the image nor its natural feel. I work with the pixels the camera captures, so there are no dropped-in backgrounds, skies or subjects. Adjustments are made as needed to Exposure, Contrast, White and Black Points, Highlights and Shadows as well as Colour and Tint. Additionally, I add Adjustment Masks to shape the light. Detail Sharpening is typically set to 60.
Each of the additional treatments began with the original raw file and took a reasonable 15 to 20 seconds to complete.
- LrEnhNR is the first of the five additional raw treatments. The LrBase file was run through Lightroom’s own Enhanced Noise Reduction algorithm set to 50 or 60; 75 for high ISO files. Finding the balance of noise removal while maintaining detail is critical. Afterwards, Detail Sharpening was typically set to 40, the Lr default for my ORF raw files.
Each of the following treatments began with the original ORF raw file. I did not use ‘File > Open In’ from within Lightroom as it creates unnecessarily large TIFFs.
- DxO: DxO Pure Raw (v4.7.0); DeepPRIME XD2s and DxO’s optical corrections were applied to the ORF. Output to DNG.
- ON1NN: ON1 No Noise AI (v2024.5) was applied to the ORF using the No Noise module set to ‘Standard’. The Tack Sharp AI module was not used. Micro Sharpening was set to the default 100 for all except for the Meru Forest file; anything higher than 50 was too aggressive. Masking was not used. Output to DNG.
- TPZ: ORF raw file + Topaz PhotoAI (v3.4.3) Raw Denoise at Standard (Strong was too aggressive) and Sharpening set to ‘All’ for landscapes and ‘Subject’ for birds and wildlife. Some tweaking of the subject mask was needed; it was helpful to have that option and something only Topaz and ON1 have. Output to DNG.
- OMW: ORF was processed through OM Workspace (v2.3.3) with AI Noise Reduction plus the various built in lens corrections. Output to a TIFF; OMW does not output to DNG.
Output
After treatment, each DNG (or TIFF) was added back into Lightroom. The original LrBase edits were copied and pasted To each file, with some colour and distortion correction. JPEGs were output at 80% or 100% quality in sRGB colour space with Sharpening set to Screen. The three sizes of JPEGs represent common, everyday uses of photographs by the vast majority of photographers:
- 1500x1125px (1.7mp),at 80% quality, to represent the needs of social media platforms, blogs, forums and other web uses, plus for HD projection; e.g. at camera club presentations. Typically, social media sizes are smaller, so any differences at this larger size be even more noticeable.
- 3840x2880px (11mp), at 80% quality, for 4K TV presentations, as well as laptop and desktop screens; e.g. wallpaper. This is also sized for prints a little larger than 9×12”, so a test of that print size as well.
- 4800x3600px (17mp), at 100% quality, is an ideal print size for photo competitions and to hang on your wall as it makes a 12×16” print at 300ppi, easily matted to 16×20” for framing or presentation. Note: each of the wildlife photographs had to be up-sized from the original to this size during the Lightroom export to JPEG. Normally, this would mean a hit on quality, but surprisingly . . . well, read on.
Results
The results I report are based on real-world uses of photographs, not on pixel-peeping. At times, I zoomed in to 200% to check sharpness, but viewing photos at this magnification is completely unrealistic. As photographers, it is all too easy to make judgements and pronouncements based on pixel-peeping simply because we can, rather than we need to— a real dis-service to the overall photograph. After all, it’s the emotional impact that attracts people to photographs, not the pixels. The details are helpful in creating that impact but what they look like at 200% is irrelevant. Pixel-peepers are simply after clicks in the guise of truth, precision and service to photographers.
(1) Web- and projection-size (1500x1125px; 1.7mp)
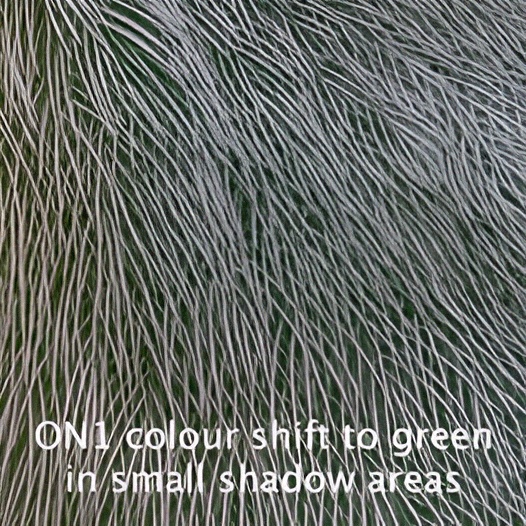
This size is larger than is needed for social media and were viewed at ‘Actual Size’ on my MacBook Pro, which is at 100%, but does not fill the screen. In each case, there is very little difference between any of the six treatments. Only when images are directly compared, one with another, very small differences begin to be noticed. The edge goes to LrEnhNR, DxO and TPZ for having very slightly sharper images that would show when viewed using HD projection (e.g. for camera club presentations), but would go un-noticed on the web. Even the LrBase image held its own against the treatments. ON1 and OMW were also excellent, but suffered from a very slight shift to green in the small deep shadow and black areas between fur and feathers.
Bottom Line: With correct sharpening and texture, any of the six treatments would produce fine web images. If projecting, then a run through LrEnhNR, DxO or Topaz would produce slightly sharper results.
(2) Screen Resolution and up to 9×12” (3840x2880px; 11mp)
When JPEGs were viewed at 100% on-screen, as would normally be the case for these photos, the differences became more apparent. All five raw treatments produced excellent results with a light edge going to LrEnhNR and DxO for their consistency across all photos, with smooth skies, balanced mountain and cloud detail, and micro-detail in foliage, fur, and feathers.
Below is a series of 100% crops from each of the 3840x2880px files arranged for side-by-side comparison. Viewing them like this, on screen, gives a sense of what they look like as web images (#1 above). Click on each image to open it to view it at full size.
on-screen at 100%, there is very little difference between the six. This is to be expected with an ISO 200 file
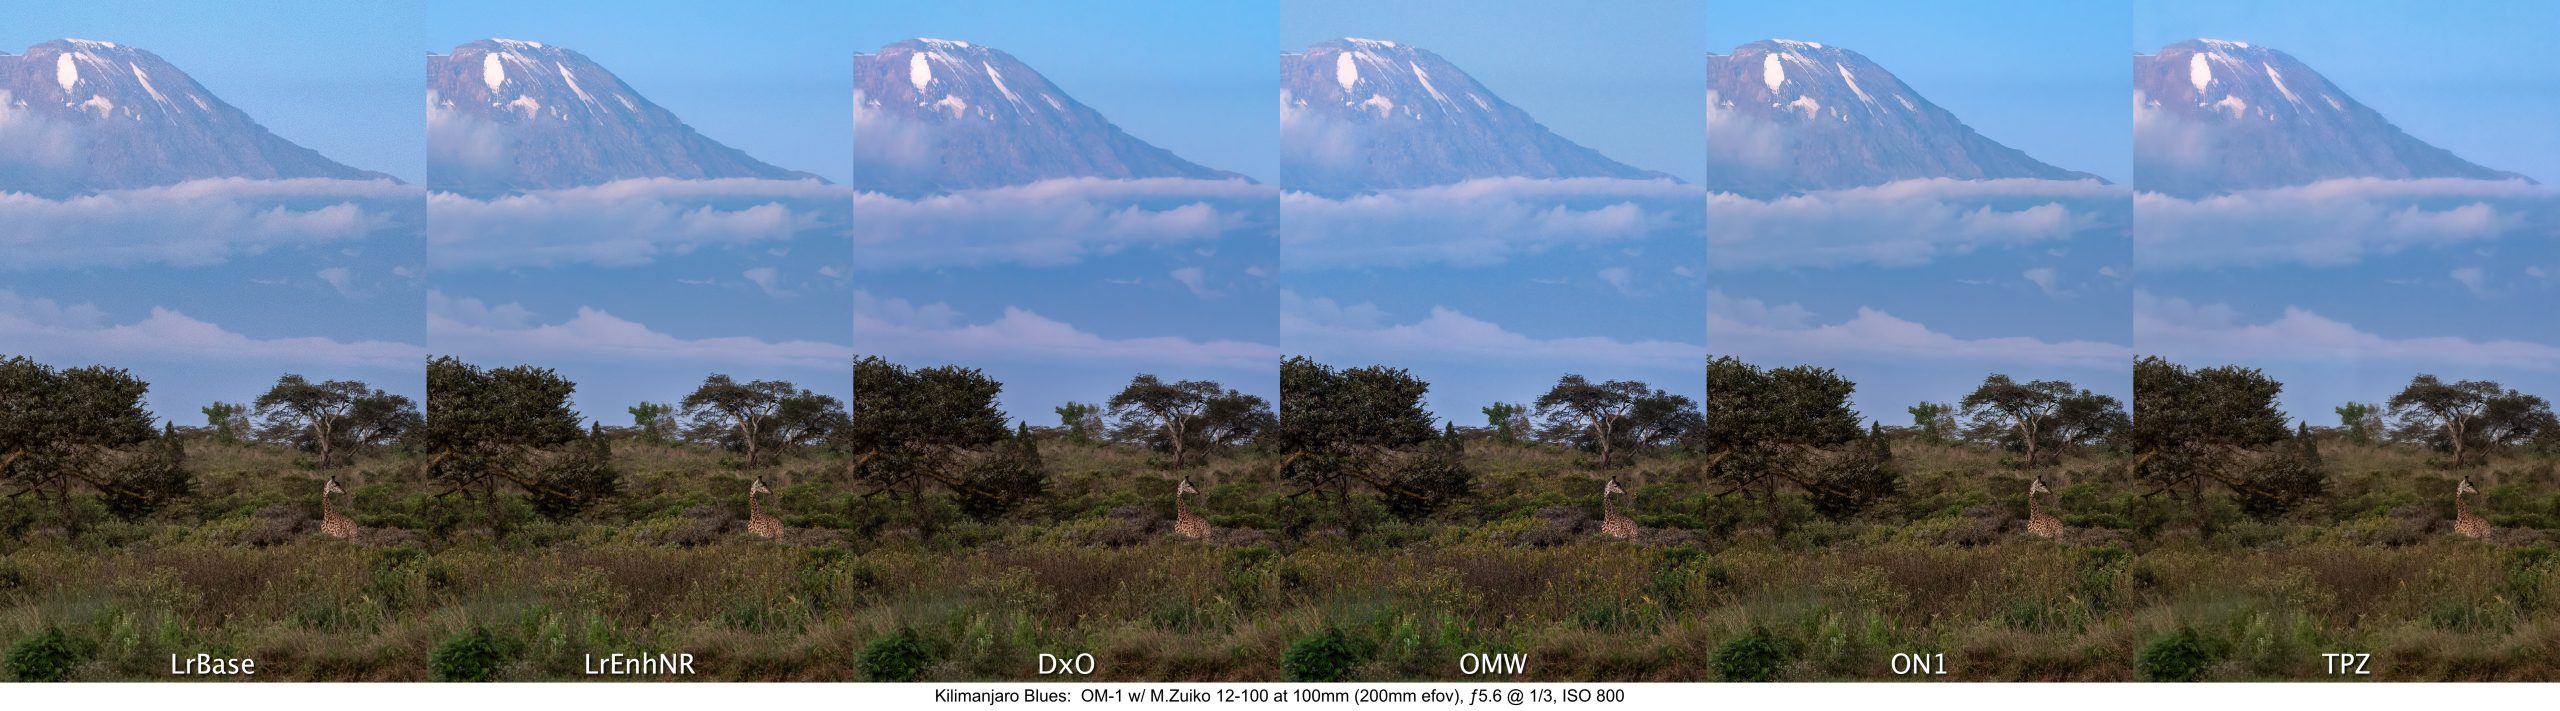
produced slightly more 3D mountain detail and a more natural-looking sharpness in the foreground. DxO, ON1, and TPZ all appear slightly over-sharpened, which was mostly tamed by ensuring Detail Sharpening in Lightroom was set to ‘0’ and Texture was reduced to –30 to –50.

exquisite. These are 600x1200px crops, totalling 3600x1300px. Who says small sensors can’t capture detail at high ISOs?
To my eyes, the stand-outs continue to be LrEnhNR, DxO, ON1 and Topaz. They are all equally sharp. ON1 was also beautifully sharp and smooth, but suffered from the same slight colour shift noted above (as did the OMW version).
By the way, this size of 3840x2880px is similar enough to the 3600x2700px required for a fine art 9×12” print. The results shown above, clearly show that any of the five treatments (barring artefacts) would make excellent fine art prints at that size.
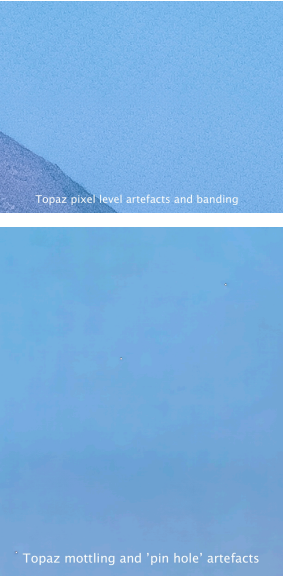
Not seen in the Topaz crop of Kili Blues is some colour mottling in the plain, blue sky area along with diagonal banding at the near pixel level. This showed up each of the multiple times I ran the file through. I have contacted Topaz about this and they are working on it. TopazLabs claim the ‘pin hole’ artefacts are ‘dead pixels’, yet they do not show on any other treatment.
STAY TUNED FOR PART 2….

Elevate Your Vision


Read this story and all the best stories on The Luminous Landscape
The author has made this story available to Luminous Landscape members only. Upgrade to get instant access to this story and other benefits available only to members.
Why choose us?
Luminous-Landscape is a membership site. Our website contains over 5300 articles on almost every topic, camera, lens and printer you can imagine. Our membership model is simple, just $2 a month ($24.00 USD a year). This $24 gains you access to a wealth of information including all our past and future video tutorials on such topics as Lightroom, Capture One, Printing, file management and dozens of interviews and travel videos.
- New Articles every few days
- All original content found nowhere else on the web
- No Pop Up Google Sense ads – Our advertisers are photo related
- Download/stream video to any device
- NEW videos monthly
- Top well-known photographer contributors
- Posts from industry leaders
- Speciality Photography Workshops
- Mobile device scalable
- Exclusive video interviews
- Special vendor offers for members
- Hands On Product reviews
- FREE – User Forum. One of the most read user forums on the internet
- Access to our community Buy and Sell pages; for members only.
You may also like