


When reading the comments on Luminous Landscape forum, it becomes quickly obvious that for many photographers the ability to reduce the weight of their gear and travel lighter is becoming one of the most important requirements in their shooting adventures.
To satisfy their desire to do so, and based on the current state of technology and outdoor gear, I’d like to present a practical guide how to carry less weight and enjoy more the creative process of outdoor photography.
Mirrors or mirrorless?
One of the latest developments in the camera industry have been the mirrorless cameras. They are lighter and less susceptible to damage resulting from falls and vibrations, so switching to a mirrorless camera is a good first step. If you can’t give up the mirrors entirely, you can always carry a light travel shave mirror, they come in both, the spherical and rectangular form factors. For panoramic image scenes, you can use a polished metal spoon (use the outside convex side).

Clothing
As outdoor photographers, we expect a lot from our clothing. It should insulate us from the heat and cold, and protect us from rain, snow, wind, and sun. Get some lightweight, moisture-wicking garments. To reduce the weight to minimum, cut off all clothing tags and wherever possible remove also all fancy signs and logos. Removing all tags and logos will not only reduce the weight, but also the overall bulk, so now you’ll be able to stuff your clothing into a smaller and lighter backpack.
Camera batteries
Many lightweight cameras use nowadays small low-capacity batteries. To reduce the number of spare batteries in your backpack, try to make them last longer. That means primarily turning off the screen display and stop any chimping. Heck, if Gallen Rowell didn’t chimp for his masterpieces, you don’t need to do that either. To save even more energy, decide on the optimal camera settings and never change them again.
Memory Cards
Compared with the previous generation of memory cards, the SD format is great in saving space. If you plan to use multiple cards, you can save even more bulk and weight by switching to micro SD cards. Since most cameras have been designed to use standard size SD cards, use just one SD shell and slide the smaller micro SD’s into that shell as needed. To store your micro SD cards, you can use a small weekly pill organizer. Each day compartment can accommodate multiple micro SD’s shot on the same day, or you can use Monday to Wednesday cells for empty cards and Thursday to Sunday cells for the full cards. If you go on a one week long trip, the 7-day pill organizer is the perfect solution. For 2 week long trips, you can still use the same organizer, storing the card from the day 8 on top of the card from day 1. Repeat this method for all other days. The microSD cards are so thin, that you can easily store 2 cards and a couple of aspirins in each slot.
By the way, don’t ever buy a camera with two card slots, that’s just a wasted space. Instead, you can pack an extra cookie or a few nuts.

Clearing the Card Images
If you are in the habit of reusing memory cards, it’s a good practice to delete all old images from your memory cards. Why carry all those superfluous bits? You can delete the old images individually in your camera or computer, but it is always better to reformat the old cards. This gets rid not only of the old images but also of all the separating lines between the individual images and it results even in more weight savings.
Camera Straps
Most camera manufacturers supply each camera with a wide neck strap, usually adorned with their name. You can reduce some weight by scraping off the imprinted brand name, or buy a narrower, but much lighter no-name strap from eBay. Or use just a wrist strap.
Tripods
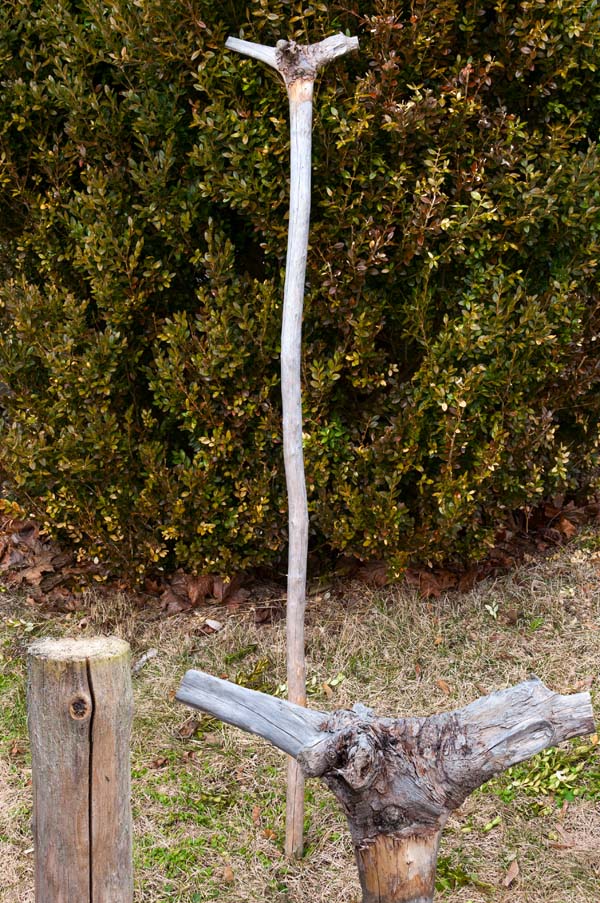
Due to the greater ISO and wider dynamic range in modern cameras , tripods are becoming these days practicaly nonessential and leaving them at home saves you a lot of bulk and weight. If you have a bad hip or knee, you may be already carrying a lightweight hiking pole which can double in difficult lighting situations as a monopod. Just make sure you get a good quality hiking pole, preferrably with a camera mounting screw on the top. Or find outside an approximately 5 ft long wooden branch, saw off one end with your Swiss Army knife, and you have a nice steady platform to support your camera. Below is an example of a branch which didn’t require much work to adapt it as a walking stick/monopod. It can be used in two ways – as a walking cane with a handle and a flat bottom, or if you reverse it, as a monopod with a small base and a flat top.
You can always pull out a nice seasoned beech stick with stripped bark from a nearby beaver dam, they are light, strong and rather attractive. If you are artistically inclined, you can even carve your name onto it.
Les Palenik
March 2020


Elevate Your Vision


You may also like


