Anselmo Generator. This image is of one of the huge generators that powered the pully system that lowered men and mules into the mines in Butte, Montana. It is lit with just one small LED panel.
Like most photographers, I believe that lighting is extremely important. As Alan Briot points out, it is one of 8 pillars that support one’s photographic vision (practically speaking). For me, it’s next in importance only to content and composition. I sometimes think (and this may sound quite strange to some of you) that it’s every bit as important as subject matter and composition! I’m saying this with a wink and a nod, but subjects, even mundane ones, with the right lighting, take on a life and presence beyond that which we expect. And so, if content is the most important thing in a photograph, how can lighting, the thing which breathes the very life into a subject, be less so?
For 35 years, I’ve been a fine art and commercial studio photographer and for 24 of those years, I’ve used Light Painting (I like to refer to it as “Sculpting with Light”) as my method of lighting subjects. Many years ago, I discovered that light painting was not only a great tool for solving problems (which was initially the reason I started experimented with it), but it also was a way to enhance, reveal and celebrate certain aspects of subjects that weren’t visible to me under normal lighting conditions! There is a transformational quality to the light, and ordinary objects can become extraordinary when seen in this “new” light.
Untitled #21, By Harold Ross
For a fun animation showing the lighting of this image, clickHERE
This article (and future follow-up articles) will be dealing specifically with lighting and post production methods as a way to put forward one’s vision using light painting.
First, though, I must credit Aaron Jones, a terrific photographer who made amazing images, for being a great influence. I was light painting before I knew of his work, but Aaron showed us things that we simply had never seen before (Remember, this is pre-Photoshop!). His work made me realize that I could put down my strobes and pick up a small flashlight for every photograph I made. I was able to use light painting in my commercial work thanks to the confidence and inspiration his work gave me. Of course, light painting was much more difficult when the final product was a 4×5 or 8×10 transparency! Digital technology has made things much easier (there’s an understatement for you!).
In light painting, the light is built up over time (in a relatively dark environment), and used in such a way as to optimize the shape, texture and dimension of subjects. In this way, we reveal what is normally beyond the eye’s scope. There is an important differentiation to be made between “painting” light and “pointing” light. The term painting suggests thought and intention. It also suggests movement. There is thought in the direction of light, intention in the skimming of light, and movement in the blending and softening of light. Direction creates shape, skimming creates texture, and movement creates softness. On the other hand, simply pointing the light at a subject does nothing but illuminate it, which leaves me (and the subject) a little flat!
Light painting doesn’t require expensive or elaborate tools. Most of my images are created with a small LED flashlight, (with a simple diffuser of my own design that can be easily made by you, or purchased on my Etsy store: http://www.etsy.com/shop/RakeTheLight), a small 4”x6” LED panel, and a scrim (diffusion panel). That’s it! Two light sources and two modifiers. (In my landscape work, I use a larger LED panel).
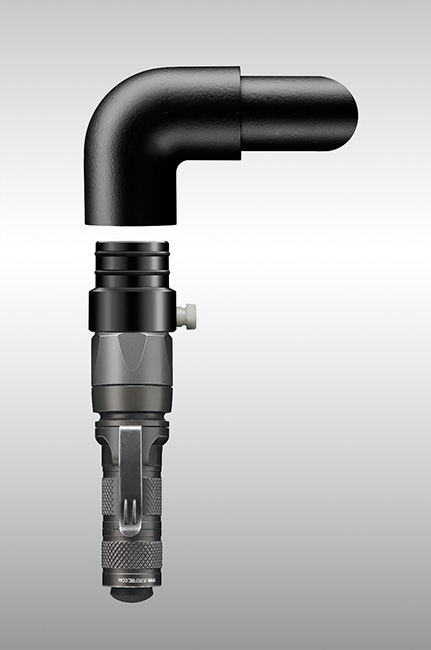
Flashlight with diffuser / adapter
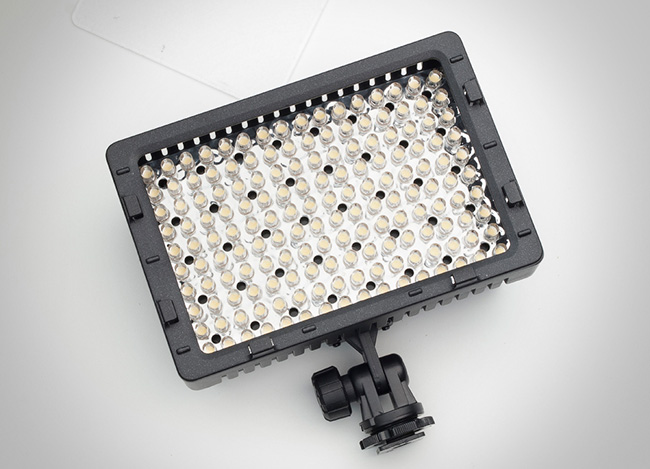
4”x6” LED panel
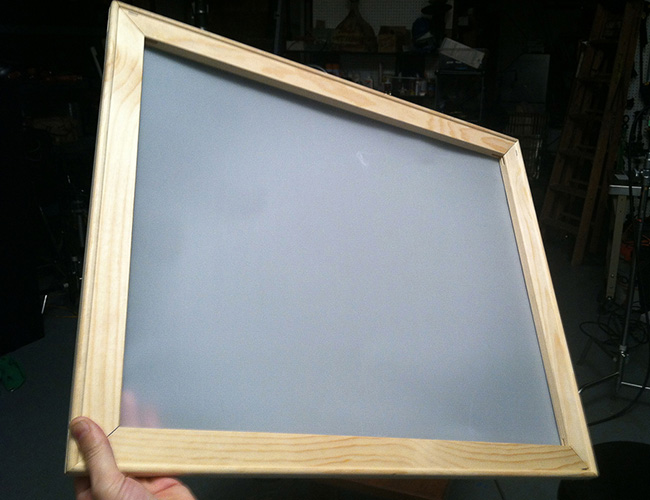
Scrim, made from painter’s canvas stretcher bars and diffusion material
You might ask how one can do so much with so little. When I light paint, I can make a very small light source look like (and have the softness of) a very large light source. How is this achieved? By bringing the light in VERY close, often just an inch or two from the subject, which effectively makes it “larger” and therefore softer, and by moving the light during the exposure, which has the same effect, making the light softer still. I recently created avideo tutorialabout this very subject:
Also, by having the light very close to the subject, I can isolate the light to just that subject, and therefore light it for its best shape, texture and dimension. Back in the day, when light painting on transparency film, this was quite challenging. I had to memorize the angle, the distance, the movement and the time for each light painted area! I would shoot repeatedly on Polaroid material until I got the right lighting, including of course, the fill light. Today, with digital capture and Photoshop layers, I can very easily combine multiple captures, and therefore I can light elements “on their own”, allowing me to optimize lighting for each element in the image (including the background).
Further, in light painting, I control the brightness of dark elements as well as light elements, simply by varying the amount of light I apply, and so, in effect, I’m controlling the dynamic range of the image!
In my process, the post production (in Photoshop) is surprisingly straightforward. I drag the light painted images into layers (which sit above the “fill light” image), and use masking in a “positive” way. We often think of using masking to “get rid of the ugly stuff”, but I like to think of it as “bringing in the beautiful stuff”. To that end, I almost always fill the mask with black, hiding everything in the layer, then use white paint (with the brush set to a very low opacity, roughly 10%, to optimize blending) to paint in the lighted elements in an even more dimensional way. In this way, I am virtually “light painting” again! ( I like to refer to this stage as an opportunity to be a painter without having the talent!) . At this stage, I can further enhance the image. There are no “tight” selections, and only soft masking, so the process is not terribly tedious. Interestingly, although I’m using Photoshop, I’m not “altering” the image. I’m simply choosing how much and in what way to reveal that which was photographed.
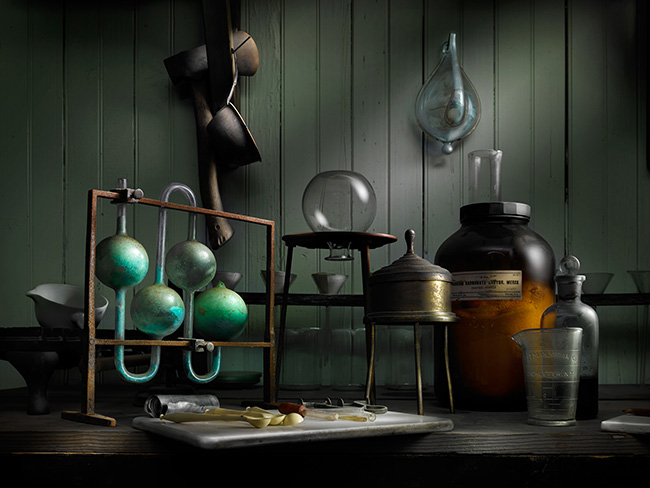
Assayer’s Office, Butte, Montana, by Harold Ross
In this image, the glass and metal reflections have a softness that only a graduated diffused scrim light can impart. At the same time, there are other elements which are lit with the flashlight to reveal texture and shape.
A great big THANKS to friend and fellow photographer John Tebbetts, who invited us to his home in Montana this past summer, and who garnered unfettered access to the Anselmo Mine in Butte. John also helped me make the photograph above as well as the opening photograph of the Anselmo Generator, and several others shot at the mines.
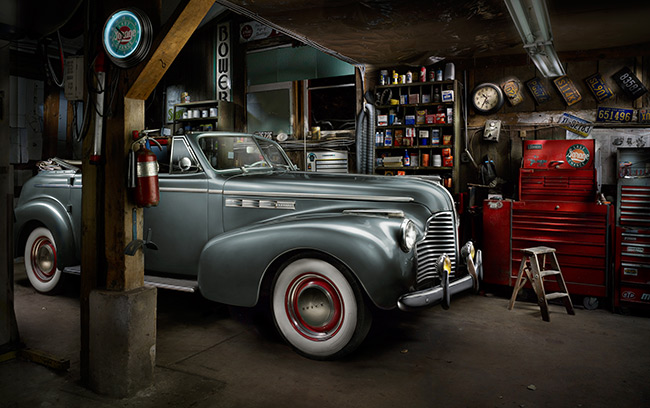
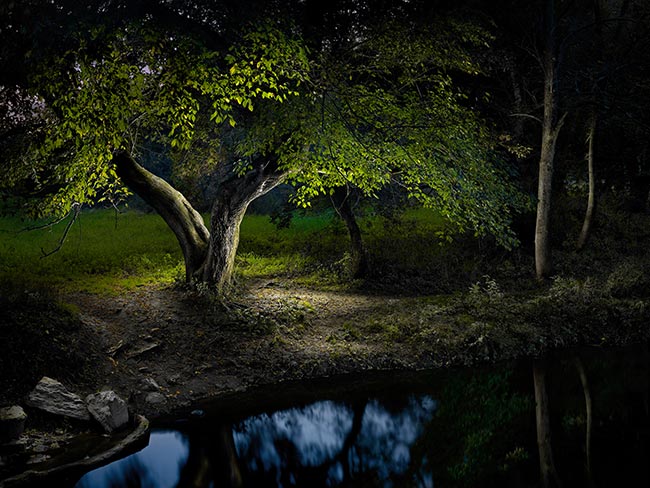
The Last Chance Garage is a currently operating garage, specializing in restoring
classic automobiles in Unionville, Pennsylvania.
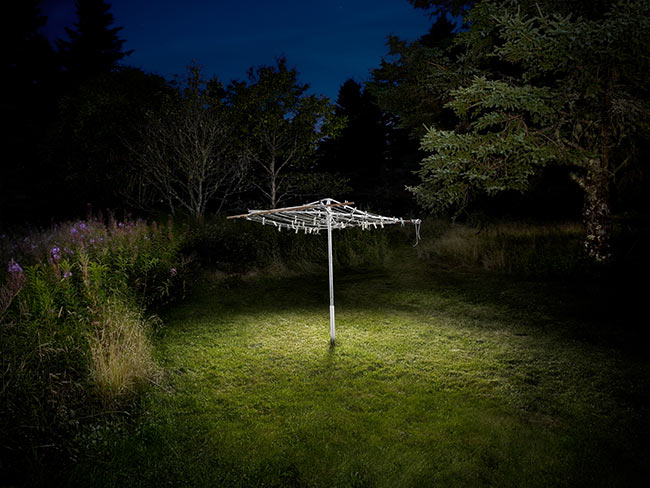
Several years ago, I decided to take my “sculpting with light” ideas outdoors. I wondered what would happen when I applied the same process to the landscape. I knew that when photographing larger objects or scenes, a larger light source is needed to maintain the same relative degree of softness in the light. To that end, I took two 10”x10” LED panels, bolted them together, and powered them from a battery pack worn on my belt. I also applied the same thinking about light, that is, don’t light from the camera viewpoint. Light coming from the camera angle, or anywhere near it, is flat, unattractive and doesn’t describe shape, dimension or texture, the things that I want in my images. I began lighting from inside the scene, and found that something wonderful happened. When lighting from a central place in the scene, the image takes on a surreal quality which I love. An absolutely real scene, when lit in this artificial (yet beautiful) way, creates a question: “How is this possible?” or, “What am I looking at here?”
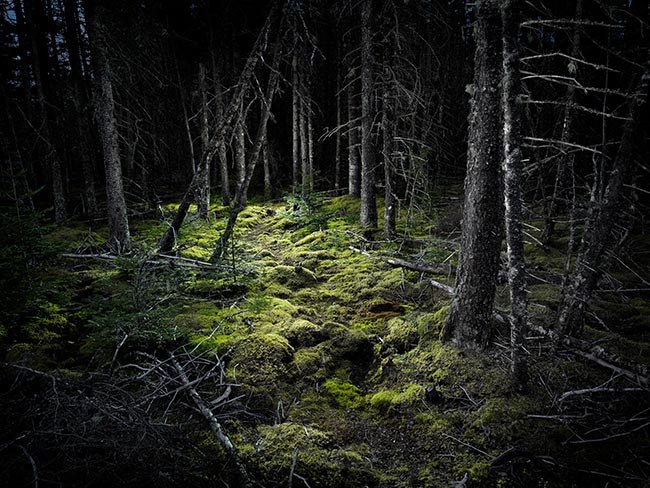
Untitled #13 by Harold Ross
Untitled #15 by Harold Ross
It dawned on me that this is what happens to an extent in my studio work also. Photographs of objects, which we know to be real, are transformed into something else altogether. I knew this to be true already, but the landscape work made it more clear to me why this was happening.
A related effect that I’ve noticed is the change in our perception of scale. I’ve made images of very small things that appear to be quite large, and vice versa. The train in the image below is the “Rocket” train built for the Reading Railroad by a British company. It is approximately 25 feet in length, but in the image, it seems like a toy.
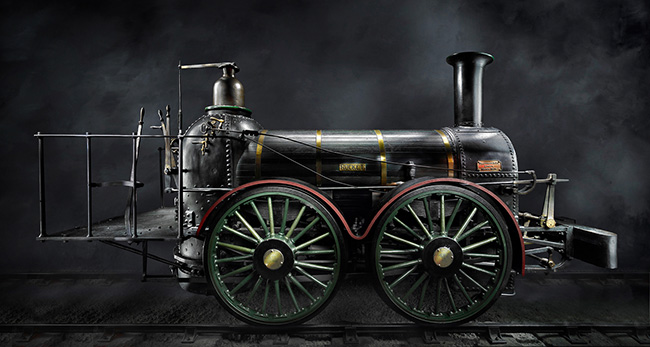
“The Rocket Train” by Harold Ross
Conversely, the image below is of two leaves (that my wife, Vera, found in our back yard) that are connected forever, even in death. This image is very symbolic for me, and the leaves, which are only 2 inches tall overall, seem to be “larger than life” in this photograph.
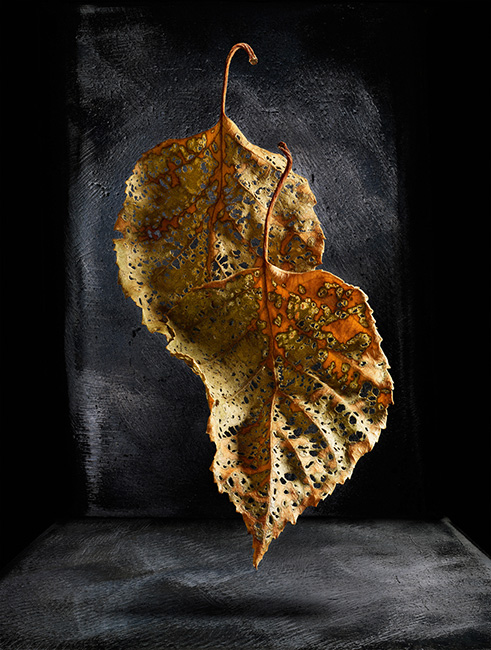
“Twins” by Harold Ross
In future articles, I’ll be delving into specific lighting techniques, as well as post production methods that are all part of the process that I’ve been perfecting for 24 years.
About Harold Ross
As a full time photographer for over 35 years, Harold has been perfecting his use of Light Painting for 24 of those years. He has been creating distinctive work in the studio as well as in the night landscape, and he teaches workshops in light painting and regularly gives lectures on his methods and process. Harold’s award winning work has been exhibited and published extensively in the U.S. and internationally. Harold has a degree in Fine Art from MICA, and lives with his wife Vera in Lancaster County, Pennsylvania.
To see more of Harold’s work, visit hiswebsite
For more information onLight Painting and on Harold’s workshops
Harold’sLight Painting and Post Production tutorials

Elevate Your Vision


Read this story and all the best stories on The Luminous Landscape
The author has made this story available to Luminous Landscape members only. Upgrade to get instant access to this story and other benefits available only to members.
Why choose us?
Luminous-Landscape is a membership site. Our website contains over 5300 articles on almost every topic, camera, lens and printer you can imagine. Our membership model is simple, just $2 a month ($24.00 USD a year). This $24 gains you access to a wealth of information including all our past and future video tutorials on such topics as Lightroom, Capture One, Printing, file management and dozens of interviews and travel videos.
- New Articles every few days
- All original content found nowhere else on the web
- No Pop Up Google Sense ads – Our advertisers are photo related
- Download/stream video to any device
- NEW videos monthly
- Top well-known photographer contributors
- Posts from industry leaders
- Speciality Photography Workshops
- Mobile device scalable
- Exclusive video interviews
- Special vendor offers for members
- Hands On Product reviews
- FREE – User Forum. One of the most read user forums on the internet
- Access to our community Buy and Sell pages; for members only.
You may also like