


On Parade
In early July every year there is a majorGay Prideparade in downtown Toronto. It draws participants and spectators from great distances and is quite a scene. Though I live right in the downtown area I have never watched the parade before.
In 2002 the marshaling area for the parade was just a few blocks from my home. A chance to do some street photography. It was a hot and sunny day, so I grabbed my Leica M7, a couple of lenses, and headed down to where the parade participants were gathering.
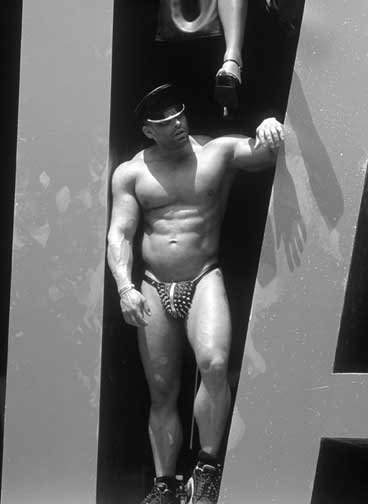 Hands & Feet‚ Toronto, 2002
Photographed with a Leica M7 and APO-Summicron-M 90mm f/2.0 ASPH on Provia 100F
I never did watch the parade. I just spent a half hour before it began, shooting the participants and spectators getting organized, and once it got underway headed home. Too hot. Too many people. I felt that the chance for the kind of images I was looking for were over, or at least my mood was. But, I shot a couple of rolls and this photograph stood out from among the 3 or 4 frames that I was happy with.
I wanted to share it here, but it is so far outside the mainstream of the kind of photography that most readers associate me with that instead ofanothertreatise on street photography or shooting technique I thought I’d write instead about how I critique my own work, by using this picture as an example. At the end of the article I also elaborate on how various compositional and finishing details were decided on.
Analysis
Regular readers of this site know that there is a section here where Icritique readers submissions. Much of the same thought process that I use when critiquing other photographer’s work goes into analyzing my own; why some images work and others don’t. I’m using this opportunity to share with you an analysis of one of my own photographs, because learning how to "read" a photograph is an important part of learning to be a better photographer. I’m also not using one of my landscape photographs because that’s too easy. I needed something more demanding. So here’s how I read this one, with a bit more detail than I usually provide when critiquing the work of others online.
Reading The Image
Two major themes are at work here‚ the strong graphic design and the homoerotic component‚ and they are virtually inseparable. In fact how they interrelate plays a large role in how various people will respond to this photograph.
The space that the man is standing in is enigmatic. A lot of questions are raised, and very few answers given. Are these shapes letters, and if so what do they say? If you didn’t know that the man was standing on a parade float, where would you think he was? The lighting is clearly daylight, but why would he be dressed (or rather, undressed) like that outdoors?
There’s a woman’s leg dangling down from the top of the frame. Or is it a woman’s? What is the relationship between these two people?
There are a number of strong repeating patterns, many of them "V" shaped and triangular. They force an orderliness into the frame that is in strong contrast to the organic randomness of the people in it and the shadows.
The curve of the dangling leg is mirrored in the curve of the man’s right arm and then again his left leg. This accentuates the vertical flow. The shadow of his hand and her foot lie right next to each other. Her high healed shoe is obscured, as are the bottoms of his shoes.
These are some of the reasons why this picture works. Graphic strength and a strong enigmatic character. This is how I "read" it now that it’s a finish photograph. All of this is post exposure intellectualization of course. None of this went through my mind when I shot it. Only as I was working on turning it into a finished print did this analysis start. And it’s only when I’ve taken a "read" like this that I know whether or not a particular photograph "works". Often I have to live with a print for a day, or two, or even longer until I know whether it’s a "keeper" or not.
So the next time you read one of my online critiques, be aware that I do it to my own work as well, but usually a lot more mercilessly than I do to the work of others.
Molding The Image
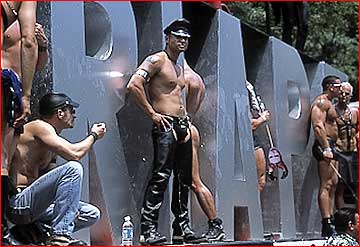 Fig. 1
A finished photograph like the one at the top and again the bottom of this page (click on it to view a larger version) almost never springs forth whole and complete. It’s almost always the results of both pre-visualization when shooting and post-visualization in the darkroom or digital desktop. How this process works and what went into the making of this particular photograph are discussed below.
Figure 1above shows "the scene"; a float preparing for the parade to start. I put on the 90mm lens (the longest I had with me) to flatten the perspective a bit and to allow me to get tight in on individuals. I knew that I needed to abstract what I wanted from the general confusion and the disorder of the scene.
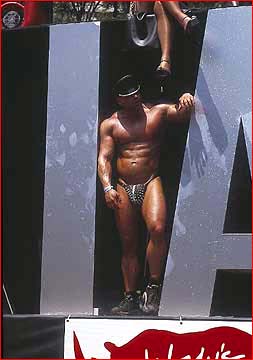 Fig. 2
On reviewing my film on the lightbox I identified this frame (Fig. 2) out of three or four similar ones as having the most potential. Though it was shot in color I immediately converted it to B&W. Color was simply wrong for this shot. Too real. Too emotional. By changing it to monochrome it’s become somewhat abstracted and less threatening. More graphic and less overtly sexual.
I did the conversion usingPhotoshop’s Channel Mixer, using only the Red channel at 100%. The reason for this is that the man’s skin is quite red, and therefore in converting to grayscale it became lighter than the similarly toned letters, thus increasing the tonal separation. This is the same as if I’d shot the scene on panchromatic B&W film with a red filter.
Next I thought about how best to crop the image. If I’d been working with an SLR and zoom lens I would have gone in tighter, but this was the closest I could get at that moment with a 90mm lens. So now the thought process was firstly, "What detracts from the core story being told, and what detracts from the graphic simplicity that’s inherent in this image?"
The banner at the bottom clearly had to go. Next, the top of the frame had to be cropped. I would have liked to retain the second crossed leg, (and if I’d shot more square-on I could have), but from the angle that I did shoot it had to go so as to be able to remove the clutter at the top left of the frame.
The final crop was at the sides. This simply became an esthetic judgment. The extra black at the left added little and so I cropped it out to the point where the remaining black space became a V, or skinny triangle. This nicely countered the shapes on the right of frame. I decided to crop the right a bit so that it too created a clearer triangle.
Hands & Feet‚ Toronto, 2002
Photographed with a Leica M7 and APO-Summicron-M 90mm f/2.0 ASPH on Provia 100F
That basically was it. A bit of spotting, someUnsharp Maskand a little seasoning with tonal adjustments and it was done.
Was the final image exactly as I had seen it? No, not exactly. Was it as I had originally shot it. Clearly not. Is it a photograph that will go in my street photography portfolio and likely be displayed in my next exhibition. Absolutely.
Related Articles of Interest


Elevate Your Vision


Read this story and all the best stories on The Luminous Landscape
The author has made this story available to Luminous Landscape members only. Upgrade to get instant access to this story and other benefits available only to members.
Why choose us?
Luminous-Landscape is a membership site. Our website contains over 5300 articles on almost every topic, camera, lens and printer you can imagine. Our membership model is simple, just $2 a month ($24.00 USD a year). This $24 gains you access to a wealth of information including all our past and future video tutorials on such topics as Lightroom, Capture One, Printing, file management and dozens of interviews and travel videos.
- New Articles every few days
- All original content found nowhere else on the web
- No Pop Up Google Sense ads – Our advertisers are photo related
- Download/stream video to any device
- NEW videos monthly
- Top well-known photographer contributors
- Posts from industry leaders
- Speciality Photography Workshops
- Mobile device scalable
- Exclusive video interviews
- Special vendor offers for members
- Hands On Product reviews
- FREE – User Forum. One of the most read user forums on the internet
- Access to our community Buy and Sell pages; for members only.
You may also like


