


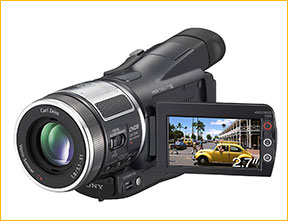
Photograph courtesy Sony
A Tipping Point
In every field a product comes along every now and then which is later regarded as atipping point– a fulcrum, if you will – around which the old and the new swing. In digital photography many regard theCanon D30of several years ago as such. It brought the the price / performance ratio of the DSLR to the point where the huge prosumer market was allowed to open up, and things haven’t been the same since.
In video, theSony HDR-HC1may likely find itself regarded in the same way as was the Canon D30. Just as the D30 wasn’t the first DSLR (numerous Kodak models as well as theNikon D1proceeded it), so too the HC1 isn’t the first High Definition camcorder. But at less than $2,000, a size that allows it to fit in a jacket pocket, and image quality rivaling that of its brethren which can cost more than twice as much, it certainly will be regarded as a milestone camera.
The HC1 became available in mid-July 2005, and this review is based on several weeks of intensive use. Though I am best known as a still photographer, author and teacher, I have been involved in video production for many years, and so while the expansion of this site to include coverage of video related topics is new, my involvement in video itself isn’t. You can read more about this in my recent (July, 2005) article titledVideography for Photographers.
____________________________________________________________________________________
HD for Everyman
To summarize what I’ve written elsewhere on this site – the future of TV is high-definition. The number of HD channels available in the US (especially on cable and satellite) grows monthly, and though the deadline has been extended by the FCC, standard definition NTSC broadcasting, in the US at least, will come to an end in not too many years. In Europe, where there is little government mandated move yet to HD, satellite broadcasters are just starting HD service.
While high definition TV continues its growth (20% of US homes as of July, 2005), up until recently consumer and non-professional videographers didn’t have any real choices. In 2003 JVC introduced the first affordable HDV camera, theGR-HD1. It was in many ways a flawed product, but it pointed the way. This was followed in late 2004 and early 2005 by Sony, with theirHDR-FX1andHRV-Z1U.These are essentially the same camera, but in Sony’s traditional mannerthere is a consumer and a prosumer version, with the Z1U having niceties such as XLR audio connectors.
____________________________________________________________________________________
Single Chip CMOS
The HC1 surprised a lot of people in two ways; by being a single chip rather than 3 chip design, and by using a CMOS sensor instead of CCD. The HC1 is only the second video camera to use a CMOS chip, and some video folks are a bit bent over it. Of course still photographers know that CMOS is rapidly replacing CCDs in DSLRs. Canon paved the way, then Kodak followed, and now Nikon – using a Sony manufactured CMOS chip in its flagship D2x.
And, as for the issue of 3 CCD vs a single chip, we’ll, the state-of-the-artDalsa / Panavisionvideo camera currently being used to film some of the latest big-budget Hollywood films is a single chip design, so with all of this it should be obvious that chip type and sensor count matter less than do the actual results.
____________________________________________________________________________________
Image Quality
The HC1 under test here is the first high definition video camera that has a size and price suitable for the consumer market. But, just because it is small and relatively inexpensive, one shouldn’t think that the image quality is necessarily deficient. My own tests show that 90% of the time the HC1 is capable of producing footage which is very close to that produced by the Z1 or FX1, cameras which cost 2-3 times what the HC1 does, and which are significantly larger in physical size.
No, the HC1 doesn’t produce images at low light levels that are as crisp and clean as those from its bigger brothers, though at normal light levels they are judged comparable. But when viewed on a 1080i high-def TV the image quality is simply remarkable, at any light level. In still photography terms it’s like comparing the image from a 6MP camera with one from a 22MP camera. Truly. HDV as implemented by Sony offers roughly twice the vertical resolution and three times the horizontal resolution of SD video.
Unfortunately there is no way for me to show you the image quality that the HC1 is capable of. Online bandwidth is inadequate, and since there isn’t even a High Definition DVD standard available yet, I can’t make disks available."Yet", is the operative word though. Regular readers andVideo Journalsubscribers know that Chris Sandersonhas been shooting content for theVideo Journalin 1080i High Def since January, 2005. We expect that a disk format will become available in 2006 (eitherBlu-RayorHD-DVD) and when it does we will be among the first video publishers to release content in that format. At that time we will include footage shot with the HC1 as well as that done with our Sony Z1U and HDR-FX1High Defcameras. We’ll even have comparisons of all three.
____________________________________________________________________________________
Ergonomics
Regular readers know that one of my major concerns when testing any new camera is its ergonomics. How a camera falls to hand; how easy (or difficult) its controls are to use; and how intelligently designed its menu structure may be, are all issues which I count as being equal if not superior to image quality in importance. A camera’s potential for high image quality is for naught if its controls get in the way of actualizing the image.
I’m pleased to report that the Sony HC1’s user interface, handling, and control layout are exemplary. Not perfect by any means, but about as good as it gets for products in its size and price category.
With any new camera, be it film or video, there is always a learning curve. Sometimes that curve is steep because of rich functionality, other times because of poor ergonomics. I’m pleased to write that in the case of the Sony HC1 any issues regarding one becoming familiar with the camera will likely be simply because of its rich feature set.
____________________________________________________________________________________
Exposure and Metering
There’s good news, and there’s bad news. The good news is that the camera provides zebra stripes, settable to either 70 or 100 IRE. This means that one clearly sees parts of the image that are overexposed, with a setting of 70 being very conservative – suitable for NTSC broadcast, while 100 is, as you might imagine, totally blown out. There is also an optional real-time histogram (though a bit small on-screen). Together they make evaluation of exposure very straightforward.
Unfortunately setting of exposure is somewhat lacking. There is the ability to set the shutter speed, from 1/4 second to 1/10,000 second – very nice for slow motion work, for narrow depth of field in bright light, and also for low light situations where there isn’t motion in the frame. But, there is no iris control. In other words, you can’t manually directly set the f stop.
What the HC1 does offer is a hybrid solution, that while it works quite well, isn’t what it should be. At the left front of the chassis, just below the lens, is a lever and button markedExposure / Vol. In playback mode the lever serves to control playback volume through the camera’s built-in speaker. In record mode it activates an exposure control that opens and closes the iris (no F stop value shown though) and then when it runs out of aperture in starts to increase gain, up to 18db. The problem is that the shift from aperture increase to gain increase isn’t controllable. It happens in a continuous fashion.
This is very handy for when one wants to simply control overall exposure. But, since you have no idea of what aperture is being chosen and when maximum aperture is reached, and the transition to gain increase is achieved, it is less than ideal for the videoographer who likes to be in control of all aspects of exposure. Still photographers used to the option of full manual control will feel cheated.
I found that while the HC1 is generally very good at setting exposure automatically, in low light levels there is a tendency to underexpose, and so the use of the histogram is recommended. I also found that in low light auto-white-balance ere’s on the side of too low a setting, and so indoor scenes can be rendered far too warm. Manual white balance in these situations will always be preferable, if possible.
____________________________________________________________________________________
The Lens, Zooming, and Accessory Lenses
The HC1’s lens is a Carl Zeiss Vario-Sonnar T* coated zoom lens with a 10:1 zoom range with a focal length range of 5.1mm – 51mm. In 16:9 aspect ratio this produces an equivalent focal length range (in 35mm terms) of 41–480mm.
This is quite long enough for most uses at the telephoto end, though not quite wide enough at the short end. There are accessory lenses available, which we’ll look at in a moment.
The aperture range of the lens is f/1.8 – f/2.1 at its widest open, nice and fast for a lens with this range. The front filter ring adaptor is 37mm, which is a standard size in the video world, and which makes availability of accessory lenses as well as filters a non-issue.
There are three ways of zooming the lens to the focal length you want. There is a zoom lever under ones right hand forefinger and the option of manual zooming with the knurled front lens ring. The zoom control gives a very fast to medium slow zoom, but can’t really be easily controlled to a very slow zoom rate. The lever just doesn’t have the degree of control that one would wish for. There are zoom buttons on the outside edge of the LCD panel, and these give a fixed rate zoom, but not near slow enough for my taste. Manual zooming with the lens ring isn’t a real mechanical zoom – it’s fly-by-wire, and therefore not as responsive or smooth as might wish for.
Autofocus works well, and doesn’t hunt much, except in very low light. Manual focus is easily activated with a switch on the lens barrel. Just beneath this switch is a button marked Expanded Focus. This magnifies the on-screen image, making precise focusing that much more accurate.
In fixed set up situations I usually let the camera autofocus at maximum focal length, slide the autofocus switch to manual, and then zoom out to the framing desired. This way if someone walks though the shot, or I reframe, the camera won’t try and refocus on something inappropriate.
Another clever way of achieving focus with the HC1 is Spot Focus. Set the camera to manual focus mode and then active Spot Focus via the menu screen. The entire screen then becomes touch sensitive and you just need to point to the spot on the screen image that you would like to have the camera focus on, and it does so. Very handy in some situations.
As far as lens quality is concerned, I haven’t done any resolution tests but careful viewing of footage on both a 42" HD plasma screen and a 32" HD LCD show little to be desired at any focal length. The lens appears to be nicely matched to the demands of the HD format. Most artifacts seen tend to be MPEG-2 related rather than caused by lens aberration, though some CA is seen on heavily backlit scenes.
Accessory Lenses
Because the zoom lens on the HC1 is not removable the only choice for achieving wider or longer focal lengths is to add accessory lenses which screw into the front of the lens. Now, photographers used to interchangeable lenses on their SLRs and DSLRs will start to itch at the thought of this approach. But in the world of video this is pretty much the norm. There are prosumer and pro level video cameras with interchangeable lenses, of course, but at the low end accessory lenses are the norm, and frankly, they’re not half bad. In fact, they’re even better than that.
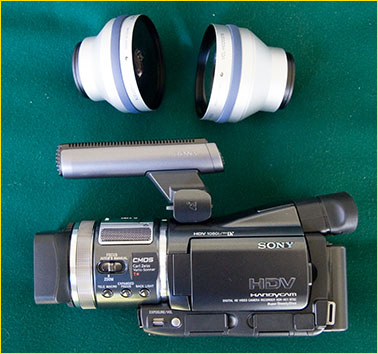
The two which I am using on the HC1 are theSony VCL-HG0737X Wide Angle adapterand theSony VCL-HG2037X Tele-converter. They are both moderately priced, and the wide angle adapter in particular is a must for anyone with an HC1. At less than $150, there’s no reason not to own this .7X converter. It makes the HC1’s coverage at the wide end equivalent to 29mm. The tele-adapter is equivalently priced and because it’s 2X, turns the built-in lens at full zoom to the equivalent of 960mm. I don’t use this much, but if shooting a dramatic sunset or other subject where heat haze and other forms of image shimmer aren’t a problem, some dramatic images can be achieved. Needless to say a very solid tripod is needed when working at almost 1000 millimeters.
____________________________________________________________________________________
Stabilization
The HC1 features Sony’sSuper-Steady Shotimage stabilization. This is not optical, but rather electronic. The way this works is that rather than moving a lens element to compensate for camera movement and vibration, the image is underscanned, and only the edges of the frame are sacrificed to smooth out movement. However its done, it works very well.
Note that there are four stabilization levels; Off, Normal, Wide and Tele. The latter two settings are ostensibly for use with accessory lenses, tailoring the amount of stabilization to the lens range used, but they also can be used as a high, medium and low setting, with the Wide setting providing the least noticeable stabilization.
This is also a good time to mention that many of the camera’s custom settings which are controlled via menus on the touch-screen only last for 12 hours with the camera powered down. After more than 12 hours they are forgotten, and so need to be reset. This is a real pain, and since other of the camera’s menu settings are permanent it’s surprising that this limitation is present. The camera really needs to have settable combinations of functions assignable to User buttons, and also for these custom settings to be able to be saved to the camera’s memory card, which is there in any event for still photography.
____________________________________________________________________________________
Audio
The camera has a built in stereo microphone that does a reasonable job. But, as with almost every video camera, it does pick up some camera noise, especially when ambient sound levels are low and the auto-gain cranks up sensitivity. (There is a manual gain setting for audio, settable and monitorial via the touch screen menus). The solution to in-camera miking is to use an accessory microphone. The one that I found works quite well is theSony ECM-HGZ1. This zoom shotgun mike sells for under $75, and attaches to the HC1 via that camera’s new and proprietary "Active Interface Shoe" atop the cameras body. You can see the mike in the accessory photograph above.
The mike has a three position switch;Off– in which case the camera’s built-in mikes are live;Zoom– in which case the microphone zooms its sensitivity pattern along with the zooming of the camera’s lens, andGun– at which setting it has its maximum sensitivity pointing forward.
No, this isn’t the greatest microphone in the world, and no it isn’t a true shotgun mike. But, it’s small, versatile and inexpensive, and does a great job of almost completely eliminating acoustic camera noise.
Incidentally, theActive Interface Shoeis a mixed blessing. On the one hand it allows "smart" devices like the HGZ1 mike to do their tricks, but on the other hand normal hot-shoe mount accessories can not be used with this camera.
Fortunately the HC1 does have a jack for an external microphone as well, so the use of any mike that you might prefer is possible. Balanced audio with XLRs connectors will require the A1 camera, the HC1’s prosumer sister coming in September.
____________________________________________________________________________________
Menus and Screen Control
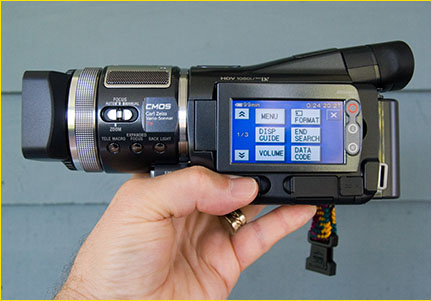
Sony are enamoured of screen-based controls, as are a number of other video camera makers. While the HC1 has physical controls for zoom, manual focus, exposure control and a few others, all of its secondary control interface is via the 2.7" wide-format touch screen.
This is a good news, bad news situation. While there is a goodly amount of manual control possible it means wading through quite a few menus, and pros used to physical controls on the exterior of the camera body will likely find this frustrating.
But Sony has provided a couple of ways of working around this. The first is that one can take any of the multitude of menu items and place them on a custom menu screen and then prioritize their display order. This makes accessing the controls that you need on a regular basis much quicker than would otherwise be the case.
The second is one that isn’t mentioned in the Sony manual, but once I discovered it turns out to be a huge workflow benefit. Here’s how it works…
The menus are visible both on the exterior LCD and in the viewfinder, but one can only control them via the LCD touch screen. This means that you have to work with the screen folded outwards. This is sometimes problematic when shooting hand-held, and can even shake the camera when tripod mounted if a long focal length is being used.
Here’s the trick. The LCD can be folded flat against the camera body, as seen below, butfacing outwards. In this caseboththe LCDandthe viewfinder are active. With the screen folded flush against the body controlling the various functions becomes much less awkward. But when used this way there is extra battery draw with two active screens. If you’re shooting in daylight though you can turn the LCD screen’s backlight off, and the screen still remains quite usable. Now you have a touch screen for camera settings that is flush to the camera body and which doesn’t provide any additional battery drain. Very neat.
Even zooming using the constant rate zoom buttons is made easier because you’re not jiggling the camera by pressing on an extended screen.
____________________________________________________________________________________
Sharpening
Image sharpening can be set to one of seven different levels; normal, and +/- 3. On typical subjects I found that thenormalsetting seemed appropriate, but if the shot has a lot of clear sky or smooth surfaces you might find that -1 or -2 is preferable. When shooting tight head shots, to avoid over-sharpened skin textures you might even prefer -3. My preferred every-day setting is -1. I don’t find any of the plus settings usable for any purpose.
____________________________________________________________________________________
Power
The HC1 uses standard Sony InfoLithium batteries and comes with an FM50. There is no separate charger. The battery is charged in-camera via the mains adaptor.
Since this standard battery only powers the camera for about an hour of typical usage extra batteries are needed. And, unless you want to tie up the camera while charging, an additional charger is a worthwhile purchase. TheBC-TRMcharger is a good choice for travel as it is small and plugs directly into an AC outlet.
Other larger batteries may be used, but there’s a problem in doing so if you use the camera’s viewfinder. The viewfinder tilts, but it doesn’t extend, and so the larger batteries stick out the back of the camera body sufficiently to prevent getting one’s eye up to the finder. One can shoo using the fold-out LCD, but an extending viewfinder would have been sweet.
____________________________________________________________________________________
Tape
HDV camcorders like the HC1 use standard Mini-DV tapes. These are ubiquitous and inexpensive. The reason that they can be used to record the huge amount of additional data required for HD is because of the use of MPEG-2, which uses much higher and more sophisticated compression than that used previously for SD recording. As mentioned elsewhere, if you transfer a 60 minute HD tape to hard disk it will occupy 13 GB. For this reason camera tapes become an excellent archiving medium.
It should be noted that while Sony makes a special tape for HD recording, its use isn’t mandated. People shooting with various Sony HD cameras have found that as long as the better quality Mini-DV tapes are used, there’s no need to purchase the much more expensive Sony HD tapes.
Most people will erase transferred footage from their hard disk once they have edited their opus, as with the non-linear editing programs it is always possible to recapture just the scenes that are needed to recreate an edit.
One of the camera’s only design flaws is that tapes load from the bottom of the camera. This means removing it from a tripod, and if a mounting plate is attached removing this as well before changing tapes. It may well be that given the small size of the camera this was the only way to execute this design, but nevertheless it’s something that is going to frustrated a large number of users.
____________________________________________________________________________________
Editing HD
While DV records 840MB / minute, uncompressed, HD needs 9.6GB / minute uncompressed. That’s right – almost 10 Gig per minute of footage shot. That’s why HD needs to use MPEG-2 compression technology. Anyone who has watched enough HD knows that there are compromises that can be seen. These include various forms of artifacting, including so-calledmosquito noiseandquilting. But, MPEG-2 does allow us to compress the huge bandwidth required for HD down to something that can be recorded, edited and distributed, so we must learn to live with its failings, at least till something better comes along.
This brings up the issue of disk storage. If you come back from a vacation with 4 or 5 hours of footage, be prepared to need a 150GB drive to store all of this data. Kind of makes shoots from even the largest digital still images seem small in size by comparison.
But of course, most people don’t "capture" all of their footage. The most sensible way of handling this is to only transfer from tape to hard disk those clips that are actually needed for your eventual use. This means having to sit and review and "log" all of the footage that you shoot, somewhat more onerous than reviewing thumbnail images of your stills, because this needs to be done in real-time. Five hours of footage takes at least 5 hours of logging and review. Then, the actual capture will need to be done in real-time as well, so do plan on spending more time sorting out your video than you ever did your still images.
The same applies to editing. Working on a single photograph in Photoshop can be the work of minutes, or sometimes even hours. But editing video, even a simple family vacation, can be the work of days. These will be enjoyable days, no doubt, but never underestimate how much time editing and sound mixing even the smallest video project will be.
____________________________________________________________________________________
Still Photographs
Like most consumer oriented camcorders the HC1 has still photo capability. It records a 3 Megapixel JPG to a Memorystick Duo card. In this era of 5-7MP pocket digicams this is no great shakes, but for snapshots and prints up to A4 these will be found to be more than acceptable. This is no substitute for a dedicated still camera, but when traveling light one can still do snapshots with the HC1 alone.
____________________________________________________________________________________
The Bottom Line
If you’ve read this far you’ll likely appreciate that I’m a big fan of this camera and of HD video in general. HD is the future of consumer video as well as of indie film makers and non-broadcast producers, and of course of broadcast television. During the first half of 2005 the Sony FX1 and Z1 high-def cameras swept though the prosumer market, and now the HC1 is destined to do the same to the hobbyist market, and prosumers who need a small, light and yet powerful HD digicam for specialized uses.
At under $2,000 the Sony HC1 is, as of summer 2005, without competition.
____________________________________________________________________________________
Resources
If you’re interested in the technology behind the HC1’s CMOS chipthis articlemay be of interest.
This sitealso has an active discussion forum about the HC1.


Elevate Your Vision


Read this story and all the best stories on The Luminous Landscape
The author has made this story available to Luminous Landscape members only. Upgrade to get instant access to this story and other benefits available only to members.
Why choose us?
Luminous-Landscape is a membership site. Our website contains over 5300 articles on almost every topic, camera, lens and printer you can imagine. Our membership model is simple, just $2 a month ($24.00 USD a year). This $24 gains you access to a wealth of information including all our past and future video tutorials on such topics as Lightroom, Capture One, Printing, file management and dozens of interviews and travel videos.
- New Articles every few days
- All original content found nowhere else on the web
- No Pop Up Google Sense ads – Our advertisers are photo related
- Download/stream video to any device
- NEW videos monthly
- Top well-known photographer contributors
- Posts from industry leaders
- Speciality Photography Workshops
- Mobile device scalable
- Exclusive video interviews
- Special vendor offers for members
- Hands On Product reviews
- FREE – User Forum. One of the most read user forums on the internet
- Access to our community Buy and Sell pages; for members only.
You may also like


