


by Bernard Languillier

Smoking Earth
It has been known for centuries that digitally assembling a mosaic of adequately captured images is possible thanks to the process called stitching. You may want to pause here for a few seconds, check for allergic skin reactions to the idea of having to spend even more time processing images…
Stitching enables the photographer to produce images in any possible aspect ratio while increasing significantly resolution and reducing the impact of lenses aberrations such as light fall off and reduced corner sharpness.
On the downside, stitching does take a bit more time and doesn’t apply to all types of images. When not done properly or ingurgitated in prescribed amounts, stitching does carry an element of risk. There may be cases when it is difficult to come up with a perfect image devoid of any stitching defects. Would that be any bigger a departure from an ideal capture of reality than our other images with their poor corner sharpness, light fall off, visible chromatic aberrations,…? I happen not to think it would, but stitching defects can sometimes be uglier and don’t quite match our genetic feel for what a photograph must look like.
Some thinkers dispute the photographic nature of stitched images because they don’t capture a single moment in history, but merge several time samples. That may indeed be a problem for those in quest of capturing reality. I don’t see it as a major issue for those looking at creating art. Somehow stitching helps get rid of the illusion that photography captures reality. It does, but then it doesn’t.
The best known application of stitching is the creation of panoramic photographs, those wide images comparable to the output of 6×12 or 6×17 cameras, that lend themselves particularly well to many landscape vistas. However the process of stitching can be applied to generate more traditional aspect ratios as well as weird looking polyline bound assemblies of doubtful taste.

Weird looking image
Stitching can be done with any type of camera but results are typically best when manual control is available to freeze the exposure and control focus between frames. One major value of stitching is the possibility to reach very high resolutions with cheaper cameras offering a lower native resolution sensor. Even cameras often considered offering only average image quality, such as the Nikon 1 series mirror less bodies, can enable the capture of panoramic images in a few seconds that easily out-do the best 4×5 sheet of film. I like to call stitching “the great equalizer”. Generally speaking I would still recommend to use cameras fitted with sensors offering the best possible “pixel quality”, notably in terms of dynamic range and noise. Quite a few affordable cameras, such as the Sony a7 mirroless body, do meet these criteria.

Nikko panorama
Some may ask “why bother?” when a single D810/a7r frame captured with a good lens and proper technique can yield gorgeous looking A1 prints. My personal answer to this question is “because it’s fun”. The same way that some folks found it rewarding to shoot with 8×10 cameras although medium format film solutions also delivered excellent image quality for most applications, stitching is about going that extra mile from amazing image quality (think IQ280 single frame) to out of this world image quality. Looking into the future, we can also foresee an increase of the quality of display medium, such as very high-resolution screens, for which resolutions higher than those of our current cameras will deliver benefits. Stitching helps make images more future proof.
Now, it is also important to know when not to stitch. Just like 8×10 doesn’t do everything well and imposes constraints on the shooting experience and subject, the availability of stitching in one’s toolkit should never limit the photographer in his/her shooting freedom. While it was impossible to transform an 8×10 camera in a Leica M, nothing prevents you from un-mounting your DSLR from its panoramic head to snap a few frames handheld at ISO 12,800.
But if you think stitching is the way to go for a given image, the technique can be further combined with other images information expansion techniques such as Depth of Field Stacking (DoF Stacking) and High Dynamic Range (HDR). The outcome are images that contain a lot more information than a single frame would have (detail, color,…). The number of frames captured to generate a single resulting image can range from a few to several hundreds or even thousands.
Recent advances in stitching software reducing the overhead, improving the quality of resulting images are opening up new possibilities in terms of situations to which stitching can be applied. This short essay focuses on 4 samples images generated with my 2 favorite stitching applications, PTGUI Pro (version 10 beta8) and Autopano Giga (version 3.6).
Image 1
This landscape image was captured in the Japanese backcountry early 2014 (Gumma prefecture). I used a Nikon D800 equipped with the new Zeiss Otus 55mm f1.4 mounted on a Really Right Stuff PG-02 based panoramic head.

Wind blown
This is typically an image that many photographers would want to capture using a T/S lens or a technical camera with tilt to align the plane of sharpness with the ground. You will also want to keep the sensor vertical in order to avoid inducing any convergence of the verticals that would show in the distant trees. This would force a pretty important amount of tilt and would typically have to be combined with some rise to bring the image circle back down and avoid too much image degradation in the higher corners.
The problem with using a T/S lens on this image is that the subject is not a plane. The wind has carved significant holes in the snow and when the camera is close to the foreground, you would probably have to stop down the lens to at least f22 to get sufficient DoF below the plane of sharpness in the foreground to get the bottom of those holes fully in focus. Focusing can be done with live view, but the small aperture would result in a loss of optimal image sharpness because of diffraction. Besides, the iterative process to converge to the optimal position of the plane of sharpness is also a bit of a pain.
The alternative solution used in this image is a combination of Depth of Field Stacking (3-7 images per tile) and panoramic stitching (2 rows of 4 tiles).
– DoF Stacking was performed using Helicon Focus 6.0,
– The stitching was performed with Autopano Pro 3.0 (the latest version of the software being 3.6 as of summer 2014).
The key challenge during capture, besides the -10C temp and strong winds, was the changing light resulting from the play of clouds. It was key to work very quickly to reduce the risk. The total capture included 44 images and was done in less than 90 seconds. I made sure to capture the upper row including the sky as one row without DoF stacking to reduce the risk of visible cloud movement between frames. Capturing the sky in 4 images took less than 10 seconds.
One possible issue with DoF stacking is the presence of gaps of sharpness resulting from an exaggerated spacing of focus point between images. In order to avoid any risk, taking also into account the aforementioned need to work quickly, I decided to shoot at f11 and to raise the ISO to 800 so as to maintain a shutter speed fast enough to avoid any wind induced blur and keep the process quick.
Using the smooth manual focus ring of the Otus, I made sure to capture images with sufficient focus overlap, erring on the side of over-doing it a little bit, especially in the foreground. It is key to locate the focus points as closely as possible to prominent features in the image to maximize the sharpness at those locations. I didn’t use live view this time to keep the shooting time as short as possible, but using live view at the sharpest aperture of the lens would be my base technique when time is less of a constraint.
Another important aspect when capturing this image was the risk of flare considering the position of the sun low over the horizon and right in the middle of the frame. Stitching does help here because:
– Longer lenses such as the Otus 55mm are typically stronger with flare compare to wider designs (the Otus in particular is very well behaved in such situations),
– Splitting the frame in parts reduces the area in the image that is likely to be affected thanks to the longer shade of those longer lenses.
Although it may seem complex, this image was pretty easy to manage from a post-processing standpoint.
– Helicon focus 6.0 made it easy to generate each DoF stacked image with a bit of manual retouching in the sky to ensure that the image with the sharpest infinite focus would be used. It took probably 15 to 20 minutes to complete the DoF stacks for the 4 images making up the lower row of the mosaic.
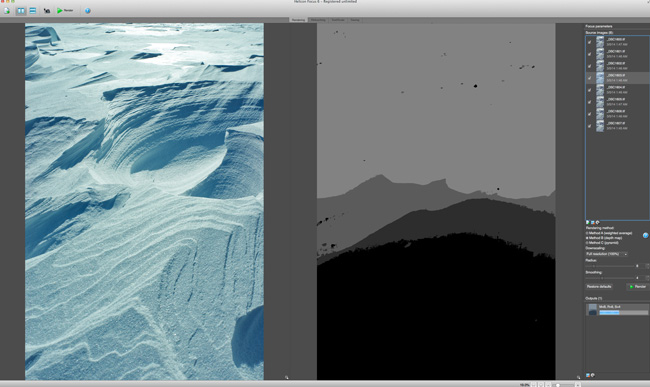
Helicon Focus 6.0 at work
– Choosing what pano software to use was also rather easy considering the nature of the scene. I tend to use Autopano Giga a lot for landscape images without obvious vertical references thanks to its remarkable ability to guesstimate the position of the horizon and automatically correct for verticals. A caveat is the impossibility with APG to generate a multi-layer .tiff file enabling the manual re-masking in PS of the individuals images after warping. This makes the balance lean in favour of PTGUI Pro when I identify possible issues resulting from automatic masking (typically where there is some subject movement near the edge of some of the tiles).
Since these risks were pretty low in the present image, I opted for Autopano pro and it turned out to be the right pick. The risk is low because stitches with only 8 tiles like this one get computed in a few minutes on recent hardware, less than 2 minutes in my environment. It would have been easy to do a second attempt with PTGui had some issues been visible.
The image below is another example created using the same technique and equipment.
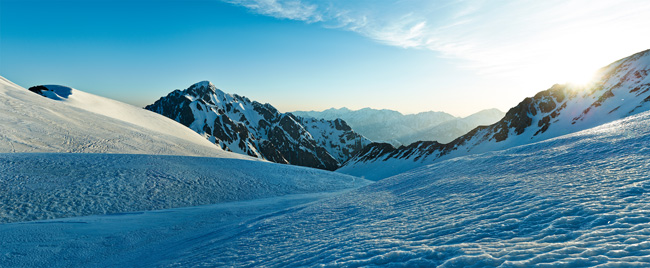
Tsurugi morning panorama
Image 2
A very different image with a different situation and challenges. This was a family snow shoe outing in December 2013 during which I was carrying my young daughter in a backpack.

Cold front on Urabandai
This prevented the usage of a tripod. These constraints together with the very poor weather conditions made me select the Nikkor 70-200 f4 VR and Nikon D800. Although the 70-200 f4 is not rated by Nikon as being weather resistant my experience has been that it can sustain wet conditions very well (do it at your own risks!). The lens has a reasonably long lens shade reducing the risk of snow landing on the front lens and has one of the best VR functions ever which enables low risk image capture without a tripod.
This image was therefore captured handheld in 2 rows of 4 images. I typically try to have 30-50% overlap when shooting pano handheld in order to have enough material for the software to perform a successful masking.
This image was challenging for another reason though. The very low contrast resulting from heavy snow fall. My stitching software of choice in such situations is always Autopano Giga. Its ability to find matching patterns between images is simply magic. It does often a better job than a human could in such images. The story says that the pattern matching capability of Autopano pro is so good that it ended up causing issues due to the software finding the same dust spots on the images and trying to align them…
The photographer has to take one decision when stitching such wide scenes in terms of the selection of the projection type to use. The outcome of a stitching effort is essentially a facetted sphere on which each tile resides. Math has to be applied to turn the facetted sphere into a perfect one and then to project the sphere into the final image plane. The 2 main options here are planar projection or cylindrical/spherical projection. My rule of thumb is to always use planar projection when possible as it reproduces perfectly the result that one would have achieved using a regular lens to cover the same scene.
There are however angles beyond which planar projection is simply mathematically impossible and they typically correspond to the widest possible non fish eye lens usable for a given sensor format, let’s say 12mm for FF sensors. Beyond 12mm equivalent field of view, the only option is to use cylindrical/spherical projection. Simply put, cylindrical projection corresponds to un-rolling the surface of the cylinder to lay it flat. The downside of this projection method is that non vertical lines are projected as curves. This is typically not visible for such landscape scenes not featuring any linear reference and can therefore often be used when very wide coverage is needed.
This image ended up being manageable with a regular planar projection and, as expected, Autopano Giga was able to deliver a perfect stitch with zero human intervention. It really was as easy as selecting the images to stitch, click a few times and here the outcome appeared. The total time elapsted between the launch of Autopano Giga and the completion of the tiff file was 3:30 seconds, among which about 2 minutes was computation time.

Autopano Pro at work
But why did I stitch in the first place here? There are three main reasons:
– I was carrying only one lens due to weight constraints and stitching enabled me to expand the field of view of my lens beyond its widest focal length,
– Shooting with a wide angle lens in such conditions is very challenging because the shade is just too short to provide adequate lens protection in such a snow storm. The safest approach is to reduce the risk by shooting with a longer lens, therefore a longer shade, and stitch,
– Increased resolution as a means to print larger and also to compensate for the slight image degradation resulting from the selection of a higher ISO to reach sufficient shutter speed handheld.
This image would have been challenging to capture without relying on stitching because of those weather constraints.
Image 3
This photograph was captured in Northern Japan late 2013, using the Otus 55mm f1.4 on the D800. This is an easy stitch made of 6 images. I selected this example because it helps highlight one of my favorite features with PTGui Pro, which is the ease and accuracy with which verticals can be corrected.

Yamadera view
The DR in the scene also seems impressive, but the light was pretty soft and the shadow and highlight functions of Capture One pro didn’t have to break much of a sweat to extract clean information from the D800 raw files shadows.
Correcting verticals in PTGui can be done easily by adding dedicated vertical control points between 2 pairs of images in the Control Points tab of the application. I typically select vertical elements as far away from each others as possible within the final targeted composition, meaning they will typically belong to the left most and right most images.
To do this, the same image containing the vertical element must be selected in the left and right windows of the Control Points tab. The “vertical control point” should be selected below these 2 windows. 2 points should be created at the 2 extremities of the first element that must appear vertically in the panorama. This must be repeated once again in the image containing the second vertical element.
Once these 2 pairs of vertical points have been created, the panorama should be optimized once more to reflect the change in the preview window.
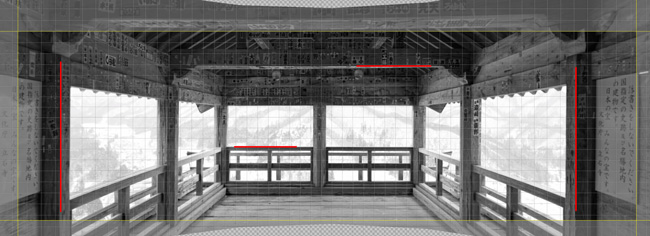
Location of the items set to be vertical and horizontal in PTGui
In this image, I decided to also define horizontal lines, which can similarly be done by adding horizontal control points in 2 of the frames. This ensured a reasonably good correction of the perspective of this image, knowing that nothing is quite perfectly straight in those old wooden structures.
The next step in the stitching process consists in launching an analysis of the images in the Exposure/HDR tab of PTGui to automatically detect and correct lens light fall off. This capability is only available in the Pro version of PTGui and is a key differentiator when stitching images shot at wide apertures and with lens of average quality. Light fall off when not corrected in each frame often shows up in the resulting panorama as a repeating darkening pattern that is badly visible in light skies.

PTGui Pro Light fall off automatic correction
I typically finalize a stitching job by deleting control points with optimization errors larger than 0.3-0.5 pixels so as to end up with an average optimization error lower than 0.25 pixels. This often has to be done in successive iterations to avoid deleting at once too many control points. This operation does contribute to the cleanliness of the resulting file in the transition areas where images overlap by ensuring the most accurate images positioning possible.

Control point stitching error visualization in PTGui Pro
PTGui Pro 10 Beta (Beta8 in this case) is now able to use GPUs through OpenCL support. On a Mac Pro 2013 equipped with D700 graphic cards, this 21,000 x 6300 pixels (780 MB Tiff file) pano was computed and saved to a fast raid thunderbolt2 disk array in a pretty unbelievable 7 seconds (yes, seven seconds).
Image 4
It is a common observation that higher resolution sensors and better performing lenses generate an apparently unsolvable dilemma between the desire to extract the finest possible detail when shooting at the optimum aperture (often f4 these days) vs the need to retain sufficient DoF.
I have been perfecting for a few months a new technique that leverages multi-row stitching to increase the DoF in a final image without having to rely on time consuming DoF stacking or T/S lenses.

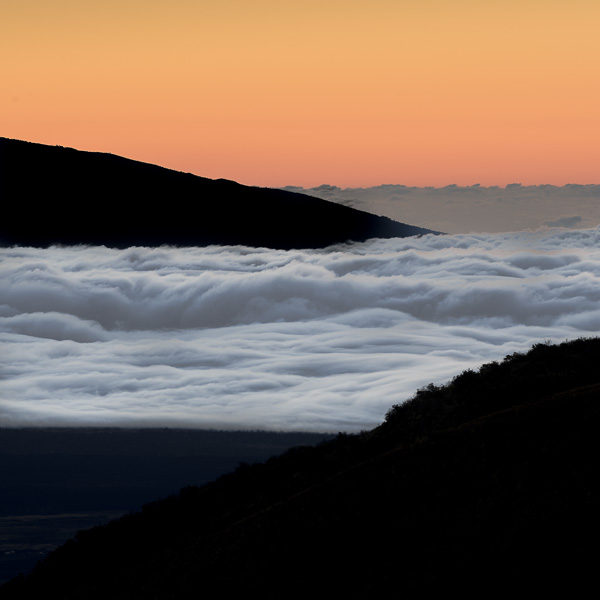
Grand Finale
The approach is simple but powerful. It consists in shooting a 2 or 3 rows panoramic stitch where each row is shot at a different focus distance and aperture so as to reach a much better compromise between diffraction and DoF.
In its simplest form, such as the one shown in the image feature here, the lower image row is shot at a moderately closed aperture (f9.5 here) and focused at a point closer than the classical hyperfocale distance to ensure good foreground sharpness without running into too much diffraction issues, while the higher row, encompassing the horizon and distant mountains, is shot at f5.6/f8 and focused a bit in front of the ridge using live view.
The technique can be tuned further by applying a mild DoF stacking to the lower row in order to shoot at an even wider aperture or to improve the uniformity of focus across distances.
The main value of this technique, compared to a full-fledged DoF stacking approach, is that it reduces considerably the time required to capture the scene and is therefore well suited for situations when light changes quickly.
A possible slight drawback is that the technique may not enable perfect sharpness in the very foreground of the image in some compositions and may also leave an area at mid distance that is not as sharp as the foreground/horizon. I have not found this to be a major issue because those areas that may remain a bit softer are typically not those where viewers focus their attention.
Finally, changing the focusing distance of a lens does typically affect its actual focal length to a degree. I have found both PTGui and Autopano pro to be able to deal with this without problems.
Conclusion
Is stitching the universal remedy to all imaging problems? It certainly isn’t, but it is a damn fine tool that every photographer claiming to look for the best possible image quality cannot decently ignore any longer. Recent software advances have greatly reduced the overhead in terms of manual operations and post-processing time while delivering un-matched image quality.
Stitching is also nearly as fun as 10×8 or 4×5 once were and helps slow down and adopt a classic contemplative approach to photography, be it performed with a DSLR able to shoot at the speed of light.
If you haven’t tried it yet or gave up on stitching years ago because of unsatisfactory results, I would urge you to give it a second shot using Autopano Pro/Giga and/or PTGui Pro. They do have trial versions but I suspect you may end up purchasing both and support the amazing job done by these small software houses (to whom I am not related whatsoever). The cost of these tools is incredibly cheap compared to that of the super high-end equipment you’d have to purchase to come close in terms of final output.

GO stitching GO!

Bernard Languillier is an amateur photographer based in Tokyo, Japan. His work can be seen online at Flickr. You can Email Bernard.


Elevate Your Vision


Read this story and all the best stories on The Luminous Landscape
The author has made this story available to Luminous Landscape members only. Upgrade to get instant access to this story and other benefits available only to members.
Why choose us?
Luminous-Landscape is a membership site. Our website contains over 5300 articles on almost every topic, camera, lens and printer you can imagine. Our membership model is simple, just $2 a month ($24.00 USD a year). This $24 gains you access to a wealth of information including all our past and future video tutorials on such topics as Lightroom, Capture One, Printing, file management and dozens of interviews and travel videos.
- New Articles every few days
- All original content found nowhere else on the web
- No Pop Up Google Sense ads – Our advertisers are photo related
- Download/stream video to any device
- NEW videos monthly
- Top well-known photographer contributors
- Posts from industry leaders
- Speciality Photography Workshops
- Mobile device scalable
- Exclusive video interviews
- Special vendor offers for members
- Hands On Product reviews
- FREE – User Forum. One of the most read user forums on the internet
- Access to our community Buy and Sell pages; for members only.
You may also like


