


THE YIN AND THE YANG
As most experienced photographers know, the smaller the lens aperture, the larger the depth of field. Unfortunately, “what a small aperture giveth, diffraction taketh away”: The more we close the lens down, the more diffraction degrades the image.
This interplay between diffraction and depth of field is a constant yin and yang in photography. Combined with other lens aberrations, it leads to a typical “sweet zone” of optimum performance for each lens. Each lens is different in this regard, but a general rule of thumb is that the sweet zone is around F/5.6 for 35 mm lenses, around F/8 for Medium Format lenses and around F/11 for 4×5 inch lenses. Please take this rule of thumb with a huge grain of salt, as the aperture range for optimum performance is unique for each lens design. True APO symmetric lenses for example often perform best wide open.
There are many types of images where the depth of field provided by a lens at a reasonable aperture is unacceptable. Furthermore, there are many types of images where the depth of field provided by a lens at ANY aperture, regardless of diffraction is insufficient.
Product photographers, still life photographers, architectural photographers, landscape photographers and many others traditionally solve this problem by using camera movements in a view camera taking advantage of the Scheimpflug effect. The beauty of the view camera lies in the amazing control available in terms of image management. One can control what areas are in focus, and equally (or even more) importantly in some instances what areas are out of focus and by how much. One can also control perspective and distortion. The versatility of the view camera is truly remarkable.
______________________________________________________________
LIMITATIONS
Unfortunately, even the view camera has limitations. There are instances where even dramatic camera movements cannot solve a depth of field problem. In the era before digital photography, all that could be done was either to avoid these situations, shoot a sub-par image, or very laboriously do a composite of several images.
It is this last idea that gave some clever engineers the impetus to solve this problem in software for digital photography.
______________________________________________________________
ADOBE AND HELICON FOCUS COME TO THE RESCUE?
I was intrigued by this concept several years ago when I came across a small company with a product called Helicon Focus www.heliconsoft.com that promised extreme depth of field through a composite of a number of images shot with the focus point at different distances in the scene. While interesting, I found the software to be quite rudimentary, with the necessity to spend huge amounts of time retouching artifacts in the final image. In the end, I gave up and decided it was not worth it.
When CS4 was released, Adobe announced with great fanfare that one of the new features in Photoshop CS4 is the ability to take several pictures focusing at different distances, and if each image is imported as a separate layer into a single Photoshop file, then the auto layer blending tool will blend the images and extend the depth of field.
As soon as I heard about this, I was really excited. I tried it a number of times, and frankly, I was disappointed. While it worked more or less OK for some images, most of the time I found areas where it completely missed, artifacts and all kinds of other things that would take huge amounts of time to properly retouch. Adobe products are usually excellent, and I think they could have and should have done a much better job with this.
Things changed somewhat, when several months ago a friend called me to ask if I had tried the newer version of Helicon Focus. I immediately downloaded the software and I contacted the company for some help in how to use it optimally. Right out of the chute I could tell that the software was a huge improvement over the prior version, and it was in a different class from the Photoshop blending of layers.
I was told at the time that a 64-bit version of the software was on its way, so I decided to wait to write this article until I had a chance to use the 64-bit version; particularly since I had just ordered a PhaseOne P65+ digital back and the P65+ files are large enough that the software would choke with composites of 4 or more images.
Now that the 64-bit version of the software is available, I can say that at least with Canon 1Ds MKIII, P45+ and P65+ files the Helicon Focus software is a total success.
______________________________________________________________
THE CLASSIC AND THE IMPOSSIBLE
First of all,Iwould like to point out that all the images depicted in this section and in subsequent sections are by no means final images. They are either the original RAW files converted to TIFF or composites from the original RAW files converted to TIFF without applying any adjustments. No sharpening, no contrast or color corrections, no saturation, nothing. I want the reader to strictly focus (pun intended!) on the extended depth of field.
I also want the reader to be aware that these images are not intended to be “works of art”, but rather illustrative examples for the purposes of this article. My “keepers” are much better than these images!
The picture below is a classic extended depth of field landscape.
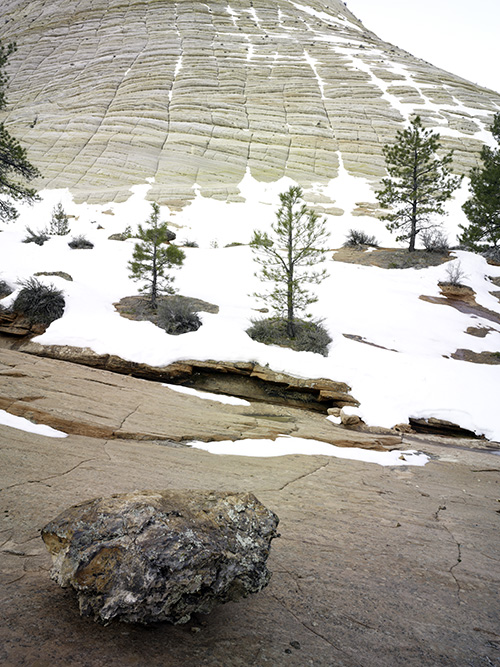
The depth of field extends from a nearby rock and the ground around it all the way to the mountain in the background. With a view camera this would be the classic use of front and/or back tilt to bring everything into focus with the proper perspective. Using a digital back on the view camera, one would have to also do a Magenta/Green cast color correction later, because when using camera movements the angle of incidence of light on the sensor changes and one side of the image goes magenta while the opposite side goes green. Shooting a translucent sheet with the exact same camera movements as the original scene, CaptureOne software allows you to make this correction quite easily.
However, I shot this scene with an Alpa TC camera, a PhaseOne P45+ back and no camera movements. Instead, I set the lens at its sweet spot aperture. Then, I took one image focusing on the foreground, one image focusing a third of the way to the mountain in the back, one image focusing two thirds of the way to the mountain and a final image focused on the far side of the mountain. I imported the images into Helicon Focus and I clicked on the “Render” button. In less than 60 seconds I had the final image shown here without any retouching.
This next image
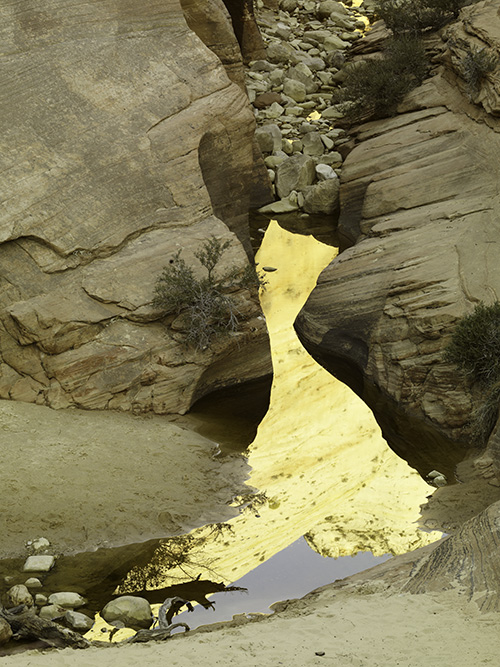
is what I call an “impossible” view camera image. The reason is that one can achieve the near/far focus on the ground without any problem using camera movements, but then the reflection on the water of a distant object ends up massively blurred, even with the lens closed all the way down. On the other hand, shooting this image is a breeze with Helicon Focus. I did 6 shots in rapid succession focusing in steps from the near object to infinity. Again, in less than 60 seconds I had a perfectly wonderful image from my P45+. No fuss, no retouching!
______________________________________________________________
TWO MORE DIFFICULT TESTS
The image of the pineapple and the plant was a setup that I thought would really put the software to the test. I mounted a Canon 1Ds MKIII with the 70-200 F/2.8 zoom lens on a tripod about 4 feet from the pineapple. The plant was approximately 30 feet from the camera. I picked a rug with a lot of texture and lines on purpose to see if any troublesome artifacts would show. I set the lens to its maximum aperture and I took 16 shots.
Below you can see the first shot, the last shot and the final composite without retouching.

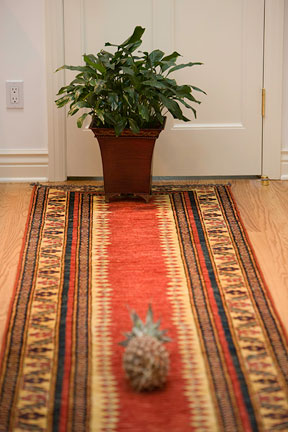

Helicon Focus did a great job on this image. There is only a narrow slice where everything is a little soft. It is only noticeable at high magnification, and I believe it was caused by user error. Mea Culpa.
What I learned from this is that to get a really good composite one must make sure that the depth of field areas of the original shots overlap. With the lens set at maximum aperture, and thus greatly reduced depth of field, I missed the overlap in one zone (this is not any different from doing a composite panoramic, where the edges of the individual shots need to overlap in order to get a good composite image).
My last test was using a PhaseOne camera with a P65+ back and the 75-150 mm zoom lens at F/5.6. It is a composite of 6 images taken in quick succession. Again, I show the first shot with the foreground in focus and the background completely out of focus, the last shot where the reverse happens and the final composite. I also show 100% enlargements of different areas of the image so you can appreciate the quality of the composite.
DETAIL, FAR SIDE AT 100%
DETAIL, MIDDLE AT 100%
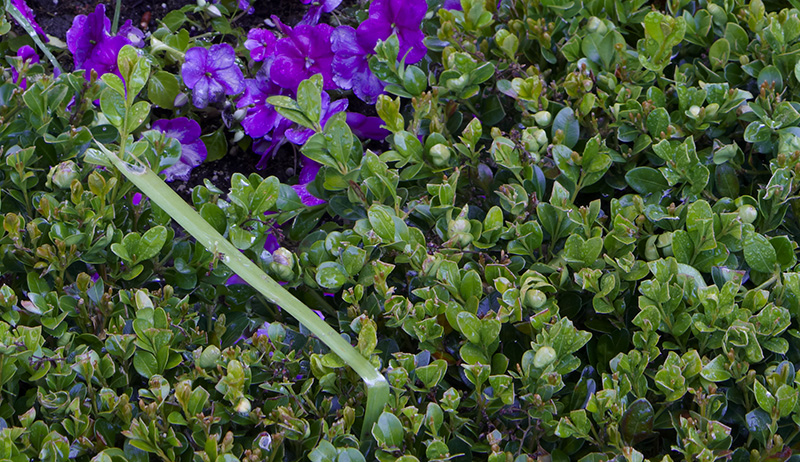
DETAIL, FOREGROUND AT 100%
With the P65+ composite, the software took a little longer. The composite was completed in just a tad under 2 minutes.
______________________________________________________________
OTHER FUNCTIONALITY
I would like to add that Helicon Focus can also be used to make panoramics by combining a number of individual shots. I have not tested the software for this purpose.
I would also like to add that the retouching tools in Helicon Focus are quite interesting. My favorite is the tool that allows you to copy from a specific shot to the final composite.
Below is a screen shot of this tool.
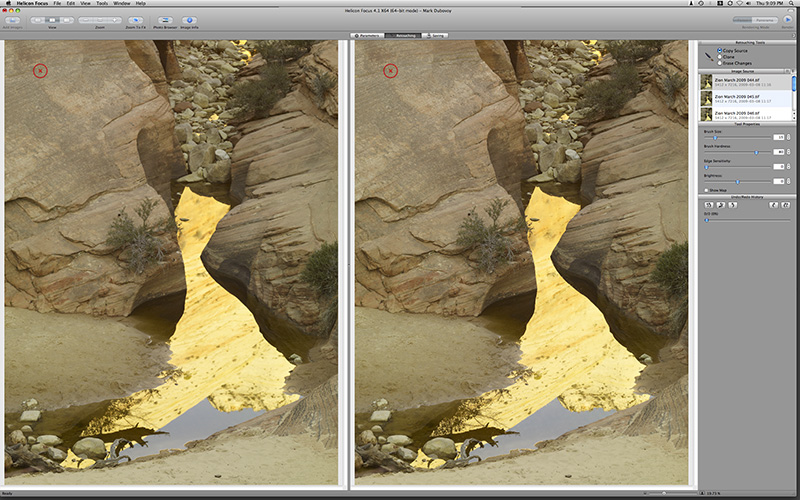
Note that there are two images side by side on the screen. You can select any individual image, and using a brush of variable size you can force the final composite to replace all the information in a “painted area” with the original information in the selected image. I find this to be extremely useful in situations where one might be shooting something that moves or changes.
The one on the left side is the selected source image. You can see your image selection from the list in the column on the far right side. Notice the red circle in both images on the upper left. When the circle is green, it will “paint” the source image into the final image. When holding the command key, the circle turns red with an “x” in the middle as shown. This erases previous retouching. The two circles always move together as if held by a rigid structure when retouching, so visually it is quite easy to see what is happening.
______________________________________________________________
MORE LIMITATIONS
So, is Helicon Focus the perfect ultimate tool for depth of field extension?
Of course not, nothing is. Like everything, it has some obvious limitations:
The subject matter has to be relatively still. If you are shooting a landscape and there is a slight breeze that might move a leaf or two a little, the software is good enough to save the day without retouching. However, if it is really windy you are probably looking at total disaster or many hours of difficult retouching.
Likewise, some subjects can be very difficult, like crashing ocean waves, where again, you are looking at either disaster, or hours of skillful retouching.
One of the key issues for me with any tool is whether the tool degrades image quality. I can see a very slight loss of sharpness overall, but it is so slight that once appropriate sharpening is applied to the composite I do not think the effect would be visible in a print.
______________________________________________________________
SUGGESTED SETTINGS
I should mention that the basic settings that I used in all the images for this article are: Blending Method B, Radius 3, Smoothing 1 and Lanczos 3 for the interpolation method. These basic settings were suggested to me by Joe Holmes who was an advisor to the company in the development of the product. These settings are an excellent starting point, but the ideal settings may vary for each image.
______________________________________________________________
CONCLUSION
Helicon Focus is a terrific tool, and as such I have definitely added it to my arsenal. It allows me to get extended depth of field while using cameras without movements, such as an Alpa TC, a PhaseOne or a Canon.
And there is no reason at all why it cannot be used with a view camera, in combination with view camera movements to produce images that would have been impossible or unimaginable without these types of software tools.
Therefore, for me the view camera is far from dead. It still offers unparalleled image control versus any other type of camera, and in conjunction with modern digital tools it is still the most powerful and the most versatile image capture device extant for still subjects.
In conclusion, the 64-bit version of Helicon Focus allows me to make images that I found practically impossible to do in the past, and also to make “classic” images with extended depth of field in a new and painless way.
This is a tool I can definitely recommend to those photographers that shoot relatively still subjects and need to extend depth of field well beyond what a typical lens can provide.
______________________________________________________________
About Mark Dubovoy
Dr. Dubovoy is highly regarded as a technical expert in many aspects of printing technology and photography. As such, he is a regular writer of technical articles for PHOTO Techniques magazine and a lecturer at various workshops.
His photographs are included in a number of private collections, as well as the permanent collections of the Museum of Contemporary Art in Mexico City, the San Francisco Museum of Modern Art, the Monterey Art Museum, the Berkeley Art Museum and the Museum of Modern Art in Nanao Japan.
June, 2009


Elevate Your Vision


Read this story and all the best stories on The Luminous Landscape
The author has made this story available to Luminous Landscape members only. Upgrade to get instant access to this story and other benefits available only to members.
Why choose us?
Luminous-Landscape is a membership site. Our website contains over 5300 articles on almost every topic, camera, lens and printer you can imagine. Our membership model is simple, just $2 a month ($24.00 USD a year). This $24 gains you access to a wealth of information including all our past and future video tutorials on such topics as Lightroom, Capture One, Printing, file management and dozens of interviews and travel videos.
- New Articles every few days
- All original content found nowhere else on the web
- No Pop Up Google Sense ads – Our advertisers are photo related
- Download/stream video to any device
- NEW videos monthly
- Top well-known photographer contributors
- Posts from industry leaders
- Speciality Photography Workshops
- Mobile device scalable
- Exclusive video interviews
- Special vendor offers for members
- Hands On Product reviews
- FREE – User Forum. One of the most read user forums on the internet
- Access to our community Buy and Sell pages; for members only.
You may also like


