The Making of a
Fine Art Photograph
By Pete Myers
 |
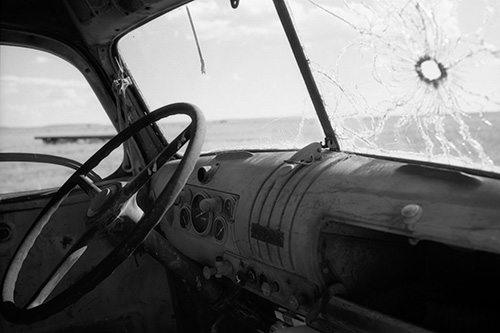
Long Road Down © 2005, Peter H. Myers
In 2005, after the release of my article, Making Images—Not Taking Images, I received a number of requests from readers, asking me to further elaborate on the subject of how a fine art photographic image is derived from its raw components—in other words, making an image in post-production, not just taking an image in the field and calling it good.
Since that time, I have been waiting for the right image to appear in my portfolio work that would yield an interesting illustration of image development, yet not become so overly complex in post-production as to overpower the reader by the process. I believe my recent image, Long Road Down, fulfills the need nicely.
___________________________________________________________________
Intent
For me, fine art photography is a metaphor for a feeling that the artist is trying to express to the viewer. It is not about the object, place, or event of the photograph, but rather about the feeling generated within the artist as part of the process of the photography. My opinion is that the success of the photograph should be evaluated by the creating artist in whether his or her sense of feeling has been conveyed to the viewer through the image.
In my work, oftentimes I am on travel throughout the lands of the West seeking out experiences that create inspiration, exploration, and hopefully results in a photograph that gives rise to the creative process in my fine art landscape photography. This is rather the norm for my work. However, on occasion, a concept will come to mind in which I seek out the elements to photograph that will create a visual metaphor for a feeling within me—Long Road Down is such a photograph.
In the summer of 2005, I met a retired lawyer, turned gallery owner here in Santa Fe, New Mexico. He had spent his freshman years as an attorney, active in the civil rights movement during the crisis years of the 1960s. Our meeting stirred up memories from my own early childhood experiences during the civil rights movement, when I was residing in the state of Illinois.
My dad was a minister. He preached what he felt in his heart—a quest for equality. The local John Birch Society members were not in agreement, and soon started a campaign of terrorism against our family. Threats of bodily harm and property damage were made. While nothing ever got out of hand and no direct action was taken against our family, I still remember the late night phone calls, and the upset in my parent’s eyes when the calls came in. Ultimately, I think that this hostility triggered our migration to California, with a ‘warmer climate’ of people, and calmer tolerances and attitudes. But the intolerance of mankind was clearly demonstrated to me in my days in Illinois—all before I reached the age of six.
Memories often swirl in mind, like eddies. For 40 years I had not remembered those late-night phone calls or their impact on my own life. But the catalyst was meeting with a person who was a young civil rights attorney in that era. Nothing needed to be, nor was, said about those times when I met him—it was something that I could feel in the room.
Many of us have feelings of concern today regarding our own moment in time, and the direction for our country, and indeed the world, in matters of conflict or peace. The feeling I had long ago as a child came full circle to me as a contemporary adult—and I had a burning need to express it through my art.
The feeling that I held internally was one of reverence in the understanding of how often it falls upon the shoulders of a handful of people—many times, just one person—to uphold their own beliefs in a time of adversity. Those days are often lonely, dark, and fearful for those willing to stand up for what they believe. This is the feeling I wanted to convey in an image.
___________________________________________________________________
Execution
I was on another rambling shoot, months earlier, when my wife Kathy and I discovered a property about 100 miles to the south of our residence. The property contained various antique bits of farm equipment and a water-drilling rig. I had photographed the makings of La Machine for a previous portfolio image in Portfolio 15, based on the workings of the drilling rig. It was mid-morning when I photographed the image, with a high sun angle for illumination.
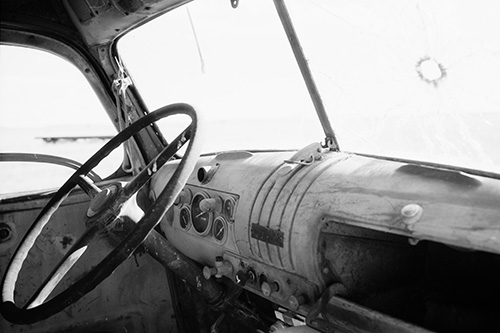
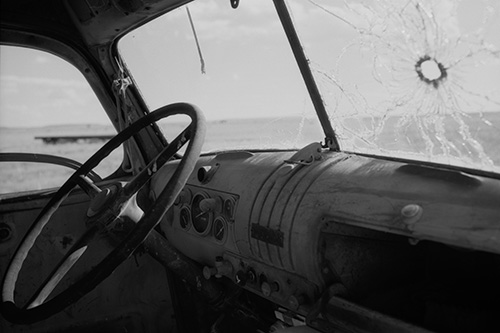
Attached to the drilling rig was a vintage truck cab for towing the rig. I had made some experimental shots of the windshield cracks of the cab, which had been made by a single gunshot through the glass. The cracks were unique in the way the glass had crazed from the impact—an effect that had much to do with the type of glass used for windshields of that era.
Not much became of these experimental shots, as the sun angle was wrong and the images photographed did not yield a subject matter to chase. But months later, in need of image elements for the composition forming in my head, a concept came into focus based on my previous experimental work at the location. The cab of the truck, the steering wheel, and the single-shot through the glass windshield, became the possible link back in time for my vision. This previous location became the bait for the possible creation of my new work.
It was clear in my mind that the sun would have to rotate around in front of the cab to properly illuminate the interior. I confirmed on a map the location and orientation of the property. It would be a late afternoon photo session to get the sun angle aligned as needed.
On a Sunday afternoon, during the peak days of summer in 2005, Kathy and I loaded up our two dogs and my photo gear into our pickup truck, and we made our way down the rural roads of New Mexico, south for our 100-mile journey. On location, Kathy helped me get over the barbed wire fence, handed me my gear, and took to hanging out with the dogs and reading her book back in the truck. For me, the focus was about the quality of light. The sun was on the proper side for the photographic event, and the abstraction of the windshield gunshot shatter had literally taken on new illumination, creating a unique glow within the pattern of the shattered glass. I got busy resuming my photography of the patterns in the windshield, as I had on my previous visit.
It took a while to get what was obvious out of my vision, and onto exploring the scene for creating the image that was burning inside of me. Opening the cab door on the passenger side of the truck cab yielded a groaning sound from the rusty old door hinges that made the hairs stand up on the back of my neck. The seat and floorboards were deposited in heavy amounts of fecal matter and artifacts from the many rodents that had previously called the cab, home. In New Mexico, this type of scene is cause for concern, as our State is one of the Nation’s leading locations for hosting the dreadful diseases of bubonic plague and hantavirus—both of which are carried by rodents. Inhaling fecal matter dust or being bitten by a flea is the cause for the onset of these diseases. Indeed, one of our friends almost died of plague down in this area of New Mexico, within just a few months of my fieldwork there—the risks are real.
But the air was calm, and there was seemingly no wind. I would work quietly.
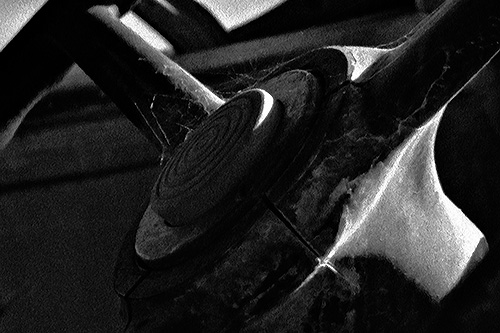
Looking through the viewfinder of my Leica MP, I could start to see a shot come together. The steering wheel and the empty space where the driver would have been represented the missing “entity.” The odometer and the curvature of the cab frame clearly indicated the vintage of the truck cab. The single gunshot hole through the windshield made me wonder about how the driver had faired. Obviously, the gunshot through the windshield was made during the abandonment of the truck and rig, but my need was to construct a metaphor for a feeling—and this was not documentary photography.
I use a monopod for camera support. It is in situations like this one, wherein the monopod saves the day. The monopod is a simple support, which can be placed in the context of a close space. Getting alignment of the shot with a “barely-wide” 35mm focal length lens was going to be tough. If I could only wiggle the camera up into the corner of the cab frame. . . .
I had two choices in the intent of focus for the image. I could stop the camera aperture down (and down, and down) until I had as much depth of field as possible—thus keeping as many elements of the cab in focus as I could muster. Or, I could use the focus of the camera to direct the viewer’s eyes, to reinforce where I wanted to place the attention of the image. I chose the latter approach for this image.
By using the cone of focus, going into and out of the focal plane, my intent was to direct the viewer’s eyes from the bullet hole (soft focus), towards the steering wheel (focal plane), and then back out of the cab to the outside world (ethereal focus). Would it work?
The focal point was to be the center of the steering wheel. But because of the method of framing and the camera position, it was virtually impossible within the restricted space of the cab for me to rotate the rangefinder focus of the camera over to center on the steering wheel. But I did notice that the odometer was pretty much in the same focal plane as I wanted for the steering wheel, and so I used it for focusing with the rangefinder.
Even at a lens aperture of f4, shutter speed would need to be slow to compensate for the deep shadows in the cab—1/8 of a second. All I could do was hold my breath, and gently squeeze off the shot. I kept refining my technique and framing during repeated shots of the interior. After the film was developed, indeed it was the last image on the roll that yielded Long Road Down. My careful refinement of the image on location had worked.
While it is not clear from the small image provided for this article or even from the detail enlargement of the steering wheel above, but the cone of focus idea did work well in practice. On a 15”-wide print, the image is best viewed from a few paces back, wherein the cone calmly directs the viewer’s eyes towards the steering wheel, without overtly overdoing the effect.
However, I have had fellow photographers examine the print from close-up, and exclaim with great alarm their concern that “the bullet hole is out of focus.” It is only when I gently ask them to pull back in their view of the image, that the photograph becomes a scene. The intent of the artist was for the viewer to become involved with the image as a scene—not just as individual picture elements to explore one-by-one
___________________________________________________________________
Post-Production
In my article, Making Images—Not Taking Images, I made the assertion that photographers have great opportunity in post-production to create an image that reflects their intent of feelings when they made the photograph, but this result does not necessarily show up in the raw image. While I showed a few limited examples of “before and after” images in the article, it certainly did not take one through the process step-by-step. Herein, I will attempt to re-trace my steps with the making of Long Road Down.
As far as the imagemaking of Long Road Down in post-production is concerned, it took a relatively short period of time for me to complete the work. Therefore we can retrace the creation process step-by-step.
 |
Copyright notice: All roll-over images in this article are: copyright 2005, 2006, Peter H. Myers
9:19 AM
The image above is what greeted me from my Sony Artisan CRT display, soon after having scanned the 35mm Efke 25 negative with the Hasselblad/Imacon 343 scanner. Since I had carefully studied the negative on the light table under the high magnification of a loop (at both 6X and 22X magnification) before I made the scan, I was not overly disappointed with the image’s “blah” look in RAW form upon my monitor. At this stage of image development, my sole intent is to make sure that the RAW scan contains the entire content of the dynamic range of the negative in good form, and without too much dust and dirt on the surface of the film during scanning.
For those of you shooting with digital cameras, we can just bump past this trivial stage. Whether scanning a negative or bringing the image out in Adobe Camera RAW, we are only setting the table for the feast to come.
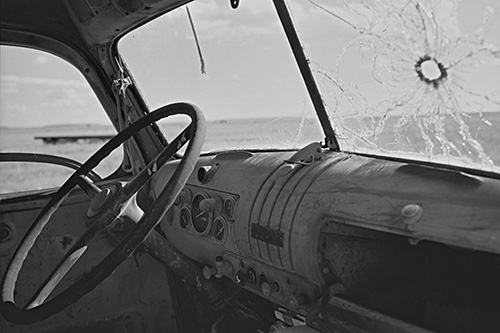
With a mouse rollover on the image above, the RAW scan can be compared to the final image of Long Road Down—giving a “before and after” comparison. We will use rollover illustrations for the remainder of the text, at each stage of processing. This should help the reader see the subtle changes from one stage of processing to the next.
The following work was performed on an Apple Computer G5 Dual, utilizing Adobe Photoshop CS 2 (hereafter referred to as Photoshop).
 |
9:37 AM
At this stage of the RAW image development, I just want to make sure to “map in” all of the zonal levels to begin the composition of gradation in the image. It was quite clear in examining the negative on the light table prior to scanning, that there was plenty of detail in the upper zonal ranges. It is common for the highlights to be “pushed up” in working from scanned negatives, as was the case here. It took me two tries at composing a PhotoShop Adjustment Curve that I liked to bring the tonality down in the corrected image—one at 9:35 AM and then again at 9:37 AM. As usual, I only used one of the two Curves to actually do the work. The other Curve is simply a “scratch pad” step in developing the final Curve values.
9:38 AM
Oftentimes, when the highlights are “mapped in,” the process pulls the entire white level down from the top, and the image loses contrast. It simply needs a bit of re-adjustment to bring it all back up to full contrast with the Photoshop Levels Adjustment.
 |
9:47 AM
My next concern was in getting the right amount of sparkle in the higher zonal values. While the previous two steps had successfully “mapped in” the zonal values, they seemed a bit misplaced, and the scene beyond the windshield seemed “dull.” While it only took me one Curve function to execute the change in gradation within the image, it took me almost 10 minutes to make up my mind as to exactly how that Curve would address the highlight issues. As can be seen in the rollover of the two steps above, it cured the ills of the “dullness” once a solution was found.
 |
9:53 AM
It certainly is the local area contrast and detail within the image that is critical in bringing the image to life. While I will not fully divulge the detail of this stage of image enhancement (proprietary), it can be safely assumed that I learned a lot during my days as a consultant to the National Aeronautics and Space Administration (NASA), which has helped me understand the perception of the human eye.
While this stage of image-processing is essential to my image-making, it also ends up distorting the gradation of the image itself. In some ways, I must start the process anew in re-mapping the gradation from this stage towards its final form. While it is not easy to see at the sample size demonstrated on this website, at full print size the image becomes “vivid” at this stage of the process.
Each image has its own needs, and I virtually have to invent a unique math solution for each image in order to bring it to life. One “process” does not address all images. The application of math can be art too!
 |
10:52 AM
The final mapping of the image with a gradation that best suits the artistic intent is a slow process. Curves 4-12 were slowly built upon, over an hour of experimenting. Though the changes were subtle from one Curve set to the next, it takes careful changes in re-mapping the tonality of each zonal range in order to bring the image into its full power. Only Curve 12 was used in creating this fifth major step in image processing. Curve 12 was made up from the qualities brought forward in developing Curves 4-11.
 |
11:26 AM
The last half-hour has been spent on the dreadful task of going into the detail of the image and painstakingly retouching all the elements. With film, there is always the additional task of dealing with dust, dirt, grain clumps, and the like. But even when I shot with a digital monochrome camera (Kodak DCS 760m), I found it necessary to do the same type of “hand work.” Photoshop Healing Brush, Cloaning Brush, and the use of the electronic “brush” of a Wacom Tablet become second nature over the years, and are the essential tools for this stage in the process. “Cleaning the image up” is the intent, and that is what was accomplished.
The rollover above does not clearly illustrate the retouches performed at this stage of processing, given the reporduction size of the web images. The rollover does work—the example just does not show enough of a change from image to image to see anything of value at this size.
After the tediousness of retouching, a lunch break is welcome—but not before turning the computer loose on a a critical task. Digital images are rarely homogeneous in their content after image-forming, and I have created my own math process to render a new image from the base material. My math process “brings together” the pixels to flow into one complete image by means of this rendering stage. It takes more than an hour of computer processing time to perform the transform, and it is a good time for me to take a break, have lunch, and rest my eyes.
|
|
12:57 PM—1:05 PM
This is the “final tune” of the image gradation—one last chance to get it right. At this stage, I am feeling that the image needs a bit more “weight” in its feeling. As it stands after rendering, it looks a bit too “friendly” and not quite “foreboding” enough. Curves 13 and 14 develop the “final tune.” With one final Curves adjustment, the image is DONE!
The Long Road Down image-making journey depictes the minute adjustments that are made at each stage of processing, which slowly shifts the image into the intended composition. It’s these slow and carefully planned changes that empower the image.
Once the image has been completed, I immediately make three DVD copies of all the image file data for archival storage. The electronic file is also copied to the appropriate file folders on two different hard-drive systems within the host computer. A fine art print of the image is made, both to admire the day’s work, and also to check the final image. It is not uncommon to find a minor defect in an image at this stage, which is only revealed in print, and prompts a bit more retouch work. But with this image, the final print passed inspection.
___________________________________________________________________
Conclusion
I hope that this article has given you a bit of insight into a unique image in the Long Road Down—an image that was relatively simple to bring to life. It is not uncommon for me to develop a single image over a week’s worth of effort—about the same time it takes a fine arts painter to create an oil painting.
There is nothing about digital image-making that is fast, inexpensive, or easy. The simple truth is that digital post-production requires a pile of inhuman technology. It takes an artist to visualize and construct a fine art image from an abstract origin (just a bunch of numbers in a computer). In our medium of digital photography, it does not hurt if the artist is gifted at math and technology as well as image composition. The technological tools are powerful when brought to bear against the RAW image components—but they are just tools.
In the end, none of this work is about technology or technique. Fine art photography is about evoking the potential for creating a feeling inside the viewer, when he or she views the final image. What the artist expresses within the fine art photograph, as a core belief of feelings, is what the work offers the viewer. It is not an easy task for the artist in so doing. In fact, even when properly attempted by accomplished artists, it does not happen often. But when it works. . . .
 |
© 2006, Peter H. Myers

Elevate Your Vision


Read this story and all the best stories on The Luminous Landscape
The author has made this story available to Luminous Landscape members only. Upgrade to get instant access to this story and other benefits available only to members.
Why choose us?
Luminous-Landscape is a membership site. Our website contains over 5300 articles on almost every topic, camera, lens and printer you can imagine. Our membership model is simple, just $2 a month ($24.00 USD a year). This $24 gains you access to a wealth of information including all our past and future video tutorials on such topics as Lightroom, Capture One, Printing, file management and dozens of interviews and travel videos.
- New Articles every few days
- All original content found nowhere else on the web
- No Pop Up Google Sense ads – Our advertisers are photo related
- Download/stream video to any device
- NEW videos monthly
- Top well-known photographer contributors
- Posts from industry leaders
- Speciality Photography Workshops
- Mobile device scalable
- Exclusive video interviews
- Special vendor offers for members
- Hands On Product reviews
- FREE – User Forum. One of the most read user forums on the internet
- Access to our community Buy and Sell pages; for members only.
You may also like