


by Bob DiNatale
The Optimum Digital Exposure – “Introducing the OneZoneTM Digital Exposure Method”
For too long we have been accepting the “digital look” of our photographs. The compression of tones, especially in the dark areas, seems intrinsic to digital photography, but in reality it is the result of “non-optimum” exposure. With optimum exposure, you don’t have to compromise the film-like appearance with digital photography.
It has been more than ten years since Michael Reichmann wrote about the concept of ETTR (Exposure To The Right). 1 Originally the primary benefit was to separate the signal from the noise of the sensor, especially in earlier digital cameras. With improvements in camera/chip technology and digital processing software, the signal-to-noise ratio has improved greatly. However, there are additional benefits when Exposing To The Right – including more tonal data; more sharpness; less processing artifacts. Though the practice of ETTR has generated much discussion and reworking, photographers still labor to “optimize” their digital raw exposure. What follows is my attempt at explaining digital exposure.
“Optimum exposure for maximum data”
Camera Exposure +2EV; (Final Exposure processed in Adobe Camera Raw)
Requirement of ETTR – More Exposure
Exposure To The Right requires more exposure. This means we need to open our lens or, even more disconcerting, use slower shutter speeds. These slower shutter speeds could cause camera shake or subject movement. To offset this need for more exposure, we can increase our ISO to maintain the desired shutter speed. Again, traditionally one would normally be concerned about the increased noise with higher ISO’s; however, remember that the digital noise is mitigated by using ETTR.
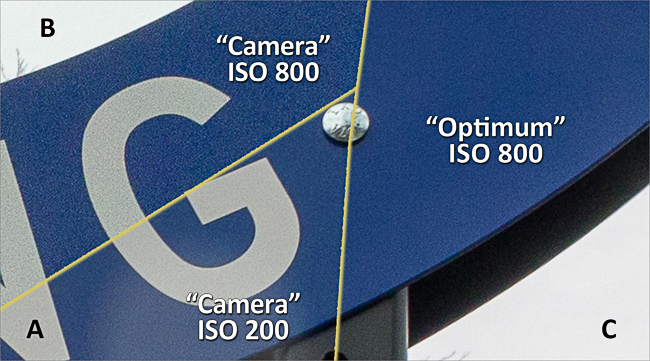
The composite below compares noise at higher ISOs. It shows 3 exposures:
- Section “A” & “B” on the left use the camera’s “metered” exposure at two different ISOs (200 & 800). As expected, we can see the increase in noise using the higher ISO – Section “B”.
- Section “C” on the right is also at 800 ISO but shot at optimum exposure then adjusted in software to match the brightness of Section “A” & “B”.
- Compare the noise from the camera’s “metered” exposure at 200 ISO (Section A) and the optimum exposure at 800 ISO (Section C). The noise from the optimum exposure at 800 ISO is the same or better than the 200 ISO at the metered exposure!

Optimum Exposure ISO Comparison
Digital Exposure Fact to Ponder…
If the brightest part of your scene has a 90% brightness in your software… Your scene is underexposed by two stops! Yes, 90% software brightness equals 2-stops under the “Optimum” exposure. If your brightest software value is around 97%, then you have still underexposed your scene by one stop and therefore lost 50% of the available scene data! 2
Add to that the little known fact that about 90% of our digital image is created by our processing software 3 …
“Optimum Exposure is more than important… it is critical !”
Different Types of Exposure
When we talk exposure, we are usually talking about “the final processed exposure” – the one we would show to our audience. You should be aware that –
“The ‘Optimum exposure’ and the ‘Final exposure’ are seldom the same.”
The idea that the camera exposure is not the final exposure is not a new concept. With both black and white and color negative films, when we tripped the camera’s shutter it was obviously not the final exposure. It was just the first step between the film and the positive print. I want you to think of digital exposure the same way –
“The camera exposure is just the first step toward the final processed exposure.”
Three Camera Exposure Options:
The inserts show 3 types of exposure choices the photographer has when making a digital capture of two classic photo examples… a black cat in a coal bin and a white rabbit in a snow storm.
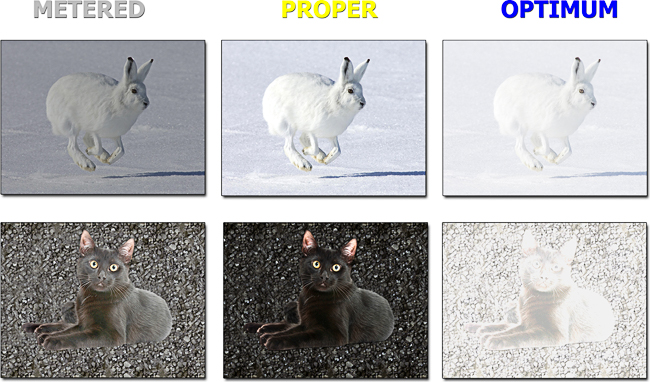
- The Metered exposure places both our white rabbit and black cat into mid-tone brightness.
- The Proper exposure would be to adjust the metered exposure: “more-exposure” for the white rabbit; “less-expose” for the black cat. This would place each exposure where the viewer would expect.
- The Optimum exposure places both the white rabbit and black cat to bright white! The white rabbit is even brighter than its “proper” exposure. And, in the case of the black cat, the “optimum” exposure places the black cat to a surprising bright white… as bright as our optimum white rabbit exposure.
“The ‘Optimum exposure’ of the black cat and the white rabbit are similar!”
Here Are a Handful of Digital Exposure Axioms:
- The “METERED” exposure and the “OPTIMUM” exposure… Can Never Be The Same!”
- The “METERED” exposure and the “PROPER” exposure are… Only The Same When Metering A Gray Card.”
- The “OPTIMUM” exposure… Produces Maximum Detail in the Shadows.”
- There is… only one “OPTIMUM Exposure” for any given scene.”
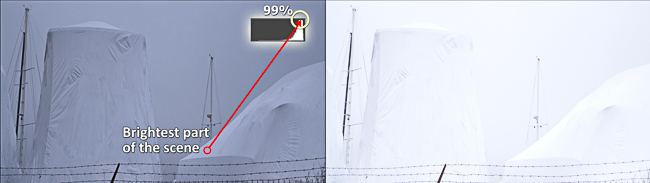
“The OPTIMUM exposure’ is… the exposure that will place the brightest part of the scene at 99+% in your software.
When viewed before processing, this “optimum digital exposure” will certainly not seem to be the “proper” exposure. However, the “Optimum Digital Negative” cannot be judged BEFORE it is developed by Raw processing Software!
Optimum Processed Exposure
“A good digital exposure looks as if it has been dipped in skim milk!”
Defining Optimum Digital Exposure
“The optimum exposure is the camera exposure that produces 99+% brightness in the software.”
That said, how do we proceed to produce the optimum exposure for an image? We know if we use our metered exposure, the black cat will be mid-tone brightness. However if somehow we could meter the brightest part of the scene – in the case of the black cat, the yellow green of his eye (left image). Then “place” that exposure at 99+% brightness on the software’s histogram… we would obtain the optimum exposure for that scene (right image).
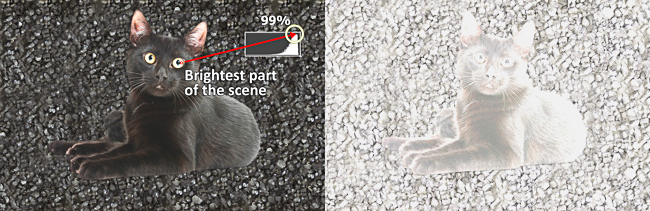
Spot Meter Brightest Area Optimum Exposure
“The best digital exposure is ‘Not Metered’, ‘Not Proper’… BUT ‘Optimum’!”
Obtaining the Optimum Exposure – Introducing the OneZoneTM Digital Exposure Method
I have developed an exposure method I call the OneZoneTM for optimizing digital exposure. Let me first define an essential OneZoneTM term – the “Optimum White Point” (OWP). The OWP is a 99+% brightness in the software. Placing the brightest part of the scene at the Optimum White Point is the basis of my OneZone method.
The method is named the OneZoneTM because… “there is only one zone that matters for achieving optimum exposure.” All other “darker tones” of the scene will fall on the camera’s sensor depending on the dynamic range of the scene. The final exposure, arrived at in the processing software, will adjust these tones to achieve the “Artist’s Vision”.
How Do You Apply This OneZonetm Method?
There are two methods:
- Method #1 uses a spot meter (either hand-held or in the camera) where photographic situations allow ample shooting time;
- Method #2 uses the in-camera multizone meter for shooting situations with little setup time.
…What follows is an overview of each method.
[Both methods are described in detail in Chapter 2 “OneZone Procedural Methods” of my book.]
The OneZone Digital Exposure Method
Method #1 – Using a Spot Meter
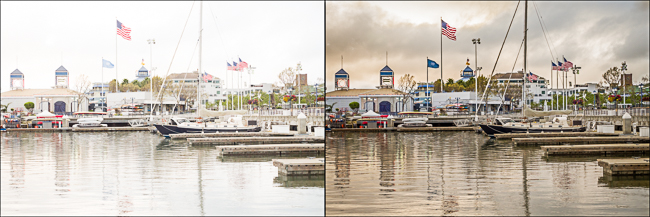
With a spot meter, meter the brightest part of the scene and then apply an exposure bias that will place the brightest part of the scene at 99+% in the processing software. [This OneZone Optimum White Point (OWP) exposure bias is determined with a simple exposure test explained in the book’s Procedural Methods chapter.] Below is a brief example of using Method #1.
The image below was shot in a boatyard on an overcast winter day. The boats were covered with white plastic. Using a spot meter (left image), I metered the brightest part of the plastic covering and then applied the OWP exposure bias to the exposure (in my testing +4.0 EV). This placed the brightest part of the scene at 99.7% brightness in the software. (right image).
Spot Meter Brightest Exposure with OWP bias applied to Meter Reading
Is The Spot-Meter OneZone Method #1 Practical?
Certainly, it is perfect for scenes and in the studio – static subjects and photographic situations with ample shooting time. BUT, what about photographing, cats, rabbits, grandkids and street scenes… this is where the OneZone Method #2 is more practical.
The OneZone Digital Exposure Method
Method #2 – Using in-camera Multi-Zone Metering
This modified OneZone Method #2 is more practical for average “street-shooting” situations with very little setup time and/or subject matter that moves too fast for spot metering. It may not be as precise as Method #1 but it provides the digital photographer with a real-world option for optimizing digital exposure.
OneZone Method #2 consists of taking a set of 3 bracketed exposures starting at +1.3 EV above the camera meter’s recommended exposure. [I describe a OneZone/Lightroom workflow in the book to explain how to work with these OZ Bracket Sets.]
The base exposure will be EV +1.3 stops more than the camera meter’s recommended exposure. The next two bracketed exposures will be exposed at +2/3 and -2/3 stops from the base exposure. The results will be a set of 3 exposures ranging from +2/3 to 2 stops more exposure than recommended by the camera’s meter.
“One Zone Bracket Set” 1st Exposure = +1.3 EV
3 exposures: 2nd Exposure = +0.6 EV
(a.k.a. OZ Bracket Set) 3rd Exposure = +2.0 EV
I recommend you place these “OneZone Method #2” settings in one of your camera’s custom modes for quick and easy access. Then, when a shooting situation presents itself, there is no need to think about optimizing exposure, just pick up the camera, select the OneZone camera mode and shoot.
Choosing The Optimum Exposure
The optimum exposure of the set cannot be determined in your camera. The evaluation must be done after import your files to your Camera Raw software. Working with the OZ Bracket Set, the optimum exposure of the set is determined by turning on the software “Highlight Clipping” – (see the Lightroom example of the roofs below). The exposure that shows no red clipping in highlight detail areas is the optimum exposure of the set. In this case EV+1.3.
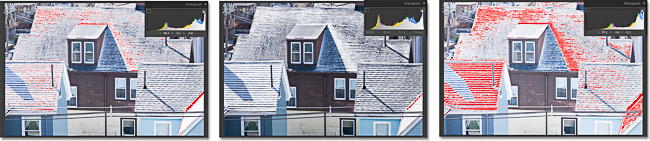
1st Exp. = +1.3 EV 2nd Exp. = +0.6 EV 3rd Exp. = +2.0 EV
One Zone Bracket Set
Note: There can be some red highlight warning in an optimum exposure if the photo includes sunlit bright snow, specular reflections, etc.. In the example above you might choose the middle +0.6 EV exposure, however, the red “Highlight Clipping” on the roof in the first exposure, +1.3 EV, could also be used. The bright snow covered roofs in bright sunlight would look natural being 100% white with no texture. Remember the expression of the Artist’s Vision is what matters.
The optimum exposure of the set could be the first, second or third. This will vary with: the framing of your scene in the viewfinder; the relative brightness of the scene vs. a mid-tone brightness; the camera’s “Multizone” metering; and the dynamic range of the scene. The two examples below will illustrate the effect brightness “subject failure” has on determining the optimum exposure:
A brighter scene (white sweater) will force a darker exposure. (Notice the brackets below have no highlight clipping even at the +2EV exposure. In this case I would use the 3rd exposure… +2EV.)
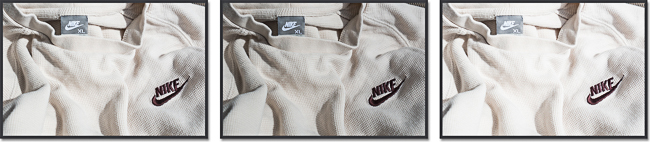
1st Exp. = +1.3 EV 2nd Exp. = +0.6 EV 3rd Exp. = +2.0 EV
White Sweater One Zone Bracket Set
A dark scene (black sweater) will force a lighter exposure. (Notice the brackets below have “Highlight Clipping” even at the darkest bracketed exposure +0.6 EV. In this case, I would use the 2nd exposure +0.6 EV.)
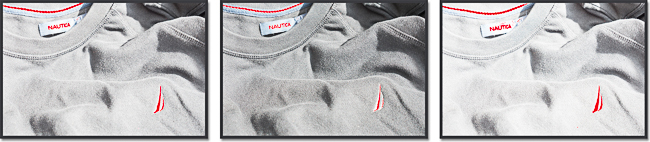
1st Exp. = +1.3 EV 2nd Exp. = +0.6 EV 3rd Exp. = +2.0 EV
Black Sweater One Zone Bracket
More About “Highlight” Warnings
An important thing to understand about highlight warnings is that they occur in two places: 1) on the back of your camera – the “Blinkies” and 2) in your software – highlight “Clipping”.
These 2 warnings ARE NOT the same. Although the camera’s High-Alert “blinkies” provide some information, you can only use them as an indication of optimum exposure. The “Blinkies” on the back of your camera occur about 1 stop before the highlight warning in your software – highlight “Clipping”!
“If you do not see camera blinkies… your exposure is sure not to be Optimum and…
you’ve probably lost more than 50% of the scene’s data!”
[ I discuss this in more detail in the book and provide a testing procedure for you to determine the difference between your camera’s “blinkies “and your software “clipping”. ]
ETTL – Exposure To The Left… (let it begin here!)
We understand the importance of Exposure To The Right – ETTR. And, we know that the “final exposure” does not happen in our camera but in our software. Let me now introduce the concept of ETTL – Exposure To The Left!
Exposure compensation can happen in two places: in the Camera and in the Software. It is beneficial to have more exposure compensation in the camera – ETTR and less exposure compensation in the software – ETTL.
In other words, after processing your image, if the software’s (i.e. Lightroom’s) “Exposure” slider does not show a minus value [ETTL]… there is a very good chance that you have missed your in-camera optimum exposure. A plus “Exposure” slider value in your camera raw software is a good indication that you likely have underexposed during the moment of capture and lost valuable scene data!
And In The End (The Light You Take Is Equal To The Light You Make)
Since first introduced, there have been many advancements in Camera Raw processing software. We can revisit our raw captures taken and processed over a decade ago and re-process them to obtain significantly better results. Digital processing technology will continuum to improve. If we optimize our digital capture today, there is no telling what detail we will be able to extract from the same data 10 years from now…
“The Camera RAW capture is the perpetual latent image!”
The Digital Exposure Mantra [M.A.P.]
Meter – the brightest part of the scene;
Adjust – for “optimum exposure” in the camera;
Process – for “final exposure” in the software!
The Optimum Digital Exposure – Introducing the OneZoneTM Method of Digital Exposure
For more details and to purchase Bob’s book go to www.OneZone.photos
Questions, Comments and Thoughts about this post can be directed to www.OneZone.photos/blog
About the Author
Bob DiNatale is an Adobe Certified Photoshop Lightroom Expert and an X-rite Coloratti.
He has a US Patent in Color Printing; worked with experimental silver emulsions at Polaroid; taught both the Nikon and Time Life Schools of Photography and founded the Olympus School of Digital Photography.
Bob is a photographer, lecturer, conducts workshops and specializes in 1-on-1 online training in digital photography.
He can be contacted by email [email protected] or from his websites www.BobDiNatale.com or BobD.TV
Article References:
1 Michael Reichmann First ETTR Post 2003;
2 George Jardine “Revisiting the Zone System”;
3 Mark Dubovoy “Chomping At The Bit To Jump In” (Section 5)
Published October 28, 2014

Elevate Your Vision


Read this story and all the best stories on The Luminous Landscape
The author has made this story available to Luminous Landscape members only. Upgrade to get instant access to this story and other benefits available only to members.
Why choose us?
Luminous-Landscape is a membership site. Our website contains over 5300 articles on almost every topic, camera, lens and printer you can imagine. Our membership model is simple, just $2 a month ($24.00 USD a year). This $24 gains you access to a wealth of information including all our past and future video tutorials on such topics as Lightroom, Capture One, Printing, file management and dozens of interviews and travel videos.
- New Articles every few days
- All original content found nowhere else on the web
- No Pop Up Google Sense ads – Our advertisers are photo related
- Download/stream video to any device
- NEW videos monthly
- Top well-known photographer contributors
- Posts from industry leaders
- Speciality Photography Workshops
- Mobile device scalable
- Exclusive video interviews
- Special vendor offers for members
- Hands On Product reviews
- FREE – User Forum. One of the most read user forums on the internet
- Access to our community Buy and Sell pages; for members only.
You may also like