![]()
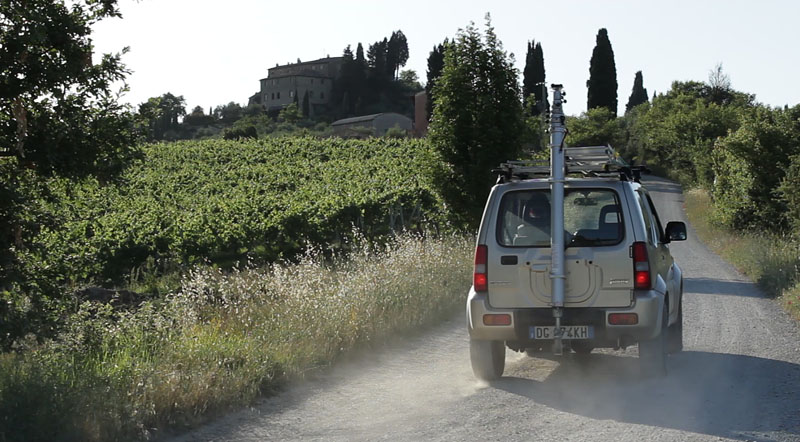
Look@thisTuscanyis the name of my latest photographic project, completely dedicated to the Tuscan rural landscape. I wanted to take pictures of this fascinating land from a different point of view, literally. Therefore I equipped my little SUV with a mechanical system that allowed me to lift the camera up to 10 meters from the ground, thus getting unusual perspectives on the surrounding landscape. Furthermore, since the camera is fixed upon a panoramic motorized head and I use image stitching techniques, I can get high resolution pictures with the horizontal field of view up to 360°.
Confirming what I had initially supposed, the images I got in this way expressed a special sweetness and harmony, as a result of the privileged point of view and of the panoramic format with cylindrical projection. This one, even if it involves some geometric distortions, paradoxically produces a much more charming effect, right where geometries predominate the scene (for example, vineyards). Of course, this is only my personal opinion – I just wanted to find out if it could be shared and so I decided to put my pictures on my website.

San Casciano, Tignanello vineyard – May 2010
The project is still in progress today, so I will periodically publish new images so that I can represent the Tuscan land during all the four seasons.
I feel thatLook@thisTuscanyis an occasion to see the land I love from different points of view. It is dedicated to Tuscany, and in return for the emotions that it gave to me I hope to live even more intensively through this experience. To actualize my vision I felt that I had to personally take care of every step of the project: the idea of a mobile system of shooting, the creation of some mechanical parts and the control software, the digital post-production of the images, and finally the design and the writing of the AS3 code for the website. I realize the final product by myself as well, that is, fine art prints.
From a technical point of view, every step of this path represented a small adventure. In fact, as I could not find anything similar to my project in the web, I have had to solve all the issues related to technical aspects, starting with the search of suitable materials up to prototypes development.
Mechanical Structure
After having considered several solutions, I chose a 7 sections aluminum telescopic pole with pneumatic activation. The pole has a rather low weight (about 20kg, 44lb) and it is very stable in case of breeze as well. Through the use of a 12Vdc small air compressor, the pole reachs its maximum extension within less than a minute, which is very important in order not to slow down the work.
The pole must always be straight in a perfectly vertical position in order to keep itself stable and allow for correct shooting. For this reason there is a sphere at the lower end of the pole that, once inserted in the apposite adapter, allows the pole to be freely leant in any direction to reach the vertical position.
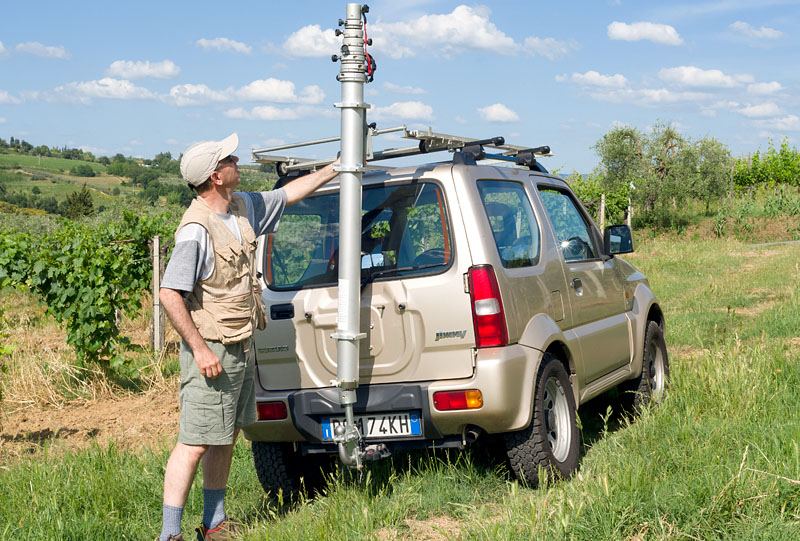
Vertical positioning of telescopic pole
It was quite simple to anchor the lower part of the structure as I used my SUV’s tow hook as support. Conversely, it has been much more difficult to find the best solution for fixing the pole up above. This anchorage must in fact follow the movements of the pole on X and Y axis in order to reach the vertical position. I also have foreseen the possibility of tipping the pole over the SUV’s roof. In this way the transportation is safer during long journeys. All this stuff must be firmly fixed to the load bars of the off road.
So, starting from some simulations in a CAD environment, I have realized a special roof rack composed of an steel chassis equipped with rails upon which a second chassis slides. A sliding plate has been fixed to it in order to hook the pole.
Such a system allows the pole to do wide movements, so that it can be put in a vertical position even when the off road drives on steep slopes.
Finally, on the top of the pole I fixed a support to hook up the two cables (USB and 12Vdc) and a Manfrotto hexagonal quick release adapter to fix the pano head.
Pano head: characteristics and control software
Pano head must have some fundamental requirements, such as: toughness, motorized movements, not excessive weight, full remote control via USB port of PC. The most suitable model I found in 2009 was a Rodeon VR, produced by the German company Dr.Clauss.
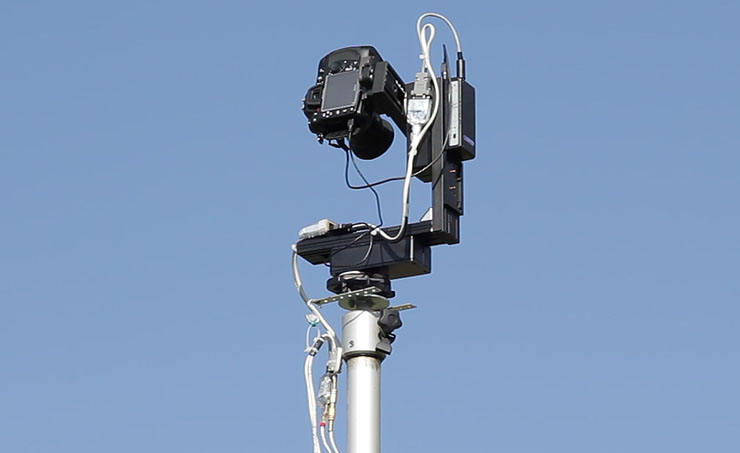
Rodeon motorized pano-head mounted on top of telescopic pole.
Since the head can be controlled by a simple script language, I decided to develop customized software for my specific needs. The “Rodeon stitcher”, which required some weeks for its development, turned out to be an excellent control tool. This was also due to the choice of 12” touch screen tablet PC, with Intel Core2 Duo processor, 3Gb RAM, 128Gb SSD disk, running Windows 7:
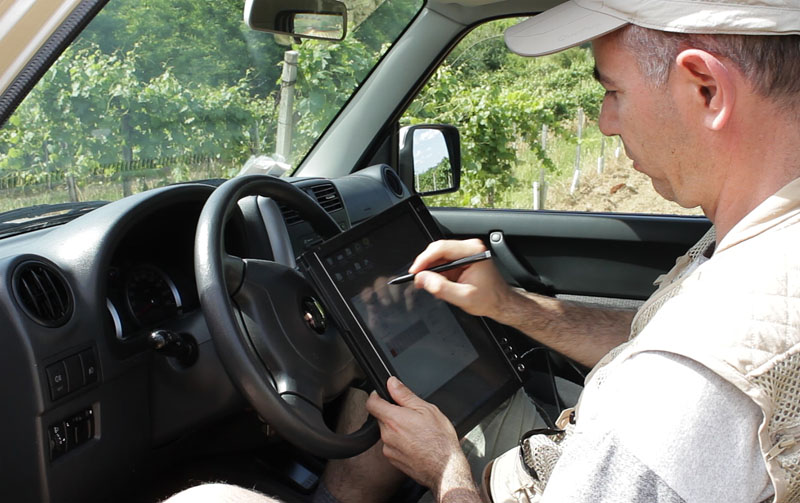
Setting up the shooting session with 12” tablet PC.
In the “project data” panel I have set up the following values:
– Image sensor size
– Image sensor resolution (megapixel)
– lens focal length
– required overlap between shots (%)
– waiting time for head stabilization after each movement
– camera exposure time
– number of consecutive shots (for bracketing implementation)
– camera mirror-up (On/Off)
– camera’s shutter delayed release
– number of focus planes, for focus stacking implementation
– number of rows and columns of shooting grid
On the basis of this input data, saved between one session and another, the software draws the shooting grid upon which I can determine the number of shoots with different focus plane to be done for every cell. Whenever data are being modified, the software updates the information relevant to the programmed panorama, for example:
– horizontal and vertical field of view
– total number of shots
– estimated time for full program execution
– estimated megapixel count

Rodeon-stitcher: the “project data” panel.
In this example, the shooting grid is composed of 8 columns by 3 rows.
The lower row will be shooted two times, with different lens focusing (focus stacking).
In the second control panel “manual adjustment” it is possible to put the head in specific positions during the preparation of the shooting program:
– head positioning with one degree of precision
– trial shooting in order to verify exposure, focusing, etc..
– panorama navigation on the shooting grid to point the camera on a certain cell, by a simple tap on PC touch screen. For example, in this way I can explore the selected area of the panorama without take photos.
Due to the Nikon Camera Control Pro software, which is running in a window beside Rodeon stitcher, I can set up any parameters of the camera, visualize the camera live view in real time, and focus on any area of the image.
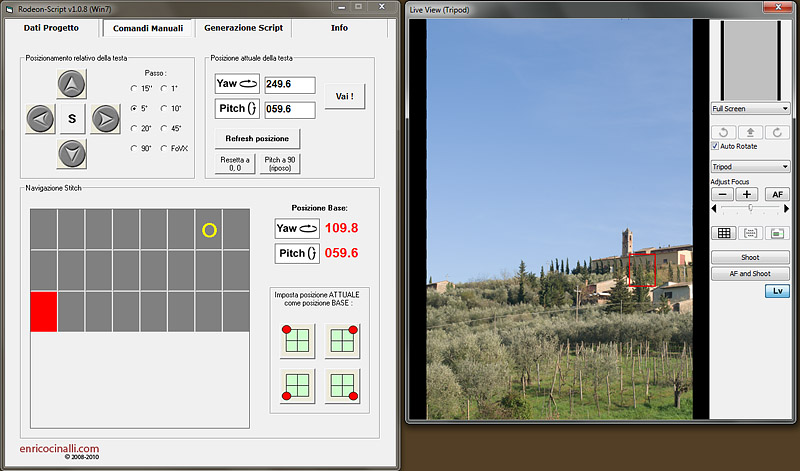
The Rodeon-stitcher “manual adjustment” panel near to the Nikon’s Live View window.
Finally, in the third panel “script generation” it is possible to manage the shooting program as follows:
– decide the grid shooting order
– decide whether to execute the whole program or only a part of it
– start the shooting session
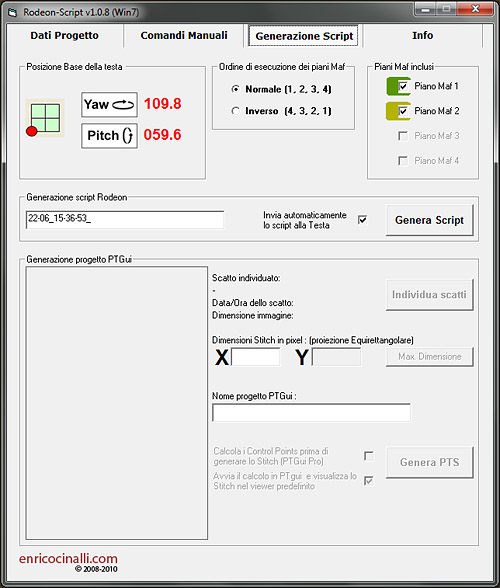
Rodeon-stitcher: the “script generation” panel
If several focus planes are programmed in the grid, the software will suspend the shooting session between a focus plane and the following one, thus allowing me to adjust the lens focus on a different plane. The camera sends in real time the images to the PC, both in RAW and in low resolution JPG format. At the end of the shooting session, I have implemented one of the most interesting and useful functions, that is, the automatic detection of any image received from the camera and the creation a script file in PTgui format – my favourite software for the assembling of panoramas.
Then the script is processed by the Batch Stitcher of PTgui, and in short time a draft image of the complete panorama is visualized on the PC screen. This operation is very quick because:
– only the low resolution JPGs are processed, not RAWs
– control-points must not be searched, as pitch and roll are provided for each frame;
– output draft image has low resolution, optimized for the visualization on PC screen .
In this way I can quickly check the panorama preview to verify if it is necessary to modify the global framing or if the light has been subject to strong variations during the shooting session. In such cases it is sufficient to come back to the main panel, change only the necessary settings and repeat the execution of the shooting program or part of it.
In concrete terms this is a great advantage because it makes the shooting procedure much easier and intuitive, and strongly reduces waiting times.
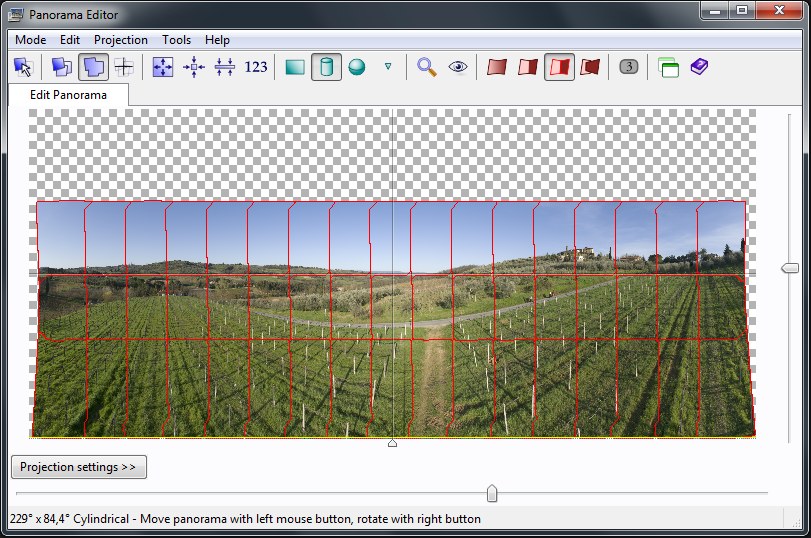
Stitch preview in the PTGui’s Panorama Editor window
The Camera
Up to now I have described every element of the system, except for the most important one: the camera! A suitable camera for this kind of application must have the following requisites, listed in order of importance:
– Efficient implementation of live-view, including the ability to auto-focus
– Complete control via USB: live-view transmission and ability to set camera parameters. As far as I know, no mirrorless camera has such a function up today. The choice is instead wide among DSLRs, in particular Canon, Nikon, and some Sony.
– In order not to overload the motorized head and to reduce the area exposed to the wind action, weight and bulk should not be excessive. ProfessionalSLRs like like the Nikon D3 and D4 or Canon 1Ds must therefore be excluded.
– APS-C Format or full-frame sensor.
The choice is therefore limited to DSLRs – professional range excluded. It has still to be defined which kind of sensor is to be preferred. Let’s start with the essential necessities of the photographer who wants to realize stitched panoramas, especially when the camera support is not perfectly stable:
– exposure time must usually be very quick, so it’s important to have clean high ISOs images (up to 800) without losing the quality of the file
– have a wide dynamic range in order to use bracketing as little as possible
– get a very uniform performance on the whole frame, corners included
According to my experiences and the DxO laboratory test results, at the moment the two best sensors are the APS-C 16Mp mounted on Nikon D5100-D7000 and the Full-Frame 36Mp sensor mounted on Nikon D800.
I prefer the Nikon D5100 because it associates low weight with a very good sensor that guarantees good performance at high ISOs, as well as a wide dynamic range (13.5 Ev @ ISO 100, 11 Ev @ ISO 800). The sensor of the Nikon D800 has certainly some better features, like pixel count and wider dynamic range, but it will be necessary to evaluate the sharpness uniformity it is possible to get, also when it is used with better full frame prime lenses.
The camera I have used to take most of the pictures forLook@thisTuscanyis a Nikon D300. Before the new 16Mp sensor came into market, the 12Mp CMOS sensor was one of the best choices (dynamic range 12 Ev @ ISO 200), even if I never use ISOs beyond 400 as the noise starts to slightly spoil the file and the dynamic range goes down to 11 Ev.
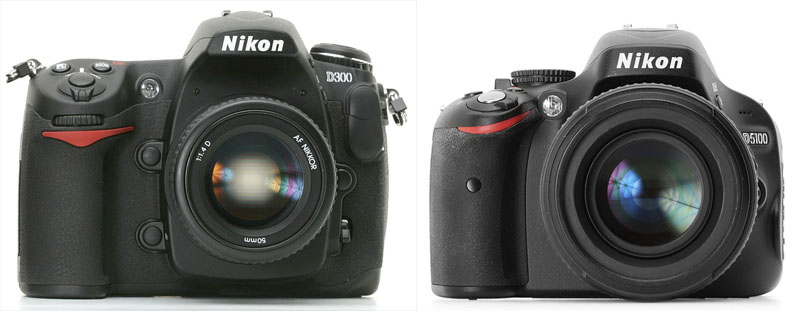
DSLRs I used forLook@thisTuscany: Nikon D300 (left) and Nikon D5100.
I hope that in the next future manufacturers will be treating mirrorless cameras as working tools just like they do with DSLRs, equipping them with those functionalities which they lack today (for example, full control through USB port). For those who take pictures of panoramas – but not only – the reflex system is useless if not counterproductive: it only adds bulk and vibrations due to mirror movements.
Shooting
When I start to shoot I must first of all evaluate the surrounding scene, which is unknown to me as observed from above.
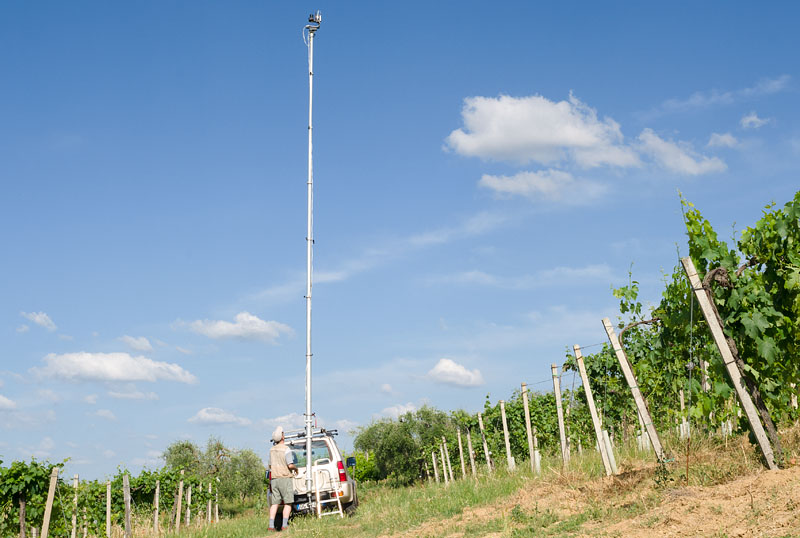
Telescopic pole fully extended (33 feets/10 meters above the ground level).
The image ” vineyard near Montauto” below was obtained from this camera position.
Then I decide the global framing and finally choose the lens to be used, according to the wind intensity and the clouds passing before the sun. If the wind is completely absent and there are a few clouds, the choice is wide: I can use focal lengths until 105mm (160mm equivalent) without problems and get output files up to 400-500 MP. It is not useful to exceed this size limit to realize my prints: with 13,000 pixels on the short side, I can print on a 44” roll @ 300dpi.
When many clouds are obscuring the sun again and again, I must make my shooting session quicker: to maintain a constant field of view, I must choose a lens with shorter focal length (down to 35 mm) in order to decrease the number of total shoots. Of course the resulting file is lighter, anyway it is sufficient to print on a 24” roll @ 300dpi. Also in case of wind it is necessary to use shorter focal lengths to guarantee the stability of the camera; notwithstanding the shooting time at 1/1000sec or even quicker, it is possible to get some slightly blurry shots using focal lengths beyond 60mm. In such cases, in order to augment the stability, it is possible to reduce the extension of the pole, even if the image perspective may change considerably.
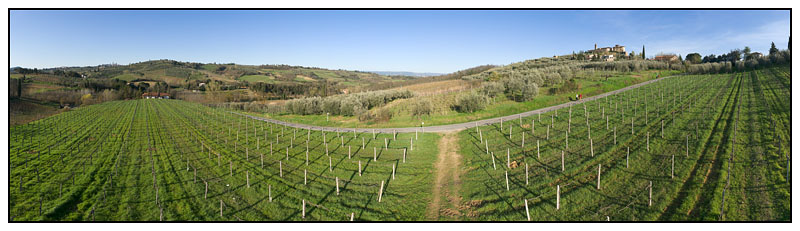
“San Gimignano, vineyard near Montauto – April 2011”
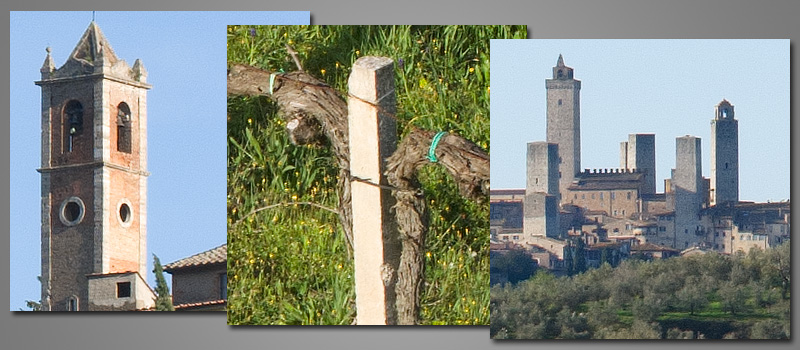
Three 100% details cropped from the above image
Conclusion
Well, after this long list of technical details, I would like to underline that technology is for me a very important tool to reach the goal, and not the purpose. Especially in the planning phase, a great commitment is necessary in order to collect the images published till today as well as those that will be published in the future. As I travel the roads of Tuscany, even the most remote corners, I look for locations to add to my database, noting position, subject and the best light condition (morning/afternoon). When I decide to go out with my equipment, I have a precise plan of the places I am going to visit – in this way I can make the most of the days when the weather conditions seem to be good. A shooting day may be very hard, but it always rewards me with wonderful images and with the sensation of having fully lived my land.
NEW !! Hereyou can watch the “backstage video” oflook@thisTuscany!
Enrico Cinalli, July 2012
www.enricocinalli.com
[email protected]
Facebook page: Look@thisTuscany

Elevate Your Vision


Read this story and all the best stories on The Luminous Landscape
The author has made this story available to Luminous Landscape members only. Upgrade to get instant access to this story and other benefits available only to members.
Why choose us?
Luminous-Landscape is a membership site. Our website contains over 5300 articles on almost every topic, camera, lens and printer you can imagine. Our membership model is simple, just $2 a month ($24.00 USD a year). This $24 gains you access to a wealth of information including all our past and future video tutorials on such topics as Lightroom, Capture One, Printing, file management and dozens of interviews and travel videos.
- New Articles every few days
- All original content found nowhere else on the web
- No Pop Up Google Sense ads – Our advertisers are photo related
- Download/stream video to any device
- NEW videos monthly
- Top well-known photographer contributors
- Posts from industry leaders
- Speciality Photography Workshops
- Mobile device scalable
- Exclusive video interviews
- Special vendor offers for members
- Hands On Product reviews
- FREE – User Forum. One of the most read user forums on the internet
- Access to our community Buy and Sell pages; for members only.
You may also like