About three years ago I wrote a tutorial on contrast masking. It was published before I had started to use digital cameras, and was intended for use with files from scanned film. Below is an updated tutorial designed for users of digital cameras.
___________________________________________________________
Too Hot is Not Cool
A digital file is much like a film positive (transparency) in that the worst sin is to blow out the highlights. In fact it’s even worse with digital than with film. Highlights on film tend to trail off gradually on the shoulder of the curve, while with digital it’s more like hitting a brick wall. Overexpose — expose too far to the right of the histogram — and you end up with nothing, nada — empty white pixels with no data whatsoever.
So the strategy for digital photographers is to expose as far to the right side of the histogram as possible. (Please see my article Expose to the Right for additional reasons why this is the correct approach to digital exposure,andIf you are unfamiliar with how to read and use the histogram, read my tutorial Understanding Histograms).
Given that digital cameras have a dynamic range of 5-7 stops (about the same or slightly greater than transparency film), one often finds that the shadow areas of a frame are rendered darker than one would wish. What to do?
There are three solutions. The first is the traditional approach taken by photographers for the past several decades — the use of split neutral density filters. (This is covered in detail in a tutorial inIssue #6 of The Video Journal). I used these for many years, but they are slow to use well and not appropriate for anything other than landscape work.
The second approach, and a viable alternative to the use of split NDs, is digital blending. But, it isn’t always possible to shoot more than one frame of a given scene.
___________________________________________________________
Photographers Have Been Using Contrast Masks for Almost 100 Years
The solution is to use what is called acontrast mask. This is now done digitally, but it is nothing new. It’s been around since the early years of the 20th Century. This used to involve the production of a B&W negative copy of the original which was then placed in superimposition with the positive while a print was made. This caused a flattening of the contrast as shadows received extra exposure while highlights were held back.
Here’s how we do it today in Photoshop.
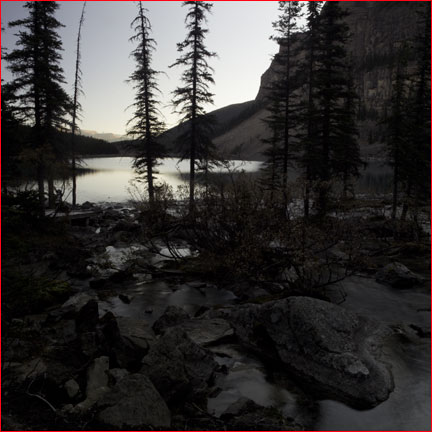
Figure 1
InFigure 1above we see a frame taken just after dawn atMoraine LakeinBanff National Park. I exposed so that the sky wouldn’t burn out, but which caused the dimly lit foreground to become quite dark. To the unaided eye the scene didn’t appear this dark, and so it’s desirable to try and reproduce what they eye wants to see, rather than what the camera actually recorded.
Here are the simple steps needed to create a contrast mask, and open up the shadow areas of this image.
- Create a Duplicate Layer ( Layer / Duplicate Layer) and name itMask
- Desaturate theMaskLayer. (Image / Adjustments / Desaturate)
- Invert theMasklayer (Image / Adjustments / Invert)
- Click on the Mask layer thumbnail and selectOverlaythenBlending Mode
- Enlarge the image to 100% and look at the horizon line or other high contrast area. This is important for the next step.
- Use Gaussian Blur to reduce resolution degradation of the image by the mask, yet at the same time avoid halos on sharp contrast boundaries such as skylines. (Filter / Blur / Gaussian Blur). Low amounts are usually best.
- Adjust Opacity as desired. (Click on theMaskLayer thumbnail and use the Opacity slider).
Figure 2
Figure 2shows the intermediate result after executing steps 1 — 7 above. The shadows have been opened up while the bright areas have not been compromised.
The next steps are to “season to taste” using the usual tools, such as Levels and Curves.Figure 3below shows what the frame looks like after a few quick adjustments. A larger version can be seen by clicking on it.
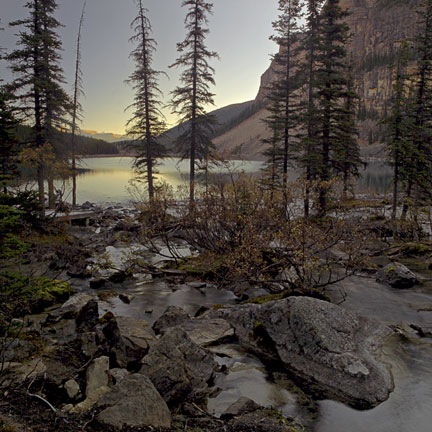
Figure 3
___________________________________________________________
Other Approaches
Every time I publish an article like this one I am inundated with e-mails detailing various alternative approaches. There are indeed many other ways of doing this. For example, one alternative is to use a mask created from one of the colour channels. Here is another approach that allows individual adjustments for both highlights and shadows.
Yet another alternative is a new Photoshop plug-in called SR Pro from Fred Miranda. Selling for $19.95 this is a well designed product for both PCs and Macs that automates the entire masking process and which also adds some unique customization features.
Elevate Your Vision


Read this story and all the best stories on The Luminous Landscape
The author has made this story available to Luminous Landscape members only. Upgrade to get instant access to this story and other benefits available only to members.
Why choose us?
Luminous-Landscape is a membership site. Our website contains over 5300 articles on almost every topic, camera, lens and printer you can imagine. Our membership model is simple, just $2 a month ($24.00 USD a year). This $24 gains you access to a wealth of information including all our past and future video tutorials on such topics as Lightroom, Capture One, Printing, file management and dozens of interviews and travel videos.
- New Articles every few days
- All original content found nowhere else on the web
- No Pop Up Google Sense ads – Our advertisers are photo related
- Download/stream video to any device
- NEW videos monthly
- Top well-known photographer contributors
- Posts from industry leaders
- Speciality Photography Workshops
- Mobile device scalable
- Exclusive video interviews
- Special vendor offers for members
- Hands On Product reviews
- FREE – User Forum. One of the most read user forums on the internet
- Access to our community Buy and Sell pages; for members only.
You may also like