


History & Moonshots
When I was in my teens (in the mid-1960s) and just starting to make my way in the world of photography in a serious manner,Pentaxbrought out theSpotmatic. This was an SLR, very much in the modern idiom, but it contained the world’s first behind the lens metering system. One had to manually close down the aperture to take a reading, and notwithstanding the name itwasn’ta spotmeter, but everyone who bought one thought that they’d died and gone to heaven. Imagine ‚a camera that could read exposure through the shooting lens, with filters, bellows extension and all. Damn, technology was advancing so much we might even land a man on the moon one day.
Tables, Charts and Selenium
Prior to this taking accurate exposure readings was problematic. There were, of course, clip on meters, hand-held meters, extinction meters (you’re definitely over 50 if you remember these) and various exposure charts and tables. There was even that extremely esotericZone SystemfromAnsel Adamsthat everyone in the know was talking about ‚and not understanding.
Hand-held meters primarily had selenium cells ‚large honeycomb matrixes. Downsides were that they could be dazzled by very bright light and they didn’t work worth a damn at light levels much lower than a cloudy day.CDScells (cadmium sulphide) were just coming out and their small size allowed them to be placed in shutter-coupled clip-on meters and then eventually to become in-built, as with thePentax Spotmatic.
All of this with the purpose of helping photographers expose their film correctly.
Anyone getting into photography today takes having sophisticated matrix metering systems in their camera for granted. But even these are fallible, and unless one understands what the automation is doing getting accurately exposed photographs under difficult lighting conditions can be problematic and frustrating. Let’s start with some basics.
Sunny 16 & Beyond
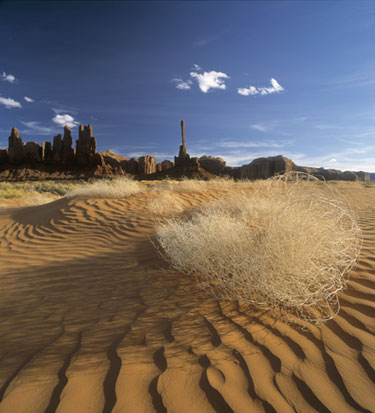 Tumbleweed Dunes, 2000
The extremes of brightness that one encounters in the natural world are not that varied. For this reason there is the so-calledSunny 16rule. This says that on the brightest day normally encountered the proper exposure is roughly the reciprocal of the film speed at f/16. Thus, if you are shooting ISO 200 film then the exposure will be 1/250 second @ f/16. This is the same whether you’re in Auckland or Amsterdam, mid-summer or mid-winter.
From the extremes of a sunny day outdoors down to typical indoor room lighting covers a range of about 10 stops. With the exception of seldom encountered situations like fireworks, cityscapes and moonlight scenes these 10 stops encompass every lighting situation you are ever likely to encounter. Only on the ski slopes or at the beach will you need to stop down one more stop beyond Sunny 16 because of reflections off the snow and sand.
So, that being the case, why is exposure so difficult? Most people should have no problem in recognizing 10 different light levels, shouldn’t they?
The Eye’s Autoexposure
Unfortunately (or fortunately, depending on your point of view), the human eye and brain have a superb autoexposure mechanism built in. This means that once your eyes have adjusted to the current lighting situation, and without clues as to what is causing the light level encountered, it is almost impossible to tell how bright things are on a relative basis. As long as the light level lies somewhere within that 10 stop range for most people it all appears the same.
This is why light meters, whether built-in or handheld, are such vital tools. But before exploring light meters and how best to use them it’s worthwhile to have in ones mind a firm idea of what "proper" exposure settings are for the ten light levels normally encountered. This way you’re not a blind slave to the meter.
Let’s assume an F stop off/8and aISO(film speed) of400. Here’s what these 10 light levels are and the shutter speed that would be needed.
A Sunny day outdoors ‚1/2000 sec
A hazy bright day ‚1/1000 sec
A bright cloudy day without shadows ‚1/500 sec
An overcast day, or open shade on a sunny day ‚1/250 sec
A heavily overcast day ‚1/125 sec
Deep shade. The woods on an bright overcast day ‚1/60 sec
Just before a thunderstorm or late on a heavily overcast day ‚1/30 sec
A brightly lit store interior ‚1/15th sec
A well lit stage or sports arena ‚1/8th sec
A well lit home interior ‚1/4 sec
Of course you would vary the F stop and shutter speed combinations to whatever would be most appropriate. In the case of a home interior, for example, instead of 1/4 second at f/8 you might choose 1/30 sec at f/2.8. The point is though that these 10 brightness levels represent 95% of the conditions under which we all do our shooting.
What a Meter Does
A light meter does one thing. It tells you what the correct exposure is for 13% Gray. This is approximately the tonality of green grass or concrete. The meters that are built into almost all cameras today are reflective meters. This means that they are measuring the light being reflected off the subject. This is a convenient way to determine proper exposure but there are potential problems because grass and concrete usually aren’t our main subjects.
Fortunately, most of time the mixture of objects in a scene; grass, sky, people, trees, rocks and so forth, when averaged together usually are pretty close to an 13% gray. But, because much of the time the things that we photograph are not so conveniently neutral in tonality manufacturers of TTL metering systems on cameras have had to go to great lengths to design multi-zone patterns and sophisticated software algorithms to enable their metering systems to provide pleasing and accurate exposures.
Of Black Cats and Snow Storms
The classic examples of how reflective meters can be lead astray are the examples of a black cat in a coal mine or a white cat in a snow storm. In both cases if you were to trustingly use even the most sophisticated multi-zone matrix metering system you would end up with very badly underexposed and overexposed negatives or transparencies. The reason, of course, is that the meter sees the black cat and coal, or the white cat and snow as being 13% gray. Even the smartest computer algorithms can’t (yet) understand what the subject is, and since there is nothing else in the scene they will provide "correct" but inappropriate exposures.
The smart photographer, knowing this, will dial in some exposure compensation. In fact, because most amateurs use colour negative film with its wide exposure latitude even this is seldom necessary and no one is the wiser.
But, the pro and the serious fine-art photographer typically shoots colour transparency material which has a much more limited exposure latitude. With these, if your exposure is more than a half-stop off, particularly in terms of overexposure, you’ve forfeited the shot.
Incident to The Rescue
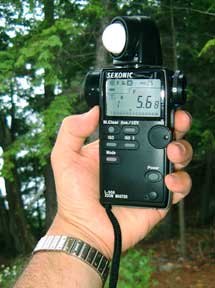 Using the L508 as an incident meter
An meter capable of taking incident light readings, like theSekonic L508reviewed on these pages, features what looks like a half of a golf-ball-sized hemisphere, usually on a swiveling support. To take an exposure reading instead of pointing the meteratthe subject, as one does with in-camera and reflected meters, you instead place the meterinthe same light as the subject.
The hemisphere, orlumisphereas some call it, is designed as a 13% gray object and thus provides a reading equivalent to that which you would get if you took a reflected reading off a theoretically perfectly integrated scene, or a Kodak 18% gray card. (It really should be 13%, but don’t ask!?)
The beauty of the incident metering approach is that you needn’t carry a large gray card around with you on location, and you don’t have to worry that your subject matter — whether because of its colour or reflectance characteristics, will give an erroneous reading.
On The Spot
A third approach after straight reflective and incident metering isspot metering. Strictly speaking spot metering is no different than other forms of reflective metering. You point the camera or handheld spotmeter at the subject to be photographed and take a reading. But interpreting the reading and knowingwhatto read are the trick. From a practical point of view I regard it as the most useful form of light metering practice.
A spot meter reads a very small area of the scene being viewed. In the case of a meter like the Sekonic L508 it can read a variable area as small as 1 degree. While using a standard reflective meter, a camera’s built in meter or an incident meter is straightforward and doesn’t requite much thought on the part of the photographer, using a spot meter implies having an understanding of film latitude, contrast ranges and other aspects of exposure control.
Most frequently a spot meter is used in conjunction with theZone System. Rather that delve too deeply into this sometimes arcane topic, here’s an explanation of how to use a spot meter to both understand and control exposure using the system’s basic concepts.If this sparks your interest you may wish to read the article on this site on asimplified zone systemapproach.
In The Zone
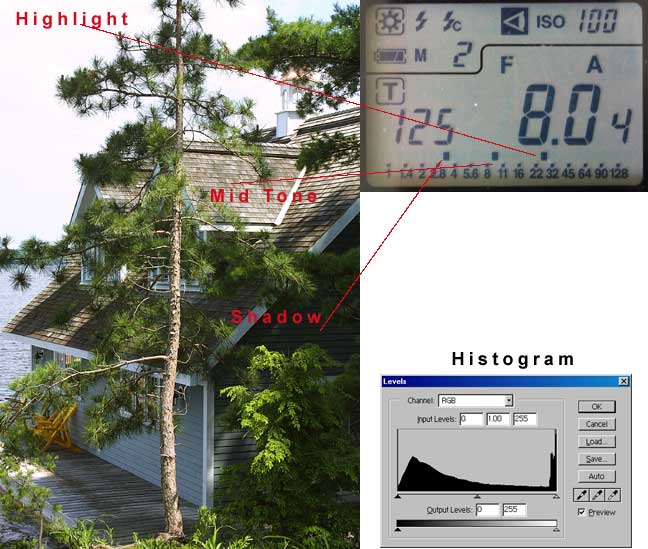
The above example photograph consists of three images. On the left is a straightforward photograph taken on a hazy bright morning. At ISO 100 my Canon D30’s built in meter read exactly 1/125 second at f/8 taking into account the entire scene.
As you can see from the histogram at the bottom right of the frame the exposure is technically perfect. The range from shadows to highlights is smooth and the shadows are just clipped, while there are clearly some extreme highlights at the far right.
Now look at the image of the Sekonic meter’s LCD screen. I used it at the same time to take 1 degree spot readings of various parts of the scene. It shows a digital readout of 1/125 second between f/8 and f/11 when reading the cedar shingles on the building’s roof; about a half stop off from the Canon’s integrated reading of the whole scene.
If you look at the meter’s reading again you’ll see a small square above the point between f/2.8 and f/4 and another one above the point between f/22 and f/32. These resulted from taking readings at the points shown ‚in the sky and in the shadow area on the side of the building.
If you count the number of F stops between these two extreme readings you’ll see that the range is6 stops. The square at the center just above the point between f/8 and f/11 is the result of pressing theAveragebutton on the meter, integrating the two extreme readings. It matches exactly the reading taken from the cedar roof, which is close to medium gray in tone.
What does this all tell us? First, you have to understand that most colour transparency films have a contrast range of about 5 stops. The best current digital SLRs about 6 stops and colour negative film about 7 stops. Carefully processed B&W film can have 8 stops.
The shot that you see above, because it was taken with a moderately high-end digital SLR canjustencompass the range needed for this exposure. There is just a hint of detail in the hazy sky and some modest detail in the deep shadows. The frame you see above has been imported in 8 bit mode and the only adjustment made was a bit ofUSM. NoLevelsorCurvesadjustments were made. If I had imported it as a 16 bit file and spent some time with it inPhotoshopI could have extracted worthwhile detail in both the highlight and shadow areas.
Working with What Nature Provides
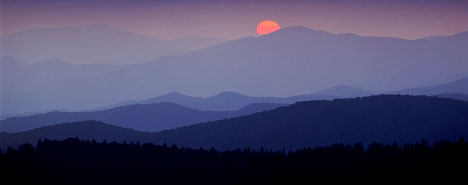
Clingmans Dome Sun. Great Smoky Mountains NP. September, 2000
Photographed with a Rollei 6008 and 300mm Schneider lens on Provia 100F.
In the studio one can adjust lighting ratios and be in control of the entire lighting strategy. But, for us landscape and nature photographers we have to take what’s served up and sometimes it’s a dog’s breakfast.
For this reason most serious photographers working outdoors carry a handheld meter in addition to whatever metering capability their camera may offer. A meter like theSekonic 508or new608is ideal because it provides two meters in one, an incident and a spot meter. (In fact they are also flash meters, but that’s outside the scope of the article).
I personally prefer to use my Sekonic in incident mode for most types of photography. When this isn’t possible I use the meter in spot mode and do what I did in the above example ‚take highlight, shadow and mid-range readings and average them. Of course this presupposes that I have the luxury of taking the time to do so.
An Experiment
Try an experiment. Turn off the autoexposure mode of your camera and turn it to manual. If you don’t have a handheld meter use your camera’s meter to take close-up readings of various parts of a scene ‚the highlight areas that you want to hold detail and the shadow areas where you also want to have detail ‚and then see how many stops range are encompassed. Can your film handle it? What’s the average of the two readings? How does it compare to the camera’s integrated reading of the whole scene?
Now, take several exposures, at 1 stop intervals, making notes of what you’re doing. Use transparency film because you’ll then be able to judge directly what the effects of varying exposure are.
Why do this? Because it will make you think about light, contrast and what film is capable of. Just remember, don’t let the highlights become overexposed. Clear film contains no information and there’s little to nothing that can be done to salvage an overexposed frame. A bit of underexposure is always to be preferred.


Elevate Your Vision


Read this story and all the best stories on The Luminous Landscape
The author has made this story available to Luminous Landscape members only. Upgrade to get instant access to this story and other benefits available only to members.
Why choose us?
Luminous-Landscape is a membership site. Our website contains over 5300 articles on almost every topic, camera, lens and printer you can imagine. Our membership model is simple, just $2 a month ($24.00 USD a year). This $24 gains you access to a wealth of information including all our past and future video tutorials on such topics as Lightroom, Capture One, Printing, file management and dozens of interviews and travel videos.
- New Articles every few days
- All original content found nowhere else on the web
- No Pop Up Google Sense ads – Our advertisers are photo related
- Download/stream video to any device
- NEW videos monthly
- Top well-known photographer contributors
- Posts from industry leaders
- Speciality Photography Workshops
- Mobile device scalable
- Exclusive video interviews
- Special vendor offers for members
- Hands On Product reviews
- FREE – User Forum. One of the most read user forums on the internet
- Access to our community Buy and Sell pages; for members only.
You may also like


