


By: Steve Kossack
Don’t Be Left in Stitches
Ok, I admit that when I first get my film back after a shoot I look at my XPan frames first, but work on them last. Like most of us I do whatÃs easy first. I like to have something to show for the thirty some rolls of film that I have just shot and had processed, and something to show quickly!
I look at the XPan frames first because they are larger compared to my normal 35mm. They are also often better in quality and certainly different. I love what my XPan does!
So why wait? Because they take more work! I have thePolaroid SprintScan 4000. I have used it for some time and like it a great deal. It does a lot of things well, but it can only scan normal 35mm frames in one pass. To scan an XPan frame this means two scans and stitching. ItÃs not the end of the world though! As a matter of fact, I have come to appreciate the difference.
Working with a panoramic camera is a different way of seeing. ItÃs not often that I see an image that can carry the format. So, as a result, I have fewer images on the light table to begin with. The process of taking one of the strong frames and working it into a finished image is quite a different process than the one I use for non-panoramics. In short, if I think I have a strong image to start with, and therefore a good chance the extra work will be rewarding, I save it for later so as to give it the time it deserves.
First You Take a Knife
You need the film-strip holder for your scanner to show more than one frame at a time. I used anX-Actoknife to cut the plastic bar between frame number one and two. Use some fine sandpaper to smooth the edges.
Insert your film in the enlarged opening and scan frame one as wide as possible. Note your scanner settings then bring the file into Photoshop. You will see that you have scanned much more than just half of your image. This is necessary so that you have enough room for the two scans to overlap.
If you need to reopen your scanner do so and place your film so that theƒ¬other halfî covers the opening of frame two. Do the second scan making sure that the settings are exactlythe sameas your first scan, and bring it too into Photoshop.
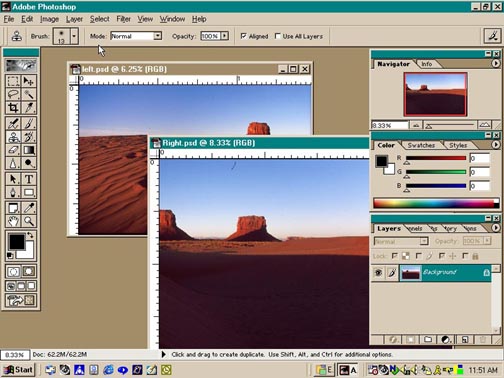 Fig. 1
Fig. 1shows the two scanned images that I have saved asLeftandRight. They are both open.
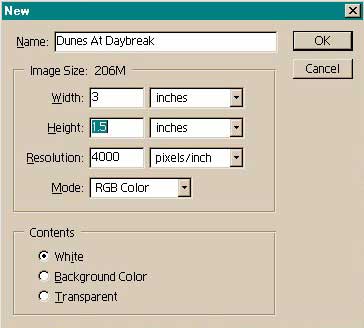 Fig. 2
Go to the file pull down menu and choose NEW (Control N) to create a new file which will contain your stitched image. In the dialog box make sure that the resolution matches your images. In my case 4000 DPI. You can make the canvas any size you like, noting the size at which you scanned your images. To handle what is almost an area twice the width of a normal 35mm frame I’ve made the canvas size 3" X 1.5". You can crop it later to a more precise size. You should name and save now.
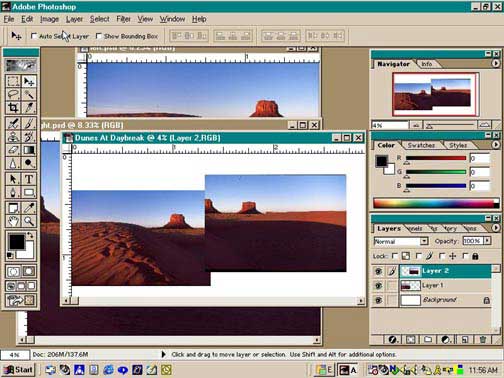 Fig. 3
Fig. 3shows bringing both images into the new document. I simply grab the move tool (V) and drag and drop them into the new document one at a time. This will prevent using the clipboard and its memory demands. The images will come in on their own layers calledLayer 1andLayer 2in the layer pallet. I like to double click each layer and rename them. In my example I’ve named themLeftandRight. It avoids later confusion as to which image you are working on. As you can see, you now have three files open.
 Fig.4
Fig.4
Fig. 4shows how IÃve changed the opacity on one of the layers so I can see both at the same time. You might experiment with both opacity and the stacking of the layers (grab the highlighted layer in the Layers pallet and drag it up or down) to see what works best for you.
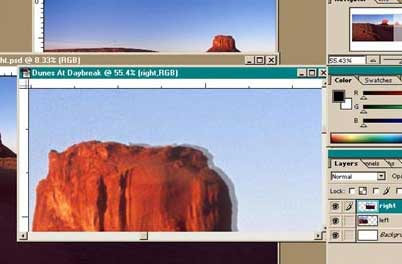 Fig. 5
Use theMovetool to bring one of the layers into alignment. You can use the arrow keys in combination with theMovetool for greater control. Always zoom in. You canÃt drive the bus from the back seat.
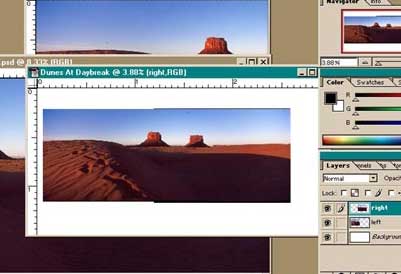 Fig. 6
Fig. 6 shows the finished alignment.
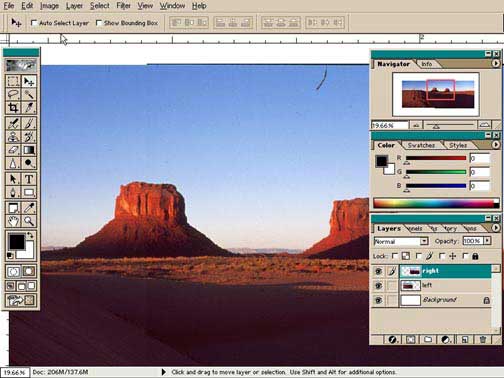 Fig. 7
You’re not quite done yet. Note that you can see the misalignment of the edges and there is a dividing line in the sky. You can also see the different layers. LetÃs fix this.
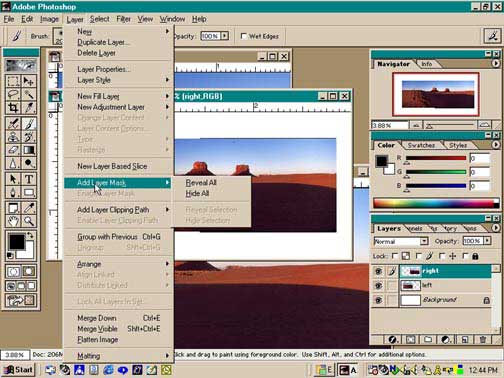 Fig. 8
There are basically two ways to do this that work for me. I can simply use the eraser tool and erase part of one layer. But IÃve found that adding aLayer Maskis the preferable solution. Make sure that the layer you want toƒ¬hideî is highlighted in the layers pallet. Go to the Layer pull-down menu and selectLayer MaskandReveal All.
You can do eitherRevealorHide. ItÃs just a difference of painting or erasing the mask. Make sure that the default is selected in the foreground color box (black on top of white) if you have selectedReveal Allfor your mask. The opposite if you have chosenHide All.
Now grab the paintbrush tool (P) and select a size and start painting the line. You should watch it disappear! RememberControl Zundoes your last move, so donÃt be afraid to make mistakes.
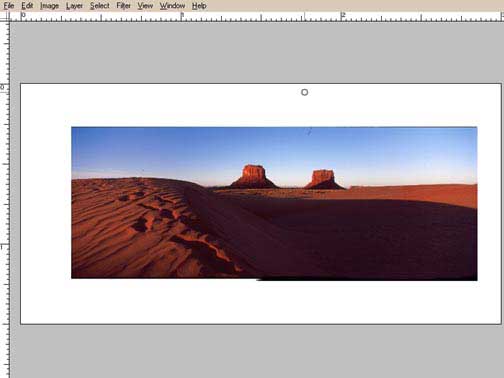 Fig. 9
You are done! Well, actually you are now ready to begin all the things you normally do to a scanned image including cropping, spotting and colour and tone correction.
This is a good time to save it as aCopy. I then flatten and size it when I reopen the copy. I never work further on the original. ThatÃs why most of the images in my portfolios haveƒ¬copyî in the title. They can be seenhere.
IÃve found that the more I do this, the easier and faster it becomes. I enjoy the process and the results are most gratifying. I’ve found that most of the stitching programs only complicate things for me. And, it sure beats the price of a medium format scanner that’s otherwise needed to do an XPan scan in one pass.
© 2002 Steve Kossack
Editors Note:
Of course this technique is not limited to just stitching XPan frames. Noblex, and any other long frames that can’t be scanned in one pass handle in exactly the same way. This includes medium format, such as when scanning a 6X12cm frame with a 6X6-only scanner. Even two frames from a 35mm camera that were taken with a shift lens shifted to either extreme will handle nicely this way. It won’t work with panoramics where the camera and lens have been swung between frames. For this you need one of the professional stitching programs, likePowerStitch, to avoid distortion.
Need a Photographic Guide to the American Southwest?
If you enjoyed this article, as well as the hundreds of other tutorials, features,
reviews and essays on this site, you can support its continued growth
and discover an exciting new photographic resource by …


Elevate Your Vision


Read this story and all the best stories on The Luminous Landscape
The author has made this story available to Luminous Landscape members only. Upgrade to get instant access to this story and other benefits available only to members.
Why choose us?
Luminous-Landscape is a membership site. Our website contains over 5300 articles on almost every topic, camera, lens and printer you can imagine. Our membership model is simple, just $2 a month ($24.00 USD a year). This $24 gains you access to a wealth of information including all our past and future video tutorials on such topics as Lightroom, Capture One, Printing, file management and dozens of interviews and travel videos.
- New Articles every few days
- All original content found nowhere else on the web
- No Pop Up Google Sense ads – Our advertisers are photo related
- Download/stream video to any device
- NEW videos monthly
- Top well-known photographer contributors
- Posts from industry leaders
- Speciality Photography Workshops
- Mobile device scalable
- Exclusive video interviews
- Special vendor offers for members
- Hands On Product reviews
- FREE – User Forum. One of the most read user forums on the internet
- Access to our community Buy and Sell pages; for members only.
You may also like


