A Simplified Zone System
By:Norman KorenThis tutorial on the Zone System, written by Norman Koren, will be of primarily interest to newcomers to photography who use negative film‚ either colour or B&W. Even experienced transparency users will find it of interest as a review of an often misunderstood topic.‚ Michael Reichmann
Why Negatives?
Most professionals work with color slides instead of negatives because clients demand them. Why? WYSIWYG! What you see is what you get; it’s easy to judge the quality of slides, and when they’re good, they’re really beautiful. It’s difficult to judge anything from a negative, and prints from camera or drug stores rarely do justice to the information on negatives.
Why then would a serious photographer choose to work with negatives? Because negatives can capture a much larger exposure range than slides. (SeeWhat exposure range can film capture?, below.) You can make excellent images in difficult lighting that would defeat slide film. Modern negative films, such as Kodak’s newSupraseries, are as sharp and fine grained as slide films of comparable speed. And we now have affordable scanners, Image editing programs and color printers that enable you to produce inexpensive prints of impressive quality‚ as good as custom darkroom prints most of the time, and better when difficult manipulations (dodging, burning, selective color shifts, etc.) are required. These scanners work well with properly exposed slides of low to moderate contrast, but if you work in the field with difficult or contrasty lighting, negatives have the edge. And difficult lighting can sometimes give you the finest, most dramatic images.
Introduction to The Zone System
The first thing you need to know is that exposure meters are dumb,
reallydumb. They are clueless about what they’re photographing. They assume that all scenes have the same average tonal value‚ middle gray‚ roughly Zone 5 in the chart below. If a scene is different, for example a snow scene, it will be exposed incorrectly. It will come out middle gray‚ underexposed. If you follow the meter’s reading,everyscene will have the same average middle gray density. You’ll get lots of bad exposures, especially if you photograph in difficult light.
Ansel Adamsdeveloped the zone system to cope with this situation. His technique was to carefully study a scene, visualize the final print, then determine the correspondence between portions of the scene and tones in the print. He would then meter, expose and develop the negative accordingly. His basic rule was,
"Expose for the shadows; develop for the highlights."
(Warning: This rule applies to negatives, not slides; more later.)
Ansel Adams used a view camera and developed each sheet film negative individually. His system is very elegant‚ it produces prints with exceptional tonality‚ but it requires a tremendous amount of testing, calibration, record keeping, and time. It’s not practical unless you have a darkroom. With my day job I don’t have that kind of time. Luckily there are shortcuts to making good exposures.
We present a simplified zone system that will enable you to expose your image correctly most of the time. It works equally well with color and black and white negatives; exposure technique is identical. Once you get the hang of it, you’ll find it’s not all that complex.
Zones
Zone system chart
Looks pretty good on my PC monitor, but may look very different on monitors and printers with different brightness curves (gammas).
The zone system begins with a zone chart. Zone 1 is pure black; zone 9 is pure white; zone 5 can be described subjectively as middle gray. On paper, zone 5 corresponds to a reflectance of 18%. Since computer monitors and printers vary greatly‚ Macintoshes have different brightness curves (gammas) from PC’s‚ what you see here may not be an accurate representation of the zone chart. You will need to have a good feeling for Zone 5– middle gray, so if what you see doesn’t seem right, you should go to a camera store and buy a Kodak 18% reflectance gray card. These cards are used by professionals for exposure metering in the studio: They place the card next to the subject and meter from it. This is equivalent toincidentlight metering: measuring the light that reaches the subject. With incident metering, the exposure is independent of the subject’s reflectance: dark subjects come out dark and light subjects come out light. Incident metering works very well in studio environments and for close-ups, but it isn’t practical for landscapes. Meters built into cameras measurereflectedlight.
Ansel Adams’ description of zones (geared towards black and white printing)
Zone 0
Zone 4
Zone 7
In a scene‚ in the field‚ each zone represents a doubling or halving of the luminance‚ the light reflected from the subject‚ or equivalently, a difference of one f-stop. The eight steps between the nine zones in the chart (1-9) represent a luminance range of 256 (2 8 ). On paper surfaces, this difference is considerably compressed. On good photographic paper, pure white is about 90% reflectance and pure black is about 2% reflectance. The maximum tonal range is around 45, equivalent to about 5.5 zones (log245). Reflectance differences between zones are less than a factor of two. The difference between zones at the ends of the scale (1 and 2 or 8 and 9) is much less than between zones in the middle (4, 5, and 6).
Apertureis the variable opening in the lens that admits light.
F-stopis a measure of the aperture opening, defined as a lens’s focal length divided by the aperture diameter. F-stops are sequenced in multiples of the square root of two: 1, 1.4, 2, 2.8, 4, 5.6, 8, 11, 16, 22, etc. Increasing the f-stop by one stephalvesthe light reaching the film.F-stopalso refers to achangein the aperture by one step, which doubles or halves the light reaching the film. "Opening up" or "increasing" the aperture means admitting more light;reducingthe f-stop. Similarly, "stopping down" means admitting less light;increasingthe f-stop. Thespeedof a lens is its maximum aperture, i.e., smallest f-stop.
Film speedis a measure of a film’s sensitivity to light. Faster films tend to have more grain and less resolving power.
Exposureis the total light reaching the film. It is a function of the luminance of the subject (the light it emits), the aperture setting, the shutter speed and the film speed. Photographers often say, "increase the exposure by one f-stop," or "stop down by two f-stops." They don’t literally mean change the aperture. They mean adjusteitherthe shutter speed or the aperture. We will use this terminology below.
ProperExposure
You probably know what a well exposed slide looks like‚ it’s pretty obvious. Colors are rich and saturated where you expect them to be, and no important areas are washed out or too dark. But it’s less obvious what makes a well exposed negative. First, there should be detail in all important shadow areas. In underexposed negatives, shadow areas look clear‚ they lack detail; there is nothing to print. Information is lost. Shadow detail is extremely important in tonally rich, satisfying fine prints. But shadow areas shouldn’t be too dense. If no areas of the negative approach the film base density; if the entire negative is thick, it’s probably overexposed. Now overexposure isn’t necessarily disastrous. Negative film can capture a huge tonal range, and the detail you need to print is probably still present. But if you overexposed, you either used a longer shutter speed than necessary (more chance of camera shake or blur) or a wider aperture (less depth of field and possibly less lens sharpness; in 35mm cameras, lenses are sharpest between two stops down from maximum aperture and f/11). Portions of the negative may be denser than the Dmax of the scanner (the highest density it can respond to, typically 3 to 4 on a logarithmic scale). In black and white film, dense areas of negatives become grainy and lose sharpness; color negative film isn’t quite as bad. Nevertheless, image quality is generally degraded in overexposed negatives.
The situation is reversed is slides, whereoverexposureis the cardinal sin. Overexposed areas are washed out and lacking in detail. Slides capture a much smaller brightness range than negatives, hence they require very careful exposure. Some detail may be lost in contrasty scenes, even in well-exposed slides. Most professionalsbrackettheir slide exposures: expose at nominal,‚± 1/2 f-stop,‚± 1 f-stop, and sometimes more. They wouldn’t think of risking a $1000 job to save $20 of film. In landscapes, where the sky and scenery at the top of the frame is often much brighter than at the bottom, a graduated neutral density filter (dark on top; clear on bottom) can be invaluable for reducing the brightness range. These filters come in several gradients and maximum densities. It takes practice to use them effectively.
The Heart of The Matter: Determining Exposure
The key to the zone system is visualizing how you want areas of the scene to appear in the final image, or in the language of the zone system, where you want to "place" them. The zone system can then be expressed in a single statement:
Select an area of the scene, meter it, then adjust the exposure by the difference between the zone you want in the final image and zone 5.For example, say you want to place the snowy mountains in scene below (Lauterbrunnen, Switzerland, with the Jungfrau range in the background) at zone 7. Meter them, thenincreasethe exposure by two f-stops, i.e., if the meter says 500 at f/16, expose at 250 at f/11. Or if you choose to place the shaded mountain on the left at zone 3, meter it, thendecreasethe exposure by two f-stops. I probably pointed the camera, a Canon FTb with a narrow angle meter, down slightly towards the Zone 5 region, then exposed as indicated. It’s that simple. Of course the devil is in the details. And there are several.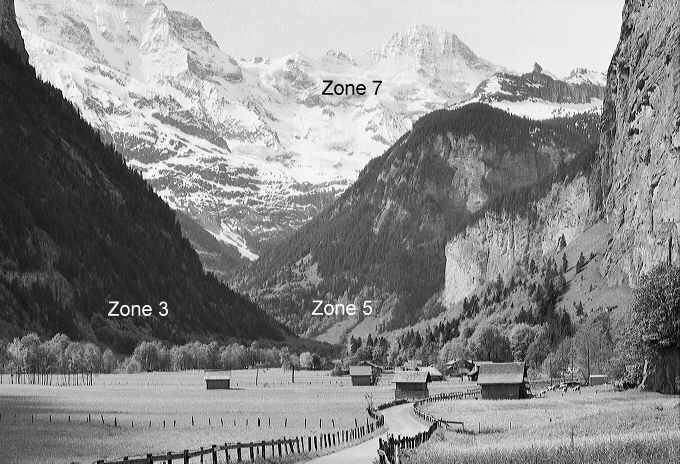
- Know your camera’s metering pattern.
- Select a portion of the scene to meter.Shadow areas are generally preferred for negatives and middle to highlight areas for slides, but the most important part of the scene is often the best choice. You’ll learn from experience.
- Decide the zone in the final image toplacethis portion of the scene. (For example, you may want to place dark foliage at zone 4 or snowy mountains at zone 7.)
- Meter the selected portion.
- Determine the exposure. Adjust the meter’s exposure by thedifference between your chosen placement and zone 5.For example, to place a region on zone 7, increase the exposure by 2 f-stops over the meter reading.
- Practice.Examine the exposure of your slides or negatives (but not prints). Keep refining your technique and calibrating your equipment.

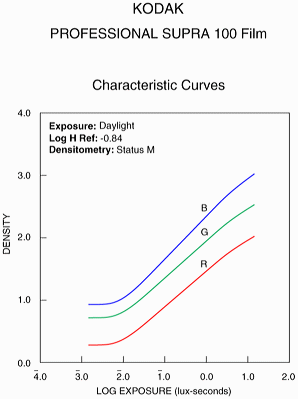
The exposure range film can respond to, particularly negative film, is further limited byflare light ‚ light that bounces off the interiors of lenses and between the elements. Flare light fogs shadow regions. It tends to be worse for zoom lenses than for primes (single focal length lenses) because zooms have more elements. The primary purpose of lens coatings is to reduce flare. Flare light originates from bright areas– often light sources– inside or outside the frame. It it’s inside the frame, you just have to hope the lens is well enough designed to keep it under control. It it’s outside, a lens shade is helpful. You can use your hand or a hat to shield the lens from glaring light sources like the sun. When flare is taken into consideration, the actual exposure range of negatives is reduced to between 7 and 9 f-stops. Because of flare light, it is generally unwise to meter from regions darker than zone 3. Of course Ansel Adams may have been able to capture longer ranges, particularly by using short development times (normal minus; N-). He also used small aperture view camera lenses with few elements, and he often used an adjustable bellows lens shade, which is a precise means of controlling flare. He was shown next to one mounted on his view camera in a 1970’s TV commercial. Nobody knows how many Toyotas he sold, but camera shops around the country reported selling out their limited stocks of bellows lens shades. Ultimately the number of f-stops the films responds to is not very critical. The main purpose of this tutorial is to help you determine the correct exposure so you can make full toned prints. For negatives that means shadow areas that are neither too thin nor too thick. The characteristic curves provide valuable information onfilm contrast, which is proportional to the average slope of the film’s sensitivity region, (y2-y2)/(x2-x1). The green (G) curve is most appropriate because that’s where the eye is most sensitive. For EV100VS slide film, contrast = (0.3-3.3)/(-0.3+2) = -3/1.7 = -1.76. For Supra 100 negative film, contrast = (2.5-0.8)/(1.0+2.0) = 1.7/3 = 0.57. EV100S isthree timescontrastier than Supra 100, and is in fact contrastier than the original scene! Very punchy. For negatives, scanner contrast is set much higher than for slides. (Papers for printing negatives also have much higher contrast.) That makes the scanner more sensitive to dust, scratches, and grain. This can give slides an advantage, particularly for softly lit, low contrast subjects. I say this with some trepidation because I continue to use negative film for most of my work. Contrast can be pretty extreme in those Rocky Mountain canyons. I’m considering carrying a second camera body with slide film for low contrast images like close-ups of flowers in shade, but, alas, that means more weight and more fumbling with gear.
Links
The Zone System by Steve Roberts of SR Photography. A nice introduction.
The Zone System by Lars Kjellberg. Fine work from creator of the website with the bestlens reviews.
Exposure compensation by Klauss Schroiff. A simple explanation of exposure without zones.
The zone system by Cicada Photography Resource. Very detailed. Probably more than you want to know.
Books on the zone system.
Copyright‚© 2001 byNorman Koren. Norman Koren lives in Colorado, where he develops magnetic recording technology for high capacity data storage systems. He has been involved with photography since 1964.
Elevate Your Vision


Read this story and all the best stories on The Luminous Landscape
The author has made this story available to Luminous Landscape members only. Upgrade to get instant access to this story and other benefits available only to members.
Why choose us?
Luminous-Landscape is a membership site. Our website contains over 5300 articles on almost every topic, camera, lens and printer you can imagine. Our membership model is simple, just $2 a month ($24.00 USD a year). This $24 gains you access to a wealth of information including all our past and future video tutorials on such topics as Lightroom, Capture One, Printing, file management and dozens of interviews and travel videos.
- New Articles every few days
- All original content found nowhere else on the web
- No Pop Up Google Sense ads – Our advertisers are photo related
- Download/stream video to any device
- NEW videos monthly
- Top well-known photographer contributors
- Posts from industry leaders
- Speciality Photography Workshops
- Mobile device scalable
- Exclusive video interviews
- Special vendor offers for members
- Hands On Product reviews
- FREE – User Forum. One of the most read user forums on the internet
- Access to our community Buy and Sell pages; for members only.
You may also like